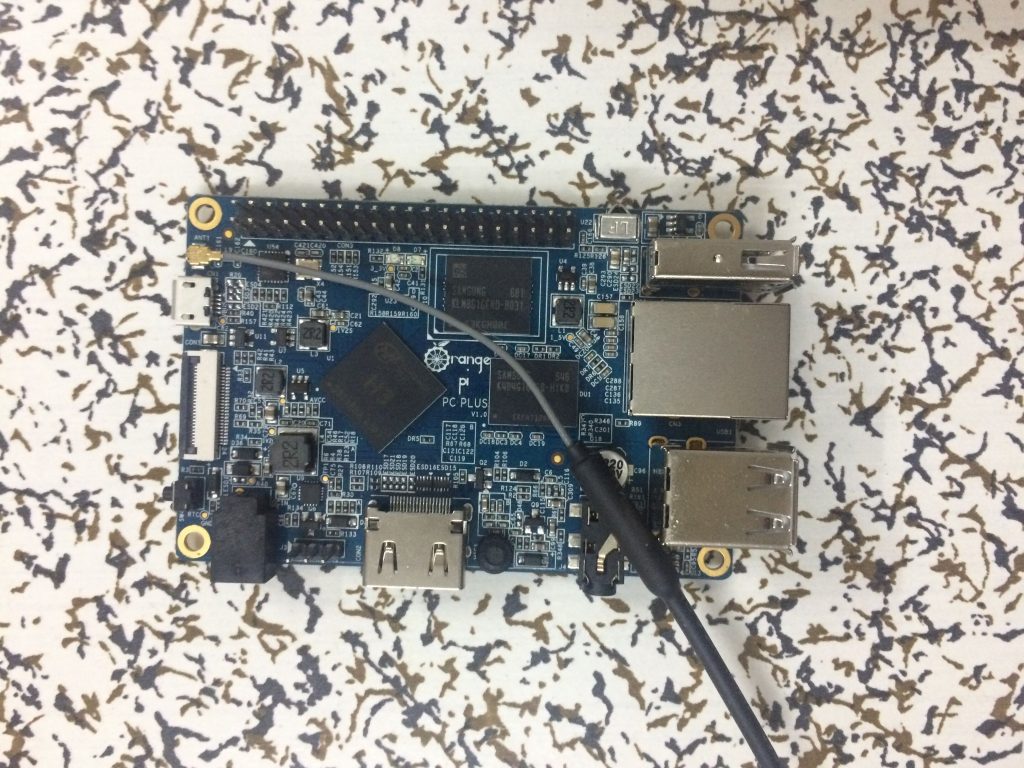
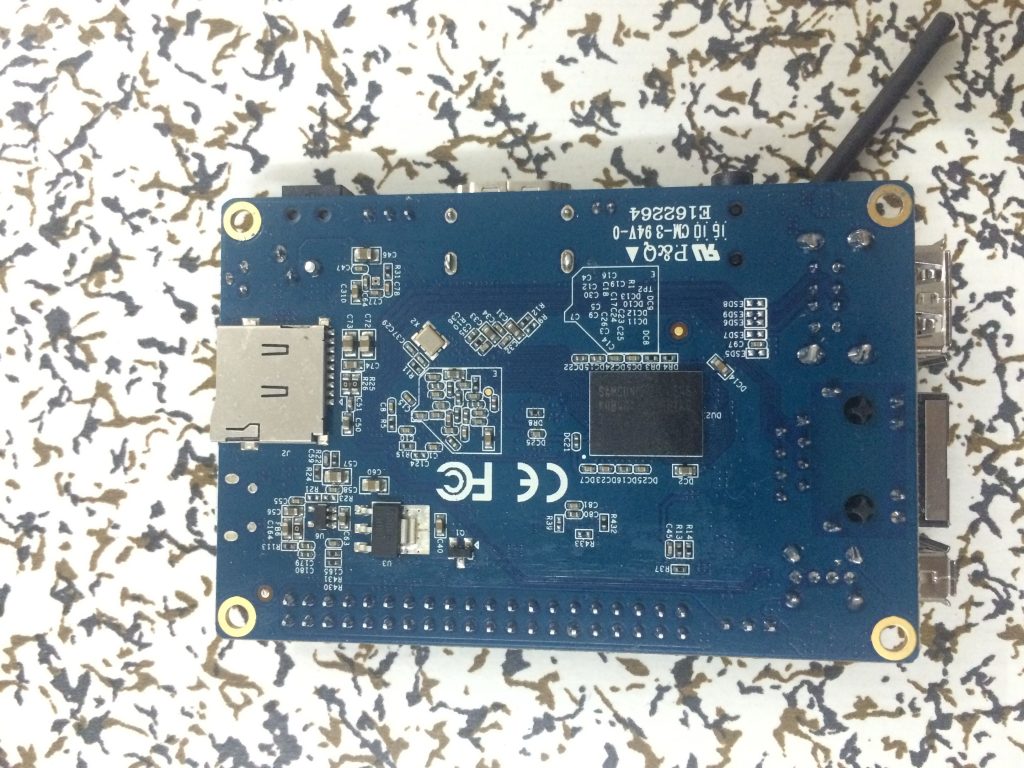
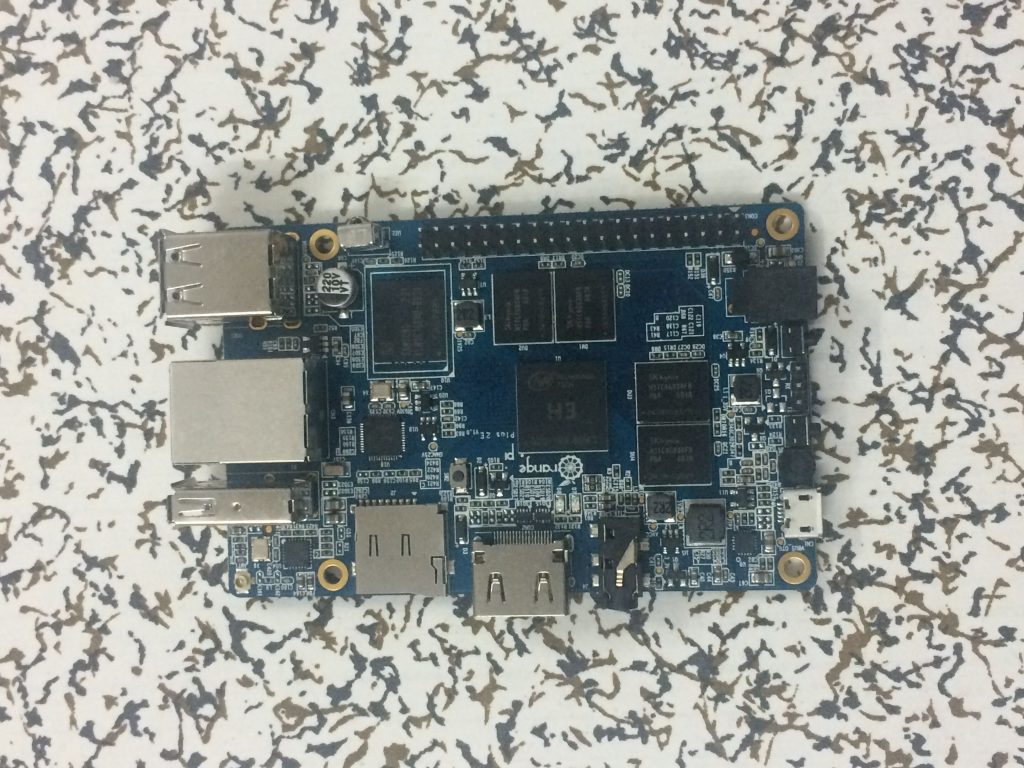
Allwinner H3搭載のOrange Piシリーズ スペック一覧

2016/01/29追記
Orange Pi ONE、送料込み$13.10で販売開始!」にて、2016年1月27日時点でのスペック一覧を掲載しています。


Allwinner H3搭載のOrange Piシリーズのスペック一覧

2015/09/16現在、リリースされているAllwinner H3搭載のOrange Piシリーズは下記の5機種(発売順)
Orange Pi PLUS(OPi-PLUS)
Orange Pi 2(OPi2)
Orange Pi mini 2
Orange Pi PC(OPi-PC)
Orange Pi Plus 2(OPi-PLUS2)

このうち、「Orange Pi 2」と「Orange Pi mini 2」は、基板共通で、WiFiチップが取り除かれてるだけの違いです。

なお、今後、「Orange Pi Plus 3」というAllwinner H64という上位の64bit SoCを積んだモデルがリリース予定です。

OPi-PLUS OPi-PLUS2 OPi2 OPi mini2

OPi-PC
CPU Allwinner H3(Cortex-A7 4コア 1.6GHz)
RAM 1GB 2GB 1GB
内蔵ストレージ eMMC 8GB なし
microSDスロット あり
SATAコネクタ あり なし
LAN 10/100/1000 10/100
無線LAN あり(RTL8189ETV) なし
USB 4+OTG 3+OTG
ボタン Power,Recovery,Uboot PWR
赤外線受信 あり
マイク あり
大きさ(mm) 108×60 108×67 93×60 85×55
重さ(g) 50g 83g 46g 45g 38g

vSphere PowerCLIの一部コマンドがPowerShell ISEで動作しない

2016/12/15追記

Add-Snappinは、古いPowerShellの場合だけだったようなので、新しいバージョンの場合にも対応したものを下記に記載しています。

vSphere PowerCLIの一部コマンドがPowerShell ISEで動作しない 2016/12/15版


vSphere PowerCLIで変な動作に遭遇した。
vSphere PowerCLIの一部コマンドがPowerShell ISE上だと動作しない、という問題である。
元々、PowerShell ISEの標準設定ではvSphere PowerCLIのコマンドは動かない。
「Add-PSSnapin VMware.VimAutomation.Core」を追加し、モジュールを読み込ませる必要があるのだが、それを行っても動かないものがいくつかあることが分かった。

まずは状況の確認から・・・

現在のvSphere Power CLIのバージョンを確認
Determining the build number for vSphere PowerCLI or VI Toolkit for Windows」より「Get-VIToolkitVersion」を実行。

PowerCLI C:\Program Files (x86)\VMware\Infrastructure\vSphere PowerCLI> Get-VIToolkitVersion

PowerCLI Version
----------------
   VMware vSphere PowerCLI 6.0 Release 1 build 2548067
---------------
Component Versions
---------------
   VMWare AutoDeploy PowerCLI Component 6.0 build 2358282
   VMWare ImageBuilder PowerCLI Component 6.0 build 2358282
   VMware License PowerCLI Component 6.0 build 2315846
   VMware vSphere PowerCLI Component 6.0 build 2548068
   VMware Cloud Infrastructure Suite PowerCLI Component 6.0 build 2548068
   VMware HA PowerCLI Component 6.0 build 2510422
   VMware PowerCLI Component for Storage Management 6.0 build 2522368
   VMware VDS PowerCLI Component 6.0 build 2548068


PowerCLI C:\Program Files (x86)\VMware\Infrastructure\vSphere PowerCLI>

(ちなみに、この記事を書いてる時点では、これより新しいバージョンが出ている)

vCenterサーバに接続

PowerCLI C:\Program Files (x86)\VMware\Infrastructure\vSphere PowerCLI> Connect-VIServer -Server vCenterServer -User root -Password vmware

Name                           Port  User
----                           ----  ----
vCenterServer                  443   root


PowerCLI C:\Program Files (x86)\VMware\Infrastructure\vSphere PowerCLI>

そして、「Get-VdsCommand」を実行してvSphre PowerCLIが提供するvDS関連コマンド一覧を取得。

PowerCLI C:\Program Files (x86)\VMware\Infrastructure\vSphere PowerCLI> Get-VdsCommand

CommandType     Name                                               ModuleName
-----------     ----                                               ----------
Cmdlet          Add-VDSwitchPhysicalNetworkAdapter                 VMware.Vi...
Cmdlet          Add-VDSwitchVMHost                                 VMware.Vi...
Cmdlet          Export-VDPortGroup                                 VMware.Vi...
Cmdlet          Export-VDSwitch                                    VMware.Vi...
Cmdlet          Get-VDBlockedPolicy                                VMware.Vi...
Cmdlet          Get-VDPort                                         VMware.Vi...
Cmdlet          Get-VDPortgroup                                    VMware.Vi...
Cmdlet          Get-VDPortgroupOverridePolicy                      VMware.Vi...
Cmdlet          Get-VDSecurityPolicy                               VMware.Vi...
Cmdlet          Get-VDSwitch                                       VMware.Vi...
Cmdlet          Get-VDSwitchPrivateVlan                            VMware.Vi...
Cmdlet          Get-VDTrafficShapingPolicy                         VMware.Vi...
Cmdlet          Get-VDUplinkLacpPolicy                             VMware.Vi...
Cmdlet          Get-VDUplinkTeamingPolicy                          VMware.Vi...
Cmdlet          New-VDPortgroup                                    VMware.Vi...
Cmdlet          New-VDSwitch                                       VMware.Vi...
Cmdlet          New-VDSwitchPrivateVlan                            VMware.Vi...
Cmdlet          Remove-VDPortGroup                                 VMware.Vi...
Cmdlet          Remove-VDSwitch                                    VMware.Vi...
Cmdlet          Remove-VDSwitchPhysicalNetworkAdapter              VMware.Vi...
Cmdlet          Remove-VDSwitchPrivateVlan                         VMware.Vi...
Cmdlet          Remove-VDSwitchVMHost                              VMware.Vi...
Cmdlet          Set-VDBlockedPolicy                                VMware.Vi...
Cmdlet          Set-VDPort                                         VMware.Vi...
Cmdlet          Set-VDPortgroup                                    VMware.Vi...
Cmdlet          Set-VDPortgroupOverridePolicy                      VMware.Vi...
Cmdlet          Set-VDSecurityPolicy                               VMware.Vi...
Cmdlet          Set-VDSwitch                                       VMware.Vi...
Cmdlet          Set-VDTrafficShapingPolicy                         VMware.Vi...
Cmdlet          Set-VDUplinkLacpPolicy                             VMware.Vi...
Cmdlet          Set-VDUplinkTeamingPolicy                          VMware.Vi...
Cmdlet          Set-VDVlanConfiguration                            VMware.Vi...


PowerCLI C:\Program Files (x86)\VMware\Infrastructure\vSphere PowerCLI> 

ここまでは良い。

PowerShell ISEでの動作が問題。
PowerShell ISE上部の編集画面に下記を入力。

Add-PSSnapin VMware.VimAutomation.Core
Get-VIToolkitVersion
Connect-VIServer -Server vCenterServer -User root -Password vmware
Get-VdsCommand

最初の1行はvSphere PowerCLIのコマンドを実行させるため設定。
これを実行すると・・・

PS C:\Users\osakanataro> Add-PSSnapin VMware.VimAutomation.Core
Get-VIToolkitVersion
Connect-VIServer -Server vCenterServer -User root -Password vmware
Get-VdsCommand

Get-VIToolkitVersion : 用語 'Get-VIToolkitVersion' は、コマンドレット、関数、スクリプト ファイル、または操作可能なプログラムの名前として認識されません。名前が正しく記述されていることを確認し、パスが含まれている場合はそのパスが正しいことを確認してから、
再試行してください。
発生場所 行:2 文字:1
+ Get-VIToolkitVersion
+ ~~~~~~~~~~~~~~~~~~~~
    + CategoryInfo          : ObjectNotFound: (Get-VIToolkitVersion:String) [], CommandNotFoundException
    + FullyQualifiedErrorId : CommandNotFoundException
 

Name                           Port  User                          
----                           ----  ----                          
vCenterServer                  443   root                          
Get-VdsCommand : 用語 'Get-VdsCommand' は、コマンドレット、関数、スクリプト ファイル、または操作可能なプログラムの名前として認識されません。名前が正しく記述されていることを確認し、パスが含まれている場合はそのパスが正しいことを確認してから、再試行してください。
発生場所 行:4 文字:1
+ Get-VdsCommand
+ ~~~~~~~~~~~~~~
    + CategoryInfo          : ObjectNotFound: (Get-VdsCommand:String) [], CommandNotFoundException
    + FullyQualifiedErrorId : CommandNotFoundException


PS C:\Users\osakanataro> 

エラーになる・・・
なぜなのか・・・

まずはPowerShell ISE内で「Get-Module」を実行し、現在使用できるコマンドを確認

PS C:\Users\osakanataro> Get-Module

ModuleType Version    Name                                ExportedCommands                                                                            
---------- -------    ----                                ----------------                                                                            
Script     1.0.0.0    ISE                                 {Get-IseSnippet, Import-IseSnippet, New-IseSnippet}                                         
Manifest   3.1.0.0    Microsoft.PowerShell.Management     {Add-Computer, Add-Content, Checkpoint-Computer, Clear-Content...}                          
Manifest   3.0.0.0    Microsoft.PowerShell.Security       {ConvertFrom-SecureString, ConvertTo-SecureString, Get-Acl, Get-AuthenticodeSignature...}   
Manifest   3.1.0.0    Microsoft.PowerShell.Utility        {Add-Member, Add-Type, Clear-Variable, Compare-Object...}                                   
Manifest   3.0.0.0    Microsoft.WSMan.Management          {Connect-WSMan, Disable-WSManCredSSP, Disconnect-WSMan, Enable-WSManCredSSP...}             


PS C:\Users\osakanataro> 

比較のためvSphere PowerCLIの方でも「Get-Module」を実行してみる

PowerCLI C:\Program Files (x86)\VMware\Infrastructure\vSphere PowerCLI> Get-Module

ModuleType Version    Name                                ExportedCommands
---------- -------    ----                                ----------------
Script     0.0        Initialize-VMware_VimAutomation_Cis
Script     0.0        Initialize-VMware_VimAutomation_Vds
Manifest   3.1.0.0    Microsoft.PowerShell.Management     {Add-Computer, Add...
Manifest   3.1.0.0    Microsoft.PowerShell.Utility        {Add-Member, Add-T...
Binary     6.0.0.0    VMware.VimAutomation.Cis.Core       {Connect-CisServer...
Manifest   6.0.0.0    VMware.VimAutomation.Core           {Add-PassthroughDe...
Binary     6.0.0.0    VMware.VimAutomation.HA             Get-DrmInfo
Manifest   6.0.0.0    VMware.VimAutomation.Sdk
Binary     6.0.0.0    VMware.VimAutomation.Storage        {Export-SpbmStorag...
Binary     6.0.0.0    VMware.VimAutomation.Vds            {Add-VDSwitchPhysi...


PowerCLI C:\Program Files (x86)\VMware\Infrastructure\vSphere PowerCLI>

全然違う
「VMware.VimAutomation.Vds」を追加すると実行できそうな雰囲気・・・

しかし、「Add-PSSnapin VMware.VimAutomation.Vds」は下記のエラーとなる。

Add-PSSnapin : Windows PowerShell スナップイン 'VMware.VimAutomation.Vds' がこのコンピューターにインストールされていません。
発生場所 行:2 文字:1
+ Add-PSSnapin VMware.VimAutomation.Vds
+ ~~~~~~~~~~~~~~~~~~~~~~~~~~~~~~~~~~~~~
    + CategoryInfo          : InvalidArgument: (VMware.VimAutomation.Vds:String) [Add-PSSnapin]、PSArgumentException
    + FullyQualifiedErrorId : AddPSSnapInRead,Microsoft.PowerShell.Commands.AddPSSnapinCommand

ではどうするか?

「Get-Command -Module モジュール名」で指定したモジュールでどんなコマンドが実行できるかを表示すると実行でいるようになるらしい。

そんな馬鹿な、と思いつつ、$DUMMY環境変数に放り込むように変更。

Add-PSSnapin VMware.VimAutomation.Core
$DUMMY=Get-Command -Module VMware.VimAutomation.Vds
Get-VIToolkitVersion
Connect-VIServer -Server vCenterServer -User root -Password vmware
Get-VdsCommand

そして実行

PS C:\Users\osakanataro> Add-PSSnapin VMware.VimAutomation.Core
$DUMMY=Get-Command -Module VMware.VimAutomation.Vds
Get-VIToolkitVersion
Connect-VIServer -Server vCenterServer -User root -Password vmware
Get-VdsCommand


PowerCLI Version
----------------
   VMware vSphere PowerCLI 6.0 Release 1 build 2548067
---------------
Component Versions
---------------
   VMWare AutoDeploy PowerCLI Component 6.0 build 2358282
   VMWare ImageBuilder PowerCLI Component 6.0 build 2358282
   VMware License PowerCLI Component 6.0 build 2315846
   VMware vSphere PowerCLI Component 6.0 build 2548068
   VMware VDS PowerCLI Component 6.0 build 2548068


IsConnected   : True
Id            : /VIServer=root@vCenterServer:443/
ServiceUri    : https://vCenterServer/sdk
SessionSecret : cb8924f9fb4b2cb6cb75a357d8127e2154376d17
Name          : vCenterServer
Port          : 443
SessionId     : cb8924f9fb4b2cb6cb75a357d8127e2154376d17
User          : root
Uid           : /VIServer=root@vCenterServer:443/
Version       : 6.0
Build         : 2776510
ProductLine   : vpx
InstanceUuid  : 1a31cfc8-0931-4752-9573-461f044cc2d4
RefCount      : 6
ExtensionData : VMware.Vim.ServiceInstance
Client        : VMware.VimAutomation.ViCore.Impl.V1.VimClient


Verb                : Add
Noun                : VDSwitchPhysicalNetworkAdapter
HelpFile            : VMware.VimAutomation.Vds.Commands.dll-Help.xml
PSSnapIn            : 
ImplementingType    : VMware.VimAutomation.Vds.Commands.Cmdlets.AddVDSwitchPhysicalNetworkAdapter
Definition          : 
                      Add-VDSwitchPhysicalNetworkAdapter [-VMHostPhysicalNic] <PhysicalNic&#91;&#93;> [-DistributedSwitch] <DistributedSwitch> [-VirtualNicPor
                      tgroup <VDPortgroup&#91;&#93;>] [-VMHostVirtualNic <HostVirtualNic&#91;&#93;>] [-Server <VIServer&#91;&#93;>] [-WhatIf] [-Confirm] [<CommonParameters>]
                      
DefaultParameterSet : 
OutputType          : {System.Void}
Options             : ReadOnly
Name                : Add-VDSwitchPhysicalNetworkAdapter
CommandType         : Cmdlet
Visibility          : Public
ModuleName          : VMware.VimAutomation.Vds
Module              : VMware.VimAutomation.Vds
RemotingCapability  : PowerShell
Parameters          : {[VMHostPhysicalNic, System.Management.Automation.ParameterMetadata], [DistributedSwitch, System.Management.Automation.Parameter
                      Metadata], [VirtualNicPortgroup, System.Management.Automation.ParameterMetadata], [VMHostVirtualNic, System.Management.Automatio
                      n.ParameterMetadata]...}
ParameterSets       : {[-VMHostPhysicalNic] <PhysicalNic&#91;&#93;> [-DistributedSwitch] <DistributedSwitch> [-VirtualNicPortgroup <VDPortgroup&#91;&#93;>] [-VMHostVi
                      rtualNic <HostVirtualNic&#91;&#93;>] [-Server <VIServer&#91;&#93;>] [-WhatIf] [-Confirm] [<CommonParameters>]}
HelpUri             : http://www.vmware.com/support/developer/PowerCLI/PowerCLI60R1/html/Add-VDSwitchPhysicalNetworkAdapter.html
DLL                 : C:\Program Files (x86)\VMware\Infrastructure\vSphere PowerCLI\Modules\VMware.VimAutomation.Vds\VMware.VimAutomation.Vds.Commands
                      .dll

<略>

Verb                : Set
Noun                : VDVlanConfiguration
HelpFile            : VMware.VimAutomation.Vds.Commands.dll-Help.xml
PSSnapIn            : 
ImplementingType    : VMware.VimAutomation.Vds.Commands.Cmdlets.Policies.SetVDVlanConfiguration
Definition          : 
                      Set-VDVlanConfiguration -VDPortgroup <VDPortgroup&#91;&#93;> [-DisableVlan] [-VlanId <int>] [-VlanTrunkRange <VlanRangeList>] [-PrivateV
                      lanId <int>] [-WhatIf] [-Confirm] [<CommonParameters>]
                      
                      Set-VDVlanConfiguration -VDSwitch <VDSwitch&#91;&#93;> [-DisableVlan] [-VlanId <int>] [-VlanTrunkRange <VlanRangeList>] [-PrivateVlanId 
                      <int>] [-WhatIf] [-Confirm] [<CommonParameters>]
                      
                      Set-VDVlanConfiguration -VDPort <VDPort&#91;&#93;> [-DisableVlan] [-VlanId <int>] [-VlanTrunkRange <VlanRangeList>] [-PrivateVlanId <int
                      >] [-WhatIf] [-Confirm] [<CommonParameters>]
                      
DefaultParameterSet : 
OutputType          : {VMware.VimAutomation.Vds.Types.V1.VlanConfiguration}
Options             : ReadOnly
Name                : Set-VDVlanConfiguration
CommandType         : Cmdlet
Visibility          : Public
ModuleName          : VMware.VimAutomation.Vds
Module              : VMware.VimAutomation.Vds
RemotingCapability  : PowerShell
Parameters          : {[VDPortgroup, System.Management.Automation.ParameterMetadata], [VDSwitch, System.Management.Automation.ParameterMetadata], [VDP
                      ort, System.Management.Automation.ParameterMetadata], [DisableVlan, System.Management.Automation.ParameterMetadata]...}
ParameterSets       : {-VDPortgroup <VDPortgroup&#91;&#93;> [-DisableVlan] [-VlanId <int>] [-VlanTrunkRange <VlanRangeList>] [-PrivateVlanId <int>] [-WhatIf] 
                      [-Confirm] [<CommonParameters>], -VDSwitch <VDSwitch&#91;&#93;> [-DisableVlan] [-VlanId <int>] [-VlanTrunkRange <VlanRangeList>] [-Priva
                      teVlanId <int>] [-WhatIf] [-Confirm] [<CommonParameters>], -VDPort <VDPort&#91;&#93;> [-DisableVlan] [-VlanId <int>] [-VlanTrunkRange <V
                      lanRangeList>] [-PrivateVlanId <int>] [-WhatIf] [-Confirm] [<CommonParameters>]}
HelpUri             : http://www.vmware.com/support/developer/PowerCLI/PowerCLI60R1/html/Set-VDVlanConfiguration.html
DLL                 : C:\Program Files (x86)\VMware\Infrastructure\vSphere PowerCLI\Modules\VMware.VimAutomation.Vds\VMware.VimAutomation.Vds.Commands
                      .dll


PS C:\Users\osakanataro> 

ほんとに実行できたーーー
じゃぁ、この段階での「Get-Module」はどうなってるか確認してみると、ちゃんとVMware.VimAutomation.Vdsが読み込まれてる・・・
謎な動作をしてますね・・・

PS C:\Users\osakanataro> Get-Module

ModuleType Version    Name                                ExportedCommands                                                                            
---------- -------    ----                                ----------------                                                                            
Script     0.0        Initialize-VMware_VimAutomation_Vds                                                                                             
Script     1.0.0.0    ISE                                 {Get-IseSnippet, Import-IseSnippet, New-IseSnippet}                                         
Manifest   3.1.0.0    Microsoft.PowerShell.Management     {Add-Computer, Add-Content, Checkpoint-Computer, Clear-Content...}                          
Manifest   3.0.0.0    Microsoft.PowerShell.Security       {ConvertFrom-SecureString, ConvertTo-SecureString, Get-Acl, Get-AuthenticodeSignature...}   
Manifest   3.1.0.0    Microsoft.PowerShell.Utility        {Add-Member, Add-Type, Clear-Variable, Compare-Object...}                                   
Manifest   3.0.0.0    Microsoft.WSMan.Management          {Connect-WSMan, Disable-WSManCredSSP, Disconnect-WSMan, Enable-WSManCredSSP...}             
Manifest   6.0.0.0    VMware.VimAutomation.Core                                                                                                       
Manifest   6.0.0.0    VMware.VimAutomation.Sdk                                                                                                        
Binary     6.0.0.0    VMware.VimAutomation.Vds            {Add-VDSwitchPhysicalNetworkAdapter, Add-VDSwitchVMHost, Export-VDPortGroup, Export-VDSwi...


PS C:\Users\osakanataro> 

SATAコネクタ付のOrange Pi Plus 2販売開始!

Allwinner H3搭載の「Orange Pi Plus 2」が販売開始されました。

Orange Pi Plus 2 H3 Quad Core 1.6GHZ 2GB RAM 4K Open-source development board beyond raspberry pi 2
HTB1gDQpKXXXXXaJXXXXq6xXFXXXJ

Orange Pi 2からの差異
・RAM 1GB→2GB
・SATAコネクタ増設
・内蔵ストレージ 8GB eMMC
・イーサネット 100Mbps→1Gbps
(Orange Pi Plusからの差異だとRAM 1GB→2GBのみ)

お値段は$52。

さて、発送はいつだ?


2015/11/02 18:00追記

もう発送連絡が来た。
China Post発送なので、約10日で到着する見込みです


2015/11/10追記
届いたので早速起動してみた→「RAMが2GBになったOrange Pi Plus 2が届いた

Orange PI PCなど向けのloboris版Linuxのカーネルアップデート手法

Orange PIフォーラムで公開されている「loboris版のLinux distribution群」に、Linux kernel のアップデート用shell scriptが提供されました。

まぁ、Linux kernelのアップデートといっても、loborisさんがAllwinner提供のSDKベースでbuildしたものだけで、最新のLinux kernelになるわけではないですけどね。

とはいえ、いままで面倒な手順だったのが簡略化されました。

1. loboris版の配布ページから、「update_kernel.sh」をダウンロード
フォーラムの11/10付け書き込みによれば、「wget http://loboris.eu/update_kernel.sh」でダウンロードだそうです。

2. Orange pi上で動作している環境にコピー
3. update_kernel.shを実行

# sh ./update_kernel.sh

*********************************************************
Updating kernel, script.bin and /lib/modules for OrangePI
*********************************************************

Do you want to download script&kernel package from server, (y/N)?

4. 「y」入力でダウンロード開始
ちなみに、2015/10/28のバージョンでは、ダウンロード済みなのでskip出来るかな?と「n」を選んだら終了します・・・

Do you want to download script&kernel package from server, (y/N)?  y.
Downloading the package ...
--2015-10-29 00:37:07--  http://loboris.eu/opi_kernel.tar.gz
Resolving loboris.eu (loboris.eu)... 82.196.4.208
Connecting to loboris.eu (loboris.eu)|82.196.4.208|:80... connected.
HTTP request sent, awaiting response... 200 OK
Length: 63577885 (61M) [application/x-gzip]
Saving to: ‘/tmp/script_kernel/opi_kernel.tar.gz’

/tmp/script_kernel/ 100%[=====================>]  60.63M   443KB/s   in 6m 1s

2015-10-29 00:43:15 (172 KB/s) - ‘/tmp/script_kernel/opi_kernel.tar.gz’ saved [63577885/63577885]

OK.
Update kernel, script.bin and /lib/modules (y/N)?

5. アップデートするので「y」

Update kernel, script.bin and /lib/modules (y/N)? y
Unpacking ...

Files unpacked.
==============================================
Select the OrangePI board you want to upgrade:
  1   OrangePI 2
  2   OrangePI PLUS
  3   OrangePI PC
?

6. ボードを選択

OrangePI board you want to upgrade:
  1   OrangePI 2
  2   OrangePI PLUS
  3   OrangePI PC
?  3
Updating OrangePI PC

===============================
Select hdmi display resolution:
  1   1080p 60Hz
  2   1080p 50Hz
  3    720p 60Hz
  4    720p 50Hz
?  

7. 次に解像度を選択

Select hdmi display resolution:
  1   1080p 60Hz
  2   1080p 50Hz
  3    720p 60Hz
  4    720p 50Hz
?  1

Selected 1080p 60Hz

=====================================
Do you have HDMI->DVI adapter, (y/N)?  

8. 最後に「HDMI->DVI変換アダプタ」を使っているか確認

Do you have HDMI->DVI adapter, (y/N)?  n
HDMI interface selected

================
CONTINUE, (y/N)?

9. そしてアップデート実行

CONTINUE, (y/N)?

kernel, script.bin and /lib/modules updated, please REBOOT.
===========================================================

root@orangepipc:~#

10. 最後に再起動して完了です。

Orange Pi PC向けのLinuxについて 2015/10/26版

Allwinner H3搭載のOrange Pi PC / Orange Pi Plus / Orange Pi 2 / Orange Pi mini 2で使用できるLinux OSがいろいろ増えた。
また、Orange Pi PC向けにRaspbianがリリースされた。

なので、ここで整理。

まず、公式リースの方から・・・

・Orange Pi PC向けにRaspbianがリリース
Orange Pi公式としてRaspbianの移植版が提供開始。
ただ、いつものごとくにBaiduのみのアップロード。
dropboxに転載「Raspbian_For_OrangePi_PC_v0_8_0.img.xz」(2015/10/28 03:30にdropboxから「過剰リンクのトラフィックがあっため停止、とのメールあり。昨日はすぐに復旧できたもの2回目は消さなければ駄目的な雰囲気….しばらく様子見)
まだ、ダウンロードしただけなので、動作についてはまだわかりません・

・loboris版のLinuxディストリビューションが増加!
フォーラムでloborisさんが公開していたDebian/Ubuntuスレがパワーアップ
Linux Distributions for Orange PI H3 boards」というタイトルに変更。
2015/10/26現在、下記のディストリビューションを配布中
 Debian 8
 Ubuntu 15.04
 Fedora 22
 Kali Linux 2.0
 Arch Linux
 OpenSuse
 Gentoo

loboris版のディストリビューションはAllwinner H3搭載機種共通イメージによる配布で、microSDにイメージを書き込んだ後、各機種にあわせた「uImage」と「script.bin」を適切に配置しなければ、全ての機能が正常に使用できません。
下記ページを参考に書き込んでください。
Orange pi PCをLinuxで使う方法 / lobris版UbuntuをOrange pi 2などで使う