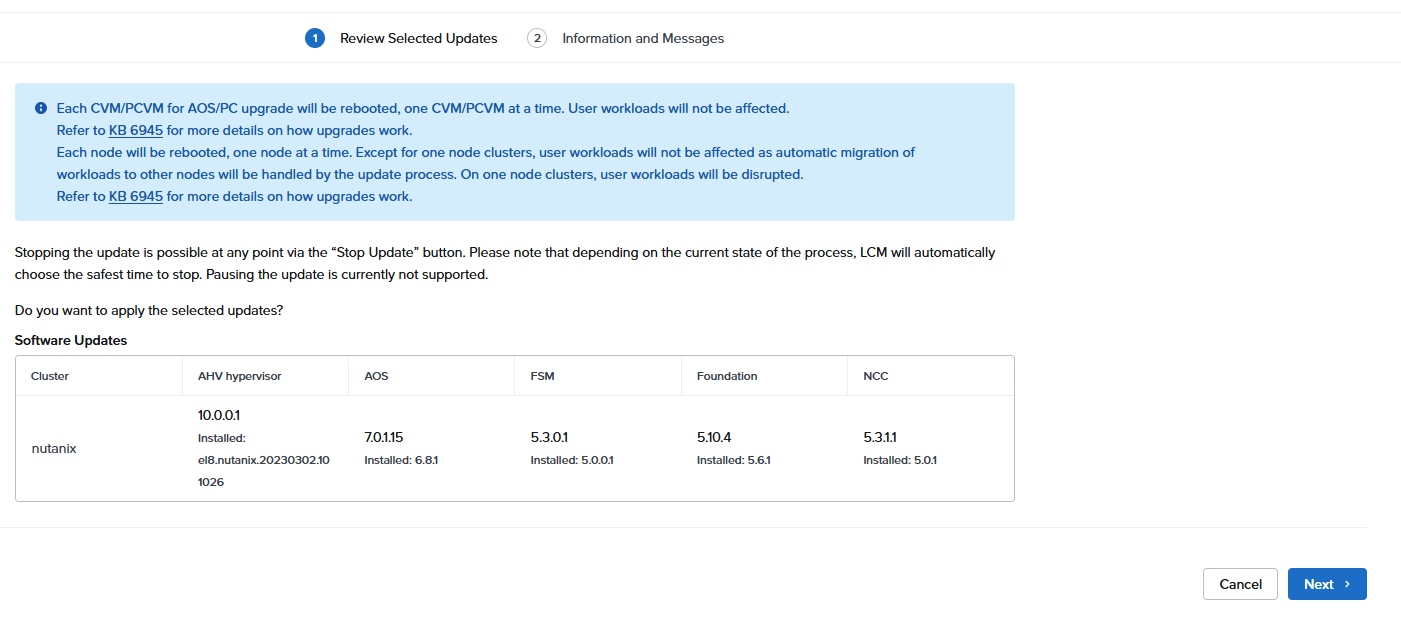
[root@esxi:~] esxcli nvme device list
HBA Name  Status  Signature
--------  ------  ---------
vmhba1    Online  nvmeMgmt-nvmhba0
vmhba0    Online  nvmeMgmt-nvmhba1
[root@esxi:~]
この環境には2つのNVMe SSDがあるので、2個表示される
1個目を確認
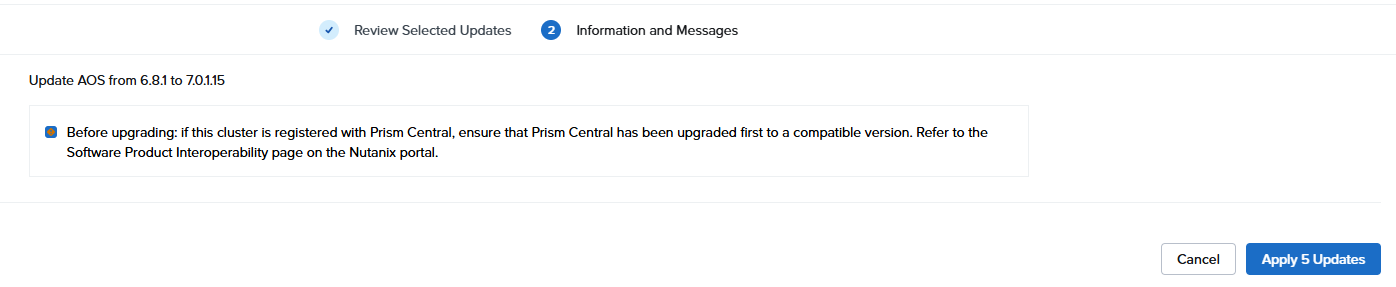
[root@esxi:~] esxcli nvme device log smart get -A vmhba0
SMART And Health Info:
   Available Spare Space Below Threshold: false
   Temperature Warning: false
   NVM Subsystem Reliability Degradation: false
   Read Only Mode: false
   Volatile Memory Backup Device Failure: false
   Composite Temperature: 318 K
   Available Spare: 100 %
   Available Spare Threshold: 10 %
   Percentage Used: 0 %
   Data Units Read: 0x281ea0
   Data Units Written: 0x27e613
   Host Read Commands: 0x145c04f
   Host Write Commands: 0x161ca45
   Controller Busy Time: 0xa37
   Power Cycles: 0xb4
   Power On Hours: 0x608
   Unsafe Shutdowns: 0xf
   Media Errors: 0x0
   Number of Error Info Log Entries: 0x0
   Warning Composite Temperature Time: 12 Mins
   Critical Composite Temperature Time: 1001 Mins
   Temperature Sensor 1: 0 K
   Temperature Sensor 2: 0 K
   Temperature Sensor 3: 0 K
   Temperature Sensor 4: 0 K
   Temperature Sensor 5: 0 K
   Temperature Sensor 6: 0 K
   Temperature Sensor 7: 0 K
   Temperature Sensor 8: 0 K
[root@esxi:~]
[root@esxi:~] esxcli nvme device log smart get -A vmhba1
SMART And Health Info:
   Available Spare Space Below Threshold: false
   Temperature Warning: false
   NVM Subsystem Reliability Degradation: false
   Read Only Mode: false
   Volatile Memory Backup Device Failure: false
   Composite Temperature: 316 K
   Available Spare: 100 %
   Available Spare Threshold: 1 %
   Percentage Used: 1 %
   Data Units Read: 0x1c706ba
   Data Units Written: 0x2fd6fe3
   Host Read Commands: 0x21811d5a
   Host Write Commands: 0x2509be1b
   Controller Busy Time: 0x891
   Power Cycles: 0xc7
   Power On Hours: 0x6db
   Unsafe Shutdowns: 0x14
   Media Errors: 0x0
   Number of Error Info Log Entries: 0x1
   Warning Composite Temperature Time: 3522 Mins
   Critical Composite Temperature Time: 1912 Mins
   Temperature Sensor 1: 316 K
   Temperature Sensor 2: 308 K
   Temperature Sensor 3: 0 K
   Temperature Sensor 4: 0 K
   Temperature Sensor 5: 0 K
   Temperature Sensor 6: 0 K
   Temperature Sensor 7: 0 K
   Temperature Sensor 8: 0 K
[root@esxi:~]
こちらは2個のセンサーが設定されていた
ストレージ操作として情報を取得する場合
ストレージデバイス一覧を取得
[root@esxi:~] esxcli storage core device list
t10.NVMe____TWSC_TSC1BN2562DF7T10A___________________0000000000010000
   Display Name: Local NVMe Disk (t10.NVMe____TWSC_TSC1BN2562DF7T10A___________________0000000000010000)
   Has Settable Display Name: true
   Size: 244198
   Device Type: Direct-Access
   Multipath Plugin: HPP
   Devfs Path: /vmfs/devices/disks/t10.NVMe____TWSC_TSC1BN2562DF7T10A___________________0000000000010000
   Vendor: NVMe
   Model: TWSC TSC1BN256-F7T10A
   Revision: T1103N0L
   SCSI Level: 0
   Is Pseudo: false
   Status: on
   Is RDM Capable: false
   Is Local: true
   Is Removable: false
   Is SSD: true
   Is VVOL PE: false
   Is Offline: false
   Is Perennially Reserved: false
   Queue Full Sample Size: 0
   Queue Full Threshold: 0
   Thin Provisioning Status: no
   Attached Filters:
   VAAI Status: unsupported
   Other UIDs: vml.05382b44a545e29308c99c2e0ef990edeaa5ba7d16ef3c2ae03a9befc3814afd0d
   Is Shared Clusterwide: false
   Is SAS: false
   Is USB: false
   Is Boot Device: true
   Device Max Queue Depth: 255
   No of outstanding IOs with competing worlds: 32
   Drive Type: physical
   RAID Level: NA
   Number of Physical Drives: 1
   Protection Enabled: false
   PI Activated: false
   PI Type: 0
   PI Protection Mask: NO PROTECTION
   Supported Guard Types: NO GUARD SUPPORT
   DIX Enabled: false
   DIX Guard Type: NO GUARD SUPPORT
   Emulated DIX/DIF Enabled: false

t10.NVMe____SPD_SP7002D2TNGH_________________________0200000000000000
   Display Name: Local NVMe Disk (t10.NVMe____SPD_SP7002D2TNGH_________________________0200000000000000)
   Has Settable Display Name: true
   Size: 1953514
   Device Type: Direct-Access
   Multipath Plugin: HPP
   Devfs Path: /vmfs/devices/disks/t10.NVMe____SPD_SP7002D2TNGH_________________________0200000000000000
   Vendor: NVMe
   Model: SPD SP700-2TNGH
   Revision: SP02203A
   SCSI Level: 0
   Is Pseudo: false
   Status: on
   Is RDM Capable: false
   Is Local: true
   Is Removable: false
   Is SSD: true
   Is VVOL PE: false
   Is Offline: false
   Is Perennially Reserved: false
   Queue Full Sample Size: 0
   Queue Full Threshold: 0
   Thin Provisioning Status: no
   Attached Filters:
   VAAI Status: unsupported
   Other UIDs: vml.05c56298c6cae09f64ef49957d1d7af93c98b2a5792c87d191b47f87ea5b89f9e2
   Is Shared Clusterwide: false
   Is SAS: false
   Is USB: false
   Is Boot Device: false
   Device Max Queue Depth: 1023
   No of outstanding IOs with competing worlds: 32
   Drive Type: physical
   RAID Level: NA
   Number of Physical Drives: 1
   Protection Enabled: false
   PI Activated: false
   PI Type: 0
   PI Protection Mask: NO PROTECTION
   Supported Guard Types: NO GUARD SUPPORT
   DIX Enabled: false
   DIX Guard Type: NO GUARD SUPPORT
   Emulated DIX/DIF Enabled: false
[root@esxi:~]
各デバイスのS.M.A.R.T情報を取得
[root@esxi:~] esxcli storage core device smart get -d t10.NVMe____TWSC_TSC1BN256
2DF7T10A___________________0000000000010000
Parameter                 Value  Threshold  Worst  Raw
------------------------  -----  ---------  -----  ---
Health Status             OK     N/A        N/A    N/A
Power-on Hours            1544   N/A        N/A    N/A
Power Cycle Count         180    N/A        N/A    N/A
Reallocated Sector Count  0      90         N/A    N/A
Drive Temperature         43     83         N/A    N/A
[root@esxi:~] esxcli storage core device smart get -d t10.NVMe____SPD_SP7002D2TN
GH_________________________0200000000000000
Parameter                 Value  Threshold  Worst  Raw
------------------------  -----  ---------  -----  ---
Health Status             OK     N/A        N/A    N/A
Power-on Hours            1755   N/A        N/A    N/A
Power Cycle Count         199    N/A        N/A    N/A
Reallocated Sector Count  0      99         N/A    N/A
Drive Temperature         43     90         N/A    N/A
[root@esxi:~]
「Drive Temperature」に温度は入っている
検証
ここまではNVMe SSDのヒートシンクに向けて冷却ファンが稼働している状態で実行していた
冷却ファンを止めて温度上昇が発生するのかを検証
[root@esxi:~] esxcli nvme device log smart get -A vmhba0
SMART And Health Info:
   Available Spare Space Below Threshold: false
   Temperature Warning: false
   NVM Subsystem Reliability Degradation: false
   Read Only Mode: false
   Volatile Memory Backup Device Failure: false
   Composite Temperature: 324 K
   Available Spare: 100 %
   Available Spare Threshold: 10 %
   Percentage Used: 0 %
   Data Units Read: 0x281fc3
   Data Units Written: 0x27e69c
   Host Read Commands: 0x145f45c
   Host Write Commands: 0x16201bc
   Controller Busy Time: 0xa38
   Power Cycles: 0xb4
   Power On Hours: 0x60a
   Unsafe Shutdowns: 0xf
   Media Errors: 0x0
   Number of Error Info Log Entries: 0x0
   Warning Composite Temperature Time: 12 Mins
   Critical Composite Temperature Time: 1001 Mins
   Temperature Sensor 1: 0 K
   Temperature Sensor 2: 0 K
   Temperature Sensor 3: 0 K
   Temperature Sensor 4: 0 K
   Temperature Sensor 5: 0 K
   Temperature Sensor 6: 0 K
   Temperature Sensor 7: 0 K
   Temperature Sensor 8: 0 K
[root@esxi:~] esxcli storage core device smart get -d t10.NVMe____TWSC_TSC1BN256
2DF7T10A___________________0000000000010000
Parameter                 Value  Threshold  Worst  Raw
------------------------  -----  ---------  -----  ---
Health Status             OK     N/A        N/A    N/A
Power-on Hours            1546   N/A        N/A    N/A
Power Cycle Count         180    N/A        N/A    N/A
Reallocated Sector Count  0      90         N/A    N/A
Drive Temperature         52     83         N/A    N/A
[root@esxi:~] esxcli nvme device log smart get -A vmhba1
SMART And Health Info:
   Available Spare Space Below Threshold: false
   Temperature Warning: false
   NVM Subsystem Reliability Degradation: false
   Read Only Mode: false
   Volatile Memory Backup Device Failure: false
   Composite Temperature: 317 K
   Available Spare: 100 %
   Available Spare Threshold: 1 %
   Percentage Used: 1 %
   Data Units Read: 0x1c71334
   Data Units Written: 0x2fd767a
   Host Read Commands: 0x2181e209
   Host Write Commands: 0x250ab10d
   Controller Busy Time: 0x891
   Power Cycles: 0xc7
   Power On Hours: 0x6dd
   Unsafe Shutdowns: 0x14
   Media Errors: 0x0
   Number of Error Info Log Entries: 0x1
   Warning Composite Temperature Time: 3522 Mins
   Critical Composite Temperature Time: 1912 Mins
   Temperature Sensor 1: 317 K
   Temperature Sensor 2: 319 K
   Temperature Sensor 3: 0 K
   Temperature Sensor 4: 0 K
   Temperature Sensor 5: 0 K
   Temperature Sensor 6: 0 K
   Temperature Sensor 7: 0 K
   Temperature Sensor 8: 0 K
[root@esxi:~] esxcli storage core device smart get -d t10.NVMe____SPD_SP7002D2TN
GH_________________________0200000000000000
Parameter                 Value  Threshold  Worst  Raw
------------------------  -----  ---------  -----  ---
Health Status             OK     N/A        N/A    N/A
Power-on Hours            1757   N/A        N/A    N/A
Power Cycle Count         199    N/A        N/A    N/A
Reallocated Sector Count  0      99         N/A    N/A
Drive Temperature         44     90         N/A    N/A
[root@esxi:~]
2時間後
[root@esxi:~] esxcli storage core device smart get -d t10.NVMe____TWSC_TSC1BN256
2DF7T10A___________________0000000000010000
Parameter                 Value  Threshold  Worst  Raw
------------------------  -----  ---------  -----  ---
Health Status             OK     N/A        N/A    N/A
Power-on Hours            1547   N/A        N/A    N/A
Power Cycle Count         180    N/A        N/A    N/A
Reallocated Sector Count  0      90         N/A    N/A
Drive Temperature         54     83         N/A    N/A
[root@esxi:~] esxcli nvme device log smart get -A vmhba0
SMART And Health Info:
   Available Spare Space Below Threshold: false
   Temperature Warning: false
   NVM Subsystem Reliability Degradation: false
   Read Only Mode: false
   Volatile Memory Backup Device Failure: false
   Composite Temperature: 327 K
   Available Spare: 100 %
   Available Spare Threshold: 10 %
   Percentage Used: 0 %
   Data Units Read: 0x2820c9
   Data Units Written: 0x27e737
   Host Read Commands: 0x1461a66
   Host Write Commands: 0x1622f01
   Controller Busy Time: 0xa39
   Power Cycles: 0xb4
   Power On Hours: 0x60b
   Unsafe Shutdowns: 0xf
   Media Errors: 0x0
   Number of Error Info Log Entries: 0x0
   Warning Composite Temperature Time: 12 Mins
   Critical Composite Temperature Time: 1001 Mins
   Temperature Sensor 1: 0 K
   Temperature Sensor 2: 0 K
   Temperature Sensor 3: 0 K
   Temperature Sensor 4: 0 K
   Temperature Sensor 5: 0 K
   Temperature Sensor 6: 0 K
   Temperature Sensor 7: 0 K
   Temperature Sensor 8: 0 K
[root@esxi:~] esxcli storage core device smart get -d t10.NVMe____TWSC_TSC1BN256
2DF7T10A___________________0000000000010000
Parameter                 Value  Threshold  Worst  Raw
------------------------  -----  ---------  -----  ---
Health Status             OK     N/A        N/A    N/A
Power-on Hours            1547   N/A        N/A    N/A
Power Cycle Count         180    N/A        N/A    N/A
Reallocated Sector Count  0      90         N/A    N/A
Drive Temperature         54     83         N/A    N/A
[root@esxi:~] esxcli nvme device log smart get -A vmhba1
SMART And Health Info:
   Available Spare Space Below Threshold: false
   Temperature Warning: false
   NVM Subsystem Reliability Degradation: false
   Read Only Mode: false
   Volatile Memory Backup Device Failure: false
   Composite Temperature: 320 K
   Available Spare: 100 %
   Available Spare Threshold: 1 %
   Percentage Used: 1 %
   Data Units Read: 0x1c78f10
   Data Units Written: 0x30203c4
   Host Read Commands: 0x218425aa
   Host Write Commands: 0x2519b431
   Controller Busy Time: 0x892
   Power Cycles: 0xc7
   Power On Hours: 0x6df
   Unsafe Shutdowns: 0x14
   Media Errors: 0x0
   Number of Error Info Log Entries: 0x1
   Warning Composite Temperature Time: 3522 Mins
   Critical Composite Temperature Time: 1912 Mins
   Temperature Sensor 1: 320 K
   Temperature Sensor 2: 334 K
   Temperature Sensor 3: 0 K
   Temperature Sensor 4: 0 K
   Temperature Sensor 5: 0 K
   Temperature Sensor 6: 0 K
   Temperature Sensor 7: 0 K
   Temperature Sensor 8: 0 K
[root@esxi:~] esxcli nvme device log smart get -A vmhba1
SMART And Health Info:
   Available Spare Space Below Threshold: false
   Temperature Warning: false
   NVM Subsystem Reliability Degradation: false
   Read Only Mode: false
   Volatile Memory Backup Device Failure: false
   Composite Temperature: 320 K
   Available Spare: 100 %
   Available Spare Threshold: 1 %
   Percentage Used: 1 %
   Data Units Read: 0x1c78f11
   Data Units Written: 0x3020450
   Host Read Commands: 0x218425f1
   Host Write Commands: 0x2519b834
   Controller Busy Time: 0x892
   Power Cycles: 0xc7
   Power On Hours: 0x6df
   Unsafe Shutdowns: 0x14
   Media Errors: 0x0
   Number of Error Info Log Entries: 0x1
   Warning Composite Temperature Time: 3522 Mins
   Critical Composite Temperature Time: 1912 Mins
   Temperature Sensor 1: 320 K
   Temperature Sensor 2: 332 K
   Temperature Sensor 3: 0 K
   Temperature Sensor 4: 0 K
   Temperature Sensor 5: 0 K
   Temperature Sensor 6: 0 K
   Temperature Sensor 7: 0 K
   Temperature Sensor 8: 0 K
[root@esxi:~] esxcli storage core device smart get -d t10.NVMe____SPD_SP7002D2TN
GH_________________________0200000000000000
Parameter                 Value  Threshold  Worst  Raw
------------------------  -----  ---------  -----  ---
Health Status             OK     N/A        N/A    N/A
Power-on Hours            1759   N/A        N/A    N/A
Power Cycle Count         199    N/A        N/A    N/A
Reallocated Sector Count  0      99         N/A    N/A
Drive Temperature         47     90         N/A    N/A
[root@esxi:~]
[root@esxi:~] esxcli nvme device log smart get -A vmhba0
SMART And Health Info:
   Available Spare Space Below Threshold: false
   Temperature Warning: false
   NVM Subsystem Reliability Degradation: false
   Read Only Mode: false
   Volatile Memory Backup Device Failure: false
   Composite Temperature: 327 K
   Available Spare: 100 %
   Available Spare Threshold: 10 %
   Percentage Used: 0 %
   Data Units Read: 0x28249f
   Data Units Written: 0x27eada
   Host Read Commands: 0x146b7f3
   Host Write Commands: 0x16305bb
   Controller Busy Time: 0xa3d
   Power Cycles: 0xb4
   Power On Hours: 0x611
   Unsafe Shutdowns: 0xf
   Media Errors: 0x0
   Number of Error Info Log Entries: 0x0
   Warning Composite Temperature Time: 12 Mins
   Critical Composite Temperature Time: 1001 Mins
   Temperature Sensor 1: 0 K
   Temperature Sensor 2: 0 K
   Temperature Sensor 3: 0 K
   Temperature Sensor 4: 0 K
   Temperature Sensor 5: 0 K
   Temperature Sensor 6: 0 K
   Temperature Sensor 7: 0 K
   Temperature Sensor 8: 0 K
[root@esxi:~] esxcli storage core device smart get -d t10.NVMe____TWSC_TSC1BN256
2DF7T10A___________________0000000000010000
Parameter                 Value  Threshold  Worst  Raw
------------------------  -----  ---------  -----  ---
Health Status             OK     N/A        N/A    N/A
Power-on Hours            1553   N/A        N/A    N/A
Power Cycle Count         180    N/A        N/A    N/A
Reallocated Sector Count  0      90         N/A    N/A
Drive Temperature         54     83         N/A    N/A
[root@esxi:~] esxcli nvme device log smart get -A vmhba1
SMART And Health Info:
   Available Spare Space Below Threshold: false
   Temperature Warning: false
   NVM Subsystem Reliability Degradation: false
   Read Only Mode: false
   Volatile Memory Backup Device Failure: false
   Composite Temperature: 321 K
   Available Spare: 100 %
   Available Spare Threshold: 1 %
   Percentage Used: 1 %
   Data Units Read: 0x1cb74d7
   Data Units Written: 0x309f82b
   Host Read Commands: 0x21a21851
   Host Write Commands: 0x2596bdff
   Controller Busy Time: 0x899
   Power Cycles: 0xc7
   Power On Hours: 0x6e5
   Unsafe Shutdowns: 0x14
   Media Errors: 0x0
   Number of Error Info Log Entries: 0x1
   Warning Composite Temperature Time: 3788 Mins
   Critical Composite Temperature Time: 1936 Mins
   Temperature Sensor 1: 321 K
   Temperature Sensor 2: 342 K
   Temperature Sensor 3: 0 K
   Temperature Sensor 4: 0 K
   Temperature Sensor 5: 0 K
   Temperature Sensor 6: 0 K
   Temperature Sensor 7: 0 K
   Temperature Sensor 8: 0 K
[root@esxi:~] esxcli storage core device smart get -d t10.NVMe____SPD_SP7002D2TN
GH_________________________0200000000000000
Parameter                 Value  Threshold  Worst  Raw
------------------------  -----  ---------  -----  ---
Health Status             OK     N/A        N/A    N/A
Power-on Hours            1765   N/A        N/A    N/A
Power Cycle Count         199    N/A        N/A    N/A
Reallocated Sector Count  0      99         N/A    N/A
Drive Temperature         48     90         N/A    N/A
[root@esxi:~]
[root@esxi:/vmfs/volumes/~/iso] esxcli softwar
e component apply -d /vmfs/volumes/~/iso/VMwar
e-amd-zen-ipmi_thermal_910.1.0.0006-5vmw.803.0.0.24022510.zip
Installation Result
   Message: The update completed successfully, but the system needs to be rebooted for the changes to be effective.
   Components Installed: VMware-smntemp_910.1.0.0006-5vmw.803.0.0.24022510
   Components Removed:
   Components Skipped:
   Reboot Required: true
   DPU Results:
[root@esxi:/vmfs/volumes/~/iso]
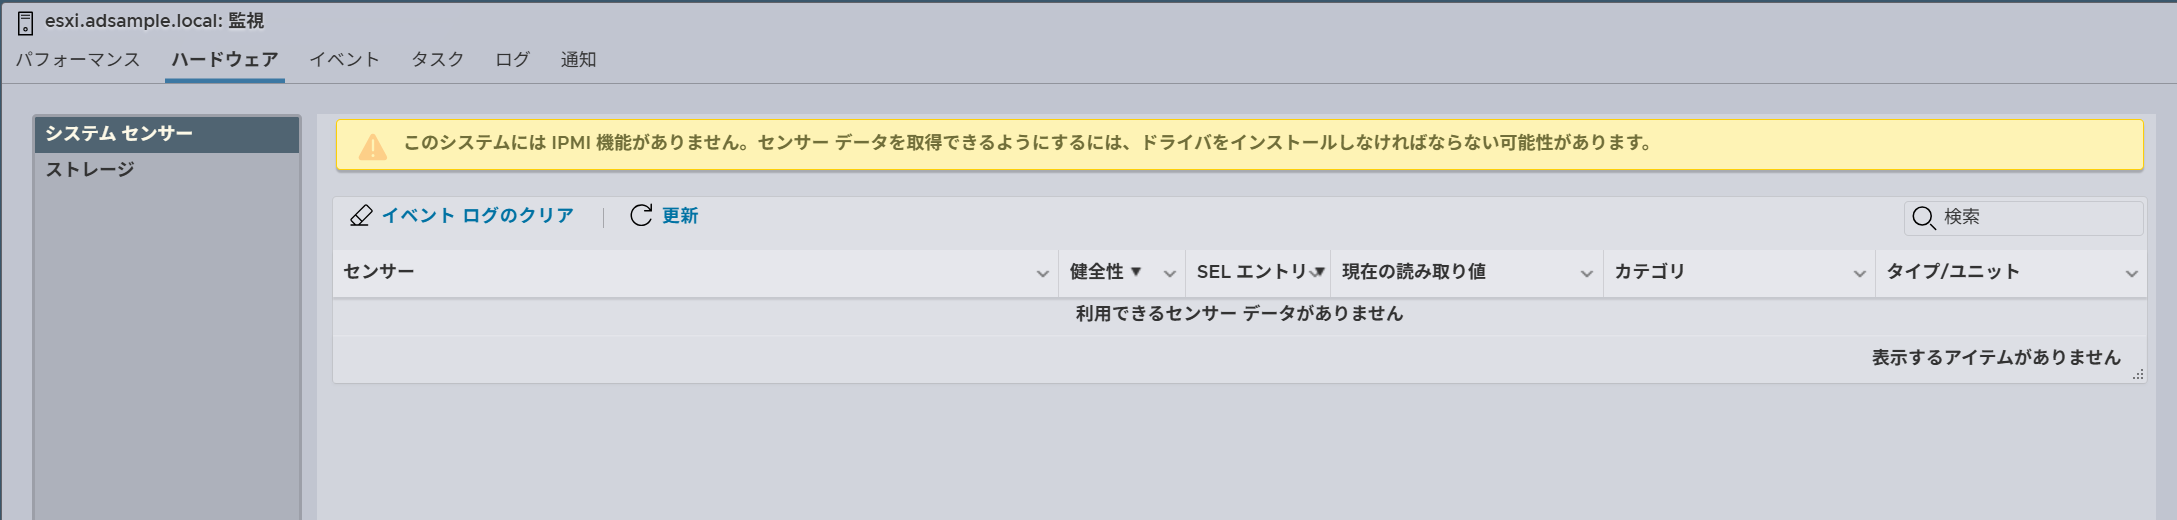
ドライバインストール後はESXi再起動必須
再起動後、ステータスを確認すると、CPU温度を認識するようになった
CLIでも認識するようになった
[root@esxi:~] esxcli hardware ipmi sdr list
Node-Sensor  Description            Entity-Instance  Computed Reading  Base Unit  Raw Reading  Sensor Type  Timestamp/Comment    Raw  Formatted-Raw
-----------  ---------------------  ---------------  ----------------  ---------  -----------  -----------  -------------------  ---  -------------
0.1          Processor 1 CPU0_Tctl  3.1              59                degrees C  59           Temperature  2026-07-08T00:56:20
[root@esxi:~]