Persisting USB NIC Bindings Option 1: Run the following ESXCLI command which will enable the driver parameter to perform a full USB bus scan during startup: esxcli system module parameters set -p “usbBusFullScanOnBootEnabled=1” -m vmkusb_nic_fling
[root@esxi:~] esxcli system module list|grep nic
vmkusb_nic_fling                     true        true
[root@esxi:~] esxcli system module list|grep usb
vmkusb_nic_fling                     true        true
[root@esxi:~]
モジュール vmkusb_nic_fling は、ESXi 8.0でも存在している。
モジュールに対して設定できるパラメータを確認。
[root@esxi:~] esxcli system module parameters list -m vmkusb_nic_fling
Name Type Value Description
--------------------------- ------ ----- -----------
usbBusFullScanOnBootEnabled int Enable USB Bus full scan on system boot: 0 No (Default), 1 Yes
usbCdromPassthroughEnabled int Enable USB CDROM device for USB passtrough: 0 No (Default), 1 Yes
usbStorageRegisterDelaySecs int Delay to register cached USB storage device: Min: 0 second, Max: 600 seconds, Default: 10 seconds
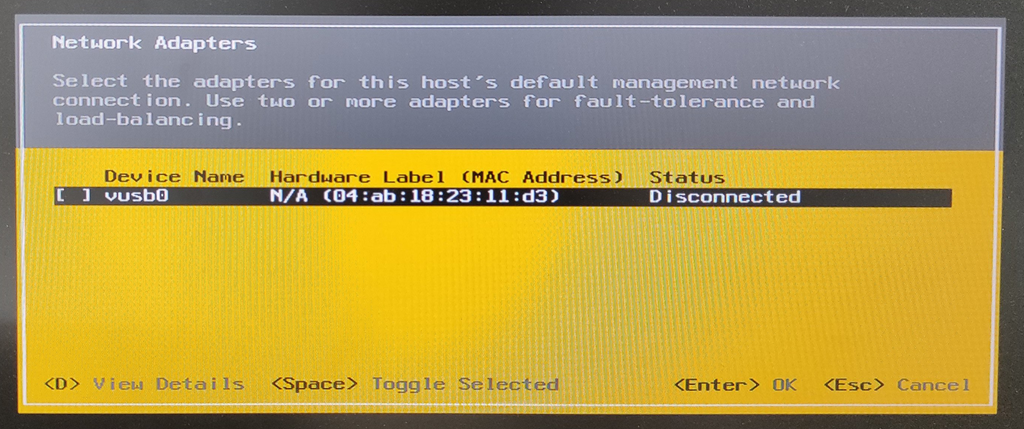
vusb0_mac string Persist vusb0 MAC Address: xx:xx:xx:xx:xx:xx
vusb10_mac string Persist vusb10 MAC Address: xx:xx:xx:xx:xx:xx
vusb11_mac string Persist vusb11 MAC Address: xx:xx:xx:xx:xx:xx
vusb1_mac string Persist vusb1 MAC Address: xx:xx:xx:xx:xx:xx
vusb2_mac string Persist vusb2 MAC Address: xx:xx:xx:xx:xx:xx
vusb3_mac string Persist vusb3 MAC Address: xx:xx:xx:xx:xx:xx
vusb4_mac string Persist vusb4 MAC Address: xx:xx:xx:xx:xx:xx
vusb5_mac string Persist vusb5 MAC Address: xx:xx:xx:xx:xx:xx
vusb6_mac string Persist vusb6 MAC Address: xx:xx:xx:xx:xx:xx
vusb7_mac string Persist vusb7 MAC Address: xx:xx:xx:xx:xx:xx
vusb8_mac string Persist vusb8 MAC Address: xx:xx:xx:xx:xx:xx
vusb9_mac string Persist vusb9 MAC Address: xx:xx:xx:xx:xx:xx
[root@esxi:~]
usbBusFullScanOnBootEnabled が初期値0で存在していることを確認
(“Persisting VMkernel to USB NIC mappings”に記載されている複数のUSB NICがある時に、指す場所を変えてもvusbの番号が変わらないようにするための設定も引き続きある)
現段階のesxcliでの正式オプションに修正して、「esxcli system module parameters set –module=vmkusb_nic_fling –parameter-string=”usbBusFullScanOnBootEnabled=1″」と実行する
[root@esxi:~] esxcli system module parameters set --module=vmkusb_nic_fling --parameter-string="usbBusFullScanOnBootEnabled=1"
[root@esxi:~] esxcli system module parameters list -m vmkusb_nic_fling
Name                         Type    Value  Description
---------------------------  ------  -----  -----------
usbBusFullScanOnBootEnabled  int     1      Enable USB Bus full scan on system boot: 0 No (Default), 1 Yes
usbCdromPassthroughEnabled   int            Enable USB CDROM device for USB passtrough: 0 No (Default), 1 Yes
usbStorageRegisterDelaySecs  int            Delay to register cached USB storage device: Min: 0 second, Max: 600 seconds, Default: 10 seconds
vusb0_mac                    string         Persist vusb0 MAC Address: xx:xx:xx:xx:xx:xx
vusb10_mac                   string         Persist vusb10 MAC Address: xx:xx:xx:xx:xx:xx
vusb11_mac                   string         Persist vusb11 MAC Address: xx:xx:xx:xx:xx:xx
vusb1_mac                    string         Persist vusb1 MAC Address: xx:xx:xx:xx:xx:xx
vusb2_mac                    string         Persist vusb2 MAC Address: xx:xx:xx:xx:xx:xx
vusb3_mac                    string         Persist vusb3 MAC Address: xx:xx:xx:xx:xx:xx
vusb4_mac                    string         Persist vusb4 MAC Address: xx:xx:xx:xx:xx:xx
vusb5_mac                    string         Persist vusb5 MAC Address: xx:xx:xx:xx:xx:xx
vusb6_mac                    string         Persist vusb6 MAC Address: xx:xx:xx:xx:xx:xx
vusb7_mac                    string         Persist vusb7 MAC Address: xx:xx:xx:xx:xx:xx
vusb8_mac                    string         Persist vusb8 MAC Address: xx:xx:xx:xx:xx:xx
vusb9_mac                    string         Persist vusb9 MAC Address: xx:xx:xx:xx:xx:xx
[root@esxi:~]
[root@esxi:~] ls -l /etc/rc.local.d
total 32
-r-xr-xr-x    1 root     root           378 Apr  3  2025 009.vsanwitness.sh
drwxr-xr-x    1 root     root           512 Oct  3 00:25 autodeploy
-r-xr-xr-x    1 root     root          2249 Apr  3  2025 backupPrevBootLogs.py
-r-xr-xr-x    1 root     root          2071 Apr  3  2025 cleanupStatefulHost.py
-r-xr-xr-x    1 root     root          2567 Apr  3  2025 kickstart.py
-rwxr-xr-t    1 root     root           506 Apr  3  2025 local.sh
-r-xr-xr-x    1 root     root           397 Apr  3  2025 psaScrub.sh
-r-xr-xr-x    1 root     root          1190 Apr  3  2025 raiseConfigStoreVob.py
[root@esxi:~] cat /etc/rc.local.d/local.sh
#!/bin/sh ++group=host/vim/vmvisor/boot

# local configuration options

# Note: modify at your own risk!  If you do/use anything in this
# script that is not part of a stable API (relying on files to be in
# specific places, specific tools, specific output, etc) there is a
# possibility you will end up with a broken system after patching or
# upgrading.  Changes are not supported unless under direction of
# VMware support.

# Note: This script will not be run when UEFI secure boot is enabled.

exit 0
[root@esxi:~]
今回実行したesxcliのコマンド群を追加
[root@esxi:~] vi /etc/rc.local.d/local.sh
[root@esxi:~] cat /etc/rc.local.d/local.sh
#!/bin/sh ++group=host/vim/vmvisor/boot

# local configuration options

# Note: modify at your own risk!  If you do/use anything in this
# script that is not part of a stable API (relying on files to be in
# specific places, specific tools, specific output, etc) there is a
# possibility you will end up with a broken system after patching or
# upgrading.  Changes are not supported unless under direction of
# VMware support.

# Note: This script will not be run when UEFI secure boot is enabled.

esxcli network vswitch standard uplink add --vswitch-name=vSwitch0 --uplink-name=vusb0
esxcli network vswitch standard portgroup policy failover set --portgroup-name="Management Network" --active-uplinks=vusb0
esxcli network vswitch standard portgroup policy failover set --portgroup-name="VM Network" --active-uplinks=vusb0

exit 0
[root@esxi:~]
[root@esxi:~] date
Fri Oct  3 00:57:12 UTC 2025
[root@esxi:~] ls -ltr /bootbank/
total 261895
<略>
-rwx------    1 root     root          1797 Sep 17 16:34 boot.cfg
-rwx------    1 root     root           102 Oct  3 00:25 jumpstrt.gz
-rwx------    1 root     root        266977 Oct  3 00:31 state.tgz
[root@esxi:~]
/bootbank/state.tgz が更新されていない
[root@esxi:~] auto-backup.sh
ConfigStore has been modified since the last backup
Bootbank lock is /var/lock/bootbank/f43b0450-7e4d6762-c6be-52e6552cc1f8
INFO: Successfully claimed lock file for pid 526790
Saving current state in /bootbank
Ssh configuration synced to configstore
Creating ConfigStore Backup
Locking esx.conf
Creating archive
Unlocked esx.conf
Using key ID d27fa69c-5edc-424d-bc0f-61d7966bf4d4 to encrypt
Clock updated.
Time: 00:57:21   Date: 10/03/2025   UTC
[root@esxi:~]
auto-backup.shを実行後を確認
[root@esxi:~] ls -ltr /bootbank/
total 261895
<略>
-rwx------    1 root     root          1797 Sep 17 16:34 boot.cfg
-rwx------    1 root     root           102 Oct  3 00:25 jumpstrt.gz
-rwx------    1 root     root        266974 Oct  3 00:57 state.tgz
[root@esxi:~]
VMware flingsで配布している「USB Network Native Driver for ESXi」からvmkusb_nic_fling ドライバをインストールすると、使えるUSB NICの種類が増える
[root@esxi:/vmfs/volumes/6908722d-a37ea8a3-525a-4d150daf152f/iso] esxcli software vib install -d /vmfs/volumes/datastore1/iso/ESXi8
03-VMKUSB-NIC-FLING-76444229-component-24179899.zip
Installation Result
   Message: The update completed successfully, but the system needs to be rebooted for the changes to be effective.
   VIBs Installed: VMW_bootbank_vmkusb-nic-fling_1.14-2vmw.803.0.0.76444229
   VIBs Removed:
   VIBs Skipped:
   Reboot Required: true
   DPU Results:
[root@esxi:/vmfs/volumes/6908722d-a37ea8a3-525a-4d150daf152f/iso]