・ONTAP 7.xのリリース時期を比較すると、初代稼働が2010/01ということは2009/夏前には試験が始まってそうなので、7.3.2だと時期が早すぎるので、 7.3.1.1 あたりと想定される 7.3.1: 23 January 2009, 7.3.1.1: April 2009, 7.3.2: Aug 14 2009 7.3.3: 18 June 2010,7.3.4: 14 March 2011
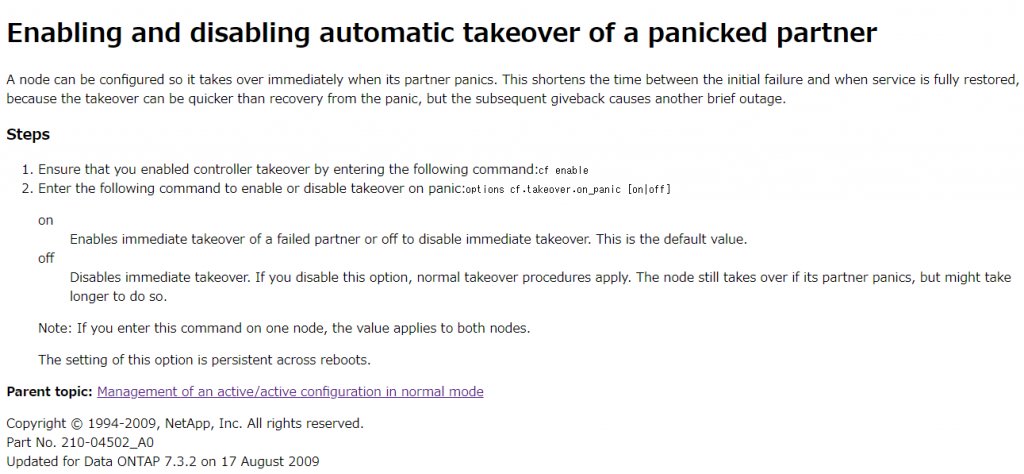
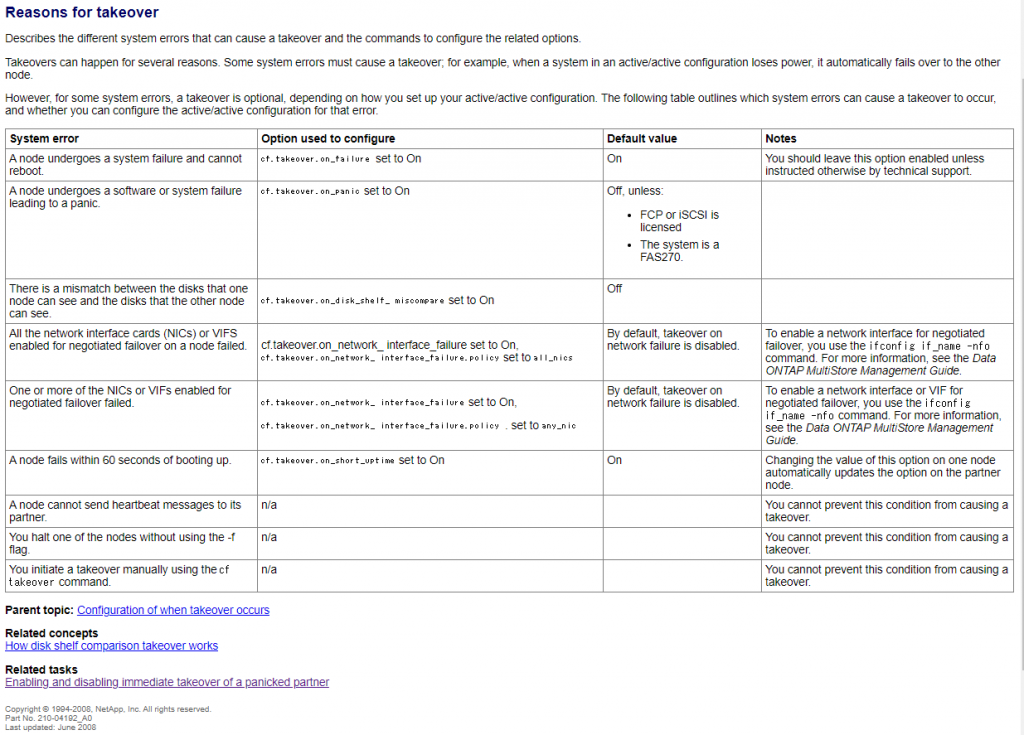
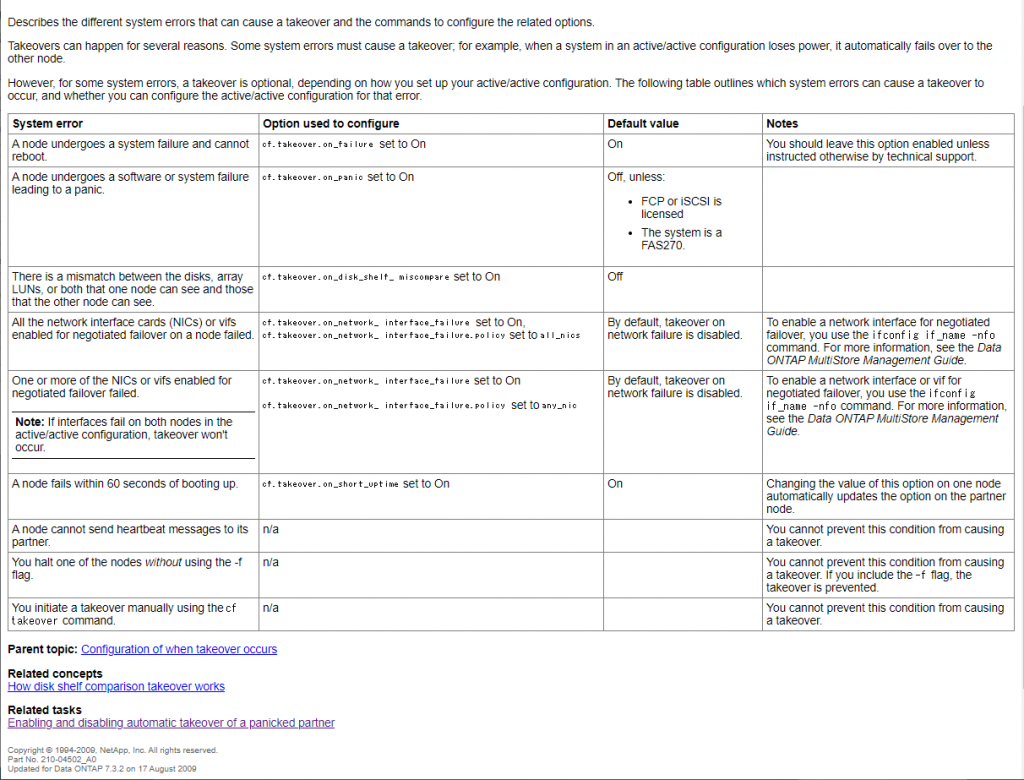
・ONTAP 7.3のマニュアルの「Reasons for takeover」にcf.takeover.on_panicはデフォルト「off」と明記。ONTAP7.3.2の同じ箇所にもデフォルトoffと書いてある。ONTAP7.3.2は同一マニュアル内でon_panicのデフォルト値が異なっているという事態に。どっちなんだよ
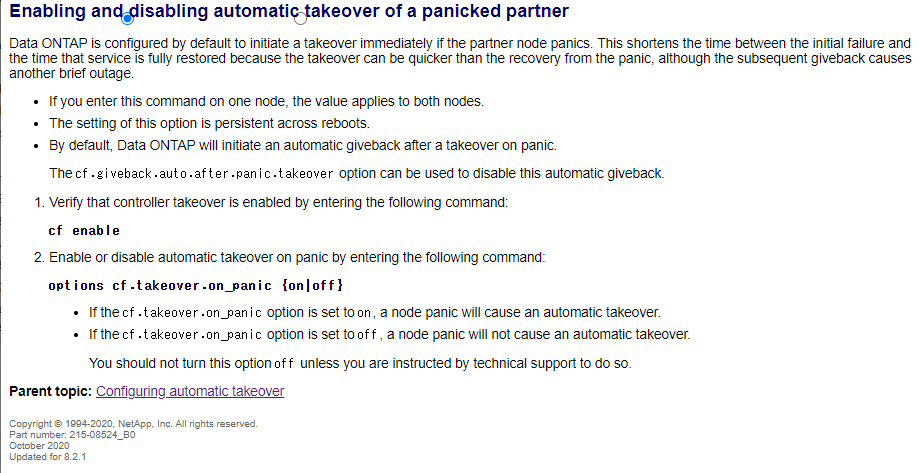
・ONTAP 8の7-modeの場合はcf.takeover.on_panicオプションがあるがoff時の説明が「a node panic will not cause an automatic takeover.」に変わっており、「You should not turn this option off unless you are instructed by technical support to do so.」と記載されている。
# yum info firefox
読み込んだプラグイン:fastestmirror
Loading mirror speeds from cached hostfile
 * base: ftp.nara.wide.ad.jp
 * epel: epel.uni-sofia.bg
 * extras: ftp.nara.wide.ad.jp
 * updates: ftp.nara.wide.ad.jp
利用可能なパッケージ
名前                : firefox
アーキテクチャー    : i686
バージョン          : 68.12.0
リリース            : 1.el7.centos
容量                : 96 M
リポジトリー        : updates/7/x86_64
要約                : Mozilla Firefox Web browser
URL                 : https://www.mozilla.org/firefox/
ライセンス          : MPLv1.1 or GPLv2+ or LGPLv2+
説明                : Mozilla Firefox is an open-source web browser, designed for standards
                    : compliance, performance and portability.

名前                : firefox
アーキテクチャー    : x86_64
バージョン          : 68.12.0
リリース            : 1.el7.centos
容量                : 93 M
リポジトリー        : updates/7/x86_64
要約                : Mozilla Firefox Web browser
URL                 : https://www.mozilla.org/firefox/
ライセンス          : MPLv1.1 or GPLv2+ or LGPLv2+
説明                : Mozilla Firefox is an open-source web browser, designed for standards
                    : compliance, performance and portability.
#
# yum install firefox
<略>
依存性を解決しました
==================================================================================================================================================================================================
Package アーキテクチャー バージョン リポジトリー 容量
==================================================================================================================================================================================================
インストール中:
firefox x86_64 68.12.0-1.el7.centos updates 93 M
依存性関連でのインストールをします:
adwaita-cursor-theme noarch 3.28.0-1.el7 base 641 k
adwaita-icon-theme noarch 3.28.0-1.el7 base 11 M
at-spi2-atk x86_64 2.26.2-1.el7 base 81 k
at-spi2-core x86_64 2.28.0-1.el7 base 158 k
atk x86_64 2.28.1-2.el7 base 263 k
avahi-libs x86_64 0.6.31-20.el7 base 62 k
cairo x86_64 1.15.12-4.el7 base 741 k
cairo-gobject x86_64 1.15.12-4.el7 base 26 k
centos-indexhtml noarch 7-9.el7.centos base 92 k
colord-libs x86_64 1.3.4-2.el7 base 186 k
cups-libs x86_64 1:1.6.3-43.el7 base 358 k
dconf x86_64 0.28.0-4.el7 base 106 k
dejavu-fonts-common noarch 2.33-6.el7 base 64 k
dejavu-sans-fonts noarch 2.33-6.el7 base 1.4 M
fontconfig x86_64 2.13.0-4.3.el7 base 254 k
fontpackages-filesystem noarch 1.44-8.el7 base 9.9 k
fribidi x86_64 1.0.2-1.el7_7.1 base 79 k
gdk-pixbuf2 x86_64 2.36.12-3.el7 base 570 k
glib-networking x86_64 2.56.1-1.el7 base 145 k
gnutls x86_64 3.3.29-9.el7_6 base 680 k
graphite2 x86_64 1.3.10-1.el7_3 base 115 k
gsettings-desktop-schemas x86_64 3.28.0-3.el7 base 606 k
gtk-update-icon-cache x86_64 3.22.30-5.el7 base 27 k
gtk2 x86_64 2.24.31-1.el7 base 3.4 M
gtk3 x86_64 3.22.30-5.el7 base 4.4 M
harfbuzz x86_64 1.7.5-2.el7 base 267 k
hicolor-icon-theme noarch 0.12-7.el7 base 42 k
jasper-libs x86_64 1.900.1-33.el7 base 150 k
jbigkit-libs x86_64 2.0-11.el7 base 46 k
json-glib x86_64 1.4.2-2.el7 base 134 k
lcms2 x86_64 2.6-3.el7 base 150 k
libICE x86_64 1.0.9-9.el7 base 66 k
libSM x86_64 1.2.2-2.el7 base 39 k
libX11 x86_64 1.6.7-2.el7 base 607 k
libX11-common noarch 1.6.7-2.el7 base 164 k
libXau x86_64 1.0.8-2.1.el7 base 29 k
libXcomposite x86_64 0.4.4-4.1.el7 base 22 k
libXcursor x86_64 1.1.15-1.el7 base 30 k
libXdamage x86_64 1.1.4-4.1.el7 base 20 k
libXext x86_64 1.3.3-3.el7 base 39 k
libXfixes x86_64 5.0.3-1.el7 base 18 k
libXft x86_64 2.3.2-2.el7 base 58 k
libXi x86_64 1.7.9-1.el7 base 40 k
libXinerama x86_64 1.1.3-2.1.el7 base 14 k
libXrandr x86_64 1.5.1-2.el7 base 27 k
libXrender x86_64 0.9.10-1.el7 base 26 k
libXt x86_64 1.1.5-3.el7 base 173 k
libXtst x86_64 1.2.3-1.el7 base 20 k
libXxf86vm x86_64 1.1.4-1.el7 base 18 k
libepoxy x86_64 1.5.2-1.el7 base 211 k
liberation-fonts-common noarch 1:1.07.2-16.el7 base 27 k
liberation-sans-fonts noarch 1:1.07.2-16.el7 base 279 k
libglvnd x86_64 1:1.0.1-0.8.git5baa1e5.el7 base 89 k
libglvnd-egl x86_64 1:1.0.1-0.8.git5baa1e5.el7 base 44 k
libglvnd-glx x86_64 1:1.0.1-0.8.git5baa1e5.el7 base 125 k
libgusb x86_64 0.2.9-1.el7 base 40 k
libjpeg-turbo x86_64 1.2.90-8.el7 base 135 k
libmodman x86_64 2.0.1-8.el7 base 28 k
libproxy x86_64 0.4.11-11.el7 base 64 k
libsoup x86_64 2.62.2-2.el7 base 411 k
libthai x86_64 0.1.14-9.el7 base 187 k
libtiff x86_64 4.0.3-32.el7 base 171 k
libusbx x86_64 1.0.21-1.el7 base 61 k
libwayland-client x86_64 1.15.0-1.el7 base 33 k
libwayland-cursor x86_64 1.15.0-1.el7 base 20 k
libwayland-egl x86_64 1.15.0-1.el7 base 13 k
libwayland-server x86_64 1.15.0-1.el7 base 39 k
libxcb x86_64 1.13-1.el7 base 214 k
libxkbcommon x86_64 0.7.1-3.el7 base 108 k
libxshmfence x86_64 1.2-1.el7 base 7.2 k
mesa-libEGL x86_64 18.3.4-7.el7_8.1 updates 109 k
mesa-libGL x86_64 18.3.4-7.el7_8.1 updates 165 k
mesa-libgbm x86_64 18.3.4-7.el7_8.1 updates 39 k
mesa-libglapi x86_64 18.3.4-7.el7_8.1 updates 46 k
mozilla-filesystem x86_64 1.9-11.el7 base 5.3 k
nettle x86_64 2.7.1-8.el7 base 327 k
pango x86_64 1.42.4-4.el7_7 base 280 k
pixman x86_64 0.34.0-1.el7 base 248 k
rest x86_64 0.8.1-2.el7 base 63 k
startup-notification x86_64 0.12-8.el7 base 39 k
trousers x86_64 0.3.14-2.el7 base 289 k
xcb-util x86_64 0.4.0-2.el7 base 16 k
xkeyboard-config noarch 2.24-1.el7 base 834 k
トランザクションの要約
==================================================================================================================================================================================================
インストール 1 パッケージ (+83 個の依存関係のパッケージ)
総ダウンロード容量: 126 M
インストール容量: 324 M
Is this ok [y/d/N]:
# yum info chromium
読み込んだプラグイン:fastestmirror
Loading mirror speeds from cached hostfile
 * base: ftp.nara.wide.ad.jp
 * epel: mirror.slu.cz
 * extras: ftp.nara.wide.ad.jp
 * updates: ftp.nara.wide.ad.jp
利用可能なパッケージ
名前                : chromium
アーキテクチャー    : x86_64
バージョン          : 85.0.4183.121
リリース            : 1.el7
容量                : 97 M
リポジトリー        : epel/x86_64
要約                : A WebKit (Blink) powered web browser
URL                 : http://www.chromium.org/Home
ライセンス          : BSD and LGPLv2+ and ASL 2.0 and IJG and MIT and GPLv2+ and ISC and OpenSSL and (MPLv1.1 or GPLv2 or LGPLv2)
説明                : Chromium is an open-source web browser, powered by WebKit (Blink).
# yum install chromium
<略>
依存性を解決しました
==================================================================================================================================================================================================
Package アーキテクチャー バージョン リポジトリー 容量
==================================================================================================================================================================================================
インストール中:
chromium x86_64 85.0.4183.121-1.el7 epel 97 M
依存性関連でのインストールをします:
adwaita-cursor-theme noarch 3.28.0-1.el7 base 641 k
adwaita-icon-theme noarch 3.28.0-1.el7 base 11 M
at-spi2-atk x86_64 2.26.2-1.el7 base 81 k
at-spi2-core x86_64 2.28.0-1.el7 base 158 k
atk x86_64 2.28.1-2.el7 base 263 k
audit-libs-python x86_64 2.8.5-4.el7 base 76 k
avahi x86_64 0.6.31-20.el7 base 264 k
avahi-libs x86_64 0.6.31-20.el7 base 62 k
cairo x86_64 1.15.12-4.el7 base 741 k
cairo-gobject x86_64 1.15.12-4.el7 base 26 k
checkpolicy x86_64 2.5-8.el7 base 295 k
chromium-common x86_64 85.0.4183.121-1.el7 epel 16 M
colord-libs x86_64 1.3.4-2.el7 base 186 k
cups-libs x86_64 1:1.6.3-43.el7 base 358 k
dconf x86_64 0.28.0-4.el7 base 106 k
dejavu-fonts-common noarch 2.33-6.el7 base 64 k
dejavu-sans-fonts noarch 2.33-6.el7 base 1.4 M
flac-libs x86_64 1.3.0-5.el7_1 base 169 k
fontconfig x86_64 2.13.0-4.3.el7 base 254 k
fontpackages-filesystem noarch 1.44-8.el7 base 9.9 k
fribidi x86_64 1.0.2-1.el7_7.1 base 79 k
gdk-pixbuf2 x86_64 2.36.12-3.el7 base 570 k
glib-networking x86_64 2.56.1-1.el7 base 145 k
gnutls x86_64 3.3.29-9.el7_6 base 680 k
graphite2 x86_64 1.3.10-1.el7_3 base 115 k
gsettings-desktop-schemas x86_64 3.28.0-3.el7 base 606 k
gsm x86_64 1.0.13-11.el7 base 30 k
gstreamer1 x86_64 1.10.4-2.el7 base 1.2 M
gtk-update-icon-cache x86_64 3.22.30-5.el7 base 27 k
gtk3 x86_64 3.22.30-5.el7 base 4.4 M
harfbuzz x86_64 1.7.5-2.el7 base 267 k
hicolor-icon-theme noarch 0.12-7.el7 base 42 k
jasper-libs x86_64 1.900.1-33.el7 base 150 k
jbigkit-libs x86_64 2.0-11.el7 base 46 k
json-glib x86_64 1.4.2-2.el7 base 134 k
lcms2 x86_64 2.6-3.el7 base 150 k
libICE x86_64 1.0.9-9.el7 base 66 k
libSM x86_64 1.2.2-2.el7 base 39 k
libX11 x86_64 1.6.7-2.el7 base 607 k
libX11-common noarch 1.6.7-2.el7 base 164 k
libXau x86_64 1.0.8-2.1.el7 base 29 k
libXcomposite x86_64 0.4.4-4.1.el7 base 22 k
libXcursor x86_64 1.1.15-1.el7 base 30 k
libXdamage x86_64 1.1.4-4.1.el7 base 20 k
libXext x86_64 1.3.3-3.el7 base 39 k
libXfixes x86_64 5.0.3-1.el7 base 18 k
libXft x86_64 2.3.2-2.el7 base 58 k
libXi x86_64 1.7.9-1.el7 base 40 k
libXinerama x86_64 1.1.3-2.1.el7 base 14 k
libXrandr x86_64 1.5.1-2.el7 base 27 k
libXrender x86_64 0.9.10-1.el7 base 26 k
libXtst x86_64 1.2.3-1.el7 base 20 k
libXxf86vm x86_64 1.1.4-1.el7 base 18 k
libasyncns x86_64 0.8-7.el7 base 26 k
libcanberra x86_64 0.30-9.el7 base 82 k
libcanberra-gtk3 x86_64 0.30-9.el7 base 31 k
libcgroup x86_64 0.41-21.el7 base 66 k
libepoxy x86_64 1.5.2-1.el7 base 211 k
libglvnd x86_64 1:1.0.1-0.8.git5baa1e5.el7 base 89 k
libglvnd-egl x86_64 1:1.0.1-0.8.git5baa1e5.el7 base 44 k
libglvnd-glx x86_64 1:1.0.1-0.8.git5baa1e5.el7 base 125 k
libgusb x86_64 0.2.9-1.el7 base 40 k
libjpeg-turbo x86_64 1.2.90-8.el7 base 135 k
libmodman x86_64 2.0.1-8.el7 base 28 k
libogg x86_64 2:1.3.0-7.el7 base 24 k
libproxy x86_64 0.4.11-11.el7 base 64 k
libsemanage-python x86_64 2.5-14.el7 base 113 k
libsndfile x86_64 1.0.25-11.el7 base 149 k
libsoup x86_64 2.62.2-2.el7 base 411 k
libtdb x86_64 1.3.18-1.el7 base 49 k
libthai x86_64 0.1.14-9.el7 base 187 k
libtiff x86_64 4.0.3-32.el7 base 171 k
libtool-ltdl x86_64 2.4.2-22.el7_3 base 49 k
libusbx x86_64 1.0.21-1.el7 base 61 k
libvorbis x86_64 1:1.3.3-8.el7.1 base 204 k
libwayland-client x86_64 1.15.0-1.el7 base 33 k
libwayland-cursor x86_64 1.15.0-1.el7 base 20 k
libwayland-egl x86_64 1.15.0-1.el7 base 13 k
libwayland-server x86_64 1.15.0-1.el7 base 39 k
libxcb x86_64 1.13-1.el7 base 214 k
libxkbcommon x86_64 0.7.1-3.el7 base 108 k
libxshmfence x86_64 1.2-1.el7 base 7.2 k
libxslt x86_64 1.1.28-5.el7 base 242 k
mesa-libEGL x86_64 18.3.4-7.el7_8.1 updates 109 k
mesa-libGL x86_64 18.3.4-7.el7_8.1 updates 165 k
mesa-libgbm x86_64 18.3.4-7.el7_8.1 updates 39 k
mesa-libglapi x86_64 18.3.4-7.el7_8.1 updates 46 k
minizip x86_64 1.2.7-18.el7 base 34 k
nettle x86_64 2.7.1-8.el7 base 327 k
nss-mdns x86_64 0.14.1-9.el7 epel 43 k
pango x86_64 1.42.4-4.el7_7 base 280 k
pixman x86_64 0.34.0-1.el7 base 248 k
policycoreutils-python x86_64 2.5-34.el7 base 457 k
pulseaudio-libs x86_64 10.0-5.el7 base 651 k
python-IPy noarch 0.75-6.el7 base 32 k
rest x86_64 0.8.1-2.el7 base 63 k
setools-libs x86_64 3.3.8-4.el7 base 620 k
sound-theme-freedesktop noarch 0.8-3.el7 base 377 k
trousers x86_64 0.3.14-2.el7 base 289 k
xkeyboard-config noarch 2.24-1.el7 base 834 k
トランザクションの要約
==================================================================================================================================================================================================
インストール 1 パッケージ (+100 個の依存関係のパッケージ)
総ダウンロード容量: 147 M
インストール容量: 504 M
Is this ok [y/d/N]:
# yum install firefox
<略>

依存性を解決しました

==================================================================================================================================================================================================
 Package                                                アーキテクチャー                      バージョン                                             リポジトリー                            容量
==================================================================================================================================================================================================
インストール中:
 firefox                                                x86_64                                68.12.0-1.el7.centos                                   updates                                 93 M
依存性関連でのインストールをします:
 centos-indexhtml                                       noarch                                7-9.el7.centos                                         base                                    92 k
 gtk2                                                   x86_64                                2.24.31-1.el7                                          base                                   3.4 M
 libXt                                                  x86_64                                1.1.5-3.el7                                            base                                   173 k
 liberation-fonts-common                                noarch                                1:1.07.2-16.el7                                        base                                    27 k
 liberation-sans-fonts                                  noarch                                1:1.07.2-16.el7                                        base                                   279 k
 mozilla-filesystem                                     x86_64                                1.9-11.el7                                             base                                   5.3 k
 startup-notification                                   x86_64                                0.12-8.el7                                             base                                    39 k
 xcb-util                                               x86_64                                0.4.0-2.el7                                            base                                    16 k

トランザクションの要約
==================================================================================================================================================================================================
インストール  1 パッケージ (+8 個の依存関係のパッケージ)

総ダウンロード容量: 97 M
インストール容量: 238 M
Is this ok [y/d/N]:
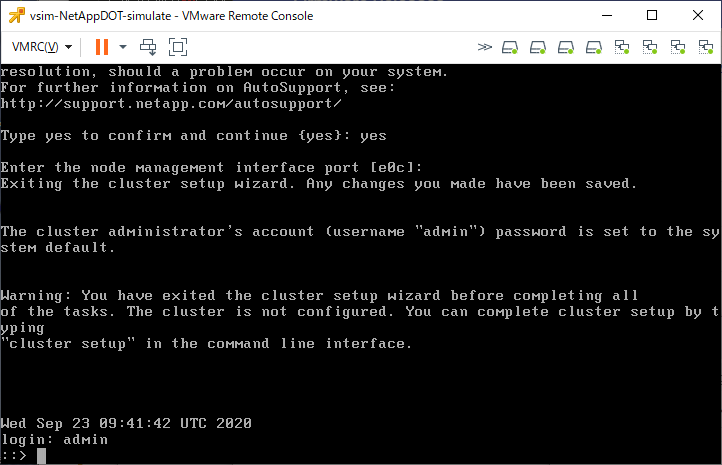
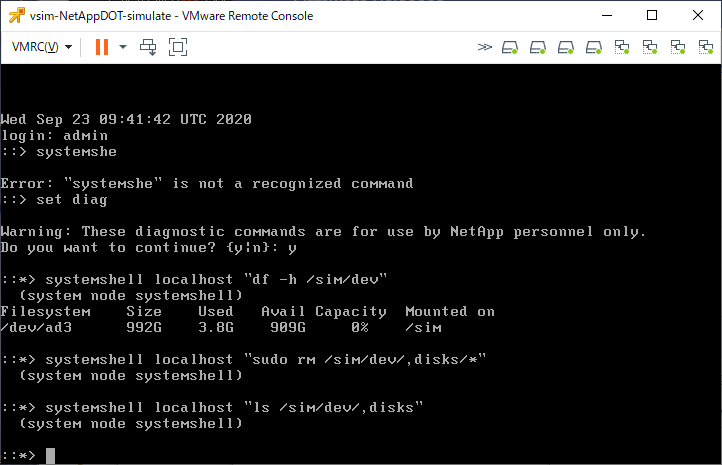
::> set diag

Warning: These diagnostic commands are for use by NetApp personnel only.
Do you want to continue? {y|n}: y

::*> system node systemshell local "df -h /sim/dev"
Filesystem    Size    Used   Avail Capacity  Mounted on
/dev/ad3      223G     11G    194G     5%    /sim
::*>