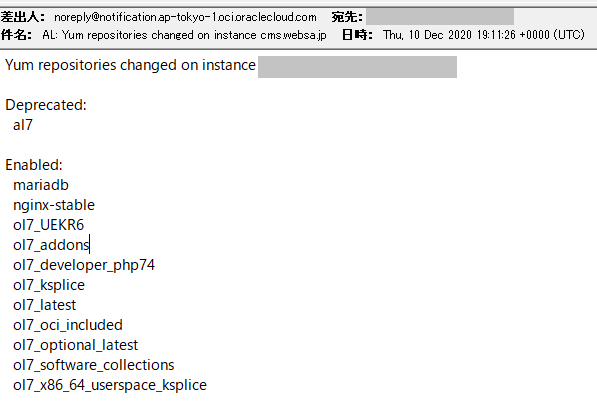
CentOS8からOracle Linux 8に移行するための公式手順が先ほど公開されました。
既存の「Oracle Linux: A better alternative to CentOS」の対応OSにCentOS8が加わりました。また、centos2ol.shのGithubでの開発公開もスタートしました。
というわけで、公式 centos2ol.sh を実行した場合の手順です。
過去事例1:CentOS8をOracleLinux8に変えようとして失敗した
過去事例2:CentOS8からOracle Linux 8への移行1(非推奨
過去事例3:CentOS8からOracle Linux 8への移行2(成功例/非公式手順/EFI環境用
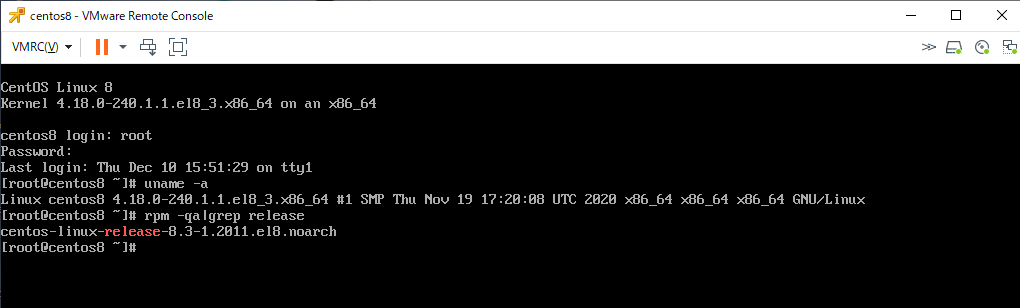
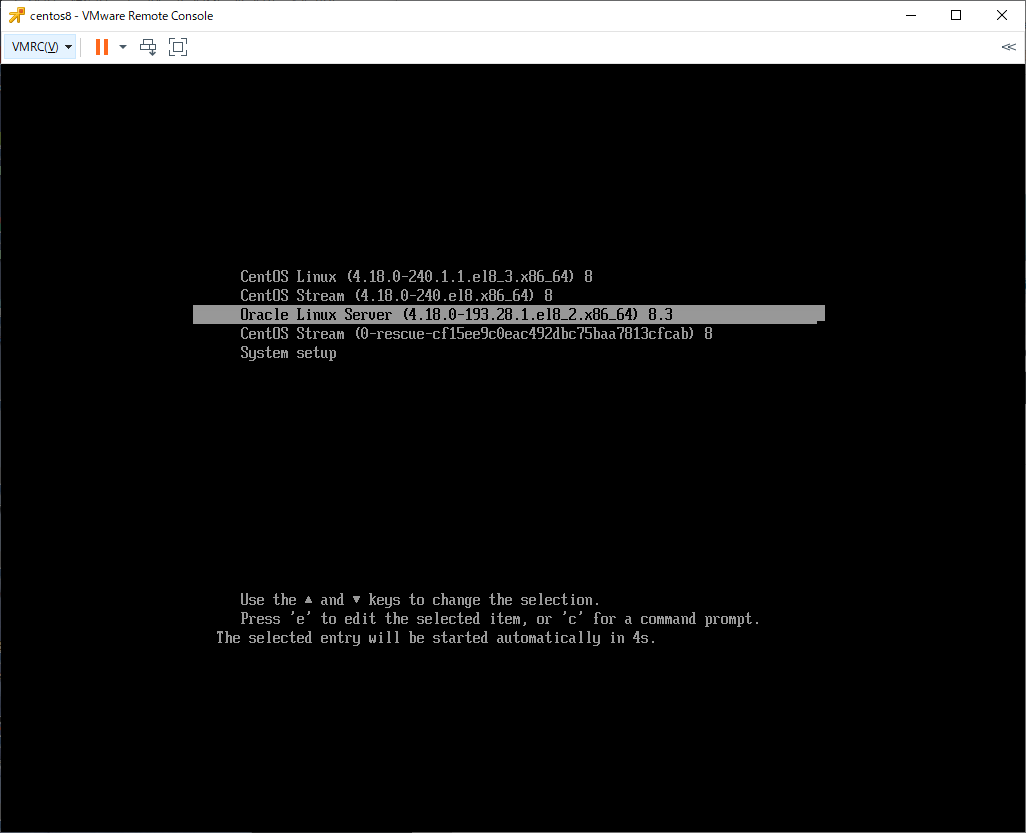
(1) CentOS8を用意
CentOS8の最新版を最小インストールで用意した。
[root@centos8 ~]# uname -a
Linux centos8 4.18.0-240.1.1.el8_3.x86_64 #1 SMP Thu Nov 19 17:20:08 UTC 2020 x86_64 x86_64 x86_64 GNU/Linux
[root@centos8 ~]# rpm -qa|grep release
centos-linux-release-8.3-1.2011.el8.noarch
[root@centos8 ~]#
現状の/etc/yum.repos.d/ の中身は下記の状態。
[root@centos8 ~]# ls -l /etc/yum.repos.d/
合計 48
-rw-r--r--. 1 root root  719 11月 10 09:32 CentOS-Linux-AppStream.repo
-rw-r--r--. 1 root root  704 11月 10 09:32 CentOS-Linux-BaseOS.repo
-rw-r--r--. 1 root root 1130 11月 10 09:32 CentOS-Linux-ContinuousRelease.repo
-rw-r--r--. 1 root root  318 11月 10 09:32 CentOS-Linux-Debuginfo.repo
-rw-r--r--. 1 root root  732 11月 10 09:32 CentOS-Linux-Devel.repo
-rw-r--r--. 1 root root  704 11月 10 09:32 CentOS-Linux-Extras.repo
-rw-r--r--. 1 root root  719 11月 10 09:32 CentOS-Linux-FastTrack.repo
-rw-r--r--. 1 root root  740 11月 10 09:32 CentOS-Linux-HighAvailability.repo
-rw-r--r--. 1 root root  693 11月 10 09:32 CentOS-Linux-Media.repo
-rw-r--r--. 1 root root  706 11月 10 09:32 CentOS-Linux-Plus.repo
-rw-r--r--. 1 root root  724 11月 10 09:32 CentOS-Linux-PowerTools.repo
-rw-r--r--. 1 root root  898 11月 10 09:32 CentOS-Linux-Sources.repo
[root@centos8 ~]#
(2) 移行用スクリプトcentos2ol.shをgithubからダウンロード
Githubの https://github.com/oracle/centos2ol で公開されている centos2ol.sh をダウンロードする。
[root@centos8 ~]# curl -O https://raw.githubusercontent.com/oracle/centos2ol/main/centos2ol.sh
  % Total    % Received % Xferd  Average Speed   Time    Time     Time  Current
                                 Dload  Upload   Total   Spent    Left  Speed
100 16065  100 16065    0     0  17442      0 --:--:-- --:--:-- --:--:-- 17424
[root@centos8 ~]# ls -l centos2ol.sh
-rw-r--r--. 1 root root 16065 12月 16 09:24 centos2ol.sh
[root@centos8 ~]#
(3) centos2ol.sh の実行
一般ユーザであれば「sudo bash centos2ol.sh」、rootユーザであれば「bash centos2ol.sh」を実行する。
内部でdistro-syncというCentOS8由来のパッケージをOracle Linux 8のパッケージに置き換える操作を実行しているので、Oracle Linux 8パッケージのダウンロードとインストールに時間がかかる。
[root@centos8 ~]# bash centos2ol.sh
Checking for required packages...
Checking your distribution...
Checking for yum lock...
Checking for required python packages...
Finding your repository directory...
Learning which repositories are enabled...
Repositories enabled before update include:
appstream
baseos
extras
Looking for yumdownloader...
メタデータの期限切れの最終確認: 0:00:02 時間前の 2020年12月16日 09時24分48秒 に実施しました。
依存関係が解決しました。
===============================================================================================================================================
 パッケージ                        アーキテクチャー               バージョン                              リポジトリー                   サイズ
===============================================================================================================================================
インストール:
 yum-utils                         noarch                         4.0.17-5.el8                            baseos                          68 k

トランザクションの概要
===============================================================================================================================================
インストール  1 パッケージ

ダウンロードサイズの合計: 68 k
インストール済みのサイズ: 20 k
パッケージのダウンロード:
yum-utils-4.0.17-5.el8.noarch.rpm                                                                              446 kB/s |  68 kB     00:00
-----------------------------------------------------------------------------------------------------------------------------------------------
合計                                                                                                           137 kB/s |  68 kB     00:00
トランザクションの確認を実行中
トランザクションの確認に成功しました。
トランザクションのテストを実行中
トランザクションのテストに成功しました。
トランザクションを実行中
  準備             :                                                                                                                       1/1
  インストール     : yum-utils-4.0.17-5.el8.noarch                                                                                         1/1
  scriptletの実行中: yum-utils-4.0.17-5.el8.noarch                                                                                         1/1
  検証             : yum-utils-4.0.17-5.el8.noarch                                                                                         1/1

インストール済み:
  yum-utils-4.0.17-5.el8.noarch

完了しました!
Backing up and removing old repository files...
Downloading Oracle Linux release package...
Oracle Linux 8 BaseOS Latest (x86_64)                                                                          8.0 MB/s |  27 MB     00:03
Oracle Linux 8 Application Stream (x86_64)                                                                     3.5 MB/s |  21 MB     00:06
Latest Unbreakable Enterprise Kernel Release 6 for Oracle Linux 8 (x86_64)                                     6.7 MB/s |  12 MB     00:01
メタデータの期限切れの最終確認: 0:00:04 時間前の 2020年12月16日 09時25分19秒 に実施しました。
(1/3): oraclelinux-release-el8-1.0-14.el8.x86_64.rpm                                                           116 kB/s |  18 kB     00:00
(2/3): redhat-release-8.3-1.0.0.1.el8.x86_64.rpm                                                               104 kB/s |  17 kB     00:00
(3/3): oraclelinux-release-8.3-1.0.4.el8.x86_64.rpm                                                            298 kB/s |  71 kB     00:00
Switching old release package with Oracle Linux...
警告: oraclelinux-release-8.3-1.0.4.el8.x86_64.rpm: ヘッダー V3 RSA/SHA256 Signature、鍵 ID ad986da3: NOKEY
警告: ファイル /etc/yum.repos.d/CentOS-Linux-Sources.repo: 削除に失敗しました: そのようなファイルやディレクトリはありません
警告: ファイル /etc/yum.repos.d/CentOS-Linux-PowerTools.repo: 削除に失敗しました: そのようなファイルやディレクトリはありません
警告: ファイル /etc/yum.repos.d/CentOS-Linux-Plus.repo: 削除に失敗しました: そのようなファイルやディレクトリはありません
警告: ファイル /etc/yum.repos.d/CentOS-Linux-Media.repo: 削除に失敗しました: そのようなファイルやディレクトリはありません
警告: ファイル /etc/yum.repos.d/CentOS-Linux-HighAvailability.repo: 削除に失敗しました: そのようなファイルやディレクトリはありません
警告: ファイル /etc/yum.repos.d/CentOS-Linux-FastTrack.repo: 削除に失敗しました: そのようなファイルやディレクトリはありません
警告: ファイル /etc/yum.repos.d/CentOS-Linux-Extras.repo: 削除に失敗しました: そのようなファイルやディレクトリはありません
警告: ファイル /etc/yum.repos.d/CentOS-Linux-Devel.repo: 削除に失敗しました: そのようなファイルやディレクトリはありません
警告: ファイル /etc/yum.repos.d/CentOS-Linux-Debuginfo.repo: 削除に失敗しました: そのようなファイルやディレクトリはありません
警告: ファイル /etc/yum.repos.d/CentOS-Linux-ContinuousRelease.repo: 削除に失敗しました: そのようなファイルやディレクトリはありません
警告: ファイル /etc/yum.repos.d/CentOS-Linux-BaseOS.repo: 削除に失敗しました: そのようなファイルやディレクトリはありません
警告: ファイル /etc/yum.repos.d/CentOS-Linux-AppStream.repo: 削除に失敗しました: そのようなファイルやディレクトリはありません
Installing base packages for Oracle Linux...
メタデータの期限切れの最終確認: 0:00:10 時間前の 2020年12月16日 09時25分19秒 に実施しました。
> 一致した引数がありません: centos-backgrounds
一致した引数がありません: centos-logos
一致した引数がありません: centos-release-cr
一致した引数がありません: desktop-backgrounds-basic
一致した引数がありません: centos-release-advanced-virtualization
一致した引数がありません: centos-release-ansible26
一致した引数がありません: centos-release-ansible-27
一致した引数がありません: centos-release-ansible-28
一致した引数がありません: centos-release-ansible-29
一致した引数がありません: centos-release-azure
一致した引数がありません: centos-release-ceph-jewel
一致した引数がありません: centos-release-ceph-luminous
一致した引数がありません: centos-release-ceph-nautilus
一致した引数がありません: centos-release-ceph-octopus
一致した引数がありません: centos-release-configmanagement
一致した引数がありません: centos-release-dotnet
一致した引数がありません: centos-release-fdio
一致した引数がありません: centos-release-gluster40
一致した引数がありません: centos-release-gluster41
一致した引数がありません: centos-release-gluster5
一致した引数がありません: centos-release-gluster6
一致した引数がありません: centos-release-gluster7
一致した引数がありません: centos-release-gluster8
一致した引数がありません: centos-release-gluster-legacy
一致した引数がありません: centos-release-messaging
一致した引数がありません: centos-release-nfs-ganesha28
一致した引数がありません: centos-release-nfs-ganesha30
一致した引数がありません: centos-release-nfv-common
一致した引数がありません: centos-release-nfv-openvswitch
一致した引数がありません: centos-release-openshift-origin
一致した引数がありません: centos-release-openstack-queens
一致した引数がありません: centos-release-openstack-rocky
一致した引数がありません: centos-release-openstack-stein
一致した引数がありません: centos-release-openstack-train
一致した引数がありません: centos-release-openstack-ussuri
一致した引数がありません: centos-release-opstools
一致した引数がありません: centos-release-ovirt42
一致した引数がありません: centos-release-ovirt43
一致した引数がありません: centos-release-ovirt44
一致した引数がありません: centos-release-paas-common
一致した引数がありません: centos-release-qemu-ev
一致した引数がありません: centos-release-qpid-proton
一致した引数がありません: centos-release-rabbitmq-38
一致した引数がありません: centos-release-samba411
一致した引数がありません: centos-release-samba412
一致した引数がありません: centos-release-scl
一致した引数がありません: centos-release-scl-rh
一致した引数がありません: centos-release-storage-common
一致した引数がありません: centos-release-virt-common
一致した引数がありません: centos-release-xen
一致した引数がありません: centos-release-xen-410
一致した引数がありません: centos-release-xen-412
一致した引数がありません: centos-release-xen-46
一致した引数がありません: centos-release-xen-48
一致した引数がありません: centos-release-xen-common
一致した引数がありません: libreport-centos
一致した引数がありません: libreport-plugin-mantisbt
一致した引数がありません: libreport-plugin-rhtsupport
一致した引数がありません: python-oauth
一致した引数がありません: sl-logos
一致した引数がありません: yum-rhn-plugin
> パッケージ basesystem-11-5.el8.noarch は既にインストールされています。
パッケージ initscripts-10.00.9-1.el8.x86_64 は既にインストールされています。
パッケージ plymouth-0.9.4-7.20200615git1e36e30.el8.x86_64 は既にインストールされています。
パッケージ grubby-8.40-41.el8.x86_64 は既にインストールされています。
> ===============================================================================================================================================
 パッケージ                        アーキテクチャー    バージョン                                         リポジトリー                   サイズ
===============================================================================================================================================
インストール:
 grub2-pc                          x86_64              1:2.02-90.0.1.el8                                  ol8_baseos_latest               40 k
 kernel-uek                        x86_64              5.4.17-2036.101.2.el8uek                           ol8_UEKR6                       61 M
 oracle-logos                      x86_64              80.5-1.0.6.el8                                     ol8_baseos_latest              1.4 M
アップグレード:
 grub2-common                      noarch              1:2.02-90.0.1.el8                                  ol8_baseos_latest              885 k
 grub2-efi-x64                     x86_64              1:2.02-90.0.1.el8                                  ol8_baseos_latest              409 k
 grub2-tools                       x86_64              1:2.02-90.0.1.el8                                  ol8_baseos_latest              2.0 M
 grub2-tools-extra                 x86_64              1:2.02-90.0.1.el8                                  ol8_baseos_latest              1.1 M
 grub2-tools-minimal               x86_64              1:2.02-90.0.1.el8                                  ol8_baseos_latest              205 k
 grubby                            x86_64              8.40-41.0.1.el8                                    ol8_baseos_latest               50 k
 linux-firmware                    noarch              999:20200902-999.5.gitd5f9eea5.el8                 ol8_baseos_latest              122 M
 plymouth                          x86_64              0.9.4-7.20200615git1e36e30.0.1.el8                 ol8_appstream                  127 k
 tuned                             noarch              2.14.0-3.0.1.el8                                   ol8_baseos_latest              294 k
依存関係のインストール:
 grub2-pc-modules                  noarch              1:2.02-90.0.1.el8                                  ol8_baseos_latest              869 k
 grub2-tools-efi                   x86_64              1:2.02-90.0.1.el8                                  ol8_baseos_latest              470 k
削除中:
 centos-linux-release              noarch              8.3-1.2011.el8                                     @anaconda                       25 k
 python3-syspurpose                x86_64              1.27.16-1.el8                                      @anaconda                      135 k

トランザクションの概要
===============================================================================================================================================
インストール    5 パッケージ
アップグレード  9 パッケージ
削除            2 パッケージ

ダウンロードサイズの合計: 191 M
パッケージのダウンロード:
(1/14): grub2-pc-2.02-90.0.1.el8.x86_64.rpm                                                                    450 kB/s |  40 kB     00:00
(2/14): grub2-tools-efi-2.02-90.0.1.el8.x86_64.rpm                                                             2.3 MB/s | 470 kB     00:00
(3/14): oracle-logos-80.5-1.0.6.el8.x86_64.rpm                                                                 2.8 MB/s | 1.4 MB     00:00
(4/14): grub2-pc-modules-2.02-90.0.1.el8.noarch.rpm                                                            1.4 MB/s | 869 kB     00:00
(5/14): grubby-8.40-41.0.1.el8.x86_64.rpm                                                                      1.2 MB/s |  50 kB     00:00
(6/14): grub2-tools-extra-2.02-90.0.1.el8.x86_64.rpm                                                           1.3 MB/s | 1.1 MB     00:00
(7/14): tuned-2.14.0-3.0.1.el8.noarch.rpm                                                                      768 kB/s | 294 kB     00:00
(8/14): grub2-efi-x64-2.02-90.0.1.el8.x86_64.rpm                                                               775 kB/s | 409 kB     00:00
(9/14): grub2-common-2.02-90.0.1.el8.noarch.rpm                                                                922 kB/s | 885 kB     00:00
(10/14): grub2-tools-2.02-90.0.1.el8.x86_64.rpm                                                                805 kB/s | 2.0 MB     00:02
(11/14): grub2-tools-minimal-2.02-90.0.1.el8.x86_64.rpm                                                        522 kB/s | 205 kB     00:00
(12/14): plymouth-0.9.4-7.20200615git1e36e30.0.1.el8.x86_64.rpm                                                613 kB/s | 127 kB     00:00
(13/14): linux-firmware-20200902-999.5.gitd5f9eea5.el8.noarch.rpm                                              7.1 MB/s | 122 MB     00:17
(14/14): kernel-uek-5.4.17-2036.101.2.el8uek.x86_64.rpm                                                        3.0 MB/s |  61 MB     00:20
-----------------------------------------------------------------------------------------------------------------------------------------------
合計                                                                                                           9.4 MB/s | 191 MB     00:20
警告: /var/cache/dnf/ol8_baseos_latest-e4c6155830ad002c/packages/oracle-logos-80.5-1.0.6.el8.x86_64.rpm: ヘッダー V3 RSA/SHA256 Signature、鍵 ID ad986da3: NOKEY
Oracle Linux 8 BaseOS Latest (x86_64)                                                                          3.0 MB/s | 3.1 kB     00:00
GPG 鍵 0xAD986DA3 をインポート中:
 Userid     : "Oracle OSS group (Open Source Software group) <build@oss.oracle.com>"
 Fingerprint: 76FD 3DB1 3AB6 7410 B89D B10E 8256 2EA9 AD98 6DA3
 From       : /etc/pki/rpm-gpg/RPM-GPG-KEY-oracle
鍵のインポートに成功しました
トランザクションの確認を実行中
トランザクションの確認に成功しました。
トランザクションのテストを実行中
トランザクションのテストに成功しました。
トランザクションを実行中
  準備             :                                                                                                                       1/1
  scriptletの実行中: grub2-common-1:2.02-90.0.1.el8.noarch                                                                                 1/1
  アップグレード   : grub2-common-1:2.02-90.0.1.el8.noarch                                                                                1/25
<略>
  検証             : python3-syspurpose-1.27.16-1.el8.x86_64                                                                             25/25

アップグレード済み:
  grub2-common-1:2.02-90.0.1.el8.noarch                                     grub2-efi-x64-1:2.02-90.0.1.el8.x86_64
  grub2-tools-1:2.02-90.0.1.el8.x86_64                                      grub2-tools-extra-1:2.02-90.0.1.el8.x86_64
  grub2-tools-minimal-1:2.02-90.0.1.el8.x86_64                              grubby-8.40-41.0.1.el8.x86_64
  linux-firmware-999:20200902-999.5.gitd5f9eea5.el8.noarch                  plymouth-0.9.4-7.20200615git1e36e30.0.1.el8.x86_64
  tuned-2.14.0-3.0.1.el8.noarch

インストール済み:
  grub2-pc-1:2.02-90.0.1.el8.x86_64               grub2-pc-modules-1:2.02-90.0.1.el8.noarch      grub2-tools-efi-1:2.02-90.0.1.el8.x86_64
  kernel-uek-5.4.17-2036.101.2.el8uek.x86_64      oracle-logos-80.5-1.0.6.el8.x86_64

削除しました:
  centos-linux-release-8.3-1.2011.el8.noarch                              python3-syspurpose-1.27.16-1.el8.x86_64

完了しました!
メタデータの期限切れの最終確認: 0:02:01 時間前の 2020年12月16日 09時25分19秒 に実施しました。
> シェルを終了します
ダウンロード済みのパッケージは、次の正常なトランザクションまでキャッシュに保存されました。
'yum clean packages' を実行することでキャッシュパッケージを削除できます。
Updating initrd...
CentOS8由来のパッケージをOracle Linuxのものに置き換えるdistro-syncを実行
Switch successful. Syncing with Oracle Linux repositories.
メタデータの期限切れの最終確認: 0:02:45 時間前の 2020年12月16日 09時25分19秒 に実施しました。
依存関係が解決しました。
===============================================================================================================================================
パッケージ アーキテクチャー バージョン リポジトリー サイズ
===============================================================================================================================================
アップグレード:
NetworkManager x86_64 1:1.26.0-9.0.2.el8_3 ol8_baseos_latest 2.4 M
NetworkManager-libnm x86_64 1:1.26.0-9.0.2.el8_3 ol8_baseos_latest 1.8 M
NetworkManager-team x86_64 1:1.26.0-9.0.2.el8_3 ol8_baseos_latest 142 k
NetworkManager-tui x86_64 1:1.26.0-9.0.2.el8_3 ol8_baseos_latest 320 k
chrony x86_64 3.5-1.0.1.el8 ol8_baseos_latest 271 k
coreutils x86_64 8.30-8.0.1.el8 ol8_baseos_latest 1.2 M
coreutils-common x86_64 8.30-8.0.1.el8 ol8_baseos_latest 2.0 M
dbus x86_64 1:1.12.8-11.0.1.el8 ol8_baseos_latest 41 k
dbus-common noarch 1:1.12.8-11.0.1.el8 ol8_baseos_latest 45 k
dbus-daemon x86_64 1:1.12.8-11.0.1.el8 ol8_baseos_latest 240 k
dbus-libs x86_64 1:1.12.8-11.0.1.el8 ol8_baseos_latest 183 k
dbus-tools x86_64 1:1.12.8-11.0.1.el8 ol8_baseos_latest 85 k
dbxtool x86_64 8-5.0.1.el8 ol8_baseos_latest 41 k
dracut x86_64 049-95.git20200804.0.2.el8 ol8_baseos_latest 369 k
dracut-config-rescue x86_64 049-95.git20200804.0.2.el8 ol8_baseos_latest 57 k
dracut-network x86_64 049-95.git20200804.0.2.el8 ol8_baseos_latest 105 k
dracut-squash x86_64 049-95.git20200804.0.2.el8 ol8_baseos_latest 58 k
efi-filesystem noarch 3-2.0.2.el8 ol8_baseos_latest 9.0 k
efibootmgr x86_64 16-1.0.1.el8 ol8_baseos_latest 47 k
firewalld noarch 0.8.2-2.0.1.el8 ol8_baseos_latest 487 k
firewalld-filesystem noarch 0.8.2-2.0.1.el8 ol8_baseos_latest 76 k
fuse x86_64 2.9.7-12.0.2.el8 ol8_baseos_latest 84 k
fuse-common x86_64 3.2.1-12.0.2.el8 ol8_baseos_latest 22 k
fuse-libs x86_64 2.9.7-12.0.2.el8 ol8_baseos_latest 104 k
glibc x86_64 2.28-127.0.1.el8 ol8_baseos_latest 3.6 M
glibc-common x86_64 2.28-127.0.1.el8 ol8_baseos_latest 1.3 M
glibc-langpack-ja x86_64 2.28-127.0.1.el8 ol8_baseos_latest 330 k
iproute x86_64 5.4.0-1.0.1.el8 ol8_UEKR6 665 k
iptables x86_64 1.8.4-15.0.1.el8 ol8_baseos_latest 583 k
iptables-ebtables x86_64 1.8.4-15.0.1.el8 ol8_baseos_latest 71 k
iptables-libs x86_64 1.8.4-15.0.1.el8 ol8_baseos_latest 106 k
iwl100-firmware noarch 999:39.31.5.1-999.5.el8 ol8_baseos_latest 151 k
iwl1000-firmware noarch 999:39.31.5.1-999.5.el8 ol8_baseos_latest 215 k
iwl105-firmware noarch 999:18.168.6.1-999.5.el8 ol8_baseos_latest 236 k
iwl135-firmware noarch 999:18.168.6.1-999.5.el8 ol8_baseos_latest 245 k
iwl2000-firmware noarch 999:18.168.6.1-999.5.el8 ol8_baseos_latest 238 k
iwl2030-firmware noarch 999:18.168.6.1-999.5.el8 ol8_baseos_latest 247 k
iwl3160-firmware noarch 999:25.30.13.0-999.5.el8 ol8_baseos_latest 1.6 M
iwl5000-firmware noarch 999:8.83.5.1_1-999.5.el8 ol8_baseos_latest 295 k
iwl5150-firmware noarch 999:8.24.2.2-999.5.el8 ol8_baseos_latest 148 k
iwl6000-firmware noarch 999:9.221.4.1-999.5.el8 ol8_baseos_latest 168 k
iwl6000g2a-firmware noarch 999:18.168.6.1-999.5.el8 ol8_baseos_latest 311 k
iwl6050-firmware noarch 999:41.28.5.1-999.5.el8 ol8_baseos_latest 244 k
iwl7260-firmware noarch 999:25.30.13.0-999.5.el8 ol8_baseos_latest 15 M
kexec-tools x86_64 2.0.20-34.0.2.el8 ol8_baseos_latest 498 k
kmod x86_64 25-16.0.1.el8 ol8_baseos_latest 128 k
kmod-libs x86_64 25-16.0.1.el8 ol8_baseos_latest 70 k
libdnf x86_64 0.48.0-5.0.2.el8 ol8_baseos_latest 650 k
libgcc x86_64 8.3.1-5.1.0.1.el8 ol8_baseos_latest 85 k
libgomp x86_64 8.3.1-5.1.0.1.el8 ol8_baseos_latest 211 k
libkcapi x86_64 1.2.0-2.0.1.el8 ol8_baseos_latest 48 k
libkcapi-hmaccalc x86_64 1.2.0-2.0.1.el8 ol8_baseos_latest 31 k
libreport-filesystem x86_64 2.9.5-15.0.1.el8 ol8_baseos_latest 22 k
libsss_autofs x86_64 2.3.0-9.0.1.el8 ol8_baseos_latest 108 k
libsss_certmap x86_64 2.3.0-9.0.1.el8 ol8_baseos_latest 141 k
libsss_idmap x86_64 2.3.0-9.0.1.el8 ol8_baseos_latest 111 k
libsss_nss_idmap x86_64 2.3.0-9.0.1.el8 ol8_baseos_latest 118 k
libsss_sudo x86_64 2.3.0-9.0.1.el8 ol8_baseos_latest 107 k
libstdc++ x86_64 8.3.1-5.1.0.1.el8 ol8_baseos_latest 458 k
libxml2 x86_64 2.9.7-8.0.1.el8 ol8_baseos_latest 696 k
libxslt x86_64 1.1.32-5.0.1.el8 ol8_baseos_latest 250 k
libzstd x86_64 1.4.4-1.0.1.el8 ol8_baseos_latest 266 k
microcode_ctl x86_64 4:20200609-2.20201027.1.0.1.el8_3 ol8_baseos_latest 4.5 M
mozjs60 x86_64 60.9.0-4.0.1.el8 ol8_baseos_latest 6.6 M
open-vm-tools x86_64 11.1.0-2.0.1.el8 ol8_appstream 716 k
os-prober x86_64 1.74-6.0.1.el8 ol8_baseos_latest 51 k
parted x86_64 3.2-38.0.1.el8 ol8_baseos_latest 556 k
platform-python x86_64 3.6.8-31.0.1.el8 ol8_baseos_latest 83 k
plymouth-core-libs x86_64 0.9.4-7.20200615git1e36e30.0.1.el8 ol8_appstream 122 k
plymouth-scripts x86_64 0.9.4-7.20200615git1e36e30.0.1.el8 ol8_appstream 44 k
policycoreutils x86_64 2.9-9.0.1.el8 ol8_baseos_latest 377 k
polkit x86_64 0.115-11.0.1.el8 ol8_baseos_latest 154 k
polkit-libs x86_64 0.115-11.0.1.el8 ol8_baseos_latest 76 k
python3-firewall noarch 0.8.2-2.0.1.el8 ol8_baseos_latest 392 k
python3-hawkey x86_64 0.48.0-5.0.2.el8 ol8_baseos_latest 112 k
python3-libdnf x86_64 0.48.0-5.0.2.el8 ol8_baseos_latest 757 k
python3-libs x86_64 3.6.8-31.0.1.el8 ol8_baseos_latest 7.8 M
python3-libxml2 x86_64 2.9.7-8.0.1.el8 ol8_baseos_latest 237 k
selinux-policy noarch 3.14.3-54.0.1.el8 ol8_baseos_latest 623 k
selinux-policy-targeted noarch 3.14.3-54.0.1.el8 ol8_baseos_latest 15 M
sssd-client x86_64 2.3.0-9.0.1.el8 ol8_baseos_latest 171 k
sssd-common x86_64 2.3.0-9.0.1.el8 ol8_baseos_latest 1.5 M
sssd-kcm x86_64 2.3.0-9.0.1.el8 ol8_baseos_latest 224 k
sssd-nfs-idmap x86_64 2.3.0-9.0.1.el8 ol8_baseos_latest 105 k
systemd x86_64 239-41.0.1.el8_3 ol8_baseos_latest 3.6 M
systemd-libs x86_64 239-41.0.1.el8_3 ol8_baseos_latest 1.1 M
systemd-pam x86_64 239-41.0.1.el8_3 ol8_baseos_latest 457 k
systemd-udev x86_64 239-41.0.1.el8_3 ol8_baseos_latest 1.3 M
vim-minimal x86_64 2:8.0.1763-15.0.1.el8 ol8_baseos_latest 572 k
xfsprogs x86_64 5.4.0-1.0.1.el8 ol8_UEKR6 1.1 M
再インストール:
acl x86_64 2.2.53-1.el8 ol8_baseos_latest 81 k
audit x86_64 3.0-0.17.20191104git1c2f876.el8 ol8_baseos_latest 254 k
audit-libs x86_64 3.0-0.17.20191104git1c2f876.el8 ol8_baseos_latest 116 k
authselect x86_64 1.2.1-2.el8 ol8_baseos_latest 115 k
authselect-libs x86_64 1.2.1-2.el8 ol8_baseos_latest 211 k
basesystem noarch 11-5.el8 ol8_baseos_latest 10 k
bash x86_64 4.4.19-12.el8 ol8_baseos_latest 1.5 M
bind-export-libs x86_64 32:9.11.20-5.el8 ol8_baseos_latest 1.1 M
biosdevname x86_64 0.7.3-2.el8 ol8_baseos_latest 44 k
brotli x86_64 1.0.6-2.el8 ol8_baseos_latest 322 k
bzip2-libs x86_64 1.0.6-26.el8 ol8_baseos_latest 48 k
c-ares x86_64 1.13.0-5.el8 ol8_baseos_latest 93 k
ca-certificates noarch 2020.2.41-80.0.el8_2 ol8_baseos_latest 391 k
chkconfig x86_64 1.13-2.el8 ol8_baseos_latest 194 k
cpio x86_64 2.12-8.el8 ol8_baseos_latest 265 k
cracklib x86_64 2.9.6-15.el8 ol8_baseos_latest 93 k
cracklib-dicts x86_64 2.9.6-15.el8 ol8_baseos_latest 4.0 M
cronie x86_64 1.5.2-4.el8 ol8_baseos_latest 119 k
cronie-anacron x86_64 1.5.2-4.el8 ol8_baseos_latest 42 k
crontabs noarch 1.11-16.20150630git.el8 ol8_baseos_latest 25 k
crypto-policies noarch 20200713-1.git51d1222.el8 ol8_baseos_latest 62 k
crypto-policies-scripts noarch 20200713-1.git51d1222.el8 ol8_baseos_latest 67 k
cryptsetup-libs x86_64 2.3.3-2.el8 ol8_baseos_latest 470 k
curl x86_64 7.61.1-14.el8 ol8_baseos_latest 353 k
cyrus-sasl-lib x86_64 2.1.27-5.el8 ol8_baseos_latest 123 k
dbus-glib x86_64 0.110-2.el8 ol8_baseos_latest 127 k
device-mapper x86_64 8:1.02.171-5.el8 ol8_baseos_latest 373 k
device-mapper-event x86_64 8:1.02.171-5.el8 ol8_baseos_latest 268 k
device-mapper-event-libs x86_64 8:1.02.171-5.el8 ol8_baseos_latest 267 k
device-mapper-libs x86_64 8:1.02.171-5.el8 ol8_baseos_latest 406 k
device-mapper-persistent-data x86_64 0.8.5-4.el8 ol8_baseos_latest 468 k
dhcp-client x86_64 12:4.3.6-41.el8 ol8_baseos_latest 318 k
dhcp-common noarch 12:4.3.6-41.el8 ol8_baseos_latest 207 k
dhcp-libs x86_64 12:4.3.6-41.el8 ol8_baseos_latest 147 k
diffutils x86_64 3.6-6.el8 ol8_baseos_latest 361 k
dmidecode x86_64 1:3.2-6.el8 ol8_baseos_latest 91 k
dnf noarch 4.2.23-4.el8 ol8_baseos_latest 513 k
dnf-data noarch 4.2.23-4.el8 ol8_baseos_latest 149 k
dnf-plugins-core noarch 4.0.17-5.el8 ol8_baseos_latest 66 k
dosfstools x86_64 4.1-6.el8 ol8_baseos_latest 122 k
e2fsprogs x86_64 1.45.6-1.el8 ol8_baseos_latest 1.0 M
e2fsprogs-libs x86_64 1.45.6-1.el8 ol8_baseos_latest 233 k
efivar x86_64 37-4.el8 ol8_baseos_latest 36 k
efivar-libs x86_64 37-4.el8 ol8_baseos_latest 108 k
elfutils-debuginfod-client x86_64 0.180-1.el8 ol8_baseos_latest 64 k
elfutils-default-yama-scope noarch 0.180-1.el8 ol8_baseos_latest 49 k
elfutils-libelf x86_64 0.180-1.el8 ol8_baseos_latest 214 k
elfutils-libs x86_64 0.180-1.el8 ol8_baseos_latest 293 k
ethtool x86_64 2:5.0-2.el8 ol8_baseos_latest 151 k
expat x86_64 2.2.5-4.el8 ol8_baseos_latest 111 k
file x86_64 5.33-16.el8 ol8_baseos_latest 76 k
file-libs x86_64 5.33-16.el8 ol8_baseos_latest 542 k
filesystem x86_64 3.8-3.el8 ol8_baseos_latest 1.1 M
findutils x86_64 1:4.6.0-20.el8 ol8_baseos_latest 528 k
freetype x86_64 2.9.1-4.el8_3.1 ol8_baseos_latest 394 k
gawk x86_64 4.2.1-1.el8 ol8_baseos_latest 1.1 M
gdbm x86_64 1:1.18-1.el8 ol8_baseos_latest 130 k
gdbm-libs x86_64 1:1.18-1.el8 ol8_baseos_latest 60 k
geolite2-city noarch 20180605-1.el8 ol8_appstream 19 M
geolite2-country noarch 20180605-1.el8 ol8_appstream 1.0 M
gettext x86_64 0.19.8.1-17.el8 ol8_baseos_latest 1.1 M
gettext-libs x86_64 0.19.8.1-17.el8 ol8_baseos_latest 312 k
glib2 x86_64 2.56.4-8.el8 ol8_baseos_latest 2.5 M
gmp x86_64 1:6.1.2-10.el8 ol8_baseos_latest 321 k
gnupg2 x86_64 2.2.20-2.el8 ol8_baseos_latest 2.4 M
gnupg2-smime x86_64 2.2.20-2.el8 ol8_baseos_latest 283 k
gnutls x86_64 3.6.14-6.el8 ol8_baseos_latest 1.0 M
gobject-introspection x86_64 1.56.1-1.el8 ol8_baseos_latest 255 k
gpgme x86_64 1.13.1-3.el8 ol8_baseos_latest 335 k
grep x86_64 3.1-6.el8 ol8_baseos_latest 274 k
groff-base x86_64 1.22.3-18.el8 ol8_baseos_latest 1.0 M
gzip x86_64 1.9-9.el8 ol8_baseos_latest 167 k
hardlink x86_64 1:1.3-6.el8 ol8_baseos_latest 29 k
hdparm x86_64 9.54-2.el8 ol8_baseos_latest 100 k
hostname x86_64 3.20-6.el8 ol8_baseos_latest 32 k
hwdata noarch 0.314-8.6.el8 ol8_baseos_latest 1.6 M
ima-evm-utils x86_64 1.1-5.el8 ol8_baseos_latest 55 k
info x86_64 6.5-6.el8 ol8_baseos_latest 198 k
initscripts x86_64 10.00.9-1.el8 ol8_baseos_latest 338 k
ipcalc x86_64 0.2.4-4.el8 ol8_baseos_latest 38 k
iprutils x86_64 2.4.19-1.el8 ol8_baseos_latest 255 k
ipset x86_64 7.1-1.el8 ol8_baseos_latest 45 k
ipset-libs x86_64 7.1-1.el8 ol8_baseos_latest 71 k
iputils x86_64 20180629-2.el8 ol8_baseos_latest 149 k
irqbalance x86_64 2:1.4.0-4.el8 ol8_baseos_latest 55 k
jansson x86_64 2.11-3.el8 ol8_baseos_latest 46 k
json-c x86_64 0.13.1-0.2.el8 ol8_baseos_latest 40 k
kbd x86_64 2.0.4-10.el8 ol8_baseos_latest 390 k
kbd-legacy noarch 2.0.4-10.el8 ol8_baseos_latest 481 k
kbd-misc noarch 2.0.4-10.el8 ol8_baseos_latest 1.5 M
kernel x86_64 4.18.0-240.1.1.el8_3 ol8_baseos_latest 4.3 M
kernel-core x86_64 4.18.0-240.1.1.el8_3 ol8_baseos_latest 30 M
kernel-modules x86_64 4.18.0-240.1.1.el8_3 ol8_baseos_latest 26 M
kernel-tools x86_64 4.18.0-240.1.1.el8_3 ol8_baseos_latest 4.5 M
kernel-tools-libs x86_64 4.18.0-240.1.1.el8_3 ol8_baseos_latest 4.3 M
keyutils-libs x86_64 1.5.10-6.el8 ol8_baseos_latest 34 k
kpartx x86_64 0.8.4-5.el8 ol8_baseos_latest 108 k
krb5-libs x86_64 1.18.2-5.el8 ol8_baseos_latest 837 k
langpacks-ja noarch 1.0-12.el8 ol8_appstream 9.5 k
less x86_64 530-1.el8 ol8_baseos_latest 164 k
libacl x86_64 2.2.53-1.el8 ol8_baseos_latest 35 k
libaio x86_64 0.3.112-1.el8 ol8_baseos_latest 33 k
libarchive x86_64 3.3.2-9.el8 ol8_baseos_latest 358 k
libassuan x86_64 2.5.1-3.el8 ol8_baseos_latest 83 k
libattr x86_64 2.4.48-3.el8 ol8_baseos_latest 27 k
libbasicobjects x86_64 0.1.1-39.el8 ol8_baseos_latest 31 k
libblkid x86_64 2.32.1-24.el8 ol8_baseos_latest 216 k
libcap x86_64 2.26-4.el8 ol8_baseos_latest 60 k
libcap-ng x86_64 0.7.9-5.el8 ol8_baseos_latest 33 k
libcollection x86_64 0.7.0-39.el8 ol8_baseos_latest 48 k
libcom_err x86_64 1.45.6-1.el8 ol8_baseos_latest 49 k
libcomps x86_64 0.1.11-4.el8 ol8_baseos_latest 81 k
libcroco x86_64 0.6.12-4.el8_2.1 ol8_baseos_latest 113 k
libcurl x86_64 7.61.1-14.el8 ol8_baseos_latest 298 k
libdaemon x86_64 0.14-15.el8 ol8_baseos_latest 36 k
libdb x86_64 5.3.28-39.el8 ol8_baseos_latest 750 k
libdb-utils x86_64 5.3.28-39.el8 ol8_baseos_latest 149 k
libdhash x86_64 0.5.0-39.el8 ol8_baseos_latest 34 k
libdrm x86_64 2.4.101-1.el8 ol8_appstream 165 k
libedit x86_64 3.1-23.20170329cvs.el8 ol8_baseos_latest 102 k
libestr x86_64 0.1.10-1.el8 ol8_appstream 27 k
libevent x86_64 2.1.8-5.el8 ol8_baseos_latest 253 k
libfastjson x86_64 0.99.8-2.el8 ol8_appstream 37 k
libfdisk x86_64 2.32.1-24.el8 ol8_baseos_latest 249 k
libffi x86_64 3.1-22.el8 ol8_baseos_latest 37 k
libgcrypt x86_64 1.8.5-4.el8 ol8_baseos_latest 462 k
libgpg-error x86_64 1.31-1.el8 ol8_baseos_latest 242 k
libidn2 x86_64 2.2.0-1.el8 ol8_baseos_latest 94 k
libini_config x86_64 1.3.1-39.el8 ol8_baseos_latest 70 k
libksba x86_64 1.3.5-7.el8 ol8_baseos_latest 135 k
libldb x86_64 2.1.3-2.el8 ol8_baseos_latest 178 k
libmaxminddb x86_64 1.2.0-10.el8 ol8_appstream 33 k
libmetalink x86_64 0.1.3-7.el8 ol8_baseos_latest 32 k
libmnl x86_64 1.0.4-6.el8 ol8_baseos_latest 30 k
libmodulemd x86_64 2.9.4-2.el8 ol8_baseos_latest 189 k
libmount x86_64 2.32.1-24.el8 ol8_baseos_latest 232 k
libmspack x86_64 0.7-0.3.alpha.el8.4 ol8_appstream 71 k
libndp x86_64 1.7-3.el8 ol8_baseos_latest 41 k
libnetfilter_conntrack x86_64 1.0.6-5.el8 ol8_baseos_latest 65 k
libnfnetlink x86_64 1.0.1-13.el8 ol8_baseos_latest 33 k
libnfsidmap x86_64 1:2.3.3-35.el8 ol8_baseos_latest 119 k
libnftnl x86_64 1.1.5-4.el8 ol8_baseos_latest 83 k
libnghttp2 x86_64 1.33.0-3.el8_2.1 ol8_baseos_latest 77 k
libnl3 x86_64 3.5.0-1.el8 ol8_baseos_latest 323 k
libnl3-cli x86_64 3.5.0-1.el8 ol8_baseos_latest 197 k
libnsl2 x86_64 1.2.0-2.20180605git4a062cf.el8 ol8_baseos_latest 58 k
libpath_utils x86_64 0.2.1-39.el8 ol8_baseos_latest 34 k
libpcap x86_64 14:1.9.1-4.el8 ol8_baseos_latest 166 k
libpciaccess x86_64 0.14-1.el8 ol8_baseos_latest 32 k
libpipeline x86_64 1.5.0-2.el8 ol8_baseos_latest 54 k
libpng x86_64 2:1.6.34-5.el8 ol8_baseos_latest 126 k
libpsl x86_64 0.20.2-6.el8 ol8_baseos_latest 61 k
libpwquality x86_64 1.4.0-9.el8 ol8_baseos_latest 102 k
libref_array x86_64 0.1.5-39.el8 ol8_baseos_latest 33 k
librepo x86_64 1.12.0-2.el8 ol8_baseos_latest 90 k
libseccomp x86_64 2.4.3-1.el8 ol8_baseos_latest 67 k
libsecret x86_64 0.18.6-1.el8 ol8_baseos_latest 163 k
libselinux x86_64 2.9-4.el8_3 ol8_baseos_latest 165 k
libselinux-utils x86_64 2.9-4.el8_3 ol8_baseos_latest 243 k
libsemanage x86_64 2.9-3.el8 ol8_baseos_latest 165 k
libsepol x86_64 2.9-1.el8 ol8_baseos_latest 339 k
libsigsegv x86_64 2.11-5.el8 ol8_baseos_latest 30 k
libsmartcols x86_64 2.32.1-24.el8 ol8_baseos_latest 175 k
libsolv x86_64 0.7.11-1.el8 ol8_baseos_latest 358 k
libss x86_64 1.45.6-1.el8 ol8_baseos_latest 53 k
libssh x86_64 0.9.4-2.el8 ol8_baseos_latest 215 k
libssh-config noarch 0.9.4-2.el8 ol8_baseos_latest 18 k
libsysfs x86_64 2.1.0-24.el8 ol8_baseos_latest 53 k
libtalloc x86_64 2.3.1-2.el8 ol8_baseos_latest 49 k
libtasn1 x86_64 4.13-3.el8 ol8_baseos_latest 76 k
libtdb x86_64 1.4.3-1.el8 ol8_baseos_latest 59 k
libteam x86_64 1.31-2.el8 ol8_baseos_latest 64 k
libtevent x86_64 0.10.2-2.el8 ol8_baseos_latest 49 k
libtirpc x86_64 1.1.4-4.el8 ol8_baseos_latest 112 k
libtool-ltdl x86_64 2.4.6-25.el8 ol8_baseos_latest 58 k
libunistring x86_64 0.9.9-3.el8 ol8_baseos_latest 422 k
libusbx x86_64 1.0.23-4.el8 ol8_baseos_latest 74 k
libuser x86_64 0.62-23.el8 ol8_baseos_latest 417 k
libutempter x86_64 1.1.6-14.el8 ol8_baseos_latest 32 k
libuuid x86_64 2.32.1-24.el8 ol8_baseos_latest 95 k
libverto x86_64 0.3.0-5.el8 ol8_baseos_latest 24 k
libxcrypt x86_64 4.1.1-4.el8 ol8_baseos_latest 73 k
libxkbcommon x86_64 0.9.1-1.el8 ol8_appstream 116 k
libyaml x86_64 0.1.7-5.el8 ol8_baseos_latest 61 k
logrotate x86_64 3.14.0-4.el8 ol8_baseos_latest 86 k
lshw x86_64 B.02.19.2-2.el8 ol8_baseos_latest 341 k
lsscsi x86_64 0.30-1.el8 ol8_baseos_latest 69 k
lua-libs x86_64 5.3.4-11.el8 ol8_baseos_latest 118 k
lvm2 x86_64 8:2.03.09-5.el8 ol8_baseos_latest 1.6 M
lvm2-libs x86_64 8:2.03.09-5.el8 ol8_baseos_latest 1.1 M
lz4-libs x86_64 1.8.3-2.el8 ol8_baseos_latest 66 k
lzo x86_64 2.08-14.el8 ol8_baseos_latest 69 k
man-db x86_64 2.7.6.1-17.el8 ol8_baseos_latest 887 k
memstrack x86_64 0.1.11-1.el8 ol8_baseos_latest 48 k
mokutil x86_64 1:0.3.0-10.el8 ol8_baseos_latest 45 k
mpfr x86_64 3.1.6-1.el8 ol8_baseos_latest 221 k
ncurses x86_64 6.1-7.20180224.el8 ol8_baseos_latest 387 k
ncurses-base noarch 6.1-7.20180224.el8 ol8_baseos_latest 81 k
ncurses-libs x86_64 6.1-7.20180224.el8 ol8_baseos_latest 335 k
nettle x86_64 3.4.1-2.el8 ol8_baseos_latest 300 k
newt x86_64 0.52.20-11.el8 ol8_baseos_latest 122 k
nftables x86_64 1:0.9.3-16.el8 ol8_baseos_latest 312 k
npth x86_64 1.5-4.el8 ol8_baseos_latest 26 k
numactl-libs x86_64 2.0.12-11.el8 ol8_baseos_latest 36 k
openldap x86_64 2.4.46-15.el8 ol8_baseos_latest 351 k
openssh x86_64 8.0p1-5.el8 ol8_baseos_latest 521 k
openssh-clients x86_64 8.0p1-5.el8 ol8_baseos_latest 666 k
openssh-server x86_64 8.0p1-5.el8 ol8_baseos_latest 483 k
openssl x86_64 1:1.1.1g-11.el8 ol8_baseos_latest 706 k
openssl-libs x86_64 1:1.1.1g-11.el8 ol8_baseos_latest 1.5 M
openssl-pkcs11 x86_64 0.4.10-2.el8 ol8_baseos_latest 66 k
p11-kit x86_64 0.23.14-5.el8_0 ol8_baseos_latest 272 k
p11-kit-trust x86_64 0.23.14-5.el8_0 ol8_baseos_latest 139 k
pam x86_64 1.3.1-11.el8 ol8_baseos_latest 738 k
passwd x86_64 0.80-3.el8 ol8_baseos_latest 115 k
pciutils x86_64 3.6.4-2.el8 ol8_baseos_latest 102 k
pciutils-libs x86_64 3.6.4-2.el8 ol8_baseos_latest 54 k
pcre x86_64 8.42-4.el8 ol8_baseos_latest 208 k
pcre2 x86_64 10.32-2.el8 ol8_baseos_latest 246 k
pigz x86_64 2.4-4.el8 ol8_baseos_latest 80 k
pinentry x86_64 1.1.0-2.el8 ol8_appstream 100 k
platform-python-pip noarch 9.0.3-18.el8 ol8_baseos_latest 1.7 M
platform-python-setuptools noarch 39.2.0-6.el8 ol8_baseos_latest 631 k
polkit-pkla-compat x86_64 0.1-12.el8 ol8_baseos_latest 46 k
popt x86_64 1.16-14.el8 ol8_baseos_latest 61 k
prefixdevname x86_64 0.1.0-6.el8 ol8_baseos_latest 427 k
procps-ng x86_64 3.3.15-3.el8 ol8_baseos_latest 328 k
publicsuffix-list-dafsa noarch 20180723-1.el8 ol8_baseos_latest 56 k
python3-configobj noarch 5.0.6-11.el8 ol8_baseos_latest 68 k
python3-dateutil noarch 1:2.6.1-6.el8 ol8_baseos_latest 251 k
python3-dbus x86_64 1.2.4-15.el8 ol8_baseos_latest 134 k
python3-decorator noarch 4.2.1-2.el8 ol8_baseos_latest 27 k
python3-dmidecode x86_64 3.12.2-15.el8 ol8_baseos_latest 94 k
python3-dnf noarch 4.2.23-4.el8 ol8_baseos_latest 526 k
python3-dnf-plugins-core noarch 4.0.17-5.el8 ol8_baseos_latest 221 k
python3-gobject-base x86_64 3.28.3-2.el8 ol8_baseos_latest 313 k
python3-gpg x86_64 1.13.1-3.el8 ol8_baseos_latest 244 k
python3-libcomps x86_64 0.1.11-4.el8 ol8_baseos_latest 52 k
python3-libselinux x86_64 2.9-4.el8_3 ol8_baseos_latest 283 k
python3-linux-procfs noarch 0.6.2-2.el8 ol8_baseos_latest 42 k
python3-nftables x86_64 1:0.9.3-16.el8 ol8_baseos_latest 26 k
python3-perf x86_64 4.18.0-240.1.1.el8_3 ol8_baseos_latest 4.4 M
python3-pip-wheel noarch 9.0.3-18.el8 ol8_baseos_latest 1.0 M
python3-pyudev noarch 0.21.0-7.el8 ol8_baseos_latest 84 k
python3-rpm x86_64 4.14.3-4.el8 ol8_baseos_latest 157 k
python3-schedutils x86_64 0.6-6.el8 ol8_baseos_latest 29 k
python3-setuptools-wheel noarch 39.2.0-6.el8 ol8_baseos_latest 287 k
python3-six noarch 1.11.0-8.el8 ol8_baseos_latest 38 k
python3-slip noarch 0.6.4-11.el8 ol8_baseos_latest 38 k
python3-slip-dbus noarch 0.6.4-11.el8 ol8_baseos_latest 39 k
python3-unbound x86_64 1.7.3-14.el8 ol8_appstream 118 k
readline x86_64 7.0-10.el8 ol8_baseos_latest 199 k
rng-tools x86_64 6.8-3.el8 ol8_baseos_latest 59 k
rootfiles noarch 8.1-22.el8 ol8_baseos_latest 13 k
rpm x86_64 4.14.3-4.el8 ol8_baseos_latest 541 k
rpm-build-libs x86_64 4.14.3-4.el8 ol8_baseos_latest 154 k
rpm-libs x86_64 4.14.3-4.el8 ol8_baseos_latest 338 k
rpm-plugin-selinux x86_64 4.14.3-4.el8 ol8_baseos_latest 75 k
rpm-plugin-systemd-inhibit x86_64 4.14.3-4.el8 ol8_baseos_latest 76 k
rsyslog x86_64 8.1911.0-6.el8 ol8_appstream 732 k
sed x86_64 4.5-2.el8 ol8_baseos_latest 298 k
setup noarch 2.12.2-6.el8 ol8_baseos_latest 181 k
sg3_utils x86_64 1.44-5.el8 ol8_baseos_latest 917 k
sg3_utils-libs x86_64 1.44-5.el8 ol8_baseos_latest 99 k
shadow-utils x86_64 2:4.6-11.el8 ol8_baseos_latest 1.2 M
shared-mime-info x86_64 1.9-3.el8 ol8_baseos_latest 328 k
slang x86_64 2.3.2-3.el8 ol8_baseos_latest 368 k
snappy x86_64 1.1.8-3.el8 ol8_baseos_latest 37 k
sqlite-libs x86_64 3.26.0-11.el8 ol8_baseos_latest 580 k
squashfs-tools x86_64 4.3-19.el8 ol8_baseos_latest 165 k
sudo x86_64 1.8.29-6.el8 ol8_baseos_latest 923 k
tar x86_64 2:1.30-5.el8 ol8_baseos_latest 838 k
teamd x86_64 1.31-2.el8 ol8_baseos_latest 130 k
timedatex x86_64 0.5-3.el8 ol8_baseos_latest 32 k
trousers x86_64 0.3.14-4.el8 ol8_baseos_latest 153 k
trousers-lib x86_64 0.3.14-4.el8 ol8_baseos_latest 168 k
tzdata noarch 2020d-1.el8 ol8_baseos_latest 471 k
unbound-libs x86_64 1.7.3-14.el8 ol8_appstream 500 k
util-linux x86_64 2.32.1-24.el8 ol8_baseos_latest 2.5 M
virt-what x86_64 1.18-6.el8 ol8_baseos_latest 35 k
which x86_64 2.21-12.el8 ol8_baseos_latest 49 k
xkeyboard-config noarch 2.28-1.el8 ol8_appstream 782 k
xmlsec1 x86_64 1.2.25-4.el8 ol8_appstream 191 k
xmlsec1-openssl x86_64 1.2.25-4.el8 ol8_appstream 94 k
xz x86_64 5.2.4-3.el8 ol8_baseos_latest 153 k
xz-libs x86_64 5.2.4-3.el8 ol8_baseos_latest 94 k
yum noarch 4.2.23-4.el8 ol8_baseos_latest 192 k
yum-utils noarch 4.0.17-5.el8 ol8_baseos_latest 68 k
zlib x86_64 1.2.11-16.el8_2 ol8_baseos_latest 102 k
ダウングレード:
shim-x64 x86_64 15-11.0.5 ol8_baseos_latest 656 k
トランザクションの概要
===============================================================================================================================================
アップグレード 90 パッケージ
ダウングレード 1 パッケージ
ダウンロードサイズの合計: 262 M
パッケージのダウンロード:
(1/380): acl-2.2.53-1.el8.x86_64.rpm 646 kB/s | 81 kB 00:00
<略>
検証 : xfsprogs-5.0.0-4.el8.x86_64 760/760
アップグレード済み:
NetworkManager-1:1.26.0-9.0.2.el8_3.x86_64 NetworkManager-libnm-1:1.26.0-9.0.2.el8_3.x86_64
NetworkManager-team-1:1.26.0-9.0.2.el8_3.x86_64 NetworkManager-tui-1:1.26.0-9.0.2.el8_3.x86_64
chrony-3.5-1.0.1.el8.x86_64 coreutils-8.30-8.0.1.el8.x86_64
coreutils-common-8.30-8.0.1.el8.x86_64 dbus-1:1.12.8-11.0.1.el8.x86_64
dbus-common-1:1.12.8-11.0.1.el8.noarch dbus-daemon-1:1.12.8-11.0.1.el8.x86_64
dbus-libs-1:1.12.8-11.0.1.el8.x86_64 dbus-tools-1:1.12.8-11.0.1.el8.x86_64
dbxtool-8-5.0.1.el8.x86_64 dracut-049-95.git20200804.0.2.el8.x86_64
dracut-config-rescue-049-95.git20200804.0.2.el8.x86_64 dracut-network-049-95.git20200804.0.2.el8.x86_64
dracut-squash-049-95.git20200804.0.2.el8.x86_64 efi-filesystem-3-2.0.2.el8.noarch
efibootmgr-16-1.0.1.el8.x86_64 firewalld-0.8.2-2.0.1.el8.noarch
firewalld-filesystem-0.8.2-2.0.1.el8.noarch fuse-2.9.7-12.0.2.el8.x86_64
fuse-common-3.2.1-12.0.2.el8.x86_64 fuse-libs-2.9.7-12.0.2.el8.x86_64
glibc-2.28-127.0.1.el8.x86_64 glibc-common-2.28-127.0.1.el8.x86_64
glibc-langpack-ja-2.28-127.0.1.el8.x86_64 iproute-5.4.0-1.0.1.el8.x86_64
iptables-1.8.4-15.0.1.el8.x86_64 iptables-ebtables-1.8.4-15.0.1.el8.x86_64
iptables-libs-1.8.4-15.0.1.el8.x86_64 iwl100-firmware-999:39.31.5.1-999.5.el8.noarch
iwl1000-firmware-999:39.31.5.1-999.5.el8.noarch iwl105-firmware-999:18.168.6.1-999.5.el8.noarch
iwl135-firmware-999:18.168.6.1-999.5.el8.noarch iwl2000-firmware-999:18.168.6.1-999.5.el8.noarch
iwl2030-firmware-999:18.168.6.1-999.5.el8.noarch iwl3160-firmware-999:25.30.13.0-999.5.el8.noarch
iwl5000-firmware-999:8.83.5.1_1-999.5.el8.noarch iwl5150-firmware-999:8.24.2.2-999.5.el8.noarch
iwl6000-firmware-999:9.221.4.1-999.5.el8.noarch iwl6000g2a-firmware-999:18.168.6.1-999.5.el8.noarch
iwl6050-firmware-999:41.28.5.1-999.5.el8.noarch iwl7260-firmware-999:25.30.13.0-999.5.el8.noarch
kexec-tools-2.0.20-34.0.2.el8.x86_64 kmod-25-16.0.1.el8.x86_64
kmod-libs-25-16.0.1.el8.x86_64 libdnf-0.48.0-5.0.2.el8.x86_64
libgcc-8.3.1-5.1.0.1.el8.x86_64 libgomp-8.3.1-5.1.0.1.el8.x86_64
libkcapi-1.2.0-2.0.1.el8.x86_64 libkcapi-hmaccalc-1.2.0-2.0.1.el8.x86_64
libreport-filesystem-2.9.5-15.0.1.el8.x86_64 libsss_autofs-2.3.0-9.0.1.el8.x86_64
libsss_certmap-2.3.0-9.0.1.el8.x86_64 libsss_idmap-2.3.0-9.0.1.el8.x86_64
libsss_nss_idmap-2.3.0-9.0.1.el8.x86_64 libsss_sudo-2.3.0-9.0.1.el8.x86_64
libstdc++-8.3.1-5.1.0.1.el8.x86_64 libxml2-2.9.7-8.0.1.el8.x86_64
libxslt-1.1.32-5.0.1.el8.x86_64 libzstd-1.4.4-1.0.1.el8.x86_64
microcode_ctl-4:20200609-2.20201027.1.0.1.el8_3.x86_64 mozjs60-60.9.0-4.0.1.el8.x86_64
open-vm-tools-11.1.0-2.0.1.el8.x86_64 os-prober-1.74-6.0.1.el8.x86_64
parted-3.2-38.0.1.el8.x86_64 platform-python-3.6.8-31.0.1.el8.x86_64
plymouth-core-libs-0.9.4-7.20200615git1e36e30.0.1.el8.x86_64 plymouth-scripts-0.9.4-7.20200615git1e36e30.0.1.el8.x86_64
policycoreutils-2.9-9.0.1.el8.x86_64 polkit-0.115-11.0.1.el8.x86_64
polkit-libs-0.115-11.0.1.el8.x86_64 python3-firewall-0.8.2-2.0.1.el8.noarch
python3-hawkey-0.48.0-5.0.2.el8.x86_64 python3-libdnf-0.48.0-5.0.2.el8.x86_64
python3-libs-3.6.8-31.0.1.el8.x86_64 python3-libxml2-2.9.7-8.0.1.el8.x86_64
selinux-policy-3.14.3-54.0.1.el8.noarch selinux-policy-targeted-3.14.3-54.0.1.el8.noarch
sssd-client-2.3.0-9.0.1.el8.x86_64 sssd-common-2.3.0-9.0.1.el8.x86_64
sssd-kcm-2.3.0-9.0.1.el8.x86_64 sssd-nfs-idmap-2.3.0-9.0.1.el8.x86_64
systemd-239-41.0.1.el8_3.x86_64 systemd-libs-239-41.0.1.el8_3.x86_64
systemd-pam-239-41.0.1.el8_3.x86_64 systemd-udev-239-41.0.1.el8_3.x86_64
vim-minimal-2:8.0.1763-15.0.1.el8.x86_64 xfsprogs-5.4.0-1.0.1.el8.x86_64
ダウングレード済み:
shim-x64-15-11.0.5.x86_64
再インストール済み:
acl-2.2.53-1.el8.x86_64 audit-3.0-0.17.20191104git1c2f876.el8.x86_64
audit-libs-3.0-0.17.20191104git1c2f876.el8.x86_64 authselect-1.2.1-2.el8.x86_64
authselect-libs-1.2.1-2.el8.x86_64 basesystem-11-5.el8.noarch
bash-4.4.19-12.el8.x86_64 bind-export-libs-32:9.11.20-5.el8.x86_64
biosdevname-0.7.3-2.el8.x86_64 brotli-1.0.6-2.el8.x86_64
bzip2-libs-1.0.6-26.el8.x86_64 c-ares-1.13.0-5.el8.x86_64
ca-certificates-2020.2.41-80.0.el8_2.noarch chkconfig-1.13-2.el8.x86_64
cpio-2.12-8.el8.x86_64 cracklib-2.9.6-15.el8.x86_64
cracklib-dicts-2.9.6-15.el8.x86_64 cronie-1.5.2-4.el8.x86_64
cronie-anacron-1.5.2-4.el8.x86_64 crontabs-1.11-16.20150630git.el8.noarch
crypto-policies-20200713-1.git51d1222.el8.noarch crypto-policies-scripts-20200713-1.git51d1222.el8.noarch
cryptsetup-libs-2.3.3-2.el8.x86_64 curl-7.61.1-14.el8.x86_64
cyrus-sasl-lib-2.1.27-5.el8.x86_64 dbus-glib-0.110-2.el8.x86_64
device-mapper-8:1.02.171-5.el8.x86_64 device-mapper-event-8:1.02.171-5.el8.x86_64
device-mapper-event-libs-8:1.02.171-5.el8.x86_64 device-mapper-libs-8:1.02.171-5.el8.x86_64
device-mapper-persistent-data-0.8.5-4.el8.x86_64 dhcp-client-12:4.3.6-41.el8.x86_64
dhcp-common-12:4.3.6-41.el8.noarch dhcp-libs-12:4.3.6-41.el8.x86_64
diffutils-3.6-6.el8.x86_64 dmidecode-1:3.2-6.el8.x86_64
dnf-4.2.23-4.el8.noarch dnf-data-4.2.23-4.el8.noarch
dnf-plugins-core-4.0.17-5.el8.noarch dosfstools-4.1-6.el8.x86_64
e2fsprogs-1.45.6-1.el8.x86_64 e2fsprogs-libs-1.45.6-1.el8.x86_64
efivar-37-4.el8.x86_64 efivar-libs-37-4.el8.x86_64
elfutils-debuginfod-client-0.180-1.el8.x86_64 elfutils-default-yama-scope-0.180-1.el8.noarch
elfutils-libelf-0.180-1.el8.x86_64 elfutils-libs-0.180-1.el8.x86_64
ethtool-2:5.0-2.el8.x86_64 expat-2.2.5-4.el8.x86_64
file-5.33-16.el8.x86_64 file-libs-5.33-16.el8.x86_64
filesystem-3.8-3.el8.x86_64 findutils-1:4.6.0-20.el8.x86_64
freetype-2.9.1-4.el8_3.1.x86_64 gawk-4.2.1-1.el8.x86_64
gdbm-1:1.18-1.el8.x86_64 gdbm-libs-1:1.18-1.el8.x86_64
geolite2-city-20180605-1.el8.noarch geolite2-country-20180605-1.el8.noarch
gettext-0.19.8.1-17.el8.x86_64 gettext-libs-0.19.8.1-17.el8.x86_64
glib2-2.56.4-8.el8.x86_64 gmp-1:6.1.2-10.el8.x86_64
gnupg2-2.2.20-2.el8.x86_64 gnupg2-smime-2.2.20-2.el8.x86_64
gnutls-3.6.14-6.el8.x86_64 gobject-introspection-1.56.1-1.el8.x86_64
gpgme-1.13.1-3.el8.x86_64 grep-3.1-6.el8.x86_64
groff-base-1.22.3-18.el8.x86_64 gzip-1.9-9.el8.x86_64
hardlink-1:1.3-6.el8.x86_64 hdparm-9.54-2.el8.x86_64
hostname-3.20-6.el8.x86_64 hwdata-0.314-8.6.el8.noarch
ima-evm-utils-1.1-5.el8.x86_64 info-6.5-6.el8.x86_64
initscripts-10.00.9-1.el8.x86_64 ipcalc-0.2.4-4.el8.x86_64
iprutils-2.4.19-1.el8.x86_64 ipset-7.1-1.el8.x86_64
ipset-libs-7.1-1.el8.x86_64 iputils-20180629-2.el8.x86_64
irqbalance-2:1.4.0-4.el8.x86_64 jansson-2.11-3.el8.x86_64
json-c-0.13.1-0.2.el8.x86_64 kbd-2.0.4-10.el8.x86_64
kbd-legacy-2.0.4-10.el8.noarch kbd-misc-2.0.4-10.el8.noarch
kernel-4.18.0-240.1.1.el8_3.x86_64 kernel-core-4.18.0-240.1.1.el8_3.x86_64
kernel-modules-4.18.0-240.1.1.el8_3.x86_64 kernel-tools-4.18.0-240.1.1.el8_3.x86_64
kernel-tools-libs-4.18.0-240.1.1.el8_3.x86_64 keyutils-libs-1.5.10-6.el8.x86_64
kpartx-0.8.4-5.el8.x86_64 krb5-libs-1.18.2-5.el8.x86_64
langpacks-ja-1.0-12.el8.noarch less-530-1.el8.x86_64
libacl-2.2.53-1.el8.x86_64 libaio-0.3.112-1.el8.x86_64
libarchive-3.3.2-9.el8.x86_64 libassuan-2.5.1-3.el8.x86_64
libattr-2.4.48-3.el8.x86_64 libbasicobjects-0.1.1-39.el8.x86_64
libblkid-2.32.1-24.el8.x86_64 libcap-2.26-4.el8.x86_64
libcap-ng-0.7.9-5.el8.x86_64 libcollection-0.7.0-39.el8.x86_64
libcom_err-1.45.6-1.el8.x86_64 libcomps-0.1.11-4.el8.x86_64
libcroco-0.6.12-4.el8_2.1.x86_64 libcurl-7.61.1-14.el8.x86_64
libdaemon-0.14-15.el8.x86_64 libdb-5.3.28-39.el8.x86_64
libdb-utils-5.3.28-39.el8.x86_64 libdhash-0.5.0-39.el8.x86_64
libdrm-2.4.101-1.el8.x86_64 libedit-3.1-23.20170329cvs.el8.x86_64
libestr-0.1.10-1.el8.x86_64 libevent-2.1.8-5.el8.x86_64
libfastjson-0.99.8-2.el8.x86_64 libfdisk-2.32.1-24.el8.x86_64
libffi-3.1-22.el8.x86_64 libgcrypt-1.8.5-4.el8.x86_64
libgpg-error-1.31-1.el8.x86_64 libidn2-2.2.0-1.el8.x86_64
libini_config-1.3.1-39.el8.x86_64 libksba-1.3.5-7.el8.x86_64
libldb-2.1.3-2.el8.x86_64 libmaxminddb-1.2.0-10.el8.x86_64
libmetalink-0.1.3-7.el8.x86_64 libmnl-1.0.4-6.el8.x86_64
libmodulemd-2.9.4-2.el8.x86_64 libmount-2.32.1-24.el8.x86_64
libmspack-0.7-0.3.alpha.el8.4.x86_64 libndp-1.7-3.el8.x86_64
libnetfilter_conntrack-1.0.6-5.el8.x86_64 libnfnetlink-1.0.1-13.el8.x86_64
libnfsidmap-1:2.3.3-35.el8.x86_64 libnftnl-1.1.5-4.el8.x86_64
libnghttp2-1.33.0-3.el8_2.1.x86_64 libnl3-3.5.0-1.el8.x86_64
libnl3-cli-3.5.0-1.el8.x86_64 libnsl2-1.2.0-2.20180605git4a062cf.el8.x86_64
libpath_utils-0.2.1-39.el8.x86_64 libpcap-14:1.9.1-4.el8.x86_64
libpciaccess-0.14-1.el8.x86_64 libpipeline-1.5.0-2.el8.x86_64
libpng-2:1.6.34-5.el8.x86_64 libpsl-0.20.2-6.el8.x86_64
libpwquality-1.4.0-9.el8.x86_64 libref_array-0.1.5-39.el8.x86_64
librepo-1.12.0-2.el8.x86_64 libseccomp-2.4.3-1.el8.x86_64
libsecret-0.18.6-1.el8.x86_64 libselinux-2.9-4.el8_3.x86_64
libselinux-utils-2.9-4.el8_3.x86_64 libsemanage-2.9-3.el8.x86_64
libsepol-2.9-1.el8.x86_64 libsigsegv-2.11-5.el8.x86_64
libsmartcols-2.32.1-24.el8.x86_64 libsolv-0.7.11-1.el8.x86_64
libss-1.45.6-1.el8.x86_64 libssh-0.9.4-2.el8.x86_64
libssh-config-0.9.4-2.el8.noarch libsysfs-2.1.0-24.el8.x86_64
libtalloc-2.3.1-2.el8.x86_64 libtasn1-4.13-3.el8.x86_64
libtdb-1.4.3-1.el8.x86_64 libteam-1.31-2.el8.x86_64
libtevent-0.10.2-2.el8.x86_64 libtirpc-1.1.4-4.el8.x86_64
libtool-ltdl-2.4.6-25.el8.x86_64 libunistring-0.9.9-3.el8.x86_64
libusbx-1.0.23-4.el8.x86_64 libuser-0.62-23.el8.x86_64
libutempter-1.1.6-14.el8.x86_64 libuuid-2.32.1-24.el8.x86_64
libverto-0.3.0-5.el8.x86_64 libxcrypt-4.1.1-4.el8.x86_64
libxkbcommon-0.9.1-1.el8.x86_64 libyaml-0.1.7-5.el8.x86_64
logrotate-3.14.0-4.el8.x86_64 lshw-B.02.19.2-2.el8.x86_64
lsscsi-0.30-1.el8.x86_64 lua-libs-5.3.4-11.el8.x86_64
lvm2-8:2.03.09-5.el8.x86_64 lvm2-libs-8:2.03.09-5.el8.x86_64
lz4-libs-1.8.3-2.el8.x86_64 lzo-2.08-14.el8.x86_64
man-db-2.7.6.1-17.el8.x86_64 memstrack-0.1.11-1.el8.x86_64
mokutil-1:0.3.0-10.el8.x86_64 mpfr-3.1.6-1.el8.x86_64
ncurses-6.1-7.20180224.el8.x86_64 ncurses-base-6.1-7.20180224.el8.noarch
ncurses-libs-6.1-7.20180224.el8.x86_64 nettle-3.4.1-2.el8.x86_64
newt-0.52.20-11.el8.x86_64 nftables-1:0.9.3-16.el8.x86_64
npth-1.5-4.el8.x86_64 numactl-libs-2.0.12-11.el8.x86_64
openldap-2.4.46-15.el8.x86_64 openssh-8.0p1-5.el8.x86_64
openssh-clients-8.0p1-5.el8.x86_64 openssh-server-8.0p1-5.el8.x86_64
openssl-1:1.1.1g-11.el8.x86_64 openssl-libs-1:1.1.1g-11.el8.x86_64
openssl-pkcs11-0.4.10-2.el8.x86_64 p11-kit-0.23.14-5.el8_0.x86_64
p11-kit-trust-0.23.14-5.el8_0.x86_64 pam-1.3.1-11.el8.x86_64
passwd-0.80-3.el8.x86_64 pciutils-3.6.4-2.el8.x86_64
pciutils-libs-3.6.4-2.el8.x86_64 pcre-8.42-4.el8.x86_64
pcre2-10.32-2.el8.x86_64 pigz-2.4-4.el8.x86_64
pinentry-1.1.0-2.el8.x86_64 platform-python-pip-9.0.3-18.el8.noarch
platform-python-setuptools-39.2.0-6.el8.noarch polkit-pkla-compat-0.1-12.el8.x86_64
popt-1.16-14.el8.x86_64 prefixdevname-0.1.0-6.el8.x86_64
procps-ng-3.3.15-3.el8.x86_64 publicsuffix-list-dafsa-20180723-1.el8.noarch
python3-configobj-5.0.6-11.el8.noarch python3-dateutil-1:2.6.1-6.el8.noarch
python3-dbus-1.2.4-15.el8.x86_64 python3-decorator-4.2.1-2.el8.noarch
python3-dmidecode-3.12.2-15.el8.x86_64 python3-dnf-4.2.23-4.el8.noarch
python3-dnf-plugins-core-4.0.17-5.el8.noarch python3-gobject-base-3.28.3-2.el8.x86_64
python3-gpg-1.13.1-3.el8.x86_64 python3-libcomps-0.1.11-4.el8.x86_64
python3-libselinux-2.9-4.el8_3.x86_64 python3-linux-procfs-0.6.2-2.el8.noarch
python3-nftables-1:0.9.3-16.el8.x86_64 python3-perf-4.18.0-240.1.1.el8_3.x86_64
python3-pip-wheel-9.0.3-18.el8.noarch python3-pyudev-0.21.0-7.el8.noarch
python3-rpm-4.14.3-4.el8.x86_64 python3-schedutils-0.6-6.el8.x86_64
python3-setuptools-wheel-39.2.0-6.el8.noarch python3-six-1.11.0-8.el8.noarch
python3-slip-0.6.4-11.el8.noarch python3-slip-dbus-0.6.4-11.el8.noarch
python3-unbound-1.7.3-14.el8.x86_64 readline-7.0-10.el8.x86_64
rng-tools-6.8-3.el8.x86_64 rootfiles-8.1-22.el8.noarch
rpm-4.14.3-4.el8.x86_64 rpm-build-libs-4.14.3-4.el8.x86_64
rpm-libs-4.14.3-4.el8.x86_64 rpm-plugin-selinux-4.14.3-4.el8.x86_64
rpm-plugin-systemd-inhibit-4.14.3-4.el8.x86_64 rsyslog-8.1911.0-6.el8.x86_64
sed-4.5-2.el8.x86_64 setup-2.12.2-6.el8.noarch
sg3_utils-1.44-5.el8.x86_64 sg3_utils-libs-1.44-5.el8.x86_64
shadow-utils-2:4.6-11.el8.x86_64 shared-mime-info-1.9-3.el8.x86_64
slang-2.3.2-3.el8.x86_64 snappy-1.1.8-3.el8.x86_64
sqlite-libs-3.26.0-11.el8.x86_64 squashfs-tools-4.3-19.el8.x86_64
sudo-1.8.29-6.el8.x86_64 tar-2:1.30-5.el8.x86_64
teamd-1.31-2.el8.x86_64 timedatex-0.5-3.el8.x86_64
trousers-0.3.14-4.el8.x86_64 trousers-lib-0.3.14-4.el8.x86_64
tzdata-2020d-1.el8.noarch unbound-libs-1.7.3-14.el8.x86_64
util-linux-2.32.1-24.el8.x86_64 virt-what-1.18-6.el8.x86_64
which-2.21-12.el8.x86_64 xkeyboard-config-2.28-1.el8.noarch
xmlsec1-1.2.25-4.el8.x86_64 xmlsec1-openssl-1.2.25-4.el8.x86_64
xz-5.2.4-3.el8.x86_64 xz-libs-5.2.4-3.el8.x86_64
yum-4.2.23-4.el8.noarch yum-utils-4.0.17-5.el8.noarch
zlib-1.2.11-16.el8_2.x86_64
完了しました!
パッケージ qemu-guest-agent はインストールされていません。
パッケージ centos-logos-ipa はインストールされていません。
パッケージ centos-logos-httpd はインストールされていません。
最後にOralce Linux UEKのインストール処理を実行
Sync successful. Switching default kernel to the UEK.
メタデータの期限切れの最終確認: 0:09:55 時間前の 2020年12月16日 09時25分19秒 に実施しました。
依存関係が解決しました。
===============================================================================================================================================
パッケージ アーキテクチャー バージョン リポジトリー サイズ
===============================================================================================================================================
再インストール:
kernel-uek x86_64 5.4.17-2036.101.2.el8uek ol8_UEKR6 61 M
トランザクションの概要
===============================================================================================================================================
ダウンロードサイズの合計: 61 M
インストール済みのサイズ: 85 M
パッケージのダウンロード:
kernel-uek-5.4.17-2036.101.2.el8uek.x86_64.rpm 3.6 MB/s | 61 MB 00:16
-----------------------------------------------------------------------------------------------------------------------------------------------
合計 3.6 MB/s | 61 MB 00:16
トランザクションの確認を実行中
トランザクションの確認に成功しました。
トランザクションのテストを実行中
トランザクションのテストに成功しました。
トランザクションを実行中
準備 : 1/1
scriptletの実行中: kernel-uek-5.4.17-2036.101.2.el8uek.x86_64 1/2
再インストール : kernel-uek-5.4.17-2036.101.2.el8uek.x86_64 1/2
scriptletの実行中: kernel-uek-5.4.17-2036.101.2.el8uek.x86_64 1/2
scriptletの実行中: kernel-uek-5.4.17-2036.101.2.el8uek.x86_64 2/2
整理 : kernel-uek-5.4.17-2036.101.2.el8uek.x86_64 2/2
scriptletの実行中: kernel-uek-5.4.17-2036.101.2.el8uek.x86_64 2/2
検証 : kernel-uek-5.4.17-2036.101.2.el8uek.x86_64 1/2
検証 : kernel-uek-5.4.17-2036.101.2.el8uek.x86_64 2/2
再インストール済み:
kernel-uek-5.4.17-2036.101.2.el8uek.x86_64
完了しました!
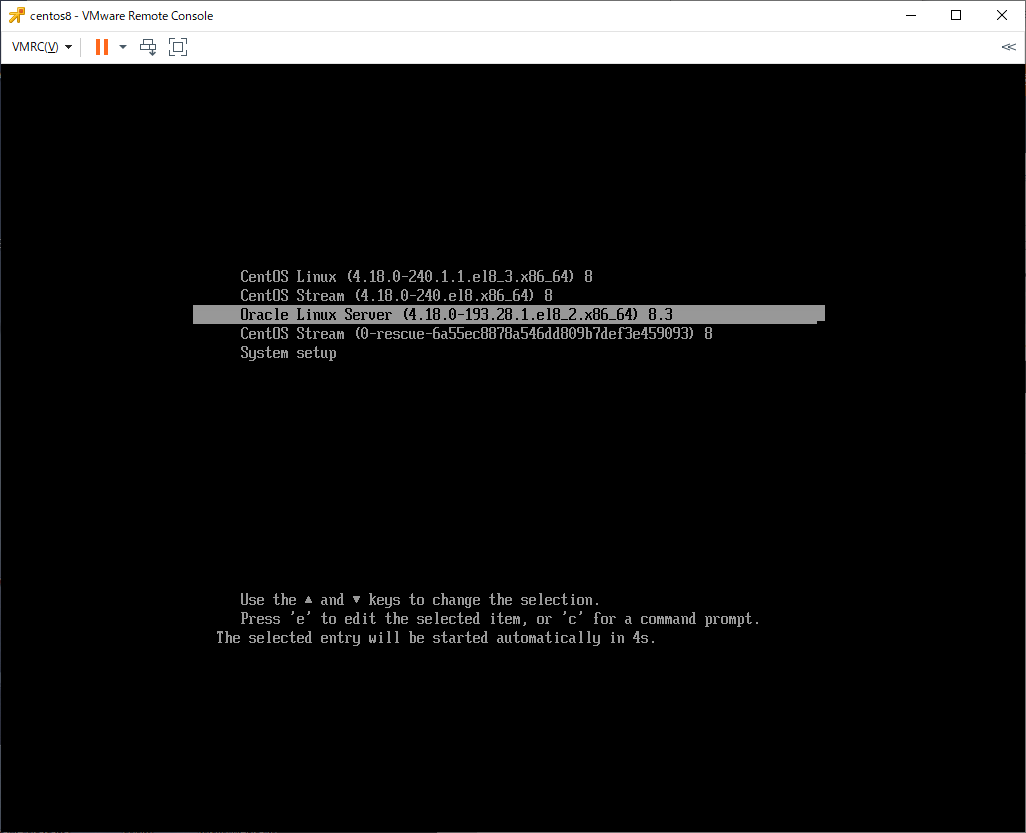
Generating grub configuration file ...
Adding boot menu entry for EFI firmware configuration
done
Removing yum cache
Switch complete. Oracle recommends rebooting this system.
[root@centos8 ~]#
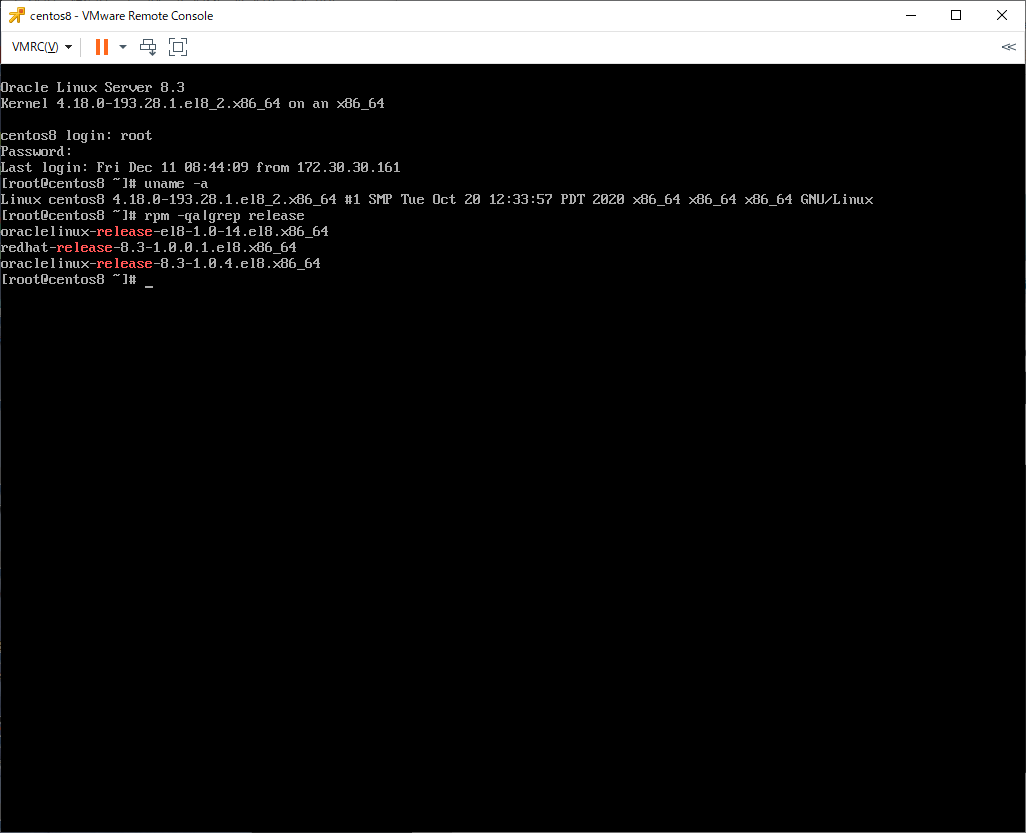
(4) 確認
再起動前に状態を確認してみる。
[root@centos8 ~]# ls -l /etc/yum.repos.d/
合計 56
-rw-r--r--. 1 root root  891 12月 16 09:24 CentOS-Linux-AppStream.repo.disabled
-rw-r--r--. 1 root root  876 12月 16 09:24 CentOS-Linux-BaseOS.repo.disabled
-rw-r--r--. 1 root root 1302 12月 16 09:24 CentOS-Linux-ContinuousRelease.repo.disabled
-rw-r--r--. 1 root root  490 12月 16 09:24 CentOS-Linux-Debuginfo.repo.disabled
-rw-r--r--. 1 root root  904 12月 16 09:24 CentOS-Linux-Devel.repo.disabled
-rw-r--r--. 1 root root  876 12月 16 09:24 CentOS-Linux-Extras.repo.disabled
-rw-r--r--. 1 root root  891 12月 16 09:24 CentOS-Linux-FastTrack.repo.disabled
-rw-r--r--. 1 root root  912 12月 16 09:24 CentOS-Linux-HighAvailability.repo.disabled
-rw-r--r--. 1 root root  865 12月 16 09:24 CentOS-Linux-Media.repo.disabled
-rw-r--r--. 1 root root  878 12月 16 09:24 CentOS-Linux-Plus.repo.disabled
-rw-r--r--. 1 root root  896 12月 16 09:24 CentOS-Linux-PowerTools.repo.disabled
-rw-r--r--. 1 root root 1070 12月 16 09:24 CentOS-Linux-Sources.repo.disabled
-rw-r--r--. 1 root root 1786 11月  4 14:43 oracle-linux-ol8.repo
-rw-r--r--. 1 root root  470 11月  6 11:14 uek-ol8.repo
[root@centos8 ~]# rpm -qa|grep centos
centos-gpg-keys-8-2.el8.noarch
[root@centos8 ~]# rpm -qa|grep release
oraclelinux-release-el8-1.0-14.el8.x86_64
redhat-release-8.3-1.0.0.1.el8.x86_64
oraclelinux-release-8.3-1.0.4.el8.x86_64
[root@centos8 ~]#
CentOS8時代のレポジトリファイルは「.disabled」とリネームされて残っているが、パッケージとしては削除されている。
[root@centos8 ~]# dnf repolist
repo id                                    repo の名前
ol8_UEKR6                                  Latest Unbreakable Enterprise Kernel Release 6 for Oracle Linux 8 (x86_64)
ol8_appstream                              Oracle Linux 8 Application Stream (x86_64)
ol8_baseos_latest                          Oracle Linux 8 BaseOS Latest (x86_64)
[root@centos8 ~]# dnf repolist --all
repo id                                   repo の名前                                                                                    状態
ol8_UEKR6                                 Latest Unbreakable Enterprise Kernel Release 6 for Oracle Linux 8 (x86_64)                     有効化
ol8_UEKR6_RDMA                            Oracle Linux 8 UEK6 RDMA (x86_64)                                                              無効化
ol8_addons                                Oracle Linux 8 Addons (x86_64)                                                                 無効化
ol8_appstream                             Oracle Linux 8 Application Stream (x86_64)                                                     有効化
ol8_baseos_latest                         Oracle Linux 8 BaseOS Latest (x86_64)                                                          有効化
ol8_codeready_builder                     Oracle Linux 8 CodeReady Builder (x86_64) - Unsupported                                        無効化
ol8_u0_baseos_base                        Oracle Linux 8 BaseOS GA (x86_64)                                                              無効化
ol8_u1_baseos_base                        Oracle Linux 8.1 BaseOS (x86_64)                                                               無効化
ol8_u2_baseos_base                        Oracle Linux 8.2 BaseOS (x86_64)                                                               無効化
ol8_u3_baseos_base                        Oracle Linux 8.3 BaseOS (x86_64)                                                               無効化
[root@centos8 ~]#
CentOS8レポジトリ用ファイルがリネームされているので、使える状態ではない。
Grub関連ファイルも置き換わっている
[root@centos8 ~]# ls -l /etc/grub2-efi.cfg
lrwxrwxrwx. 1 root root 31 11月  6 04:56 /etc/grub2-efi.cfg -> ../boot/efi/EFI/redhat/grub.cfg
[root@centos8 ~]# ls -l /boot/efi/EFI/*
/boot/efi/EFI/BOOT:
合計 1548
-rwx------. 1 root root 1216760  7月 25 03:42 BOOTX64.EFI
-rwx------. 1 root root  361600  7月 25 03:42 fbx64.efi

/boot/efi/EFI/centos:
合計 12
-rwx------. 1 root root 6544 12月 16 09:04 grub.cfg
-rwx------. 1 root root 1024 12月 16 09:09 grubenv

/boot/efi/EFI/redhat:
合計 4204
-rwx------. 1 root root     134  7月 25 03:42 BOOTX64.CSV
drwx------. 2 root root    4096 11月  6 04:56 fonts
-rwx------. 1 root root    6545 12月 16 09:36 grub.cfg
-rwx------. 1 root root    1024 12月 16 09:36 grubenv
-rwx------. 1 root root 1895592 11月  6 04:56 grubx64.efi
-rwx------. 1 root root 1165032  7月 25 03:42 mmx64.efi
-rwx------. 1 root root 1216760  7月 25 03:42 shimx64.efi
[root@centos8 ~]#
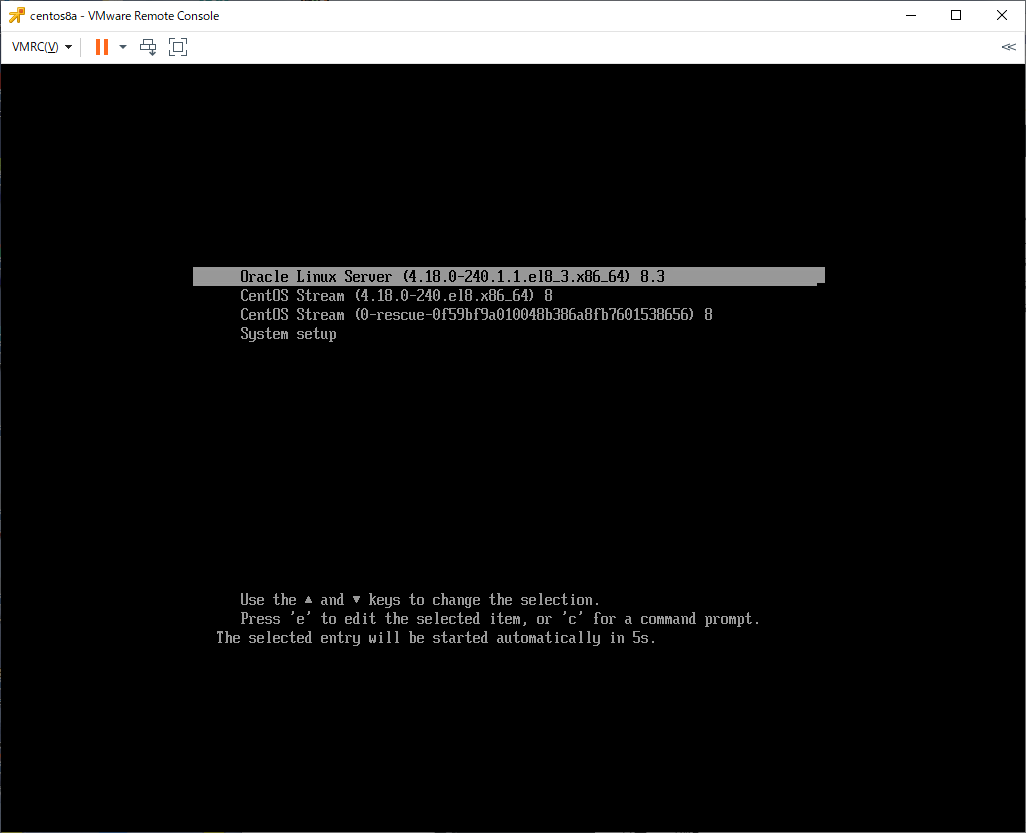
(5) 再起動
サーバを再起動。
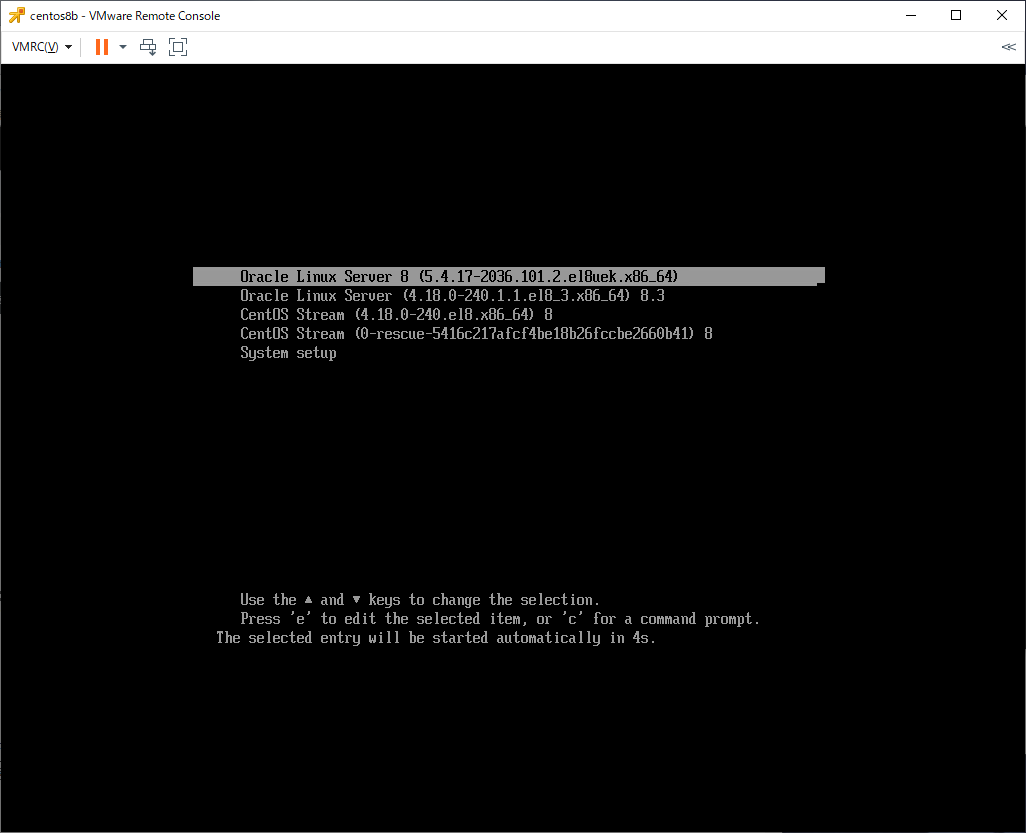
[root@centos8 ~]# uname -a
Linux centos8 5.4.17-2036.101.2.el8uek.x86_64 #2 SMP Wed Dec 2 17:56:10 PST 2020 x86_64 x86_64 x86_64 GNU/Linux
[root@centos8 ~]#
Oracle Linux 8のUEKカーネルで起動していることを確認できました。