Windows Server 2016環境にVMware PowerCLIをインストールしたので、その手順のメモ
なお、2020年4月以降、PowerShell GalleryへのアクセスがTLS 1.2必須となったため、後半に書かれている対処方法を行う必要がある。
(1) PowerShellを起動
(2)「Install-Module -Name VMware.PowerCLI」を実行
途中、NuGetプロバイダーのインストールと、PowerCLIがあるレポジトリの追加が要求されるので、両方許可する。
Windows PowerShell
Copyright (C) 2016 Microsoft Corporation. All rights reserved.

PS C:\Users\Administrator> Install-Module -Name VMware.PowerCLI

続行するには NuGet プロバイダーが必要です
PowerShellGet で NuGet ベースのリポジトリを操作するには、'2.8.5.201' 以降のバージョンの NuGet
プロバイダーが必要です。NuGet プロバイダーは 'C:\Program Files\PackageManagement\ProviderAssemblies' または
'C:\Users\Administrator\AppData\Local\PackageManagement\ProviderAssemblies'
に配置する必要があります。'Install-PackageProvider -Name NuGet -MinimumVersion 2.8.5.201 -Force' を実行して NuGet
プロバイダーをインストールすることもできます。今すぐ PowerShellGet で NuGet
プロバイダーをインストールしてインポートしますか?
[Y] はい(Y)  [N] いいえ(N)  [S] 中断(S)  [?] ヘルプ (既定値は "Y"): y

信頼されていないリポジトリ
信頼されていないリポジトリからモジュールをインストールしようとしています。このリポジトリを信頼する場合は、Set-PSReposit
ory コマンドレットを実行して、リポジトリの InstallationPolicy の値を変更してください。'PSGallery'
からモジュールをインストールしますか?
[Y] はい(Y)  [A] すべて続行(A)  [N] いいえ(N)  [L] すべて無視(L)  [S] 中断(S)  [?] ヘルプ (既定値は "N"): y
PS C:\Users\Administrator>
(3) 以上!
なお、その後のメモ
自己証明書を使ってるvCenterサーバに接続しようとすると下記のエラーがでる。
PS C:\Users\Administrator> Connect-VIServer -Server vcenterサーバ -User administrator@vsphere.local -Password "パスワード"
Connect-VIServer : 2018/12/20 11:25:08  Connect-VIServer                Error: Invalid server certificate. Use Set-PowerCLIConfiguration to set the value for the InvalidCertificateAction option to Prompt if you'd like to connect once or to add a permanent exception for this server.
Additional Information: 機関 'vcenterサーバ' との SSL/TLS のセキュリティで保護されているチャネルに対する信頼関係を確立できませんでした。
発生場所 行:1 文字:1
+ Connect-VIServer -Server vcenterサーバ -User administrator@vsphere.loca ...
+ ~~~~~~~~~~~~~~~~~~~~~~~~~~~~~~~~~~~~~~~~~~~~~~~~~~~~~~~~~~~~~~~~~~~~~
    + CategoryInfo          : セキュリティ エラー: (: ) [Connect-VIServer]、ViSecurityNegotiationException
    + FullyQualifiedErrorId : Client20_ConnectivityServiceImpl_Reconnect_CertificateError,VMware.VimAutomation.ViCore.
   Cmdlets.Commands.ConnectVIServer

PS C:\Users\Administrator>
以前は「」オプションで回避できていたが、今のPowerCLIでは「Set-PowerCLIConfiguration -InvalidCertificateAction Ignore」を設定する必要がある。(参考:New Release: VMware PowerCLI 10.0.0 )
Users\Administrator> Set-PowerCLIConfiguration -InvalidCertificateAction Ignore

Perform operation?
Performing operation 'Update PowerCLI configuration.'?
[Y] はい(Y)  [A] すべて続行(A)  [N] いいえ(N)  [L] すべて無視(L)  [S] 中断(S)  [?] ヘルプ (既定値は "Y"): y

Scope    ProxyPolicy     DefaultVIServerMode InvalidCertificateAction  DisplayDeprecationWarnings WebOperationTimeout
                                                                                                  Seconds
-----    -----------     ------------------- ------------------------  -------------------------- -------------------
Session  UseSystemProxy  Multiple            Ignore                    True                       300
User                                         Ignore
AllUsers


PS C:\Users\Administrator>
これで接続できるようになる。
PS C:\Users\Administrator> Connect-VIServer -Server vCenterサーバ -User administrator@vsphere.local -Password "パスワード"

Name                           Port  User
----                           ----  ----
vCenterサーバ                    443   VSPHERE.LOCAL\Administrator

PS C:\Users\Administrator>
2020/07/16追記
久しぶりにやってみたら、以下のエラーになった。
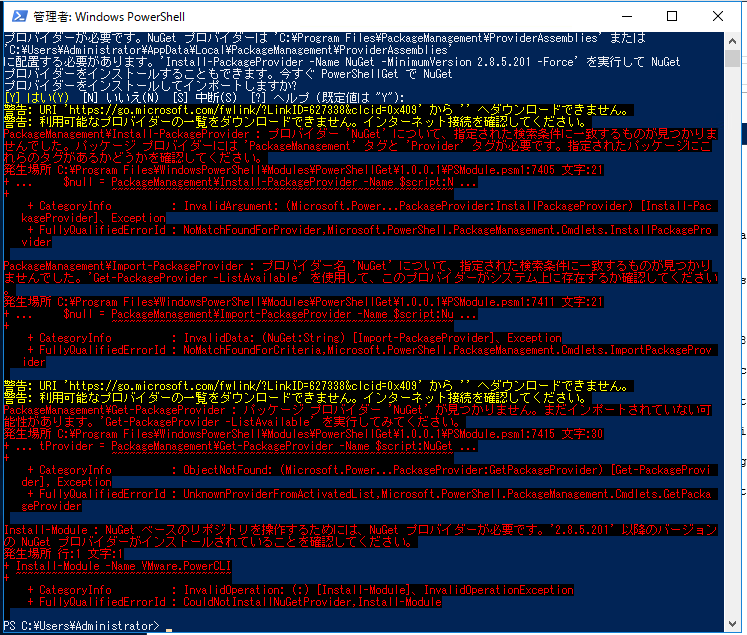
PS C:\Users\Administrator> Install-Module -Name VMware.PowerCLI

続行するには NuGet プロバイダーが必要です
PowerShellGet で NuGet ベースのリポジトリを操作するには、'2.8.5.201' 以降のバージョンの NuGet
プロバイダーが必要です。NuGet プロバイダーは 'C:\Program Files\PackageManagement\ProviderAssemblies' または
'C:\Users\Administrator\AppData\Local\PackageManagement\ProviderAssemblies'
に配置する必要があります。'Install-PackageProvider -Name NuGet -MinimumVersion 2.8.5.201 -Force' を実行して NuGet
プロバイダーをインストールすることもできます。今すぐ PowerShellGet で NuGet
プロバイダーをインストールしてインポートしますか?
[Y] はい(Y)  [N] いいえ(N)  [S] 中断(S)  [?] ヘルプ (既定値は "Y"):
警告: URI 'https://go.microsoft.com/fwlink/?LinkID=627338&clcid=0x409' から '' へダウンロードできません。
警告: 利用可能なプロバイダーの一覧をダウンロードできません。インターネット接続を確認してください。
PackageManagement\Install-PackageProvider : プロバイダー 'NuGet' について、指定された検索条件に一致するものが見つかりま
せんでした。パッケージ プロバイダーには 'PackageManagement' タグと 'Provider' タグが必要です。指定されたパッケージにこ
れらのタグがあるかどうかを確認してください。
発生場所 C:\Program Files\WindowsPowerShell\Modules\PowerShellGet\1.0.0.1\PSModule.psm1:7405 文字:21
+ ...     $null = PackageManagement\Install-PackageProvider -Name $script:N ...
+                 ~~~~~~~~~~~~~~~~~~~~~~~~~~~~~~~~~~~~~~~~~~~~~~~~~~~~~~~~~
    + CategoryInfo          : InvalidArgument: (Microsoft.Power...PackageProvider:InstallPackageProvider) [Install-Pac
   kageProvider]、Exception
    + FullyQualifiedErrorId : NoMatchFoundForProvider,Microsoft.PowerShell.PackageManagement.Cmdlets.InstallPackagePro
   vider

PackageManagement\Import-PackageProvider : プロバイダー名 'NuGet' について、指定された検索条件に一致するものが見つかり
ませんでした。'Get-PackageProvider -ListAvailable' を使用して、このプロバイダーがシステム上に存在するか確認してください
。
発生場所 C:\Program Files\WindowsPowerShell\Modules\PowerShellGet\1.0.0.1\PSModule.psm1:7411 文字:21
+ ...     $null = PackageManagement\Import-PackageProvider -Name $script:Nu ...
+                 ~~~~~~~~~~~~~~~~~~~~~~~~~~~~~~~~~~~~~~~~~~~~~~~~~~~~~~~~~
    + CategoryInfo          : InvalidData: (NuGet:String) [Import-PackageProvider]、Exception
    + FullyQualifiedErrorId : NoMatchFoundForCriteria,Microsoft.PowerShell.PackageManagement.Cmdlets.ImportPackageProv
   ider

警告: URI 'https://go.microsoft.com/fwlink/?LinkID=627338&clcid=0x409' から '' へダウンロードできません。
警告: 利用可能なプロバイダーの一覧をダウンロードできません。インターネット接続を確認してください。
PackageManagement\Get-PackageProvider : パッケージ プロバイダー 'NuGet' が見つかりません。まだインポートされていない可
能性があります。'Get-PackageProvider -ListAvailable' を実行してみてください。
発生場所 C:\Program Files\WindowsPowerShell\Modules\PowerShellGet\1.0.0.1\PSModule.psm1:7415 文字:30
+ ... tProvider = PackageManagement\Get-PackageProvider -Name $script:NuGet ...
+                 ~~~~~~~~~~~~~~~~~~~~~~~~~~~~~~~~~~~~~~~~~~~~~~~~~~~~~~~~~
    + CategoryInfo          : ObjectNotFound: (Microsoft.Power...PackageProvider:GetPackageProvider) [Get-PackageProvi
   der], Exception
    + FullyQualifiedErrorId : UnknownProviderFromActivatedList,Microsoft.PowerShell.PackageManagement.Cmdlets.GetPacka
   geProvider

Install-Module : NuGet ベースのリポジトリを操作するためには、NuGet プロバイダーが必要です。'2.8.5.201' 以降のバージョン
の NuGet プロバイダーがインストールされていることを確認してください。
発生場所 行:1 文字:1
+ Install-Module -Name VMware.PowerCLI
+ ~~~~~~~~~~~~~~~~~~~~~~~~~~~~~~~~~~~~
    + CategoryInfo          : InvalidOperation: (:) [Install-Module]、InvalidOperationException
    + FullyQualifiedErrorId : CouldNotInstallNuGetProvider,Install-Module

PS C:\Users\Administrator>
しかし、該当サーバでブラウザから「https://go.microsoft.com/fwlink/?LinkID=627338&clcid=0x409」にアクセスしてみると、正常にファイルが取得できる。
調べて見ると、TLS 1.2アクセス必須となったためのエラーのようである。
MasayaSawada「NuGet がmsg:unabletodownload エラーでインストールできない!」
PowerShell devblog「PowerShell Gallery TLS Support」
現状SSL3とTLS1のサポートとなっている設定をTLS1.2サポートにする、という設定変更を行うことになる。
現状値の確認と変更は下記の様に行う。
PS C:\Users\Administrator> [Net.ServicePointManager]::SecurityProtocol
Ssl3, Tls
PS C:\Users\Administrator> [Net.ServicePointManager]::SecurityProtocol=[Net.SecurityProtocolType]::Tls12
PS C:\Users\Administrator> [Net.ServicePointManager]::SecurityProtocol
Tls12
PS C:\Users\Administrator>
これを設定した後に「Install-Module -Name VMware.PowerCLI」を再実行することでダウンロードとインストールが実施されます。
なお、下記サイトに書かれている様に「[Net.ServicePointManager]::SecurityProtocol=[Net.SecurityProtocolType]::Tls12」というコマンドは保存されない設定を行うものであるため、PowerShell窓を閉じてしまうと元の設定に戻ります。
しばたテックブログ「Windows PowerShellとTLS 1.2」