ontap91::> cluster peer create -peer-addrs 172.17.44.223

Notice: Choose a passphrase of 8 or more characters. To ensure the authenticity
        of the peering relationship, use a phrase or sequence of characters
        that would be hard to guess.

Enter the passphrase:
Confirm the passphrase:

Notice: Now use the same passphrase in the "cluster peer create" command in the
        other cluster.

ontap91::>
ontap97::> cluster peer create -peer-addrs 172.17.44.222

Notice: Use a generated passphrase or choose a passphrase of 8 or more
        characters. To ensure the authenticity of the peering relationship, use
        a phrase or sequence of characters that would be hard to guess.

Enter the passphrase:
Confirm the passphrase:

Error: command failed: Remote cluster would not use encryption for this
       relationship.

ontap97::>
これは、暗号化接続に関する設定オプションを明示的に指定することで回避できる。
ontap97::> cluster peer create -peer-addrs 172.17.44.222 -encryption-protocol-proposed none

Notice: Use a generated passphrase or choose a passphrase of 8 or more
        characters. To ensure the authenticity of the peering relationship, use
        a phrase or sequence of characters that would be hard to guess.

Enter the passphrase:
Confirm the passphrase:

ontap97::>
ontap91::> cluster peer show
Peer Cluster Name         Cluster Serial Number Availability   Authentication
------------------------- --------------------- -------------- --------------
ontap97                   1-80-000008           Available      ok
1 entries were displayed.

ontap91::>
ontap97::> cluster peer show
Peer Cluster Name         Cluster Serial Number Availability   Authentication
------------------------- --------------------- -------------- --------------
ontap91                   1-80-000008           Available      ok

ontap97::>
なお、設定完了後すぐはCluster Serial Numberが空欄になっているが、しばらく経つと表示されるはず。
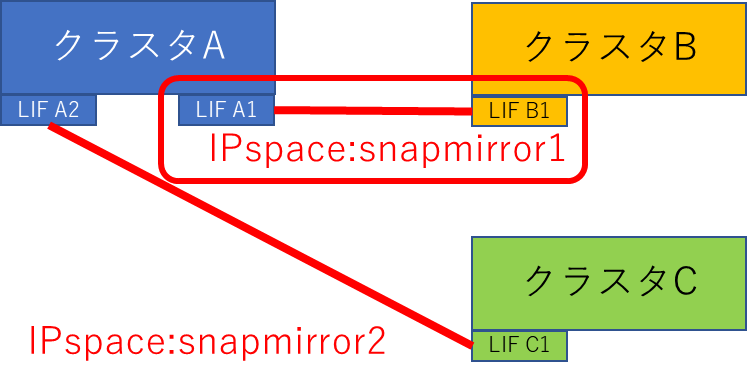
netapp9101dr::> cluster peer modify -cluster netapp9101 -ipspace snapmirror2

Error: command failed: No operational intercluster LIFs of the IPv4 address
       family and IPspace "snapmirror2" are available on this node.

netapp9101dr::>
netapp001c::> cluster peer create -peer-addrs 相手のintercluster IP

Notice: Use a generated passphrase or choose a passphrase of 8 or more
        characters. To ensure the authenticity of the peering relationship, use
        a phrase or sequence of characters that would be hard to guess.

Enter the passphrase:
Confirm the passphrase:

Notice: Now use the same passphrase in the "cluster peer create" command in the
        other cluster.

netapp001c::>
netapp002c::> cluster peer create -peer-addrs 相手のintercluster IP

Notice: Use a generated passphrase or choose a passphrase of 8 or more
        characters. To ensure the authenticity of the peering relationship, use
        a phrase or sequence of characters that would be hard to guess.

Enter the passphrase:
Confirm the passphrase:

netapp002c::>
netapp002c::> cluster peer show
Peer Cluster Name         Cluster Serial Number Availability   Authentication
------------------------- --------------------- -------------- --------------
netapp001c                   1-80-000008           Available      ok

netapp002c::>
[root@almalinux ~]# dnf remove centos-linux-release centos-linux-repos
Repository baseos is listed more than once in the configuration
Repository appstream is listed more than once in the configuration
Repository powertools is listed more than once in the configuration
Repository extras is listed more than once in the configuration
Repository baseos-source is listed more than once in the configuration
Repository appstream-source is listed more than once in the configuration
Repository extras-source is listed more than once in the configuration
依存関係が解決しました。
================================================================================
 パッケージ                Arch        バージョン          リポジトリー   サイズ
================================================================================
削除中:
 centos-linux-release      noarch      8.3-1.2011.el8      @anaconda       25 k
 centos-linux-repos        noarch      8-2.el8             @anaconda       26 k
未使用の依存関係の削除:
 centos-gpg-keys           noarch      1:8-2.el8           @anaconda      3.3 k

トランザクションの概要
================================================================================
削除  3 パッケージ

解放された容量: 54 k
これでよろしいですか? [y/N]: y
トランザクションの確認を実行中
トランザクションの確認に成功しました。
トランザクションのテストを実行中
トランザクションのテストに成功しました。
トランザクションを実行中
  準備             :                                                        1/1
  scriptletの実行中: centos-linux-release-8.3-1.2011.el8.noarch             1/1
  削除             : centos-linux-release-8.3-1.2011.el8.noarch             1/3
  削除             : centos-linux-repos-8-2.el8.noarch                      2/3
  削除             : centos-gpg-keys-1:8-2.el8.noarch                       3/3
  scriptletの実行中: centos-gpg-keys-1:8-2.el8.noarch                       3/3
  検証             : centos-gpg-keys-1:8-2.el8.noarch                       1/3
  検証             : centos-linux-release-8.3-1.2011.el8.noarch             2/3
  検証             : centos-linux-repos-8-2.el8.noarch                      3/3

削除しました:
  centos-gpg-keys-1:8-2.el8.noarch   centos-linux-release-8.3-1.2011.el8.noarch
  centos-linux-repos-8-2.el8.noarch

完了しました!
[root@almalinux ~]#
この段階でのレポジトリ登録を確認
[root@almalinux ~]# ls /etc/yum.repos.d/
almalinux.repo  media.repo
[root@almalinux ~]# dnf repolist
repo id                         repo の名前
appstream                       AlmaLinux 8.3 - AppStream
baseos                          AlmaLinux 8.3 - BaseOS
extras                          AlmaLinux 8.3 - Extras
media                           AlmaLinux 8 Media
powertools                      AlmaLinux 8.3 - PowerTools
[root@almalinux ~]#