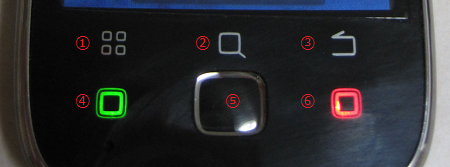
Rstream A1をCM7.1にしてカメラとか使う手法 2012/01/09版にて新しいkernel適用手順を案内しています。
—- 以下は古い手順です —-
いままでRstream A1にCyanogenMod7.1をインストールした場合、カメラが全く動かないという現象が発生していました。
このたび、at_not_foundさんにより、この現象を回避する方法が開発されました。
要点としては
・どうやら他の類似機種とカメラとボタン周りのハードウェアが違う(MUCHTEL A1全般が?)
・カーネルとカメラドライバ周りをMUCHTEL A1に併せて再構成
といった感じです。
いまのところ、「終話ボタン(6)で、画面が消えるスリープモードに入ってしまう」と「検索キー(2)がバックキー扱いになる」、という問題がありますが、それ以外はおおむね良好そうな感じで動作中です。

なお、終話ボタンの動作については、「Spare parts」の「End button behavior」を変更することで、スリープにしないという動作をさせることができます。(情報元:500yen さんより「Rstream A1 + CM7.1 で終話ボタンでスリープする動作は Spare Parts の End button behavior で変更が出来ました」)
以下に手順をMUCHTEL A1純正Android 2.2.2にアップデートするところから手順を書いていきます。
すでにCyanogenMod7が適用されている場合は、手順8から行ってください。
(2011/01/04手順修正:ROM Managerからアップデート差分を適用する手順に変更しました)
手順1
とりあえず、MUCHTEL A1純正Android 2.2にあげる。
いまのところ、どんな状態になっても、電源を切って、「ボリュームUP」+「ボリュームDOWN」を押しながら電源を入れて入るFTMモードになり、その状態でMUCHTEL版SUT1.7.4を実行すれば、かならずAndroid 2.2.2になることは確認している。
詳しい手法はRstream A1にMUCHTEL A1純正 Android 2.2を書き込むを参照のこと。
手順2
上記のAndroid 2.2が起動している状態でCM7の.nb0形式のfirmwareを書き込む。
今回使ったのはBoston Maniaの[Rom 2.3.4] CyanogenMod 7 EA v1 (nb0) である。
([Rom 2.3.4] CyanogenMod 7 EA v3 (nb0) でも確認したが、電源オンロゴがBostonになる)
なお、書き込み後は、以下の状態となる。
CyanogenMod 7 EA v1の場合
モデル番号: Z71
Androidバージョン: 2.3.4
ベースバンドバージョン: MP1_850
カーネルバージョン: 2.6.32.9-SuperAosp root@CML#1
Modバージョン: CyanogenMod-7_EAv1
ビルド番号: GRJ22
ClockworkMod Recovery v2.5.1.3
電源投入直後のロゴが「Android」
CyanogenMod 7 EA v3の場合
モデル番号: Boston
Androidバージョン: 2.3.4
ベースバンドバージョン: MP1_850
カーネルバージョン: 2.6.32.9-SuperAosp root@CML#1
Modバージョン: CyanogenMod-7_EAv3
ビルド番号: GRJ22
ClockworkMod Recovery v4.0.0.5
電源投入直後のロゴが「Bonston」
また、どちらも「フロントパネルのボタン動作がいままでと違う割り当てになる」「カメラが動かない」という問題は発生する。
書き込みには、SUT 1.7.0をパソコンにインストールし、CM7の.nb0タイプのfirmwareを書き込む、という手法を使う。
標準のRecoveryにある「Download nb0 from sdcard」では、上記にあげたnb0ファイルは正当なものとして認識してくれなかった。
また、MUCHTEL版のSUT 1.7.4は、FTMモードで書き換えを行うが、SUT1.7.0では、Android OSが起動している状態でないと、ツールが認識してくれなかった。
このため、正常に起動しない状況に陥っている場合は、必ずMUCHTEL A1版に戻す必要がある。
手順3
ROM Managerの動作要件を満たすため、ネットワークにつながる設定(ClockworkMod recoveryとかをダウンロードする)、と、Android Marketの設定(ROM Managerを最新版にして、CM7.1のzipファイルダウンロードを可能とするため)を行う。
後者のAndroid Marketの設定はCM7.1のzipファイルを別途ダウンロードしてくるのであれば、不要。
手順4
ROM Managerを起動する。
手順5
ROM Managerから、「ClockworkMod Recoveryを導入」を実行。
機種はCommtiva Z71を選択する。
手順6
「ROMをダウンロード」を選択し、
Freeのくくりにある「CyanogenMod」を選択し、「CyanogenMod 7.1.0」を選択して、ダウンロード。
「ROM Pre-Installation(ROMインストール前処理)」では「Wipe Dalvik Cache」のみ選択。
なお、ここでダウンロードできるCyanogenMod 7.1.0ではなく、[Rom 2.3.7] CyanogenMod 7 EA v7.2 (zip) でも良い。(個人的にはこっちのカスタマイズ具合の方が好みですが、手順9以降のROM Manager操作が動作しません。その場合、手順Aを行ってください。)
こちらを行う場合はROM Managerで「SDカードからROMをインストール」を選択し、SDCARDにコピーした上記のzipファイルを指定する。
手順7
再起動し、Recoveryモードで自動実行される。
完了すると、再起動する。
起動が完了すると以下の表記でブートしているはず。
モデル番号: Z71
Androidバージョン: 2.3.7
ベースバンドバージョン: MP1_850
カーネルバージョン: 2.6.35.13-Cyanogenmod rmcc@glskard #1
Modバージョン: CyanogenMod-7.1.0-Z71
ビルド番号: GWK74
ClockworkMod Recovery v2.5.1.3
電源投入直後のロゴは、先ほどの状態がそのまま維持される。
CyanogenMod 7 EA v7.2の場合は以下となる。
モデル番号: Boston
Androidバージョン: 2.3.7
ベースバンドバージョン: MP1_850
カーネルバージョン: 2.6.32.9-EA edgar@ubuntu #37
Modバージョン: CM7.1_EAv7.2
ビルド番号: GWK74
ClockworkMod Recovery v4.0.0.8
「フロントパネルのボタン動作がいままでと違う割り当てになる」「カメラが動かない」という問題は直っていない状態。
手順8
CM7.1をMUCHTEL A1用に修正するファイルをSDカードにコピーする。
これに含まれる修正は以下です。
・MUCHTEL A1向け修正kernel
・MUCHTEL A1向け修正libcamera
・MUCHTEL A1向け修正qwerty.klファイル
・日本語フォント(モトヤ)
修正ファイル:update.zip形式のkernel修正+カメラ修正+qwerty.kl修正ファイル+日本語フォントをダウンロードする。
手順9
手順8でダウンロードしたmuchtela1-cm7-custom-afnf33.zipを、/sdcard/にコピーする。
手順10
ROM Managerを起動する。
なお、RecoveryのバージョンがClockworkMod Recovery 2.5.1.3以外である場合、この後の手順が正常動作しません。
手順5と同様に「ClockworkMod Recoveryを導入」から機種は「Commtiva Z71」を選択し、ClockworkMod Recoveryを2.5.1.3にしてから以下の手順を行ってください。
もしくは、手順10~12の代わりに手順Aを行ってください。
手順11
「SDカードからROMをインストール」を選択し、先ほどコピーしたmuchtela1-cm7-custom-afnf33.zipを指定する。
「ROM Pre-Installation(ROMインストール前処理)」では「Wipe Dalvik Cache」のみ選択。
手順12
再起動し、Recoveryモードで自動実行される。
完了すると、再起動する。
作業完了後は「カーネルバージョン: 2.6.35.13.rstream-a1 afnf@ubuntu #33」になる。
(それ以外の情報は、手順7終了時と同じとなる)
手順A
ClockworkMod Recoveryを直接操作して、アップデートzipを適用します。
1. 電源をオフします。
2. 「ボリュームUP」と「シャッターボタン」を押しながら電源を入れ、Recoveryモードに入ります。
3. 「ボリュームUP」をうまく押して「install zip from sdcard」に合わせます。(ボタンを1回押すと2つ進むが、押しっぱなしにすると1つしか進まない)
4. 「シャッターボタン」を押します
5. 「choose zip from sdcard」が選択されていることを確認し、「シャッターボタン」を押します
6. 「ボリュームUP」か「ボリュームDOWN」をうまく操作し、先ほど転送したmuchtela1-cm7-custom-afnf33.zipに合わせます。。(ボタンを1回押すと2つ進むが、押しっぱなしにすると1つしか進まない)
7. 「シャッターボタン」を押します
8. 適用が開始されるので、終わるのを待ちます。終わると、再度「choose zip from sdcard」のところになります。
9. 何回かボリュームUPを押していると「Back menu button enabled.」という表示が出ます。
10. でたら、何か当たりさわりがないところを選び「シャッターボタン」を押します。
11. そうすると、「+++++Go Back+++++」という項目が増えるので、そこにカーソルを合わせ、
最初のメインメニューに戻り、「reboot system now」を選びます
12. 終了
— 以下、資料用 —
【謎端末】Rstream A1【SIMフリー】の17~19より
17 : ◆afnf4199GA :2012/01/03(火) 03:01:54.89 ID:6+yJDTeh
CM7.1でカメラが動かない件の対処。
1. カーネルをrmcc(https://github.com/rmcc/commtiva-kernel-z71.git)から取得
2. arch/arm/mach-msm/board-fxx.cのI2C_BOARD_INFO(“ov5642af”, 0xFD)を0x3Cに書き換え
3. drivers/media/video/msm/msm_camera.c、sdata->flash_dataがnullなのでinfo.flash_enabled = 1;に変更
4. .configはmuchtel222から抜いたものをベースにoldconfigで修正したものを使用
5. カーネルビルド
6. CM7.1のinitramfsでブートイメージ生成
7. CM7.1を適用したデバイスに7をfastboot flash boot
8. CM7.1版の/system/lib/liboemcamera.soについて、文字列”00fd”を”003c”に書き換え
9. QualcommCameraHardware.cpp(https://github.com/CyanogenMod/android_device_commtiva_z71.git)を
ov5642af向けに修正(picture_sizes-1、sensorTypes+1、ov5642→ov5642af)
10. mmでlibcamera.soを生成して/system/libに書き戻す
18 : ◆afnf4199GA :2012/01/03(火) 03:04:27.58 ID:6+yJDTeh
っていうのが面倒な人は、
http://www.mediafire.com/?fb2xjfa2jj4dbfc
sha1sum:e51899d08a660cd84898a1dc7879bb90ddf4dd93
これ落として、fastbootモードから以下を実行。
fastboot flash boot rstream-a1-mod33.img
fastboot reboot
→通常起動
adb shell mount -o remount,rw / /system
adb push libcamera.so /system/lib
adb push liboemcamera.so /system/lib
adb push qwerty.kl /system/usr/keylayout
adb shell chmod 644 /system/usr/keylayout/qwerty.kl
→もう一回再起動
3G通話、3Gデータ通信は未テスト。
終話キーでスリープになってしまう不具合有り。
他は大丈夫だと思う。
なんでこんな修正が必要なのかっていう所だけど、
少なくともカメラ周りとボタン周りはハードが違うみたい。
あとi2c fake addressってのもポイントだったが、これは良く分からん。
19 : ◆afnf4199GA :2012/01/03(火) 03:07:07.53 ID:6+yJDTeh
以上です。
誰か追試してくださいな。
