2024/05/21追記: 新規でONTAPシミュレータを作る人は「ONTAPシミュレータの新規導入手順」の方を読んでください。
この記事は稼働中のONTAPシミュレータをなんとかしようとするものです。
NetApp ONTAP 9.7シミュレータをしばらく稼働させ続けていると、ディスクがフルとなって死ぬ。
なんでなんだろーなー?とONTAP 9.1シミュレータと構成の差をみてみたら、仮想ディスクの大きさが4GBから1GBに縮小されていた。
そりゃ、ディスクの余裕がだいぶ異なりますね。
というわけで、vol0の容量を増やしましょう
状況の確認
まず、aggregate の空き容量を確認
「storage aggregate show」か「df -A -h」を実行します。
ontap97-sub::> storage aggregate show


Aggregate     Size Available Used% State   #Vols  Nodes            RAID Status
--------- -------- --------- ----- ------- ------ ---------------- ------------
aggr0_ontap97_sub_01 855MB 41.41MB 95% online   1 ontap97-sub-01   raid_dp,
                                                                   normal
aggr1      14.06GB   14.00GB    0% online       3 ontap97-sub-01   raid_dp,
                                                                   normal
2 entries were displayed.

ontap97-sub::> df -A -h
Aggregate                total       used      avail capacity
aggr0_ontap97_sub_01     855MB      812MB       42MB      95%
aggr0_ontap97_sub_01/.snapshot 45MB    0B       45MB       0%
aggr1                     14GB       61MB       14GB       0%
aggr1/.snapshot             0B         0B         0B       0%
4 entries were displayed.

ontap97-sub::>
空きディスクの確認
現状、aggr0の空き容量がないため、ディスクを追加します。
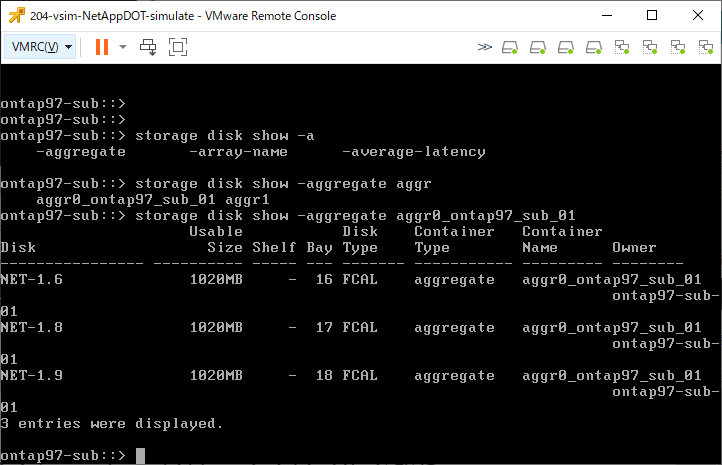
追加できるディスクがあるかを「storage disk show -container-type spare」を実行して確認
ontap97-sub::> storage disk show -container-type spare
                     Usable           Disk    Container   Container
Disk                   Size Shelf Bay Type    Type        Name      Owner
---------------- ---------- ----- --- ------- ----------- --------- --------
NET-1.19             1020MB     -  27 FCAL    spare       Pool0     ontap97-sub-01
NET-1.20             1020MB     -  28 FCAL    spare       Pool0     ontap97-sub-01
NET-1.21             1020MB     -  29 FCAL    spare       Pool0     ontap97-sub-01
NET-1.27             1020MB     -  32 FCAL    spare       Pool0     ontap97-sub-01
NET-1.28             1020MB     -  32 FCAL    spare       Pool0     ontap97-sub-01
5 entries were displayed.

ontap97-sub::>
現在5本のスペアがあります。スペアが0本だと問題が発生します。
その場合はディスクを追加します。
シミュレータへのディスク追加
ONTAPシミュレータが認識しているディスクを追加することはできます。
追加はシミュレータ仮想マシンの仮想ディスクとして追加するのではなく、シミュレータOS内部でディスクファイルを作成する形で行います。
ちなみに、security loginコマンドでshellにログインできるような権限を付与してパスワードも設定する、的なことを書いている手順もありますが、それは必要が無い手法を使います。
まずは、diagモードに切り替えてコマンドを実行する必要があるので「set diag」を実行します。
ontap97-sub::> set diag

Warning: These diagnostic commands are for use by NetApp personnel only.
Do you want to continue? {y|n}: y

ontap97-sub::*>
現在使われているディスクタイプを確認するため、「systemshell local “ls -l /sim/dev/,disks”」を実行します。(disksの前に「,」が入っています)
(最近のONTAPではdiagアカウントがlockされていて実行できない。その場合はロックを解除する)
ontap97-sub::*> systemshell local "ls -l /sim/dev/,disks"
  (system node systemshell)
total 1849640
-rwxr-xr-x  1 root  wheel         912 Mar 10 16:07 ,reservations
-rw-r--r--  1 root  wheel        1372 Mar 10 16:07 Shelf:DiskShelf14
-rw-r--r--  1 root  wheel  1094312960 Mar 10 16:45 v0.16:NETAPP__:VD-1000MB-FZ-520:13511800:2104448
-rw-r--r--  1 root  wheel  1094312960 Mar 10 16:45 v0.17:NETAPP__:VD-1000MB-FZ-520:13511901:2104448
<略>
-rw-r--r--  1 root  wheel  1094312960 Mar 10 16:23 v1.29:NETAPP__:VD-1000MB-FZ-520:15901912:2104448
-rw-r--r--  1 root  wheel  1094312960 Mar 10 16:23 v1.32:NETAPP__:VD-1000MB-FZ-520:15901913:2104448

ontap97-sub::*>
上記の場合「NETAPP__:VD-1000MB-FZ-520」というディスクを使っています。
このディスクを追加するために該当するdisk type IDを「systemshell local “vsim_makedisks -h”」を実行して確認します。
ontap97-sub::*> systemshell local "vsim_makedisks -h"
  (system node systemshell)
Usage: /usr/sbin/vsim_makedisks [ -n <additional number of disks to create> ]
          [ -t <disk type ID> ]
          [ -e <additional sectors> ]
          [ -a <adapter on which to start populating disks ]
          [ -h ]

By default 5 disks will be added. The <disk type ID> can be one
of the following: (NOTE, 0 is the default)
                                                               Fast
Type Vendor ID Product ID       Usable Size[B] Actual Size[B]  Zero  BPS   RPM
  0  NETAPP__  VD-16MB_________     16,777,216     38,273,024   No   512  10000
  1  NETAPP__  VD-35MB_________     35,913,728     57,409,536   No   512  10000
  2  NETAPP__  VD-50MB_________     52,428,800     73,924,608   No   512  10000
  3  NETAPP__  VD-100MB________    104,857,600    126,353,408   No   512  10000
  4  NETAPP__  VD-500MB________    524,288,000    545,783,808   No   512  10000
  5  NETAPP__  VD-1000MB_______  1,048,576,000  1,070,071,808   No   512  10000
  6  NETAPP__  VD-16MB-FZ______     16,777,216     38,273,024   Yes  512  15000
  7  NETAPP__  VD-35MB-FZ______     35,913,728     57,409,536   Yes  512  15000
  8  NETAPP__  VD-50MB-FZ______     52,428,800     73,924,608   Yes  512  15000
  9  NETAPP__  VD-100MB-FZ_____    104,857,600    126,353,408   Yes  512  15000
 10  NETAPP__  VD-500MB-FZ_____    524,288,000    545,783,808   Yes  512  15000
 11  NETAPP__  VD-1000MB-FZ____  1,048,576,000  1,070,071,808   Yes  512  15000
 12  NETAPP__  VD-16MB-520_____     16,777,216     38,273,024   No   520  10000
 13  NETAPP__  VD-35MB-520_____     35,913,728     57,409,536   No   520  10000
 14  NETAPP__  VD-50MB-520_____     52,428,800     73,924,608   No   520  10000
 15  NETAPP__  VD-100MB-520____    104,857,600    126,353,408   No   520  10000
 16  NETAPP__  VD-500MB-520____    524,288,000    545,783,808   No   520  10000
 17  NETAPP__  VD-1000MB-520___  1,048,576,000  1,070,071,808   No   520  10000
 18  NETAPP__  VD-16MB-FZ-520__     16,777,216     38,273,024   Yes  520  15000
 19  NETAPP__  VD-35MB-FZ-520__     35,913,728     57,409,536   Yes  520  15000
 20  NETAPP__  VD-50MB-FZ-520__     52,428,800     73,924,608   Yes  520  15000
 21  NETAPP__  VD-100MB-FZ-520_    104,857,600    126,353,408   Yes  520  15000
 22  NETAPP__  VD-500MB-FZ-520_    524,288,000    545,783,808   Yes  520  15000
 23  NETAPP__  VD-1000MB-FZ-520  1,048,576,000  1,070,071,808   Yes  520  15000
 24  NETAPP__  VD-16MB-FZ-ATA__     16,777,216     51,388,416   Yes  512   7200
 25  NETAPP__  VD-35MB-FZ-ATA__     36,700,160     73,801,728   Yes  512   7200
 26  NETAPP__  VD-50MB-FZ-ATA__     52,428,800     91,496,448   Yes  512   7200
 27  NETAPP__  VD-100MB-FZ-ATA_    104,857,600    150,478,848   Yes  512   7200
 28  NETAPP__  VD-500MB-FZ-ATA_    524,288,000    622,338,048   Yes  512   7200
 29  NETAPP__  VD-1000MB-FZ-ATA  1,048,576,000  1,212,162,048   Yes  512   7200
 30  NETAPP__  VD-2000MB-FZ-520  2,097,512,000  2,119,007,808   Yes  520  15000
 31  NETAPP__  VD-4000MB-FZ-520  4,194,304,000  4,215,799,808   Yes  520  15000
 32  NETAPP__  VD-2000MB-FZ-ATA  2,097,512,000  2,391,810,048   Yes  512   7200
 33  NETAPP__  VD-4000MB-FZ-ATA  4,194,304,000  4,751,106,048   Yes  512   7200
 34  NETAPP__  VD-100MB-SS-512_    104,857,600    126,353,408   Yes  512  15000
 35  NETAPP__  VD-500MB-SS-520_    524,288,000    545,783,808   Yes  520  15000
 36  NETAPP__  VD-9000MB-FZ-520  9,437,184,000  9,458,679,808   Yes  520  15000
 37  NETAPP__  VD-9000MB-FZ-ATA  9,437,184,000 10,649,346,048   Yes  512   7200

ontap97-sub::*>
上記結果より「23」でした。
ディスク追加は「systemshell localhost “cd /sim/dev;sudo vsim_makedisks -t タイプ -n 追加本数”」を実行して行います。
“sudo”コマンドを使用することでsecurity loginコマンドによる設定変更を省略しています。
今回、使用しているディスクはタイプ23であるため、これを10本追加するのであれは「systemshell localhost “cd /sim/dev;sudo vsim_makedisks -t 23 -n 10″」を実行します。
ontap97-sub::*> systemshell localhost "cd /sim/dev;sudo vsim_makedisks -t 23 -n 10"
  (system node systemshell)
Creating ,disks/v0.33:NETAPP__:VD-1000MB-FZ-520:66781814:2104448
Creating ,disks/v0.34:NETAPP__:VD-1000MB-FZ-520:66781815:2104448
Creating ,disks/v0.35:NETAPP__:VD-1000MB-FZ-520:66781816:2104448
Creating ,disks/v0.36:NETAPP__:VD-1000MB-FZ-520:66781817:2104448
Creating ,disks/v0.37:NETAPP__:VD-1000MB-FZ-520:66781818:2104448
Creating ,disks/v0.38:NETAPP__:VD-1000MB-FZ-520:66781819:2104448
Creating ,disks/v0.39:NETAPP__:VD-1000MB-FZ-520:66781820:2104448
Creating ,disks/v0.40:NETAPP__:VD-1000MB-FZ-520:66781821:2104448
Creating ,disks/v0.41:NETAPP__:VD-1000MB-FZ-520:66781822:2104448
Creating ,disks/v0.42:NETAPP__:VD-1000MB-FZ-520:66781823:2104448
Shelf file Shelf:DiskShelf14 updated

ontap97-sub::*>
ディスクを追加すると、まず未割り当てとして登録されます。
未割り当てディスクは「storage disk show -container-type unassigned」で確認します。
ontap97-sub::*> storage disk show -container-type unassigned
There are no entries matching your query.

ontap97-sub::*>
また「storage disk show -container-type spare」を実行してスペアディスクが増えていないことを確認します。
シミュレータ環境では追加したディスクがオンラインで認識されず、シミュレータの再起動が必要なようです。
再起動後、「storage disk show -container-type spare」を実行するとスペアディスクが増えていることがわかります。
ontap97-sub::> storage disk show -container-type spare
                     Usable           Disk    Container   Container
Disk                   Size Shelf Bay Type    Type        Name      Owner
---------------- ---------- ----- --- ------- ----------- --------- --------
NET-1.19             1020MB     -  27 FCAL    spare       Pool0     ontap97-sub-01
NET-1.20             1020MB     -  28 FCAL    spare       Pool0     ontap97-sub-01
NET-1.21             1020MB     -  29 FCAL    spare       Pool0     ontap97-sub-01
NET-1.27             1020MB     -  32 FCAL    spare       Pool0     ontap97-sub-01
NET-1.28             1020MB     -  32 FCAL    spare       Pool0     ontap97-sub-01
NET-1.29             1020MB     -  33 FCAL    spare       Pool0     ontap97-sub-01
NET-1.30             1020MB     -  34 FCAL    spare       Pool0     ontap97-sub-01
NET-1.31             1020MB     -  35 FCAL    spare       Pool0     ontap97-sub-01
NET-1.32             1020MB     -  36 FCAL    spare       Pool0     ontap97-sub-01
NET-1.33             1020MB     -  37 FCAL    spare       Pool0     ontap97-sub-01
NET-1.34             1020MB     -  38 FCAL    spare       Pool0     ontap97-sub-01
NET-1.35             1020MB     -  39 FCAL    spare       Pool0     ontap97-sub-01
NET-1.36             1020MB     -  40 FCAL    spare       Pool0     ontap97-sub-01
NET-1.37             1020MB     -  41 FCAL    spare       Pool0     ontap97-sub-01
NET-1.38             1020MB     -  42 FCAL    spare       Pool0     ontap97-sub-01
15 entries were displayed.

ontap97-sub::>
システムaggregateへのディスク追加
システムaggregateにディスクを追加します。
とりあえずディスクを3本追加します。
「storage aggregate add-disks -aggregate システムaggr名 -diskcount ディスク本数」
ontap97-sub::> storage aggregate add-disks -aggregate aggr0_ontap97_sub_01 -diskcount 3

Warning: Aggregate "aggr0_ontap97_sub_01" is a root aggregate. Adding disks to
         the root aggregate is not recommended. Once added, disks cannot be
         removed without reinitializing the node.
Do you want to continue? {y|n}: y

Info: Disks would be added to aggregate "aggr0_ontap97_sub_01" on node
      "ontap97-sub-01" in the following manner:

      First Plex

        RAID Group rg0, 6 disks (block checksum, raid_dp)
                                                            Usable Physical
          Position   Disk                      Type           Size     Size
          ---------- ------------------------- ---------- -------- --------
          data       NET-1.19                  FCAL         1000MB   1.00GB
          data       NET-1.27                  FCAL         1000MB   1.00GB
          data       NET-1.20                  FCAL         1000MB   1.00GB

      Aggregate capacity available for volume use would be increased by 2.64GB.

Do you want to continue? {y|n}: y

ontap97-sub::>
aggregateの容量が増えたことを確認します
ontap97-sub::> storage aggregate show


Aggregate     Size Available Used% State   #Vols  Nodes            RAID Status
--------- -------- --------- ----- ------- ------ ---------------- ------------
aggr0_ontap97_sub_01 3.34GB 2.55GB 24% online   1 ontap97-sub-01   raid_dp,
                                                                   normal
aggr1      14.06GB   14.00GB    0% online       3 ontap97-sub-01   raid_dp,
                                                                   normal
2 entries were displayed.

ontap97-sub::> df -A -h
Aggregate                total       used      avail capacity
aggr0_ontap97_sub_01    3420MB      812MB     2607MB      24%
aggr0_ontap97_sub_01/.snapshot 180MB   0B      180MB       0%
aggr1                     14GB       61MB       14GB       0%
aggr1/.snapshot             0B         0B         0B       0%
4 entries were displayed.

ontap97-sub::>
システムボリュームの拡張
まずは現状のvol0のサイズを確認します
ontap97-sub::> volume show
Vserver Volume Aggregate State Type Size Available Used%
--------- ------------ ------------ ---------- ---- ---------- ---------- -----
ontap97-sub-01 vol0 aggr0_ontap97_sub_01 online RW 807.3MB 230.4MB 69%
1 entries were displayed.
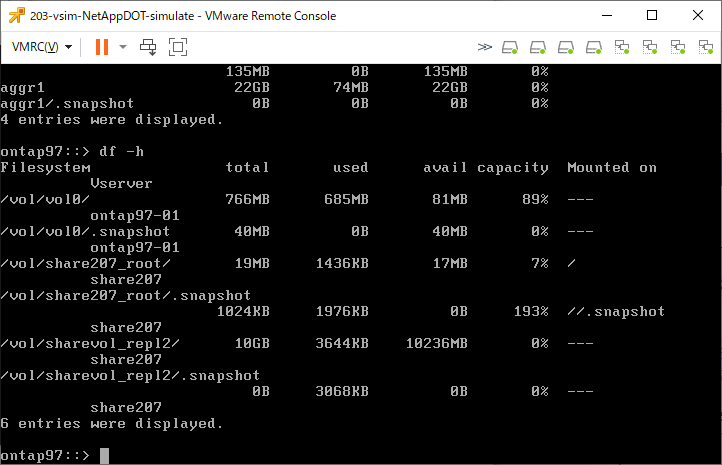
ontap97-sub::> df -h
Filesystem total used avail capacity Mounted on Vserver
/vol/vol0/ 766MB 536MB 230MB 69% --- ontap97-sub-01
/vol/vol0/.snapshot 40MB 32MB 7824KB 81% --- ontap97-sub-01
2 entries were displayed.
ontap97-sub::>
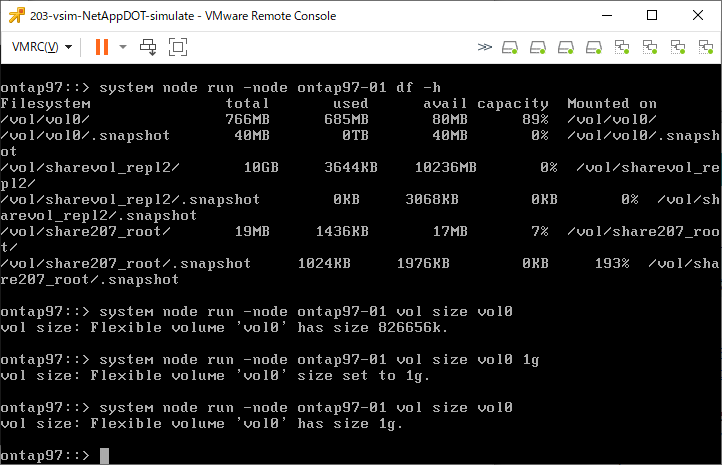
「system node run -node ノード名 df -h」という手法でもボリューム容量を確認することができます。
ontap97-sub::> system node run -node ontap97-sub-01 df -h
Filesystem               total       used      avail capacity  Mounted on
/vol/vol0/               766MB      544MB      222MB      71%  /vol/vol0/
/vol/vol0/.snapshot       40MB       32MB     7768KB      81%  /vol/vol0/.snapshot

ontap97-sub::>
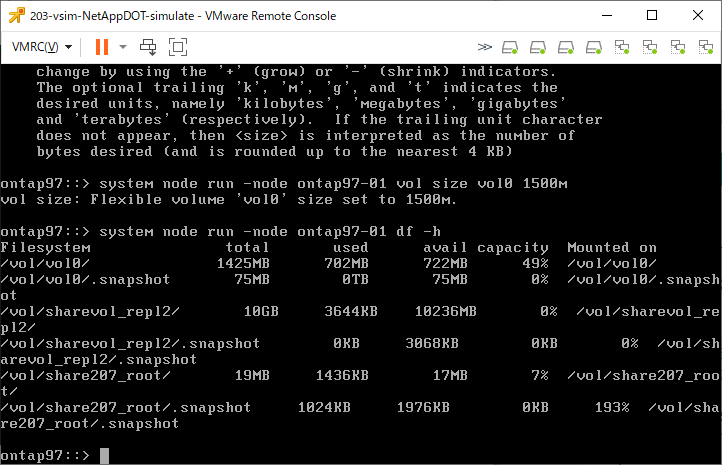
現状のvol0サイズを確認するため「system node run -node ノード名 vol size vol0」を実行します。
ontap97-sub::> system node run -node ontap97-sub-01 vol size vol0
vol size: Flexible volume 'vol0' has size 826656k.

ontap97-sub::>
vol0のサイズを2GBに設定します。
ontap97-sub::> system node run -node ontap97-sub-01 vol size vol0 2g
vol size: Flexible volume 'vol0' size set to 2g.

ontap97-sub::>
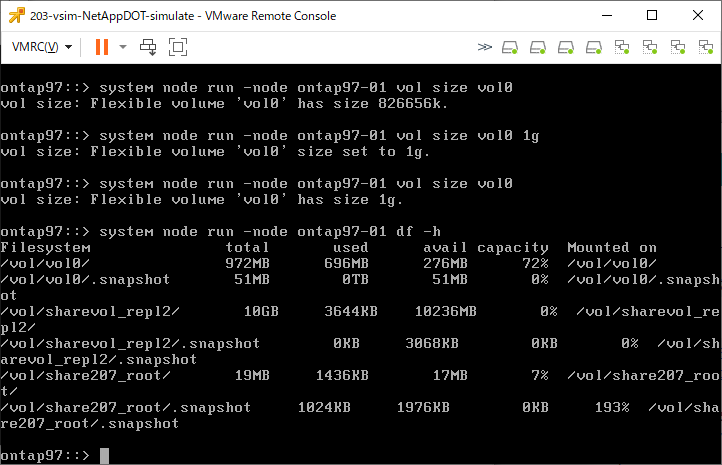
容量が変わったことを確認します。
ontap97-sub::> volume show
Vserver   Volume       Aggregate    State      Type       Size  Available Used%
--------- ------------ ------------ ---------- ---- ---------- ---------- -----
ontap97-sub-01 vol0    aggr0_ontap97_sub_01 online RW      2GB     1.38GB   27%
1 entries were displayed.

ontap97-sub::> df -h
Filesystem               total       used      avail capacity  Mounted on                 Vserver
/vol/vol0/              1945MB      536MB     1409MB      27%  ---                        ontap97-sub-01
/vol/vol0/.snapshot      102MB       32MB       69MB      32%  ---                        ontap97-sub-01
2 entries were displayed.

ontap97-sub::> system node run -node ontap97-sub-01 df -h
Filesystem               total       used      avail capacity  Mounted on
/vol/vol0/              1945MB      543MB     1402MB      28%  /vol/vol0/
/vol/vol0/.snapshot      102MB       32MB       69MB      32%  /vol/vol0/.snapshot
ontap97-sub::>
これで、vol0に余裕ができました。