5月に「NanoPi R2S+openWRT 21.02.0RCでBIGLOBEのMAP-E接続」にてOpenWRT 21.02.0-RC版での手順を作成した。
しかし、OpenWRT 21.02.0リリース版になってみると、いろいろ設定画面が変更となり、この手順のままでは動作させることができなかった。
ぐぐってみたところ「OpenWrt(21.02)でIPv6インターネットを使う」に手順があったので、参考にしつつ手順を更新した。
前書き
OpenWRTルータを作成するにあたり、いろいろある選択肢からRockchip RK3328のNanoPi R2S と Rockchip RK3399のNanoPi R4S を候補にあげた。
Amazon日本の倉庫に在庫があるというのと、openWRTのページに「FriendlyARM NanoPi R2S」とデバイスに関する個別ページが作成されており、リリース版の提供がされていたので、NanoPi R2Sを買って設定を行った。

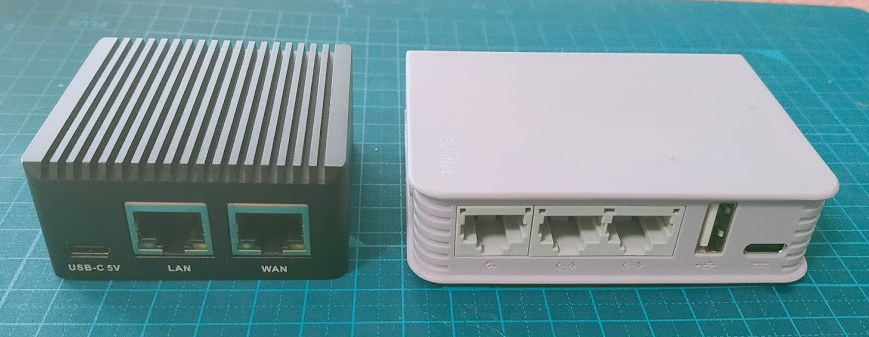
ちなみに置き換え対象となったGL-MV1000とのサイズ比較はこんな感じ

OpenWRT 21.02.0-RC版の時代はアップグレードしたら以前の設定を残しておくと起動しなくなるとか問題もありましたが、OpenWRT 21.02.0リリース版を書き込んだあと設定復旧で動作させることができました。
設定手順0: MicroSD作成
friendlyarm_nanopi-r2s-squashfs-sysupgrade.img.gz を展開したものをmicroSDに書き込んでNanoPi R2Sを起動。
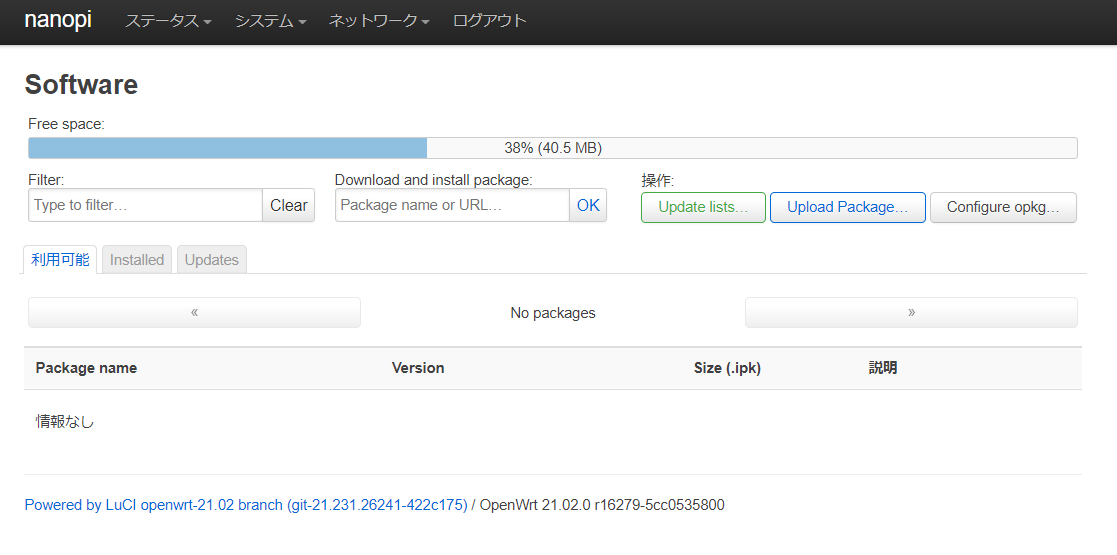
設定手順1:パッケージの追加
mapパッケージと日本語UIパッケージ(luci-i18n-base-ja)をインストール
また、後述のニチバン対策を行う場合は iptables-mod-ipopt もインストールする。
GUIの場合、[システム]-[Software]にて、「Update lists」を実行してパッケージ一覧を取得した後に、「Filter」にパッケージ名を入れて、出てきたモジュールを「Install」する。
CLIでインストールする場合は以下を実行
# opkg update
# opkg install luci-i18n-base-ja
# opkg install map
# okpg install iptables-mod-ipopt
インストール後は再起動を行うこと。
再起動しないとluciのネットワーク設定で「プロトコル:MAP / LW4over6」が選択肢に現れません。
設定手順2:WAN6インタフェースの作成
WAN6インタフェースがなければ「プロトコル: DHCPv6クライアント」で作成する
最初はそのまま設定して、有効化し、WAN6インタフェースに割り当てられるIPv6アドレスを確認すること。
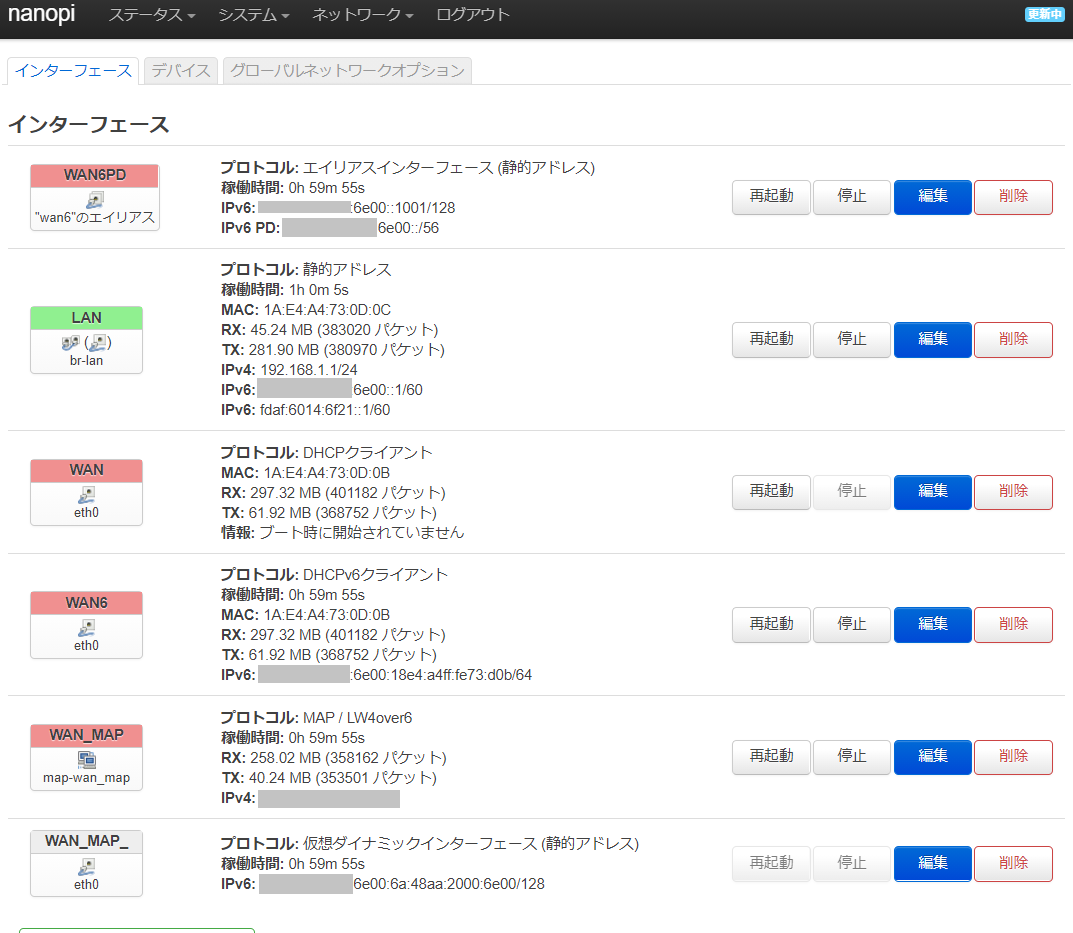
↑の画像は使い回しなので、この段階では無いはずの「MAP」インタフェースなどが入ってます
上記のようにWAN6インタフェースに「IPv6」アドレスが確認できたら、そのアドレスをコピーして、notepadにでも貼り付けておきます。
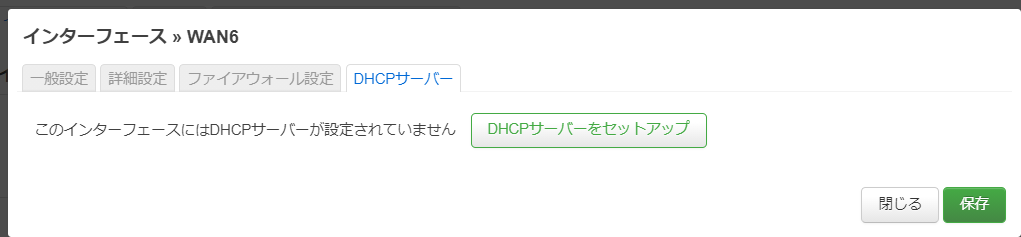
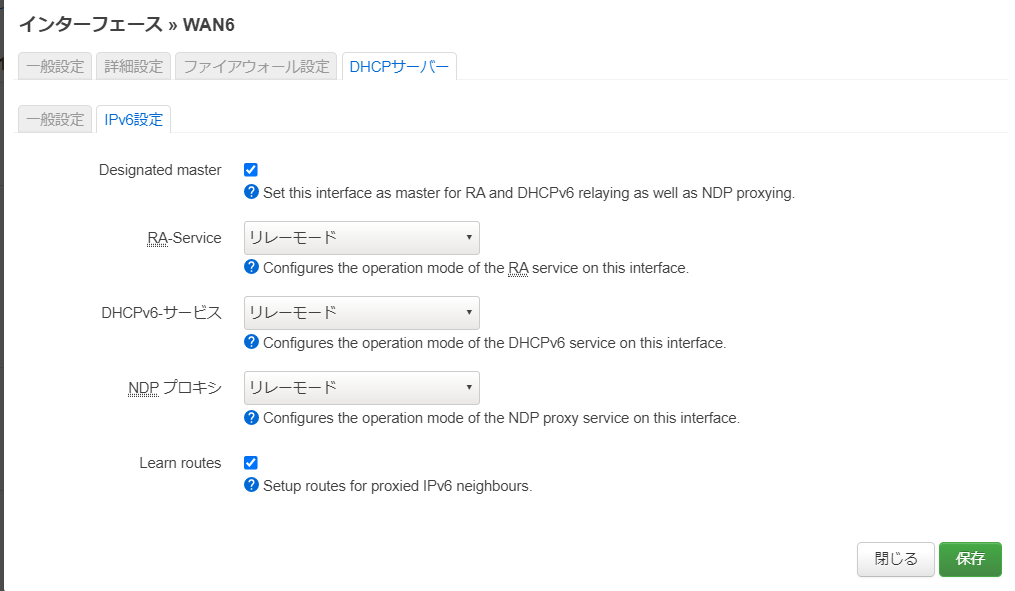
設定手順3:WAN6インタフェースにDHCPv6関連設定
openWRT 21.02.0のリリース版になったらWAN6インタフェースではDHCPv6関連設定がGUIできるようになりました。
[DHCPサーバー]を選択して、下記のようになっている場合は「DHCPサーバーをセットアップ」をクリックします。
クリックしたあと[一般設定]タブは下記のような感じで変更せず
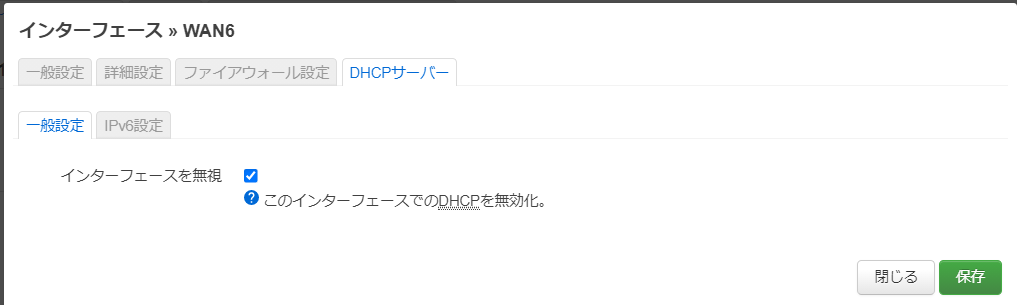
[IPv6設定]タブで下記の設定を行います。
Designated master: チェックを入れる
RA-Service:リレーモード
DHCPv6-サービス: リレーモード
NDP-Proxy: リレーモード
(Learn routesは設定を変更していない)
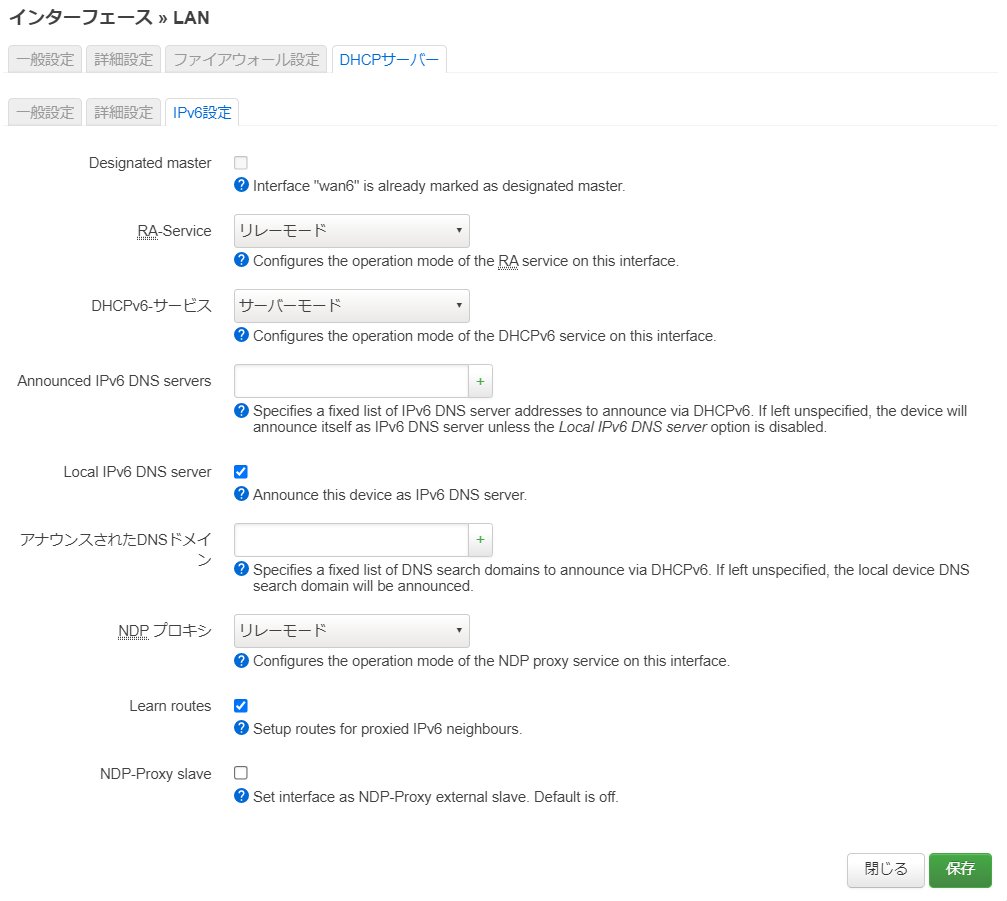
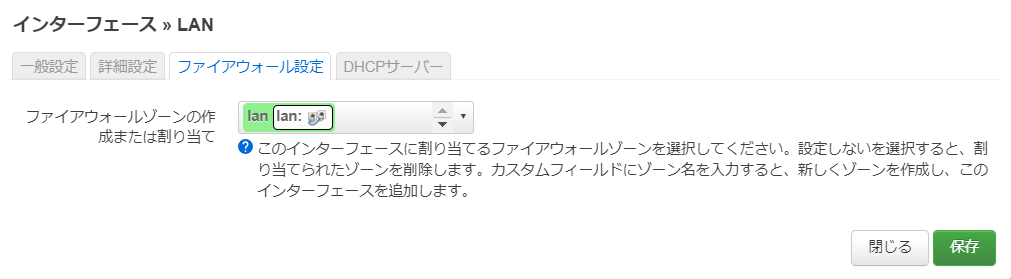
設定手順4:LANインタフェースにDHCPv6関連設定
LANインタフェースの[DHCPサーバー]-[IPv6設定]で以下の設定を行います。
RA-Service:リレーモード
DHCPv6-サービス: サーバーモード
NDP-Proxy: リレーモード
(マスターにチェックは入れません)
設定手順5: IPv6 PD設定
OpenWRT 21.02.0-RC版だとIPv6 PD設定がWAN6にあったのですが、リリース版だと消えています。
これは別のインタフェースとして作成することで対応するようです。
[インタフェースを新規作成]から下記でインタフェースを作成します。
名前:WAN6PD
プロトコル:静的アドレス
デバイス: WAN6インタフェース(@wan6表記)

詳細設定では手順2で確認したIPv6アドレスを使います。
IPv6アドレスが「IPv6: wwww:xxxx:yyyy:zzzz:aaaa:bbbb:cccc:dddd/64」というようになっているとき、先頭の4カラム「wwww:xxxx:yyyy:zzzz」を使います。
まず、WAN6PDに割り当てる 「wwww:xxxx:yyyy:zzzz::1001」を「IPv6アドレス」に設定します。
「IPv6 ゲートウェイ」には「wwww:xxxx:yyyy:zzzz::1 」を指定します。このアドレスは設定完了後、WAN6PDインタフェースではなく、LANインタフェースに対して割り当てられます。
「IPv6ルートプレフィックス」には「wwww:xxxx:yyyy:zzzz::/56」と指定します。
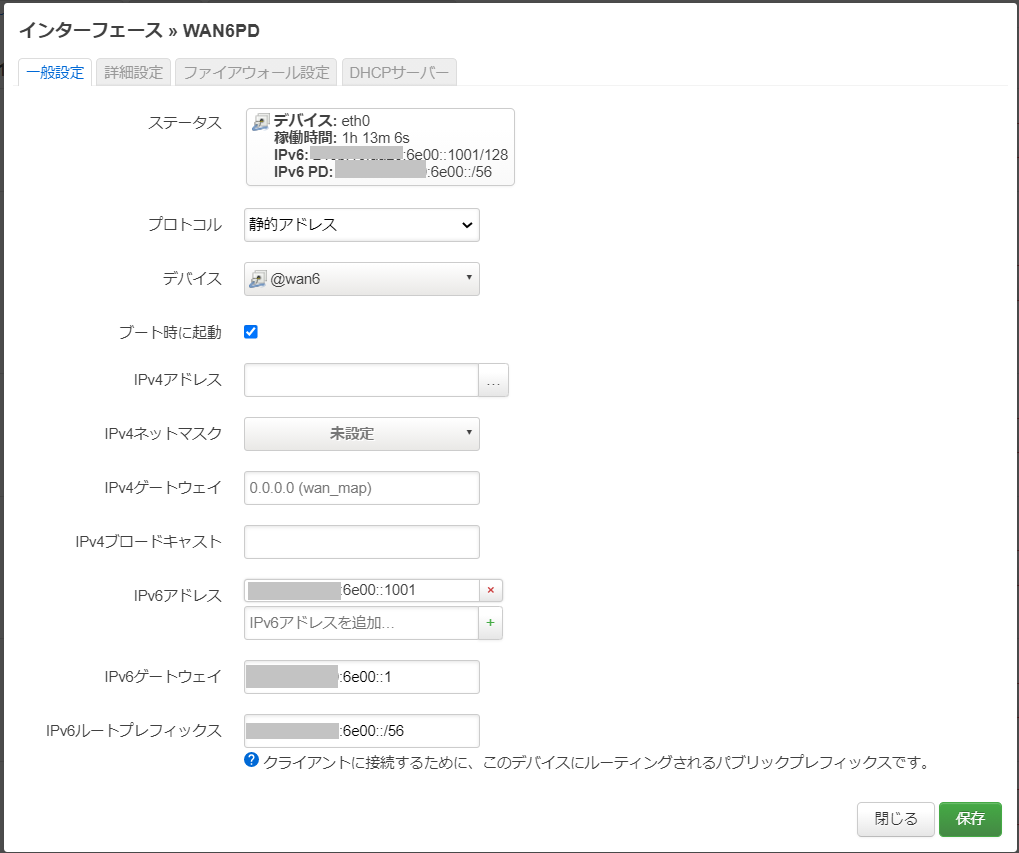
設定すると上記のような感じです。
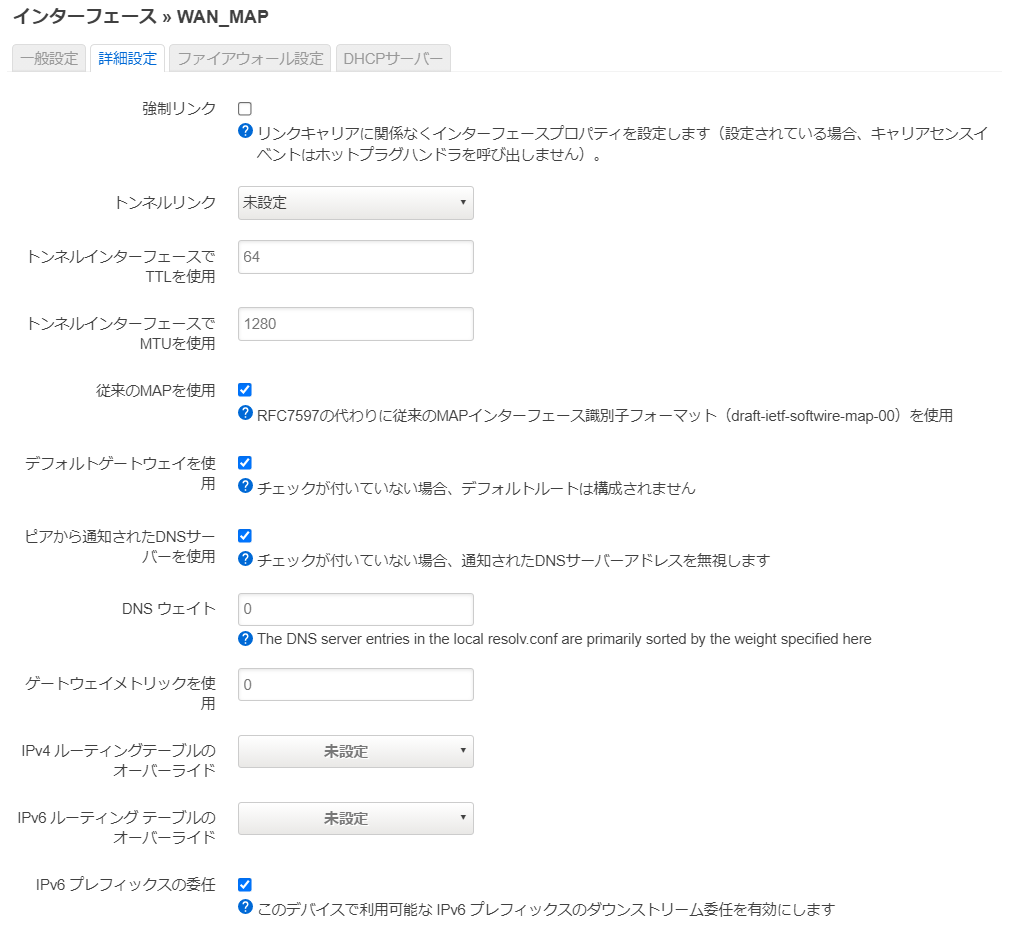
設定手順6: MAP-E接続設定
インタフェースの新規作成で「プロトコル:MAP / LW4over6」を作成して、必要な値を入れていきます。今回は「WAN_MAP」で作成しました。
[一般設定]では下記の様にしました。
プロトコル:MAP/LW4over6
タイプ:MAP-E
以後は環境に合わせた値
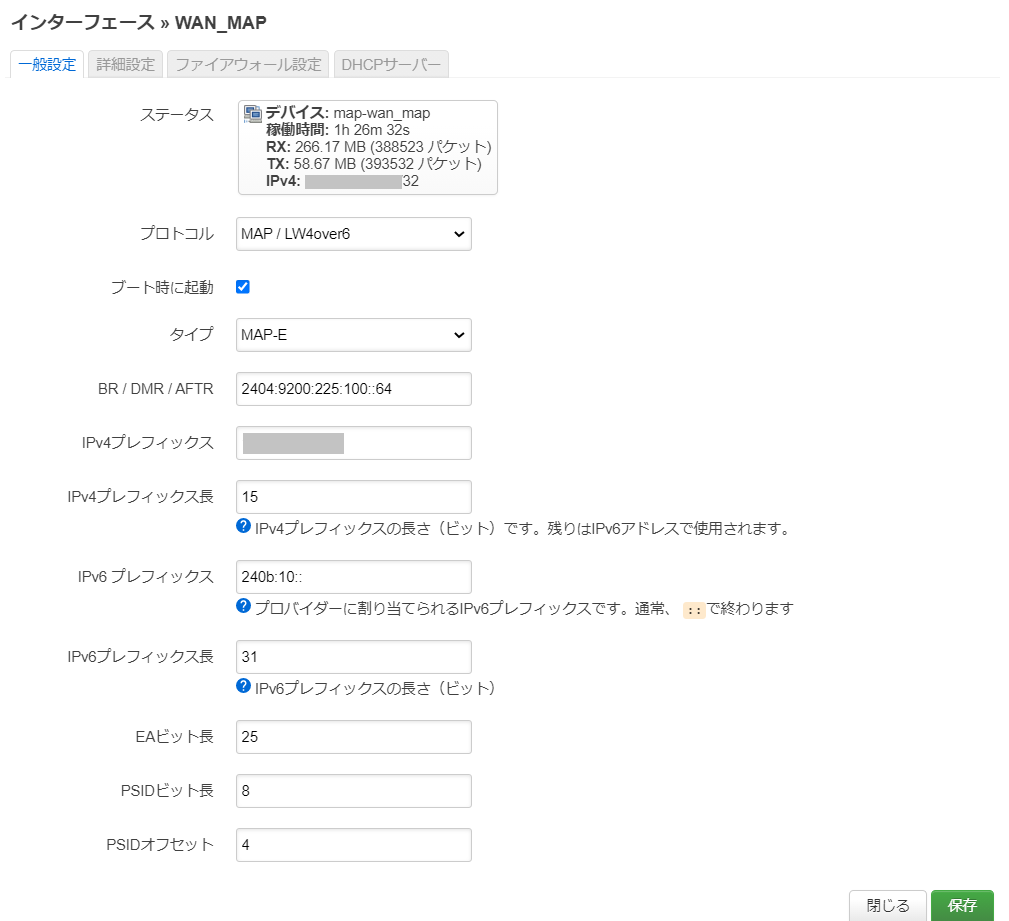
[詳細設定]では「従来のMAPを使用」にチェックを入れる
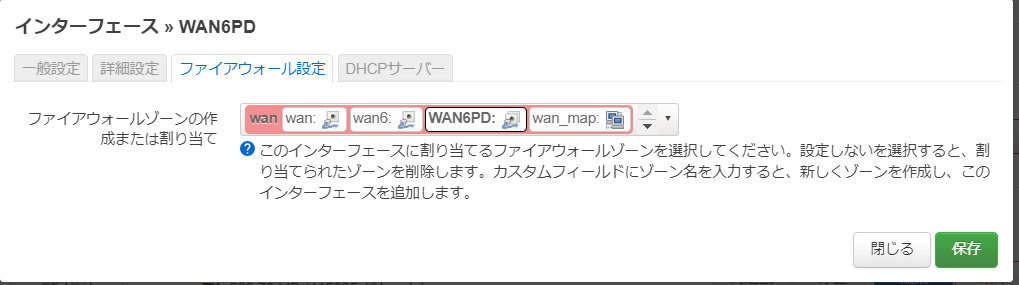
設定手順7: 各インタフェースのファイアウォールゾーン設定
wan系のゾーンに「wan_map」と「WAN6PD」を追加します。
設定完了
ひとまずこれで設定完了です。
うまく接続が始まらない場合は、再起動してみてください。
設定:ニチバン対策
通称「ニチバンベンチ」と呼ばれているものがある。
一部のIPv4通信のみが可能なサイトにアクセスした際に、一定数以上の通信が行えなくなりコンテンツが欠けるなどの現象が発生することがある。
これはNATテーブルの利用手法と、一回確保したNATテーブルエントリの有効期限設定の兼ね合いで、MAP-Eで確保できるIPv4通信用のNAT用ポートを使い果たしてしまった場合に発生している。
大量の小さなファイルがWebサーバ側の同時セッション数が非常に多い設定で流れてこなければならないので、この現象が発生しているかどうかを意図的に確認するのがなかなか難しいものがある。
しかし、長らくニチバンサイトではその条件に合致するサイト構造であったため、ニチバンサイトを10窓ぐらいでリロードすれば発生していたため、確認手法としてニチバンにアクセスすることを「ニチバンベンチ」と呼称していた。(なお、2021年9月時点のニチバンサイトはサイト内容が一新され発生しなくなっている)
このNATテーブルとIPv4 ポート割り当ての問題を解消するためにiptablesを利用して割り当て手法の調整を行う https://paste.teknik.io/VeN9r を使用した。
IP4,PSID, TUNDEVは自分の環境に合わせて変更すること
IP4, PSIDがわからない場合は http://ipv4.web.fc2.com/map-e.html で確認すること
TUNDEVは、GUIから設定した名前ではなく、アイコンの下に小さく書かれている方の名前を使う。↑の場合は「map-wan_map」になる。
また、units1とunits2は、BIGLOBEはV6plus相当であるため、数値を変更する。
units1=15 #V6plus:15 OCN:63
units2=4096 #V6plus 4096 OCN:1024
IP4='xxx.xxx.xxx.xxx'
PSID='x'
TUNDEV='map-wan_map'


iptables -t nat -F PREROUTING
iptables -t nat -F OUTPUT
iptables -t nat -F POSTROUTING

rule=1
while [ $rule -le $units1  ] ; do
  mark=`expr $rule + 16`
  pn=`expr $rule - 1`
  portl=`expr $rule \* $units2 + $PSID \* 16`
  portr=`expr $portl + 15`

  iptables -t nat -A PREROUTING -m statistic --mode nth --every $units1 --packet $pn -j MARK --set-mark $mark
  iptables -t nat -A OUTPUT -m statistic --mode nth --every $units1 --packet $pn -j MARK --set-mark $mark

  iptables -t nat -A POSTROUTING -p icmp -o $TUNDEV -m mark --mark $mark -j SNAT --to $IP4:$portl-$portr
  iptables -t nat -A POSTROUTING -p tcp -o $TUNDEV -m mark --mark $mark -j SNAT --to $IP4:$portl-$portr
  iptables -t nat -A POSTROUTING -p udp -o $TUNDEV -m mark --mark $mark -j SNAT --to $IP4:$portl-$portr
  rule=`expr $rule + 1`
done
上記をopenwrtの[ネットワーク]-[ファイヤーウォール]-[Custom Rules] (/etc/firewall.user) に記載する。
また、[システム]-[スタートアップ]-[ローカルスタートアップ] (/etc/rc.local)の exit 0よりも前に下記2行を追加する
sleep 30
sh /etc/firewall.user
なお、iptablesのstatisticモジュールはiptables-mod-ipoptに入っているが、標準では導入されていないため、冒頭でインストールしているが、まだの場合は下記のような感じでインストールする。
root@nanopi:~# opkg install iptables-mod-ipopt
Installing iptables-mod-ipopt (1.8.7-1) to root...
Downloading https://downloads.openwrt.org/releases/21.02.0-rc1/targets/rockchip/armv8/packages/iptables-mod-ipopt_1.8.7-1_aarch64_generic.ipk
Installing kmod-ipt-ipopt (5.4.111-1) to root...
Downloading https://downloads.openwrt.org/releases/21.02.0-rc1/targets/rockchip/armv8/packages/kmod-ipt-ipopt_5.4.111-1_aarch64_generic.ipk
Configuring kmod-ipt-ipopt.
Configuring iptables-mod-ipopt.
root@nanopi:~#
これで、とりあえずニチバンもスムースに開けるようになった。
参考資料
/etc/config/network
config interface 'loopback'
        option device 'lo'
        option proto 'static'
        option ipaddr '127.0.0.1'
        option netmask '255.0.0.0'

config globals 'globals'
        option ula_prefix 'fdaf:6014:6f21::/48'

config device
        option name 'br-lan'
        option type 'bridge'
        list ports 'eth1'

config device
        option name 'eth1'
        option macaddr '1a:e4:a4:73:0d:0c'

config interface 'lan'
        option device 'br-lan'
        option proto 'static'
        option netmask '255.255.255.0'
        option ip6assign '60'
        option ipaddr '192.168.1.1'

config device
        option name 'eth0'
        option macaddr '1a:e4:a4:73:0d:0b'

config interface 'wan'
        option device 'eth0'
        option proto 'dhcp'
        option auto '0'

config interface 'wan6'
        option device 'eth0'
        option proto 'dhcpv6'
        option reqaddress 'try'
        option reqprefix 'auto'

config interface 'wan_map'
        option proto 'map'
        option maptype 'map-e'
        option peeraddr '2404:9200:225:100::64'
        option ipaddr 'xxx.xxx.xxx.xxx'
        option ip4prefixlen '15'
        option ip6prefix 'wwww:xxxx::'
        option ip6prefixlen '31'
        option ealen '25'
        option psidlen '8'
        option offset '4'
        option legacymap '1'

config interface 'WAN6PD'
        option proto 'static'
        list ip6addr 'wwww:xxxx:yyyy:zzzz::1001'
        option ip6gw 'wwww:xxxx:yyyy:zzzz::1'
        option ip6prefix 'wwww:xxxx:yyyy:zzzz::/56'
        option device '@wan6'
/etc/config/dhcp
config dnsmasq
        option domainneeded '1'
        option boguspriv '1'
        option filterwin2k '0'
        option localise_queries '1'
        option rebind_protection '1'
        option rebind_localhost '1'
        option local '/lan/'
        option domain 'lan'
        option expandhosts '1'
        option nonegcache '0'
        option authoritative '1'
        option readethers '1'
        option leasefile '/tmp/dhcp.leases'
        option resolvfile '/tmp/resolv.conf.d/resolv.conf.auto'
        option nonwildcard '1'
        option localservice '1'
        option ednspacket_max '1232'

config dhcp 'lan'
        option interface 'lan'
        option start '100'
        option limit '150'
        option leasetime '12h'
        option dhcpv4 'server'
        option ra 'relay'
        option ndp 'relay'
        list ra_flags 'none'
        option dhcpv6 'server'

config dhcp 'wan6'
        option dhcpv6 'relay'
        option ra 'relay'
        option ndp 'relay'
        option master '1'
        option interface 'wan6'
        option ignore '1'
        list ra_flags 'none'
iptablesの結果
意図した分散が行われているかを「iptables -t nat -L -v」のPOSTROUTING tcp/udpのpkts/bytesカウントが分散して増加していっているかを確認する。
ちなみに、 /etc/rc.local にsleep 30とsh /etc/firewall.user を入れないと、システムが生成した分散ルールも残って表示される。
root@nanopi:~# iptables -t nat -L -v
Chain PREROUTING (policy ACCEPT 2756 packets, 474K bytes)
 pkts bytes target     prot opt in     out     source               destination
  185 32012 MARK       all  --  any    any     anywhere             anywhere             statistic mode nth every 15 MARK set 0x11
  184 28575 MARK       all  --  any    any     anywhere             anywhere             statistic mode nth every 15 packet 1 MARK set 0x12
  184 31952 MARK       all  --  any    any     anywhere             anywhere             statistic mode nth every 15 packet 2 MARK set 0x13
  184 31323 MARK       all  --  any    any     anywhere             anywhere             statistic mode nth every 15 packet 3 MARK set 0x14
  184 33123 MARK       all  --  any    any     anywhere             anywhere             statistic mode nth every 15 packet 4 MARK set 0x15
  184 36047 MARK       all  --  any    any     anywhere             anywhere             statistic mode nth every 15 packet 5 MARK set 0x16
  184 32939 MARK       all  --  any    any     anywhere             anywhere             statistic mode nth every 15 packet 6 MARK set 0x17
  184 33412 MARK       all  --  any    any     anywhere             anywhere             statistic mode nth every 15 packet 7 MARK set 0x18
  184 29916 MARK       all  --  any    any     anywhere             anywhere             statistic mode nth every 15 packet 8 MARK set 0x19
  184 28526 MARK       all  --  any    any     anywhere             anywhere             statistic mode nth every 15 packet 9 MARK set 0x1a
  184 29308 MARK       all  --  any    any     anywhere             anywhere             statistic mode nth every 15 packet 10 MARK set 0x1b
  183 32364 MARK       all  --  any    any     anywhere             anywhere             statistic mode nth every 15 packet 11 MARK set 0x1c
  183 30150 MARK       all  --  any    any     anywhere             anywhere             statistic mode nth every 15 packet 12 MARK set 0x1d
  183 29944 MARK       all  --  any    any     anywhere             anywhere             statistic mode nth every 15 packet 13 MARK set 0x1e
  183 34100 MARK       all  --  any    any     anywhere             anywhere             statistic mode nth every 15 packet 14 MARK set 0x1f

Chain INPUT (policy ACCEPT 598 packets, 40818 bytes)
 pkts bytes target     prot opt in     out     source               destination

Chain OUTPUT (policy ACCEPT 67 packets, 5056 bytes)
 pkts bytes target     prot opt in     out     source               destination
    5   372 MARK       all  --  any    any     anywhere             anywhere             statistic mode nth every 15 MARK set 0x11
    5   372 MARK       all  --  any    any     anywhere             anywhere             statistic mode nth every 15 packet 1 MARK set 0x12
    5   372 MARK       all  --  any    any     anywhere             anywhere             statistic mode nth every 15 packet 2 MARK set 0x13
    5   372 MARK       all  --  any    any     anywhere             anywhere             statistic mode nth every 15 packet 3 MARK set 0x14
    5   380 MARK       all  --  any    any     anywhere             anywhere             statistic mode nth every 15 packet 4 MARK set 0x15
    5   380 MARK       all  --  any    any     anywhere             anywhere             statistic mode nth every 15 packet 5 MARK set 0x16
    5   380 MARK       all  --  any    any     anywhere             anywhere             statistic mode nth every 15 packet 6 MARK set 0x17
    4   300 MARK       all  --  any    any     anywhere             anywhere             statistic mode nth every 15 packet 7 MARK set 0x18
    4   304 MARK       all  --  any    any     anywhere             anywhere             statistic mode nth every 15 packet 8 MARK set 0x19
    4   304 MARK       all  --  any    any     anywhere             anywhere             statistic mode nth every 15 packet 9 MARK set 0x1a
    4   304 MARK       all  --  any    any     anywhere             anywhere             statistic mode nth every 15 packet 10 MARK set 0x1b
    4   304 MARK       all  --  any    any     anywhere             anywhere             statistic mode nth every 15 packet 11 MARK set 0x1c
    4   304 MARK       all  --  any    any     anywhere             anywhere             statistic mode nth every 15 packet 12 MARK set 0x1d
    4   304 MARK       all  --  any    any     anywhere             anywhere             statistic mode nth every 15 packet 13 MARK set 0x1e
    4   304 MARK       all  --  any    any     anywhere             anywhere             statistic mode nth every 15 packet 14 MARK set 0x1f

Chain POSTROUTING (policy ACCEPT 23 packets, 1064 bytes)
 pkts bytes target     prot opt in     out     source               destination
    2   168 SNAT       icmp --  any    map-wan_map  anywhere             anywhere             mark match 0x11 to:xxx.xxx.xxx.xxx:5856-5871
   41  2607 SNAT       tcp  --  any    map-wan_map  anywhere             anywhere             mark match 0x11 to:xxx.xxx.xxx.xxx:5856-5871
    8   557 SNAT       udp  --  any    map-wan_map  anywhere             anywhere             mark match 0x11 to:xxx.xxx.xxx.xxx:5856-5871
    4   336 SNAT       icmp --  any    map-wan_map  anywhere             anywhere             mark match 0x12 to:xxx.xxx.xxx.xxx:9952-9967
   50  3503 SNAT       tcp  --  any    map-wan_map  anywhere             anywhere             mark match 0x12 to:xxx.xxx.xxx.xxx:9952-9967
   13   868 SNAT       udp  --  any    map-wan_map  anywhere             anywhere             mark match 0x12 to:xxx.xxx.xxx.xxx:9952-9967
    0     0 SNAT       icmp --  any    map-wan_map  anywhere             anywhere             mark match 0x13 to:xxx.xxx.xxx.xxx:14048-14063
   46  2981 SNAT       tcp  --  any    map-wan_map  anywhere             anywhere             mark match 0x13 to:xxx.xxx.xxx.xxx:14048-14063
   11   771 SNAT       udp  --  any    map-wan_map  anywhere             anywhere             mark match 0x13 to:xxx.xxx.xxx.xxx:14048-14063
    0     0 SNAT       icmp --  any    map-wan_map  anywhere             anywhere             mark match 0x14 to:xxx.xxx.xxx.xxx:18144-18159
   33  1991 SNAT       tcp  --  any    map-wan_map  anywhere             anywhere             mark match 0x14 to:xxx.xxx.xxx.xxx:18144-18159
   10   709 SNAT       udp  --  any    map-wan_map  anywhere             anywhere             mark match 0x14 to:xxx.xxx.xxx.xxx:18144-18159
    2   168 SNAT       icmp --  any    map-wan_map  anywhere             anywhere             mark match 0x15 to:xxx.xxx.xxx.xxx:22240-22255
   38  2280 SNAT       tcp  --  any    map-wan_map  anywhere             anywhere             mark match 0x15 to:xxx.xxx.xxx.xxx:22240-22255
   13   950 SNAT       udp  --  any    map-wan_map  anywhere             anywhere             mark match 0x15 to:xxx.xxx.xxx.xxx:22240-22255
    0     0 SNAT       icmp --  any    map-wan_map  anywhere             anywhere             mark match 0x16 to:xxx.xxx.xxx.xxx:26336-26351
   42  3095 SNAT       tcp  --  any    map-wan_map  anywhere             anywhere             mark match 0x16 to:xxx.xxx.xxx.xxx:26336-26351
   11   831 SNAT       udp  --  any    map-wan_map  anywhere             anywhere             mark match 0x16 to:xxx.xxx.xxx.xxx:26336-26351
    0     0 SNAT       icmp --  any    map-wan_map  anywhere             anywhere             mark match 0x17 to:xxx.xxx.xxx.xxx:30432-30447
   51  3838 SNAT       tcp  --  any    map-wan_map  anywhere             anywhere             mark match 0x17 to:xxx.xxx.xxx.xxx:30432-30447
   11   823 SNAT       udp  --  any    map-wan_map  anywhere             anywhere             mark match 0x17 to:xxx.xxx.xxx.xxx:30432-30447
    1    84 SNAT       icmp --  any    map-wan_map  anywhere             anywhere             mark match 0x18 to:xxx.xxx.xxx.xxx:34528-34543
   41  2564 SNAT       tcp  --  any    map-wan_map  anywhere             anywhere             mark match 0x18 to:xxx.xxx.xxx.xxx:34528-34543
    9   656 SNAT       udp  --  any    map-wan_map  anywhere             anywhere             mark match 0x18 to:xxx.xxx.xxx.xxx:34528-34543
    0     0 SNAT       icmp --  any    map-wan_map  anywhere             anywhere             mark match 0x19 to:xxx.xxx.xxx.xxx:38624-38639
   44  2665 SNAT       tcp  --  any    map-wan_map  anywhere             anywhere             mark match 0x19 to:xxx.xxx.xxx.xxx:38624-38639
    9   629 SNAT       udp  --  any    map-wan_map  anywhere             anywhere             mark match 0x19 to:xxx.xxx.xxx.xxx:38624-38639
    0     0 SNAT       icmp --  any    map-wan_map  anywhere             anywhere             mark match 0x1a to:xxx.xxx.xxx.xxx:42720-42735
   55  3841 SNAT       tcp  --  any    map-wan_map  anywhere             anywhere             mark match 0x1a to:xxx.xxx.xxx.xxx:42720-42735
   11   762 SNAT       udp  --  any    map-wan_map  anywhere             anywhere             mark match 0x1a to:xxx.xxx.xxx.xxx:42720-42735
    1    84 SNAT       icmp --  any    map-wan_map  anywhere             anywhere             mark match 0x1b to:xxx.xxx.xxx.xxx:46816-46831
   53  3161 SNAT       tcp  --  any    map-wan_map  anywhere             anywhere             mark match 0x1b to:xxx.xxx.xxx.xxx:46816-46831
   10   699 SNAT       udp  --  any    map-wan_map  anywhere             anywhere             mark match 0x1b to:xxx.xxx.xxx.xxx:46816-46831
    2   168 SNAT       icmp --  any    map-wan_map  anywhere             anywhere             mark match 0x1c to:xxx.xxx.xxx.xxx:50912-50927
   46  2965 SNAT       tcp  --  any    map-wan_map  anywhere             anywhere             mark match 0x1c to:xxx.xxx.xxx.xxx:50912-50927
    9   632 SNAT       udp  --  any    map-wan_map  anywhere             anywhere             mark match 0x1c to:xxx.xxx.xxx.xxx:50912-50927
    1    84 SNAT       icmp --  any    map-wan_map  anywhere             anywhere             mark match 0x1d to:xxx.xxx.xxx.xxx:55008-55023
   45  2700 SNAT       tcp  --  any    map-wan_map  anywhere             anywhere             mark match 0x1d to:xxx.xxx.xxx.xxx:55008-55023
   10   671 SNAT       udp  --  any    map-wan_map  anywhere             anywhere             mark match 0x1d to:xxx.xxx.xxx.xxx:55008-55023
    1    84 SNAT       icmp --  any    map-wan_map  anywhere             anywhere             mark match 0x1e to:xxx.xxx.xxx.xxx:59104-59119
   48  2992 SNAT       tcp  --  any    map-wan_map  anywhere             anywhere             mark match 0x1e to:xxx.xxx.xxx.xxx:59104-59119
   15  1003 SNAT       udp  --  any    map-wan_map  anywhere             anywhere             mark match 0x1e to:xxx.xxx.xxx.xxx:59104-59119
    1    84 SNAT       icmp --  any    map-wan_map  anywhere             anywhere             mark match 0x1f to:xxx.xxx.xxx.xxx:63200-63215
   38  2280 SNAT       tcp  --  any    map-wan_map  anywhere             anywhere             mark match 0x1f to:xxx.xxx.xxx.xxx:63200-63215
    9   615 SNAT       udp  --  any    map-wan_map  anywhere             anywhere             mark match 0x1f to:xxx.xxx.xxx.xxx:63200-63215

Chain postrouting_lan_rule (1 references)
 pkts bytes target     prot opt in     out     source               destination

Chain postrouting_rule (0 references)
 pkts bytes target     prot opt in     out     source               destination

Chain postrouting_wan_rule (1 references)
 pkts bytes target     prot opt in     out     source               destination

Chain prerouting_lan_rule (1 references)
 pkts bytes target     prot opt in     out     source               destination

Chain prerouting_rule (0 references)
 pkts bytes target     prot opt in     out     source               destination

Chain prerouting_wan_rule (1 references)
 pkts bytes target     prot opt in     out     source               destination

Chain zone_lan_postrouting (0 references)
 pkts bytes target     prot opt in     out     source               destination
    0     0 postrouting_lan_rule  all  --  any    any     anywhere             anywhere             /* !fw3: Custom lan postrouting rule chain */

Chain zone_lan_prerouting (0 references)
 pkts bytes target     prot opt in     out     source               destination
  389 44358 prerouting_lan_rule  all  --  any    any     anywhere             anywhere             /* !fw3: Custom lan prerouting rule chain */

Chain zone_wan_postrouting (0 references)
 pkts bytes target     prot opt in     out     source               destination
    0     0 postrouting_wan_rule  all  --  any    any     anywhere             anywhere             /* !fw3: Custom wan postrouting rule chain */
    0     0 MASQUERADE  all  --  any    any     anywhere             anywhere             /* !fw3 */

Chain zone_wan_prerouting (0 references)
 pkts bytes target     prot opt in     out     source               destination
    6   786 prerouting_wan_rule  all  --  any    any     anywhere             anywhere             /* !fw3: Custom wan prerouting rule chain */
root@nanopi:~#
2021/09/22追記: 8日間稼働した後の状態
root@nanopi:~# iptables -t nat -L -v
Chain PREROUTING (policy ACCEPT 1434K packets, 285M bytes)
 pkts bytes target     prot opt in     out     source               destination
95575   19M MARK       all  --  any    any     anywhere             anywhere             statistic mode nth every 15 MARK set 0x11
95574   19M MARK       all  --  any    any     anywhere             anywhere             statistic mode nth every 15 packet 1 MARK set 0x12
95574   19M MARK       all  --  any    any     anywhere             anywhere             statistic mode nth every 15 packet 2 MARK set 0x13
95574   19M MARK       all  --  any    any     anywhere             anywhere             statistic mode nth every 15 packet 3 MARK set 0x14
95574   19M MARK       all  --  any    any     anywhere             anywhere             statistic mode nth every 15 packet 4 MARK set 0x15
95574   19M MARK       all  --  any    any     anywhere             anywhere             statistic mode nth every 15 packet 5 MARK set 0x16
95574   19M MARK       all  --  any    any     anywhere             anywhere             statistic mode nth every 15 packet 6 MARK set 0x17
95573   19M MARK       all  --  any    any     anywhere             anywhere             statistic mode nth every 15 packet 7 MARK set 0x18
95573   19M MARK       all  --  any    any     anywhere             anywhere             statistic mode nth every 15 packet 8 MARK set 0x19
95573   19M MARK       all  --  any    any     anywhere             anywhere             statistic mode nth every 15 packet 9 MARK set 0x1a
95573   19M MARK       all  --  any    any     anywhere             anywhere             statistic mode nth every 15 packet 10 MARK set 0x1b
95573   19M MARK       all  --  any    any     anywhere             anywhere             statistic mode nth every 15 packet 11 MARK set 0x1c
95573   19M MARK       all  --  any    any     anywhere             anywhere             statistic mode nth every 15 packet 12 MARK set 0x1d
95573   19M MARK       all  --  any    any     anywhere             anywhere             statistic mode nth every 15 packet 13 MARK set 0x1e
95573   19M MARK       all  --  any    any     anywhere             anywhere             statistic mode nth every 15 packet 14 MARK set 0x1f

Chain INPUT (policy ACCEPT 231K packets, 17M bytes)
 pkts bytes target     prot opt in     out     source               destination

Chain OUTPUT (policy ACCEPT 1399 packets, 222K bytes)
 pkts bytes target     prot opt in     out     source               destination
   94 15373 MARK       all  --  any    any     anywhere             anywhere             statistic mode nth every 15 MARK set 0x11
   94 16668 MARK       all  --  any    any     anywhere             anywhere             statistic mode nth every 15 packet 1 MARK set 0x12
   94 13812 MARK       all  --  any    any     anywhere             anywhere             statistic mode nth every 15 packet 2 MARK set 0x13
   94 14151 MARK       all  --  any    any     anywhere             anywhere             statistic mode nth every 15 packet 3 MARK set 0x14
   93 14819 MARK       all  --  any    any     anywhere             anywhere             statistic mode nth every 15 packet 4 MARK set 0x15
   93 13431 MARK       all  --  any    any     anywhere             anywhere             statistic mode nth every 15 packet 5 MARK set 0x16
   93 15387 MARK       all  --  any    any     anywhere             anywhere             statistic mode nth every 15 packet 6 MARK set 0x17
   93 14528 MARK       all  --  any    any     anywhere             anywhere             statistic mode nth every 15 packet 7 MARK set 0x18
   93 15124 MARK       all  --  any    any     anywhere             anywhere             statistic mode nth every 15 packet 8 MARK set 0x19
   93 16367 MARK       all  --  any    any     anywhere             anywhere             statistic mode nth every 15 packet 9 MARK set 0x1a
   93 14850 MARK       all  --  any    any     anywhere             anywhere             statistic mode nth every 15 packet 10 MARK set 0x1b
   93 14763 MARK       all  --  any    any     anywhere             anywhere             statistic mode nth every 15 packet 11 MARK set 0x1c
   93 14121 MARK       all  --  any    any     anywhere             anywhere             statistic mode nth every 15 packet 12 MARK set 0x1d
   93 13029 MARK       all  --  any    any     anywhere             anywhere             statistic mode nth every 15 packet 13 MARK set 0x1e
   93 15394 MARK       all  --  any    any     anywhere             anywhere             statistic mode nth every 15 packet 14 MARK set 0x1f

Chain POSTROUTING (policy ACCEPT 1289 packets, 186K bytes)
 pkts bytes target     prot opt in     out     source               destination
  772 64680 SNAT       icmp --  any    map-wan_map  anywhere             anywhere             mark match 0x11 to:xxx.xxx.xxx.xxx:5856-5871
14703  948K SNAT       tcp  --  any    map-wan_map  anywhere             anywhere             mark match 0x11 to:xxx.xxx.xxx.xxx:5856-5871
 3753  257K SNAT       udp  --  any    map-wan_map  anywhere             anywhere             mark match 0x11 to:xxx.xxx.xxx.xxx:5856-5871
  837 70140 SNAT       icmp --  any    map-wan_map  anywhere             anywhere             mark match 0x12 to:xxx.xxx.xxx.xxx:9952-9967
14623  945K SNAT       tcp  --  any    map-wan_map  anywhere             anywhere             mark match 0x12 to:xxx.xxx.xxx.xxx:9952-9967
 3628  254K SNAT       udp  --  any    map-wan_map  anywhere             anywhere             mark match 0x12 to:xxx.xxx.xxx.xxx:9952-9967
  806 67536 SNAT       icmp --  any    map-wan_map  anywhere             anywhere             mark match 0x13 to:xxx.xxx.xxx.xxx:14048-14063
14690  930K SNAT       tcp  --  any    map-wan_map  anywhere             anywhere             mark match 0x13 to:xxx.xxx.xxx.xxx:14048-14063
 3705  257K SNAT       udp  --  any    map-wan_map  anywhere             anywhere             mark match 0x13 to:xxx.xxx.xxx.xxx:14048-14063
  853 71540 SNAT       icmp --  any    map-wan_map  anywhere             anywhere             mark match 0x14 to:xxx.xxx.xxx.xxx:18144-18159
14620  936K SNAT       tcp  --  any    map-wan_map  anywhere             anywhere             mark match 0x14 to:xxx.xxx.xxx.xxx:18144-18159
 3696  255K SNAT       udp  --  any    map-wan_map  anywhere             anywhere             mark match 0x14 to:xxx.xxx.xxx.xxx:18144-18159
  802 67088 SNAT       icmp --  any    map-wan_map  anywhere             anywhere             mark match 0x15 to:xxx.xxx.xxx.xxx:22240-22255
14833  942K SNAT       tcp  --  any    map-wan_map  anywhere             anywhere             mark match 0x15 to:xxx.xxx.xxx.xxx:22240-22255
 3723  256K SNAT       udp  --  any    map-wan_map  anywhere             anywhere             mark match 0x15 to:xxx.xxx.xxx.xxx:22240-22255
  834 69944 SNAT       icmp --  any    map-wan_map  anywhere             anywhere             mark match 0x16 to:xxx.xxx.xxx.xxx:26336-26351
14759  930K SNAT       tcp  --  any    map-wan_map  anywhere             anywhere             mark match 0x16 to:xxx.xxx.xxx.xxx:26336-26351
 3689  258K SNAT       udp  --  any    map-wan_map  anywhere             anywhere             mark match 0x16 to:xxx.xxx.xxx.xxx:26336-26351
  804 67480 SNAT       icmp --  any    map-wan_map  anywhere             anywhere             mark match 0x17 to:xxx.xxx.xxx.xxx:30432-30447
14874  946K SNAT       tcp  --  any    map-wan_map  anywhere             anywhere             mark match 0x17 to:xxx.xxx.xxx.xxx:30432-30447
 3746  261K SNAT       udp  --  any    map-wan_map  anywhere             anywhere             mark match 0x17 to:xxx.xxx.xxx.xxx:30432-30447
  868 72800 SNAT       icmp --  any    map-wan_map  anywhere             anywhere             mark match 0x18 to:xxx.xxx.xxx.xxx:34528-34543
14703  937K SNAT       tcp  --  any    map-wan_map  anywhere             anywhere             mark match 0x18 to:xxx.xxx.xxx.xxx:34528-34543
 3698  254K SNAT       udp  --  any    map-wan_map  anywhere             anywhere             mark match 0x18 to:xxx.xxx.xxx.xxx:34528-34543
  843 70644 SNAT       icmp --  any    map-wan_map  anywhere             anywhere             mark match 0x19 to:xxx.xxx.xxx.xxx:38624-38639
14651  931K SNAT       tcp  --  any    map-wan_map  anywhere             anywhere             mark match 0x19 to:xxx.xxx.xxx.xxx:38624-38639
 3720  256K SNAT       udp  --  any    map-wan_map  anywhere             anywhere             mark match 0x19 to:xxx.xxx.xxx.xxx:38624-38639
  768 64288 SNAT       icmp --  any    map-wan_map  anywhere             anywhere             mark match 0x1a to:xxx.xxx.xxx.xxx:42720-42735
14731  942K SNAT       tcp  --  any    map-wan_map  anywhere             anywhere             mark match 0x1a to:xxx.xxx.xxx.xxx:42720-42735
 3689  251K SNAT       udp  --  any    map-wan_map  anywhere             anywhere             mark match 0x1a to:xxx.xxx.xxx.xxx:42720-42735
  839 70084 SNAT       icmp --  any    map-wan_map  anywhere             anywhere             mark match 0x1b to:xxx.xxx.xxx.xxx:46816-46831
14826  944K SNAT       tcp  --  any    map-wan_map  anywhere             anywhere             mark match 0x1b to:xxx.xxx.xxx.xxx:46816-46831
 3729  257K SNAT       udp  --  any    map-wan_map  anywhere             anywhere             mark match 0x1b to:xxx.xxx.xxx.xxx:46816-46831
  841 70420 SNAT       icmp --  any    map-wan_map  anywhere             anywhere             mark match 0x1c to:xxx.xxx.xxx.xxx:50912-50927
14751  939K SNAT       tcp  --  any    map-wan_map  anywhere             anywhere             mark match 0x1c to:xxx.xxx.xxx.xxx:50912-50927
 3697  252K SNAT       udp  --  any    map-wan_map  anywhere             anywhere             mark match 0x1c to:xxx.xxx.xxx.xxx:50912-50927
  783 65492 SNAT       icmp --  any    map-wan_map  anywhere             anywhere             mark match 0x1d to:xxx.xxx.xxx.xxx:55008-55023
14802  937K SNAT       tcp  --  any    map-wan_map  anywhere             anywhere             mark match 0x1d to:xxx.xxx.xxx.xxx:55008-55023
 3679  255K SNAT       udp  --  any    map-wan_map  anywhere             anywhere             mark match 0x1d to:xxx.xxx.xxx.xxx:55008-55023
  850 71288 SNAT       icmp --  any    map-wan_map  anywhere             anywhere             mark match 0x1e to:xxx.xxx.xxx.xxx:59104-59119
14824  942K SNAT       tcp  --  any    map-wan_map  anywhere             anywhere             mark match 0x1e to:xxx.xxx.xxx.xxx:59104-59119
 3622  246K SNAT       udp  --  any    map-wan_map  anywhere             anywhere             mark match 0x1e to:xxx.xxx.xxx.xxx:59104-59119
  870 72968 SNAT       icmp --  any    map-wan_map  anywhere             anywhere             mark match 0x1f to:xxx.xxx.xxx.xxx:63200-63215
14802  941K SNAT       tcp  --  any    map-wan_map  anywhere             anywhere             mark match 0x1f to:xxx.xxx.xxx.xxx:63200-63215
 3684  258K SNAT       udp  --  any    map-wan_map  anywhere             anywhere             mark match 0x1f to:xxx.xxx.xxx.xxx:63200-63215

Chain postrouting_lan_rule (1 references)
 pkts bytes target     prot opt in     out     source               destination

Chain postrouting_rule (0 references)
 pkts bytes target     prot opt in     out     source               destination

Chain postrouting_wan_rule (1 references)
 pkts bytes target     prot opt in     out     source               destination

Chain prerouting_lan_rule (1 references)
 pkts bytes target     prot opt in     out     source               destination

Chain prerouting_rule (0 references)
 pkts bytes target     prot opt in     out     source               destination

Chain prerouting_wan_rule (1 references)
 pkts bytes target     prot opt in     out     source               destination

Chain zone_lan_postrouting (0 references)
 pkts bytes target     prot opt in     out     source               destination
    0     0 postrouting_lan_rule  all  --  any    any     anywhere             anywhere             /* !fw3: Custom lan postrouting rule chain */

Chain zone_lan_prerouting (0 references)
 pkts bytes target     prot opt in     out     source               destination
  389 44358 prerouting_lan_rule  all  --  any    any     anywhere             anywhere             /* !fw3: Custom lan prerouting rule chain */

Chain zone_wan_postrouting (0 references)
 pkts bytes target     prot opt in     out     source               destination
    0     0 postrouting_wan_rule  all  --  any    any     anywhere             anywhere             /* !fw3: Custom wan postrouting rule chain */
    0     0 MASQUERADE  all  --  any    any     anywhere             anywhere             /* !fw3 */

Chain zone_wan_prerouting (0 references)
 pkts bytes target     prot opt in     out     source               destination
    6   786 prerouting_wan_rule  all  --  any    any     anywhere             anywhere             /* !fw3: Custom wan prerouting rule chain */
root@nanopi:~#
2022/04/14追記
32日起動していた場合の出力なんだけど、以前と違って「conn dst/32 <= 16 /* !fw3: ubus:wan_map[map] nat」の数が増えてないのはなんなのだ???
root@nanopi:~# uptime
09:48:41 up 32 days, 12:38, load average: 0.00, 0.01, 0.00
root@nanopi:~# iptables -t nat -L -v
Chain PREROUTING (policy ACCEPT 6326K packets, 1296M bytes)
pkts bytes target prot opt in out source destination
422K 86M MARK all -- any any anywhere anywhere statistic mode nth every 15 MARK set 0x11
422K 86M MARK all -- any any anywhere anywhere statistic mode nth every 15 packet 1 MARK set 0x12
422K 86M MARK all -- any any anywhere anywhere statistic mode nth every 15 packet 2 MARK set 0x13
422K 86M MARK all -- any any anywhere anywhere statistic mode nth every 15 packet 3 MARK set 0x14
422K 87M MARK all -- any any anywhere anywhere statistic mode nth every 15 packet 4 MARK set 0x15
422K 87M MARK all -- any any anywhere anywhere statistic mode nth every 15 packet 5 MARK set 0x16
422K 86M MARK all -- any any anywhere anywhere statistic mode nth every 15 packet 6 MARK set 0x17
422K 86M MARK all -- any any anywhere anywhere statistic mode nth every 15 packet 7 MARK set 0x18
422K 86M MARK all -- any any anywhere anywhere statistic mode nth every 15 packet 8 MARK set 0x19
422K 86M MARK all -- any any anywhere anywhere statistic mode nth every 15 packet 9 MARK set 0x1a
422K 86M MARK all -- any any anywhere anywhere statistic mode nth every 15 packet 10 MARK set 0x1b
422K 86M MARK all -- any any anywhere anywhere statistic mode nth every 15 packet 11 MARK set 0x1c
422K 87M MARK all -- any any anywhere anywhere statistic mode nth every 15 packet 12 MARK set 0x1d
422K 87M MARK all -- any any anywhere anywhere statistic mode nth every 15 packet 13 MARK set 0x1e
422K 86M MARK all -- any any anywhere anywhere statistic mode nth every 15 packet 14 MARK set 0x1f
6326K 1296M prerouting_rule all -- any any anywhere anywhere /* !fw3: Custom prerouting rule chain */
6321K 1295M zone_lan_prerouting all -- br-lan any anywhere anywhere /* !fw3 */
0 0 zone_wan_prerouting all -- eth0 any anywhere anywhere /* !fw3 */
4905 558K zone_wan_prerouting all -- map-wan_map any anywhere anywhere /* !fw3 */
Chain INPUT (policy ACCEPT 1037K packets, 79M bytes)
pkts bytes target prot opt in out source destination
Chain OUTPUT (policy ACCEPT 9463 packets, 1532K bytes)
pkts bytes target prot opt in out source destination
632 101K MARK all -- any any anywhere anywhere statistic mode nth every 15 MARK set 0x11
631 103K MARK all -- any any anywhere anywhere statistic mode nth every 15 packet 1 MARK set 0x12
631 100K MARK all -- any any anywhere anywhere statistic mode nth every 15 packet 2 MARK set 0x13
631 99184 MARK all -- any any anywhere anywhere statistic mode nth every 15 packet 3 MARK set 0x14
631 101K MARK all -- any any anywhere anywhere statistic mode nth every 15 packet 4 MARK set 0x15
631 103K MARK all -- any any anywhere anywhere statistic mode nth every 15 packet 5 MARK set 0x16
631 105K MARK all -- any any anywhere anywhere statistic mode nth every 15 packet 6 MARK set 0x17
631 102K MARK all -- any any anywhere anywhere statistic mode nth every 15 packet 7 MARK set 0x18
631 102K MARK all -- any any anywhere anywhere statistic mode nth every 15 packet 8 MARK set 0x19
631 97260 MARK all -- any any anywhere anywhere statistic mode nth every 15 packet 9 MARK set 0x1a
631 104K MARK all -- any any anywhere anywhere statistic mode nth every 15 packet 10 MARK set 0x1b
631 102K MARK all -- any any anywhere anywhere statistic mode nth every 15 packet 11 MARK set 0x1c
631 105K MARK all -- any any anywhere anywhere statistic mode nth every 15 packet 12 MARK set 0x1d
630 100K MARK all -- any any anywhere anywhere statistic mode nth every 15 packet 13 MARK set 0x1e
630 104K MARK all -- any any anywhere anywhere statistic mode nth every 15 packet 14 MARK set 0x1f
Chain POSTROUTING (policy ACCEPT 7238 packets, 1363K bytes)
pkts bytes target prot opt in out source destination
2962 257K SNAT icmp -- any map-wan_map anywhere anywhere mark match 0x11 to:xxx.xx.xxx.xx:5856-5871
62597 4208K SNAT tcp -- any map-wan_map anywhere anywhere mark match 0x11 to:xxx.xx.xxx.xx:5856-5871
14955 4828K SNAT udp -- any map-wan_map anywhere anywhere mark match 0x11 to:xxx.xx.xxx.xx:5856-5871
2998 256K SNAT icmp -- any map-wan_map anywhere anywhere mark match 0x12 to:xxx.xx.xxx.xx:9952-9967
62399 4173K SNAT tcp -- any map-wan_map anywhere anywhere mark match 0x12 to:xxx.xx.xxx.xx:9952-9967
14973 4852K SNAT udp -- any map-wan_map anywhere anywhere mark match 0x12 to:xxx.xx.xxx.xx:9952-9967
2972 263K SNAT icmp -- any map-wan_map anywhere anywhere mark match 0x13 to:xxx.xx.xxx.xx:14048-14063
62056 4109K SNAT tcp -- any map-wan_map anywhere anywhere mark match 0x13 to:xxx.xx.xxx.xx:14048-14063
14958 4830K SNAT udp -- any map-wan_map anywhere anywhere mark match 0x13 to:xxx.xx.xxx.xx:14048-14063
3020 270K SNAT icmp -- any map-wan_map anywhere anywhere mark match 0x14 to:xxx.xx.xxx.xx:18144-18159
62491 4170K SNAT tcp -- any map-wan_map anywhere anywhere mark match 0x14 to:xxx.xx.xxx.xx:18144-18159
15125 4922K SNAT udp -- any map-wan_map anywhere anywhere mark match 0x14 to:xxx.xx.xxx.xx:18144-18159
2948 255K SNAT icmp -- any map-wan_map anywhere anywhere mark match 0x15 to:xxx.xx.xxx.xx:22240-22255
62215 4170K SNAT tcp -- any map-wan_map anywhere anywhere mark match 0x15 to:xxx.xx.xxx.xx:22240-22255
15160 4931K SNAT udp -- any map-wan_map anywhere anywhere mark match 0x15 to:xxx.xx.xxx.xx:22240-22255
2985 259K SNAT icmp -- any map-wan_map anywhere anywhere mark match 0x16 to:xxx.xx.xxx.xx:26336-26351
62214 4147K SNAT tcp -- any map-wan_map anywhere anywhere mark match 0x16 to:xxx.xx.xxx.xx:26336-26351
15056 4989K SNAT udp -- any map-wan_map anywhere anywhere mark match 0x16 to:xxx.xx.xxx.xx:26336-26351
3116 271K SNAT icmp -- any map-wan_map anywhere anywhere mark match 0x17 to:xxx.xx.xxx.xx:30432-30447
62050 4150K SNAT tcp -- any map-wan_map anywhere anywhere mark match 0x17 to:xxx.xx.xxx.xx:30432-30447
15061 4789K SNAT udp -- any map-wan_map anywhere anywhere mark match 0x17 to:xxx.xx.xxx.xx:30432-30447
2973 256K SNAT icmp -- any map-wan_map anywhere anywhere mark match 0x18 to:xxx.xx.xxx.xx:34528-34543
62684 4173K SNAT tcp -- any map-wan_map anywhere anywhere mark match 0x18 to:xxx.xx.xxx.xx:34528-34543
15055 4832K SNAT udp -- any map-wan_map anywhere anywhere mark match 0x18 to:xxx.xx.xxx.xx:34528-34543
3046 272K SNAT icmp -- any map-wan_map anywhere anywhere mark match 0x19 to:xxx.xx.xxx.xx:38624-38639
62090 4162K SNAT tcp -- any map-wan_map anywhere anywhere mark match 0x19 to:xxx.xx.xxx.xx:38624-38639
14894 4747K SNAT udp -- any map-wan_map anywhere anywhere mark match 0x19 to:xxx.xx.xxx.xx:38624-38639
3045 263K SNAT icmp -- any map-wan_map anywhere anywhere mark match 0x1a to:xxx.xx.xxx.xx:42720-42735
62550 4157K SNAT tcp -- any map-wan_map anywhere anywhere mark match 0x1a to:xxx.xx.xxx.xx:42720-42735
15085 4847K SNAT udp -- any map-wan_map anywhere anywhere mark match 0x1a to:xxx.xx.xxx.xx:42720-42735
2970 255K SNAT icmp -- any map-wan_map anywhere anywhere mark match 0x1b to:xxx.xx.xxx.xx:46816-46831
62369 4167K SNAT tcp -- any map-wan_map anywhere anywhere mark match 0x1b to:xxx.xx.xxx.xx:46816-46831
14965 4803K SNAT udp -- any map-wan_map anywhere anywhere mark match 0x1b to:xxx.xx.xxx.xx:46816-46831
2912 257K SNAT icmp -- any map-wan_map anywhere anywhere mark match 0x1c to:xxx.xx.xxx.xx:50912-50927
62665 4189K SNAT tcp -- any map-wan_map anywhere anywhere mark match 0x1c to:xxx.xx.xxx.xx:50912-50927
15057 4704K SNAT udp -- any map-wan_map anywhere anywhere mark match 0x1c to:xxx.xx.xxx.xx:50912-50927
3024 263K SNAT icmp -- any map-wan_map anywhere anywhere mark match 0x1d to:xxx.xx.xxx.xx:55008-55023
62282 4191K SNAT tcp -- any map-wan_map anywhere anywhere mark match 0x1d to:xxx.xx.xxx.xx:55008-55023
15039 4877K SNAT udp -- any map-wan_map anywhere anywhere mark match 0x1d to:xxx.xx.xxx.xx:55008-55023
3022 262K SNAT icmp -- any map-wan_map anywhere anywhere mark match 0x1e to:xxx.xx.xxx.xx:59104-59119
62369 4163K SNAT tcp -- any map-wan_map anywhere anywhere mark match 0x1e to:xxx.xx.xxx.xx:59104-59119
15014 4877K SNAT udp -- any map-wan_map anywhere anywhere mark match 0x1e to:xxx.xx.xxx.xx:59104-59119
3001 261K SNAT icmp -- any map-wan_map anywhere anywhere mark match 0x1f to:xxx.xx.xxx.xx:63200-63215
62511 4145K SNAT tcp -- any map-wan_map anywhere anywhere mark match 0x1f to:xxx.xx.xxx.xx:63200-63215
15094 4836K SNAT udp -- any map-wan_map anywhere anywhere mark match 0x1f to:xxx.xx.xxx.xx:63200-63215
10025 1475K postrouting_rule all -- any any anywhere anywhere /* !fw3: Custom postrouting rule chain */
0 0 SNAT icmp -- any map-wan_map anywhere anywhere #conn dst/32 <= 16 /* !fw3: ubus:wan_map[map] nat 0 */ to:xxx.xx.xxx.xx:5856-5871
2787 111K SNAT tcp -- any map-wan_map anywhere anywhere #conn dst/32 <= 16 /* !fw3: ubus:wan_map[map] nat 1 */ to:xxx.xx.xxx.xx:5856-5871
0 0 SNAT udp -- any map-wan_map anywhere anywhere #conn dst/32 <= 16 /* !fw3: ubus:wan_map[map] nat 2 */ to:xxx.xx.xxx.xx:5856-5871
0 0 SNAT icmp -- any map-wan_map anywhere anywhere #conn dst/32 <= 16 /* !fw3: ubus:wan_map[map] nat 3 */ to:xxx.xx.xxx.xx:9952-9967
0 0 SNAT tcp -- any map-wan_map anywhere anywhere #conn dst/32 <= 16 /* !fw3: ubus:wan_map[map] nat 4 */ to:xxx.xx.xxx.xx:9952-9967
0 0 SNAT udp -- any map-wan_map anywhere anywhere #conn dst/32 <= 16 /* !fw3: ubus:wan_map[map] nat 5 */ to:xxx.xx.xxx.xx:9952-9967
0 0 SNAT icmp -- any map-wan_map anywhere anywhere #conn dst/32 <= 16 /* !fw3: ubus:wan_map[map] nat 6 */ to:xxx.xx.xxx.xx:14048-14063
0 0 SNAT tcp -- any map-wan_map anywhere anywhere #conn dst/32 <= 16 /* !fw3: ubus:wan_map[map] nat 7 */ to:xxx.xx.xxx.xx:14048-14063
0 0 SNAT udp -- any map-wan_map anywhere anywhere #conn dst/32 <= 16 /* !fw3: ubus:wan_map[map] nat 8 */ to:xxx.xx.xxx.xx:14048-14063
0 0 SNAT icmp -- any map-wan_map anywhere anywhere #conn dst/32 <= 16 /* !fw3: ubus:wan_map[map] nat 9 */ to:xxx.xx.xxx.xx:18144-18159
0 0 SNAT tcp -- any map-wan_map anywhere anywhere #conn dst/32 <= 16 /* !fw3: ubus:wan_map[map] nat 10 */ to:xxx.xx.xxx.xx:18144-18159
0 0 SNAT udp -- any map-wan_map anywhere anywhere #conn dst/32 <= 16 /* !fw3: ubus:wan_map[map] nat 11 */ to:xxx.xx.xxx.xx:18144-18159
0 0 SNAT icmp -- any map-wan_map anywhere anywhere #conn dst/32 <= 16 /* !fw3: ubus:wan_map[map] nat 12 */ to:xxx.xx.xxx.xx:22240-22255
0 0 SNAT tcp -- any map-wan_map anywhere anywhere #conn dst/32 <= 16 /* !fw3: ubus:wan_map[map] nat 13 */ to:xxx.xx.xxx.xx:22240-22255
0 0 SNAT udp -- any map-wan_map anywhere anywhere #conn dst/32 <= 16 /* !fw3: ubus:wan_map[map] nat 14 */ to:xxx.xx.xxx.xx:22240-22255
0 0 SNAT icmp -- any map-wan_map anywhere anywhere #conn dst/32 <= 16 /* !fw3: ubus:wan_map[map] nat 15 */ to:xxx.xx.xxx.xx:26336-26351
0 0 SNAT tcp -- any map-wan_map anywhere anywhere #conn dst/32 <= 16 /* !fw3: ubus:wan_map[map] nat 16 */ to:xxx.xx.xxx.xx:26336-26351
0 0 SNAT udp -- any map-wan_map anywhere anywhere #conn dst/32 <= 16 /* !fw3: ubus:wan_map[map] nat 17 */ to:xxx.xx.xxx.xx:26336-26351
0 0 SNAT icmp -- any map-wan_map anywhere anywhere #conn dst/32 <= 16 /* !fw3: ubus:wan_map[map] nat 18 */ to:xxx.xx.xxx.xx:30432-30447
0 0 SNAT tcp -- any map-wan_map anywhere anywhere #conn dst/32 <= 16 /* !fw3: ubus:wan_map[map] nat 19 */ to:xxx.xx.xxx.xx:30432-30447
0 0 SNAT udp -- any map-wan_map anywhere anywhere #conn dst/32 <= 16 /* !fw3: ubus:wan_map[map] nat 20 */ to:xxx.xx.xxx.xx:30432-30447
0 0 SNAT icmp -- any map-wan_map anywhere anywhere #conn dst/32 <= 16 /* !fw3: ubus:wan_map[map] nat 21 */ to:xxx.xx.xxx.xx:34528-34543
0 0 SNAT tcp -- any map-wan_map anywhere anywhere #conn dst/32 <= 16 /* !fw3: ubus:wan_map[map] nat 22 */ to:xxx.xx.xxx.xx:34528-34543
0 0 SNAT udp -- any map-wan_map anywhere anywhere #conn dst/32 <= 16 /* !fw3: ubus:wan_map[map] nat 23 */ to:xxx.xx.xxx.xx:34528-34543
0 0 SNAT icmp -- any map-wan_map anywhere anywhere #conn dst/32 <= 16 /* !fw3: ubus:wan_map[map] nat 24 */ to:xxx.xx.xxx.xx:38624-38639
0 0 SNAT tcp -- any map-wan_map anywhere anywhere #conn dst/32 <= 16 /* !fw3: ubus:wan_map[map] nat 25 */ to:xxx.xx.xxx.xx:38624-38639
0 0 SNAT udp -- any map-wan_map anywhere anywhere #conn dst/32 <= 16 /* !fw3: ubus:wan_map[map] nat 26 */ to:xxx.xx.xxx.xx:38624-38639
0 0 SNAT icmp -- any map-wan_map anywhere anywhere #conn dst/32 <= 16 /* !fw3: ubus:wan_map[map] nat 27 */ to:xxx.xx.xxx.xx:42720-42735
0 0 SNAT tcp -- any map-wan_map anywhere anywhere #conn dst/32 <= 16 /* !fw3: ubus:wan_map[map] nat 28 */ to:xxx.xx.xxx.xx:42720-42735
0 0 SNAT udp -- any map-wan_map anywhere anywhere #conn dst/32 <= 16 /* !fw3: ubus:wan_map[map] nat 29 */ to:xxx.xx.xxx.xx:42720-42735
0 0 SNAT icmp -- any map-wan_map anywhere anywhere #conn dst/32 <= 16 /* !fw3: ubus:wan_map[map] nat 30 */ to:xxx.xx.xxx.xx:46816-46831
0 0 SNAT tcp -- any map-wan_map anywhere anywhere #conn dst/32 <= 16 /* !fw3: ubus:wan_map[map] nat 31 */ to:xxx.xx.xxx.xx:46816-46831
0 0 SNAT udp -- any map-wan_map anywhere anywhere #conn dst/32 <= 16 /* !fw3: ubus:wan_map[map] nat 32 */ to:xxx.xx.xxx.xx:46816-46831
0 0 SNAT icmp -- any map-wan_map anywhere anywhere #conn dst/32 <= 16 /* !fw3: ubus:wan_map[map] nat 33 */ to:xxx.xx.xxx.xx:50912-50927
0 0 SNAT tcp -- any map-wan_map anywhere anywhere #conn dst/32 <= 16 /* !fw3: ubus:wan_map[map] nat 34 */ to:xxx.xx.xxx.xx:50912-50927
0 0 SNAT udp -- any map-wan_map anywhere anywhere #conn dst/32 <= 16 /* !fw3: ubus:wan_map[map] nat 35 */ to:xxx.xx.xxx.xx:50912-50927
0 0 SNAT icmp -- any map-wan_map anywhere anywhere #conn dst/32 <= 16 /* !fw3: ubus:wan_map[map] nat 36 */ to:xxx.xx.xxx.xx:55008-55023
0 0 SNAT tcp -- any map-wan_map anywhere anywhere #conn dst/32 <= 16 /* !fw3: ubus:wan_map[map] nat 37 */ to:xxx.xx.xxx.xx:55008-55023
0 0 SNAT udp -- any map-wan_map anywhere anywhere #conn dst/32 <= 16 /* !fw3: ubus:wan_map[map] nat 38 */ to:xxx.xx.xxx.xx:55008-55023
0 0 SNAT icmp -- any map-wan_map anywhere anywhere #conn dst/32 <= 16 /* !fw3: ubus:wan_map[map] nat 39 */ to:xxx.xx.xxx.xx:59104-59119
0 0 SNAT tcp -- any map-wan_map anywhere anywhere #conn dst/32 <= 16 /* !fw3: ubus:wan_map[map] nat 40 */ to:xxx.xx.xxx.xx:59104-59119
0 0 SNAT udp -- any map-wan_map anywhere anywhere #conn dst/32 <= 16 /* !fw3: ubus:wan_map[map] nat 41 */ to:xxx.xx.xxx.xx:59104-59119
0 0 SNAT icmp -- any map-wan_map anywhere anywhere #conn dst/32 <= 16 /* !fw3: ubus:wan_map[map] nat 42 */ to:xxx.xx.xxx.xx:63200-63215
0 0 SNAT tcp -- any map-wan_map anywhere anywhere #conn dst/32 <= 16 /* !fw3: ubus:wan_map[map] nat 43 */ to:xxx.xx.xxx.xx:63200-63215
0 0 SNAT udp -- any map-wan_map anywhere anywhere #conn dst/32 <= 16 /* !fw3: ubus:wan_map[map] nat 44 */ to:xxx.xx.xxx.xx:63200-63215
7137 1356K zone_lan_postrouting all -- any br-lan anywhere anywhere /* !fw3 */
0 0 zone_wan_postrouting all -- any eth0 anywhere anywhere /* !fw3 */
0 0 zone_wan_postrouting all -- any map-wan_map anywhere anywhere /* !fw3 */
Chain postrouting_lan_rule (1 references)
pkts bytes target prot opt in out source destination
Chain postrouting_rule (1 references)
pkts bytes target prot opt in out source destination
Chain postrouting_wan_rule (1 references)
pkts bytes target prot opt in out source destination
Chain prerouting_lan_rule (1 references)
pkts bytes target prot opt in out source destination
Chain prerouting_rule (1 references)
pkts bytes target prot opt in out source destination
Chain prerouting_wan_rule (1 references)
pkts bytes target prot opt in out source destination
Chain zone_lan_postrouting (1 references)
pkts bytes target prot opt in out source destination
7137 1356K postrouting_lan_rule all -- any any anywhere anywhere /* !fw3: Custom lan postrouting rule chain */
Chain zone_lan_prerouting (1 references)
pkts bytes target prot opt in out source destination
6321K 1295M prerouting_lan_rule all -- any any anywhere anywhere /* !fw3: Custom lan prerouting rule chain */
Chain zone_wan_postrouting (2 references)
pkts bytes target prot opt in out source destination
0 0 postrouting_wan_rule all -- any any anywhere anywhere /* !fw3: Custom wan postrouting rule chain */
0 0 MASQUERADE all -- any any anywhere anywhere /* !fw3 */
Chain zone_wan_prerouting (2 references)
pkts bytes target prot opt in out source destination
4905 558K prerouting_wan_rule all -- any any anywhere anywhere /* !fw3: Custom wan prerouting rule chain */
root@nanopi:~#
これはどうやら、openwrt起動後にSoftwareパッケージの個別更新を実施していたのだが、ネットワークのrestartが行われた際に、iptablesが再設定されたためだったようで、openwrt全体を再起動した正常になった。
現在行っている設定はネットワーク開始後に /etc/rc.local からiptablesの設定を追加しているので、rc.localで行うことが消えた、という感じである