(Oracle Linux 9向けのWordpress設定手順はこちら)
Oracle CloudのAlways Freeで作れるインスタンスにARMベースのインスタンスが追加された。
従来のCPU1個/メモリ1GBに対して、CPU1~4個/メモリ6GB~24GBと破格のスペックなので、Wordpressサーバでも移行してみるかな、と思って、「CentOS 7 / Oracle Linux 7でWordPressサーバを建てる」の手順でつくろうとしてみたところ、Oracle Linux 7 ARMではPHP Packages for Oracle Linuxが提供されていなかった。
Oracle Linux 8であれば標準状態でphp 7.4が利用できるようなので、Oracle Linux 8で作成する手順を策定した。
変更履歴
・Wordpress本体を更新しようとしたらできなかったので「手順8-2: php-fpmの書き込み権限問題」追加
・既存blogのデータをインポートしようとしたらファイルサイズオーバーだったので「手順9: WordPressで取り扱えるファイルサイズの拡大」追加
・存在を思い出したので「手順10: WordPressのSite Health Status対応」追加
・パーマリンク設定を変更したら動かなかったので「手順11: WordPressの.htaccess有効化」追加
・「手順12: OS自動更新の設定」追加
・日本語Localeに設定した場合の対応として「手順2-3:日本語Locale対応」追加
・2022/04/06にOracle-Linux-8.5-aarch64-2022.03.17-1を使って構築した時の状況を追加
・手順8が2つあったので番号を振り直した
・wordpressにWP Multibyte Patchをインストールする手順を書き忘れていたので追加
また、手順8以降でWordpressにアクセスすると「Service Unavailable」と表示される場合があります。その場合は、php-fpmのSELinuxポリシー設定問題であるため「Oracle Linux 8でphp 7.4.19-1にアップデート後からphp-fpmが起動しなくなった」の対処を行ってみてください。
準備1: Oracle Cloud用手順
準備1-1: IPv6アドレス割り当て:Oracle Cloudコンソール側
Oracle Cloudのコンソールを開いて、インスタンスにIPv6アドレスを割り当てます。
また、割り当てられたIPv6アドレスを確認します。
準備1-2: インスタンス側操作
2021年5月27日の段階ではOracle Cloud環境で提供されるOracle Linux 8でIPv6アドレスの自動割り当てが動作していませんでした。
Oracle-Linux-8.5-aarch64-2022.03.17-1(2022/04/06時点)やOracle-Linux-8.6-aarch64-2022.05.30-0(2022/07/01時点)でも同様でした。
このため、firewalldの設定でdhcpv6-clientが許可されていないために発生していましたので、許可します。
まず初期状態を確認
$ sudo firewall-cmd --list-all
public (active)
  target: default
  icmp-block-inversion: no
  interfaces: enp0s3
  sources:
  services: ssh
  ports:
  protocols:
  masquerade: no
  forward-ports:
  source-ports:
  icmp-blocks:
  rich rules:
$
dhcpv6-clientの許可設定と設定読み込みと確認
$ sudo firewall-cmd --permanent --add-service=dhcpv6-client
success
$ sudo firewall-cmd --reload
success
$ sudo firewall-cmd --list-all
public (active)
  target: default
  icmp-block-inversion: no
  interfaces: enp0s3
  sources:
  services: dhcpv6-client ssh
  ports:
  protocols:
  masquerade: no
  forward-ports:
  source-ports:
  icmp-blocks:
  rich rules:
$
準備2: 一般的な前準備
準備2-1: 日本時間にする
日本に住んでいる場合、日本時間表記の方が使いやすいので、OSも日本時間表示に設定する。
$ sudo timedatectl set-timezone Japan
$
準備2-2: パッケージを最新にアップデートする
現時点でインストール済みパッケージを最新にします。
Oracle Linux 8ではyum updateではなくdnf updateとなります。アップデート後は再起動します。(yumコマンドでも動きます)
$ sudo dnf update -y
<略>
$ sudo reboot
手順2-3:日本語Locale対応
ja_JP.UTF-8など日本語Localeで設定した際、「Failed to set locale, defaulting to C.UTF-8」というメッセージが出力される場合があります。
その場合は日本語Localeを追加インストールします。
$ sudo dnf install langpacks-ja glibc-langpack-ja
<略>
$
手順3: EPELレポジトリの追加
EPELレポジトリを使うので、使用できるようにします。
Oracle Cloud上のOracle Linux 8環境ではレポジトリパッケージのインストールはされているので、有効化を行います。(なお、/etc/yum.repo.d/のファイルを編集するのは時代遅れな操作です)
また、2021年11月以降のOracle Cloudでの新規インスタンスではOS管理が有効になっている関係で手順が変わっています。新規で作る場合は手順3-1bの方を参照してください。
手順3-1a:通常の手順
Oracle Cloud外の環境でOracle Linux 8をインストールしている場合や古めのOracle Cloudインスタンスの場合、こちらのOS側のコマンドで設定する手順を行います。
現状のレポジトリ設定状況を「sudo dnf repolist –all」を実行して確認します。
$ sudo dnf repolist --all
repo id                          repo name                              status
ol8_MySQL80                      MySQL 8.0 for Oracle Linux 8 (aarch64) enabled
ol8_MySQL80_connectors_community MySQL 8.0 Connectors Community for Ora enabled
ol8_MySQL80_tools_community      MySQL 8.0 Tools Community for Oracle L enabled
ol8_aarch64_userspace_ksplice    Ksplice aware userspace packages for O disabled
ol8_appstream                    Oracle Linux 8 Application Stream (aar enabled
ol8_baseos_latest                Oracle Linux 8 BaseOS Latest (aarch64) enabled
ol8_codeready_builder            Oracle Linux 8 CodeReady Builder (aarc disabled
ol8_developer                    Oracle Linux 8 Development Packages (a disabled
ol8_developer_EPEL               Oracle Linux 8 EPEL Packages for Devel disabled
ol8_developer_UEKR6              Developer Preview of UEK Release 6 (aa disabled
ol8_distro_builder               Oracle Linux 8 Distro Builder (aarch64 disabled
ol8_ksplice                      Ksplice for Oracle Linux 8 (aarch64)   enabled
ol8_oci_included                 Oracle Software for OCI users on Oracl enabled
ol8_u2_baseos_base               Oracle Linux 8.2 BaseOS (aarch64)      disabled
ol8_u3_baseos_base               Oracle Linux 8.3 BaseOS (aarch64)      disabled
ol8_u4_baseos_base               Oracle Linux 8.4 BaseOS (aarch64)      disabled
$
上記の場合、ol8_developer_EPELが登録されているもののdisabledになっています。
この場合は「sudo dnf config-manager –set-enabled ol8_developer_EPEL」を実行し、enabledに変更されたことを確認します。
$ sudo dnf config-manager --set-enabled ol8_developer_EPEL
$ sudo dnf repolist --all
repo id                          repo name                              status
ol8_MySQL80                      MySQL 8.0 for Oracle Linux 8 (aarch64) enabled
ol8_MySQL80_connectors_community MySQL 8.0 Connectors Community for Ora enabled
ol8_MySQL80_tools_community      MySQL 8.0 Tools Community for Oracle L enabled
ol8_aarch64_userspace_ksplice    Ksplice aware userspace packages for O disabled
ol8_appstream                    Oracle Linux 8 Application Stream (aar enabled
ol8_baseos_latest                Oracle Linux 8 BaseOS Latest (aarch64) enabled
ol8_codeready_builder            Oracle Linux 8 CodeReady Builder (aarc disabled
ol8_developer                    Oracle Linux 8 Development Packages (a disabled
ol8_developer_EPEL               Oracle Linux 8 EPEL Packages for Devel enabled
ol8_developer_UEKR6              Developer Preview of UEK Release 6 (aa disabled
ol8_distro_builder               Oracle Linux 8 Distro Builder (aarch64 disabled
ol8_ksplice                      Ksplice for Oracle Linux 8 (aarch64)   enabled
ol8_oci_included                 Oracle Software for OCI users on Oracl enabled
ol8_u2_baseos_base               Oracle Linux 8.2 BaseOS (aarch64)      disabled
ol8_u3_baseos_base               Oracle Linux 8.3 BaseOS (aarch64)      disabled
ol8_u4_baseos_base               Oracle Linux 8.4 BaseOS (aarch64)      disabled
$
手順3-1b:Oracle CloudのOS管理下にある場合の手順
2022年4月6日時点でOracle Cloud上で提供されているOracle-Linux-8.5-aarch64-2022.03.17-1では「sudo dnf repolist –all」の実行結果に変化があり、「This system is receiving updates from OSMS server.」と書かれた上で、だいぶ整理されたレポジトリのみが表示されます。
$ sudo dnf repolist --all
This system is receiving updates from OSMS server.
repo id                                  repo name                       status
ol8_addons-aarch64                       Oracle Linux 8 Add ons (aarch64 enabled
ol8_appstream-aarch64                    Oracle Linux 8 Application Stre enabled
ol8_baseos_latest-aarch64                Oracle Linux 8 BaseOS Latest (a enabled
ol8_ksplice-aarch64                      Ksplice for Oracle Linux 8 (aar enabled
ol8_mysql80-aarch64                      MySQL 8.0 for Oracle Linux 8 (a enabled
ol8_mysql80_connectors_community-aarch64 MySQL 8.0 Connectors for Oracle enabled
ol8_mysql80_tools_community-aarch64      MySQL 8.0 Tools Community for O enabled
ol8_oci_included-aarch64                 Oracle Software for OCI users o enabled
$
これはOracle Cloudの「OS管理(OS Managemnt System)」という機能との連携が始まり、Oracle CloudのWebコンソール からパッチ状態を見れるように変更になったためです。
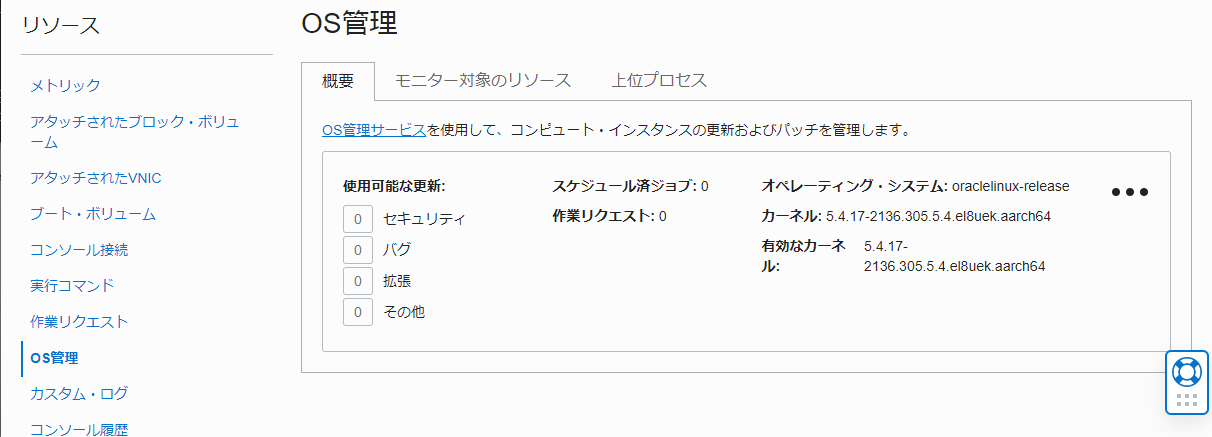
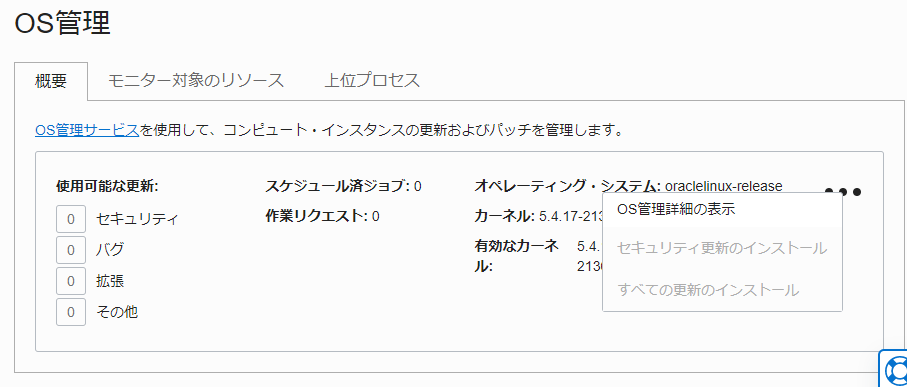
レポジトリの設定変更は上記画面の「…」をクリックし「OS管理詳細の表示」を選択
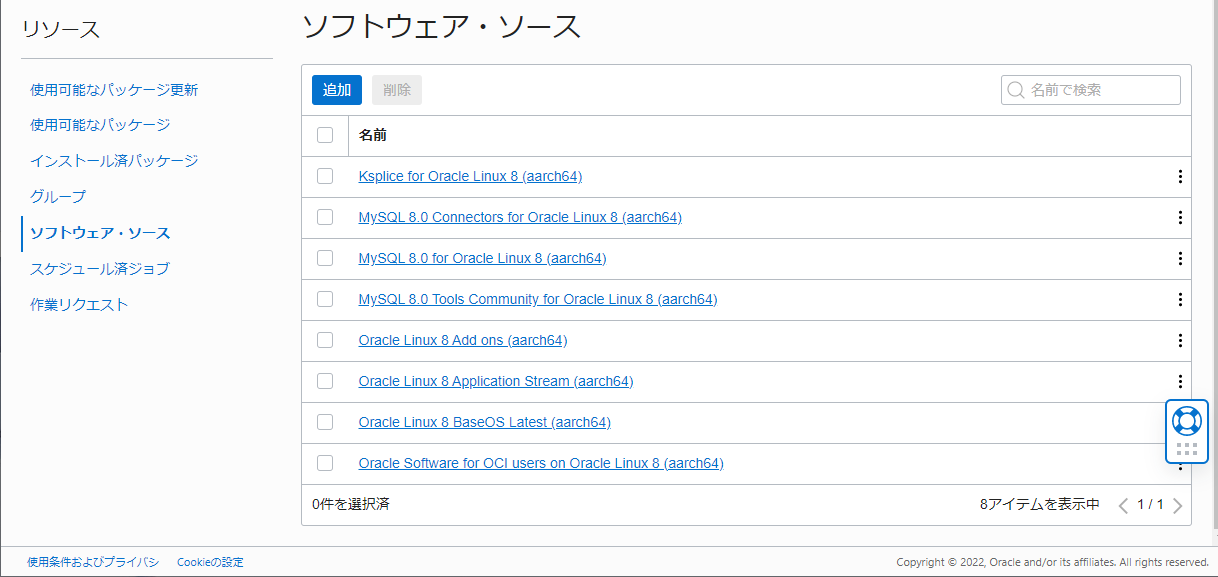
[リソース]-[ソフトウェア・ソース]から「追加」を選択
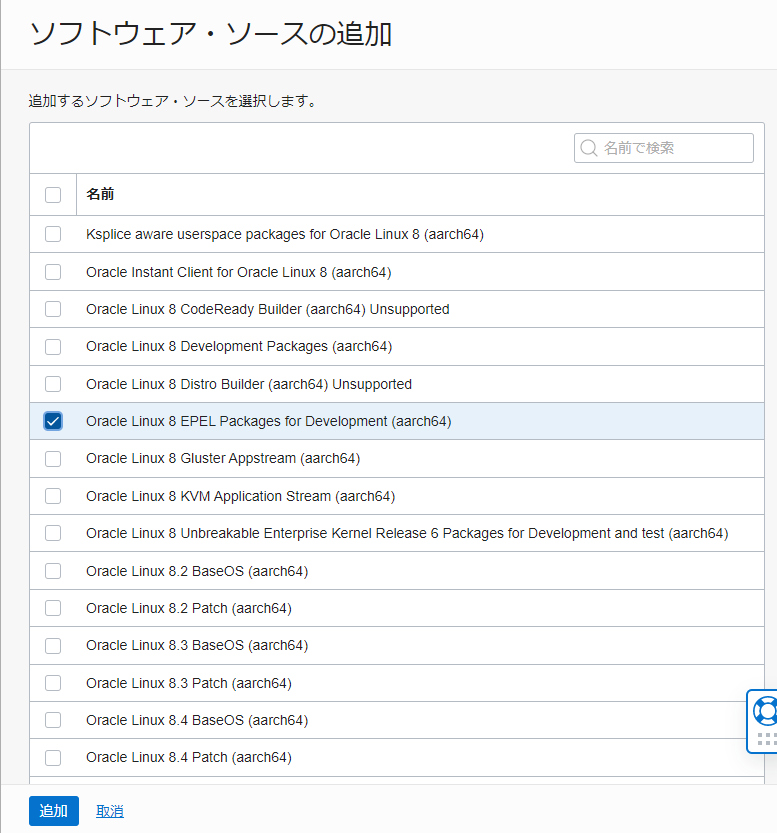
「Oralce Linux 8 EPEL Packages for Development」を選択し「追加」
Web上で追加されたことを確認
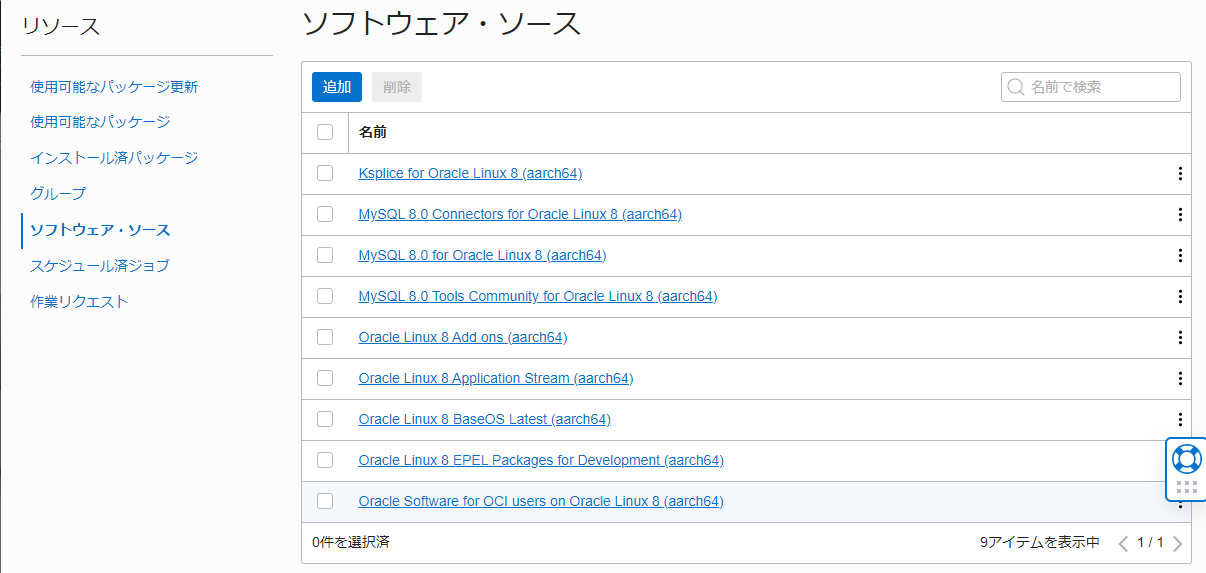
次にコマンドに戻り「sudo dnf repolist –all」を実行するとEPELレポジトリがenabledとして増えていることが確認できます。
$ sudo dnf repolist --all
This system is receiving updates from OSMS server.
repo id                                  repo name                       status
ol8_addons-aarch64                       Oracle Linux 8 Add ons (aarch64 enabled
ol8_appstream-aarch64                    Oracle Linux 8 Application Stre enabled
ol8_baseos_latest-aarch64                Oracle Linux 8 BaseOS Latest (a enabled
ol8_developer_epel-aarch64               Oracle Linux 8 EPEL Packages fo enabled
ol8_ksplice-aarch64                      Ksplice for Oracle Linux 8 (aar enabled
ol8_mysql80-aarch64                      MySQL 8.0 for Oracle Linux 8 (a enabled
ol8_mysql80_connectors_community-aarch64 MySQL 8.0 Connectors for Oracle enabled
ol8_mysql80_tools_community-aarch64      MySQL 8.0 Tools Community for O enabled
ol8_oci_included-aarch64                 Oracle Software for OCI users o enabled
手順4: インターネット公開用設定
手順4-1: fail2ban導入
公開サーバは各種のアタックにさらされます。管理用sshポートにもやってきます。
多少なりとも軽減するためにEPELレポジトリ収録のfail2banを使用します。
$ sudo dnf install fail2ban -y
$
カスタム設定は/etc/fail2ban/jail.localに行います。
$ sudo vi /etc/fail2ban/jail.local
$ cat /etc/fail2ban/jail.local
[DEFAULT]
# 86400秒=24時間以内に5回不審なアクセスがあったら24時間BAN
bantime  = 86400
findtime  = 86400
maxretry = 5
# 259200秒=3日以内に5回不審なアクセスがあったら3日間BAN
#bantime  = 259200
#findtime  = 259200
#maxretry = 5

# 除外IP
ignoreip = 127.0.0.1 127.0.0.0/8 10.0.0.0/8 172.16.0.0/12 192.168.0.0/16

[sshd]
enabled = true
banaction = firewallcmd-ipset
$
上記設定では24時間BANにしていますが、まぁ、3日BANでもかまわないとは思います。(本当に間違えた場合に困るのでほどほどにしておくとよい)
fail2banをOS起動時に実行する設定と、今すぐfail2banを起動するコマンドを実行します。
$ sudo systemctl enable fail2ban
$ sudo systemctl start fail2ban
$
以降、アタックがあると /var/log/fail2ban.log にログが出ます。
手順4-2: Webサーバ用ポート公開設定
この段階では、dhcpv6-clientとsshのみが許可されています。
Webサーバ公開用にhttp(ポート80)とhttps(ポート443)を追加します。
$ sudo firewall-cmd --list-all
public (active)
  target: default
  icmp-block-inversion: no
  interfaces: enp0s3
  sources:
  services: dhcpv6-client ssh
  ports:
  protocols:
  masquerade: no
  forward-ports:
  source-ports:
  icmp-blocks:
  rich rules:
$
$ sudo firewall-cmd --permanent --add-service=http
success
$ sudo firewall-cmd --permanent --add-service=https
success
$ sudo firewall-cmd --reload
success
$ sudo firewall-cmd --list-all
public (active)
  target: default
  icmp-block-inversion: no
  interfaces: enp0s3
  sources:
  services: dhcpv6-client http https ssh
  ports:
  protocols:
  masquerade: no
  forward-ports:
  source-ports:
  icmp-blocks:
  rich rules:
$
手順5: php 7.4追加
Oracle Linux 8環境では、moduleという形で複数バージョンのソフトウェアが提供されています。
phpに関してどのようなものがあるのかを「dnf module list | grep php」を実行して確認します。
$ sudo dnf module list | grep php
php                  7.2 [d]         common [d], devel, minimal               PHP scripting language
php                  7.3             common [d], devel, minimal               PHP scripting language
php                  7.4             common [d], devel, minimal               PHP scripting language
$
php 7.2が標準選択で、他にphp 7.3とphp 7.4が選べることがわかります。
2022/07/01時点で提供されているOracle Linux 8.6では php 8.0も選択できるようになっています。
php7.4を指定してパッケージを追加します。
$ sudo dnf install @php:7.4 -y
Last metadata expiration check: 0:07:11 ago on Thu 27 May 2021 01:04:16 PM JST.
Dependencies resolved.
==========================================================================================================================================
 Package                     Architecture       Version                                                Repository                    Size
==========================================================================================================================================
Installing group/module packages:
 php-cli                     aarch64            7.4.6-4.module+el8.3.0+7685+72d70b58                   ol8_appstream                2.8 M
 php-common                  aarch64            7.4.6-4.module+el8.3.0+7685+72d70b58                   ol8_appstream                675 k
 php-fpm                     aarch64            7.4.6-4.module+el8.3.0+7685+72d70b58                   ol8_appstream                1.5 M
 php-json                    aarch64            7.4.6-4.module+el8.3.0+7685+72d70b58                   ol8_appstream                 73 k
 php-mbstring                aarch64            7.4.6-4.module+el8.3.0+7685+72d70b58                   ol8_appstream                474 k
 php-xml                     aarch64            7.4.6-4.module+el8.3.0+7685+72d70b58                   ol8_appstream                166 k
Installing dependencies:
 httpd-filesystem            noarch             2.4.37-39.0.1.module+el8.4.0+20024+b87b2deb            ol8_appstream                 39 k
 libxslt                     aarch64            1.1.32-6.0.1.el8                                       ol8_baseos_latest            239 k
 nginx-filesystem            noarch             1:1.14.1-9.0.1.module+el8.0.0+5347+9282027e            ol8_appstream                 25 k
Installing module profiles:
 php/common
Enabling module streams:
 httpd                                          2.4
 nginx                                          1.14
 php                                            7.4

Transaction Summary
==========================================================================================================================================
Install  9 Packages

Total download size: 5.9 M
Installed size: 23 M
Downloading Packages:
<略>
$
手順6: MySQL設定編
Oralce Linux 8ではわざわざ「MySQL 8.0 for Oracle Linux 8 (aarch64)」を用意していますが、よく見るとそこにmysql-serverはなく、メインのol8_appstream に含まれているという理由はよくわかりませんが、せっかくなのでそのまま使用します。
(ちなみにol8_appstreamではmariadb 10.3と10.5も提供されていますので変更することもできます)
$ sudo dnf install mysql-server -y
Last metadata expiration check: 0:56:46 ago on Thu 27 May 2021 01:04:16 PM JST.
Dependencies resolved.
================================================================================
 Package      Arch    Version                               Repository     Size
================================================================================
Installing:
 mysql-server aarch64 8.0.21-1.module+el8.2.0+7793+cfe2b687 ol8_appstream  28 M
Installing dependencies:
 mariadb-connector-c-config
              noarch  3.1.11-2.el8_3                        ol8_appstream  15 k
 mecab        aarch64 0.996-1.module+el8.0.0+5253+1dce7bb2.9
                                                            ol8_appstream 367 k
 mysql        aarch64 8.0.21-1.module+el8.2.0+7793+cfe2b687 ol8_appstream  13 M
 mysql-common aarch64 8.0.21-1.module+el8.2.0+7793+cfe2b687 ol8_appstream 147 k
 mysql-errmsg aarch64 8.0.21-1.module+el8.2.0+7793+cfe2b687 ol8_appstream 581 k
 protobuf-lite
              aarch64 3.5.0-13.el8                          ol8_appstream 129 k
Enabling module streams:
 mysql                8.0

Transaction Summary
================================================================================
Install  7 Packages

Total download size: 42 M
Installed size: 228 M
Downloading Packages:
<略>
$
mysqldを自動起動する設定とします。
$ sudo systemctl enable mysqld
Created symlink /etc/systemd/system/multi-user.target.wants/mysqld.service → /usr/lib/systemd/system/mysqld.service.
$
mysqldを起動します。
$ sudo systemctl start mysqld
$
WordPress用データベースを作成します。
MySQL 8におけるデータベースユーザ作成と権限の割り当てが従来の「grant all on DB名.* to wordpress@localhost identified by ‘パスワード’;」という一文から、「create user ~」と「grant ~」の2つに分かれている点に注意が必要です。
$ sudo mysql -u root
Welcome to the MySQL monitor.  Commands end with ; or \g.
Your MySQL connection id is 8
Server version: 8.0.21 Source distribution

Copyright (c) 2000, 2020, Oracle and/or its affiliates. All rights reserved.

Oracle is a registered trademark of Oracle Corporation and/or its
affiliates. Other names may be trademarks of their respective
owners.

Type 'help;' or '\h' for help. Type '\c' to clear the current input statement.

mysql> create database DB名 character set utf8;
Query OK, 1 row affected, 1 warning (0.00 sec)

mysql> create user wordpress@localhost  identified by 'パスワード';
Query OK, 0 rows affected (0.01 sec)

mysql> grant all privileges on DB名.* to wordpress@localhost;
Query OK, 0 rows affected (0.00 sec)

mysql> quit
Bye
$
手順7: Webサーバ設定
手順7-1: httpdインストール
httpdをインストールします。
Oracle Linux 8では httpd(Apache) 2.4と nginx 1.14 / 1.16 / 1.18 が使用できますが、httpdを使用します。nginxを使用したい場合は「Oracle Autonomous Linuxでwordpressサーバを建ててみた」を参照してください。
$ sudo dnf install httpd -y
Last metadata expiration check: 0:08:49 ago on Thu 27 May 2021 01:04:16 PM JST.
Dependencies resolved.
==========================================================================================================================================
 Package                      Architecture      Version                                                 Repository                   Size
==========================================================================================================================================
Installing:
 httpd                        aarch64           2.4.37-39.0.1.module+el8.4.0+20024+b87b2deb             ol8_appstream               1.4 M
Installing dependencies:
 apr                          aarch64           1.6.3-11.el8                                            ol8_appstream               119 k
 apr-util                     aarch64           1.6.1-6.el8                                             ol8_appstream               104 k
 httpd-tools                  aarch64           2.4.37-39.0.1.module+el8.4.0+20024+b87b2deb             ol8_appstream               104 k
 mod_http2                    aarch64           1.15.7-3.module+el8.4.0+20024+b87b2deb                  ol8_appstream               146 k
 oracle-logos-httpd           noarch            84.3-1.0.1.el8                                          ol8_baseos_latest            29 k

Transaction Summary
==========================================================================================================================================
Install  6 Packages

Total download size: 1.8 M
Installed size: 10 M
Downloading Packages:
<略>
$
次で設定変更をするので、この段階ではhttpdを起動しません。
OS起動時に自動起動する設定だけを行います。
$ sudo systemctl enable httpd
$
手順7-2: dehydratedによるLet’s Encrypt導入
Let’s EncryptによるSSL証明書導入はcertbotを使うのが一般的ではあるのだが、python環境とあわせてパッケージサイズが大きいので、コンパクトでEPELにも収録されているdehydratedを使用する。
$ sudo dnf install dehydrated -y
Last metadata expiration check: 1:07:45 ago on Thu 27 May 2021 01:04:16 PM JST.
Dependencies resolved.
================================================================================
 Package          Architecture Version           Repository                Size
================================================================================
Installing:
 dehydrated       noarch       0.6.5-1.el8       ol8_developer_EPEL        90 k

Transaction Summary
================================================================================
Install  1 Package

Total download size: 90 k
Installed size: 164 k
Downloading Packages:
<略>
$
dehydratedによるSSL証明書取得処理には /var/www/dehydrated が使用されるためディレクトリを作成します。
$ sudo mkdir  /var/www/dehydrated
$
http://~/.well-known/acme-challenge でアクセスした時に上記ディレクトリが開くようApacheの設定を /etc/httpd/conf.d/dehydrated.conf として作成します。(sudo vi /etc/httpd/conf.d/dehydrated.conf )
$ sudo vi /etc/httpd/conf.d/dehydrated.conf
$ cat /etc/httpd/conf.d/dehydrated.conf
Alias /.well-known/acme-challenge /var/www/dehydrated
<Directory /var/www/dehydrated/>
</Directory>
$
httpdを起動します
$ sudo systemctl start httpd
$
SSL証明書を発行するホスト名を /etc/dehydrated/domains.txt に記載する。(sudo vi /etc/dehydrated/domains.txt)
1行に複数のホスト名を記載するとaliasになります。
$ sudo vi /etc/dehydrated/domains.txt
$ sudo cat /etc/dehydrated/domains.txt
ホスト1名.ドメイン名 ホスト2名.ドメイン名
$
登録操作を開始します。
$ sudo dehydrated --register
# INFO: Using main config file /etc/dehydrated/config
# INFO: Using additional config file /etc/dehydrated/conf.d/local.sh

To use dehydrated with this certificate authority you have to agree to their terms of service which you can find here: https://letsencrypt.org/documents/LE-SA-v1.2-November-15-2017.pdf

To accept these terms of service run `/bin/dehydrated --register --accept-terms`.
$ sudo /bin/dehydrated --register --accept-terms
# INFO: Using main config file /etc/dehydrated/config
# INFO: Using additional config file /etc/dehydrated/conf.d/local.sh
+ Generating account key...
+ Registering account key with ACME server...
+ Fetching account ID...
+ Done!
$
初回のSSL証明書発行処理を実行します。
$ sudo dehydrated --cron
# INFO: Using main config file /etc/dehydrated/config
# INFO: Using additional config file /etc/dehydrated/conf.d/local.sh
Processing ホスト1名.ドメイン名 with alternative names: ホスト2名.ドメイン名
 + Signing domains...
 + Generating private key...
 + Generating signing request...
 + Requesting new certificate order from CA...
 + Received 2 authorizations URLs from the CA
 + Handling authorization for ホスト1名.ドメイン名
 + Handling authorization for ホスト2名.ドメイン名
 + 2 pending challenge(s)
 + Deploying challenge tokens...
 + Responding to challenge for ホスト1名.ドメイン名 authorization...
 + Challenge is valid!
 + Responding to challenge for ホスト2名.ドメイン名 authorization...
 + Challenge is valid!
 + Cleaning challenge tokens...
 + Requesting certificate...
 + Checking certificate...
 + Done!
 + Creating fullchain.pem...
 + Done!
$
手順7-3: WebサーバへのSSL証明書設定
まず、httpdにmod_sslを追加します。
$ sudo dnf install mod_ssl -y
Last metadata expiration check: 1:36:21 ago on Thu 27 May 2021 01:04:16 PM JST.
Dependencies resolved.
================================================================================
 Package
      Arch    Version                                       Repository     Size
================================================================================
Installing:
 mod_ssl
      aarch64 1:2.4.37-39.0.1.module+el8.4.0+20024+b87b2deb ol8_appstream 126 k

Transaction Summary
================================================================================
Install  1 Package

Total download size: 126 k
Installed size: 274 k
Downloading Packages:
<略>
$
標準の /etc/httpd/conf.d/ssl.conf は使わず、Mozilla SSL Configuration Generatorベースの設定を /etc/httpd/conf.d/ssl-mozilla.conf として作成します。(なお、ssl.conf には”Listen 443 https”設定もあるので、そのままにしています)
$ sudo vi /etc/httpd/conf.d/ssl-mozilla.conf
$ cat /etc/httpd/conf.d/ssl-mozilla.conf
# generated 2021-05-27, Mozilla Guideline v5.6, Apache 2.4.37, OpenSSL 1.1.1g, intermediate configuration
# https://ssl-config.mozilla.org/#server=apache&version=2.4.37&config=intermediate&openssl=1.1.1g&guideline=5.6

# this configuration requires mod_ssl, mod_socache_shmcb, mod_rewrite, and mod_headers
<VirtualHost *:80>
    RewriteEngine On
    RewriteCond %{REQUEST_URI} !^/\.well\-known/acme\-challenge/
    RewriteRule ^(.*)$ https://%{HTTP_HOST}$1 [R=301,L]
</VirtualHost>

<VirtualHost *:443>
    SSLEngine on

    # curl https://ssl-config.mozilla.org/ffdhe2048.txt >> /path/to/signed_cert_and_intermediate_certs_and_dhparams
    SSLCertificateFile      /etc/dehydrated/certs/<ホスト名>/cert.pem
    SSLCertificateKeyFile   /etc/dehydrated/certs/<ホスト名>/privkey.pem

    # enable HTTP/2, if available
    Protocols h2 http/1.1

    # HTTP Strict Transport Security (mod_headers is required) (63072000 seconds)
    Header always set Strict-Transport-Security "max-age=63072000"
</VirtualHost>

# intermediate configuration
SSLProtocol             all -SSLv3 -TLSv1 -TLSv1.1
SSLCipherSuite          ECDHE-ECDSA-AES128-GCM-SHA256:ECDHE-RSA-AES128-GCM-SHA256:ECDHE-ECDSA-AES256-GCM-SHA384:ECDHE-RSA-AES256-GCM-SHA384:ECDHE-ECDSA-CHACHA20-POLY1305:ECDHE-RSA-CHACHA20-POLY1305:DHE-RSA-AES128-GCM-SHA256:DHE-RSA-AES256-GCM-SHA384
SSLHonorCipherOrder     off
SSLSessionTickets       off

SSLUseStapling On
SSLStaplingCache "shmcb:logs/ssl_stapling(32768)"
$
httpdを再起動します。
$ sudo systemctl restart httpd
$
手順8: WordPress導入
手順8-1: WordPressの基本インストール
WordPressのWebから最新版をダウンロードして、/var/www/html以下に展開します。
(日本語環境向けのlatest-ja.tar.gzファイルを使っていないのはWordpressプラグインが正常にインストールできるかを確認するためにWP Multibyte Patchを手動インストールする手順を入れているためです)
$ cd /var/www/html/
$ ls
$ sudo curl -O https://wordpress.org/latest.tar.gz
  % Total    % Received % Xferd  Average Speed   Time    Time     Time  Current
                                 Dload  Upload   Total   Spent    Left  Speed
100 15.0M  100 15.0M    0     0  6978k      0  0:00:02  0:00:02 --:--:-- 6978k
$ ls
latest.tar.gz
$ sudo tar xfz latest.tar.gz
$ ls -l
total 15388
-rw-r--r--. 1 root   root   15750424 May 27 14:54 latest.tar.gz
drwxr-xr-x. 5 nobody nobody     4096 May 13 08:49 wordpress
$ sudo rm latest.tar.gz
$
WordPressディレクトリの所有者をWebサービスのユーザである「apache」に変更します。
$ ps -ef|grep http
root        7619       1  0 14:52 ?        00:00:00 /usr/sbin/httpd -DFOREGROUND
apache      7621    7619  0 14:52 ?        00:00:00 /usr/sbin/httpd -DFOREGROUND
apache      7622    7619  0 14:52 ?        00:00:00 /usr/sbin/httpd -DFOREGROUND
apache      7623    7619  0 14:52 ?        00:00:00 /usr/sbin/httpd -DFOREGROUND
apache      7624    7619  0 14:52 ?        00:00:00 /usr/sbin/httpd -DFOREGROUND
apache      7836    7619  0 14:52 ?        00:00:00 /usr/sbin/httpd -DFOREGROUND
opc         7943    2643  0 14:55 pts/0    00:00:00 grep --color=auto http
$ sudo chown -R apache:apache wordpress/
$ ls -l
total 4
drwxr-xr-x. 5 apache apache 4096 May 13 08:49 wordpress
$
/var/www/html/wordpress をDocumentRootとするように ssl-mozilla.conf に追加して、httpdを再起動します。
$ sudo vi /etc/httpd/conf.d/ssl-mozilla.conf
$ cat /etc/httpd/conf.d/ssl-mozilla.conf
# generated 2021-05-27, Mozilla Guideline v5.6, Apache 2.4.37, OpenSSL 1.1.1g, intermediate configuration
# https://ssl-config.mozilla.org/#server=apache&version=2.4.37&config=intermediate&openssl=1.1.1g&guideline=5.6

# this configuration requires mod_ssl, mod_socache_shmcb, mod_rewrite, and mod_headers
<VirtualHost *:80>
    RewriteEngine On
    RewriteCond %{REQUEST_URI} !^/\.well\-known/acme\-challenge/
    RewriteRule ^(.*)$ https://%{HTTP_HOST}$1 [R=301,L]
</VirtualHost>

<VirtualHost *:443>
    DocumentRoot /var/www/html/wordpress
    SSLEngine on

    # curl https://ssl-config.mozilla.org/ffdhe2048.txt >> /path/to/signed_cert_and_intermediate_certs_and_dhparams
    SSLCertificateFile      /etc/dehydrated/certs/<ホスト名>/cert.pem
    SSLCertificateKeyFile   /etc/dehydrated/certs/<ホスト名>/privkey.pem

    # enable HTTP/2, if available
    Protocols h2 http/1.1

    # HTTP Strict Transport Security (mod_headers is required) (63072000 seconds)
    Header always set Strict-Transport-Security "max-age=63072000"
</VirtualHost>

# intermediate configuration
SSLProtocol             all -SSLv3 -TLSv1 -TLSv1.1
SSLCipherSuite          ECDHE-ECDSA-AES128-GCM-SHA256:ECDHE-RSA-AES128-GCM-SHA256:ECDHE-ECDSA-AES256-GCM-SHA384:ECDHE-RSA-AES256-GCM-SHA384:ECDHE-ECDSA-CHACHA20-POLY1305:ECDHE-RSA-CHACHA20-POLY1305:DHE-RSA-AES128-GCM-SHA256:DHE-RSA-AES256-GCM-SHA384
SSLHonorCipherOrder     off
SSLSessionTickets       off

SSLUseStapling On
SSLStaplingCache "shmcb:logs/ssl_stapling(32768)"
$ sudo systemctl restart httpd
$
手順8-2:「Service Unavailable」となる場合の対処
ブラウザからアクセスして「Service Unavailable」となる場合はphp-fpmのSELinux設定問題が発生しています。

httpd_execmemを有効にします。
$ getsebool httpd_execmem
httpd_execmem --> off
$ sudo setsebool -P httpd_execmem on
$ sudo getsebool httpd_execmem
httpd_execmem --> on
$
次に、php-fpm用のSELinux設定を作成します。まず「sudo ausearch -m AVC |grep php |audit2allow」を実行して「allow ~」の出力があることを確認
$ sudo ausearch -m AVC |grep php |audit2allow


#============= httpd_t ==============
allow httpd_t httpd_exec_t:file execmod;
$
次にこれを使ってSELinux用のモジュールを作成
$ sudo ausearch -m AVC |grep php |sudo audit2allow -M ph
p-fpm
******************** IMPORTANT ***********************
To make this policy package active, execute:

semodule -i php-fpm.pp

$ ls
php-fpm.pp  php-fpm.te  wordpress
$
モジュールとして組み込みphp-fpmを起動
$ sudo semodule -i php-fpm.pp
$ sudo systemctl start php-fpm
$
手順8-3: 「missing the MySQL extension」がでる場合の手順
php-fpmが正常に動作している状態でブラウザからアクセスすると、下記の表示になります。

これはphpからMySQLにアクセスするためのパッケージがインストールされていないためなので、php-mysqlndを追加して、httpdを再起動します。
$ sudo dnf install php-mysqlnd -y
Last metadata expiration check: 1:56:37 ago on Thu 27 May 2021 01:04:16 PM JST.
Dependencies resolved.
================================================================================
 Package     Arch    Version                                Repository     Size
================================================================================
Installing:
 php-mysqlnd aarch64 7.4.6-4.module+el8.3.0+7685+72d70b58   ol8_appstream 182 k
Installing dependencies:
 php-pdo     aarch64 7.4.6-4.module+el8.3.0+7685+72d70b58   ol8_appstream 118 k

Transaction Summary
================================================================================
Install  2 Packages

Total download size: 300 k
Installed size: 806 k
Downloading Packages:
<略>
$ sudo systemctl restart httpd
$
WordPressの設定手順を進めると wp-config.php に書き込めない、と出ますので、「sudo vi /var/www/html/wordpress/wp-config.php」を実行し、指定された内容を記載します。
手順9: SELinux設定
手順9-1: httpdのネットワーク接続問題
一見するとここまででうまく動いているように見えます。
しかし、プラグインをインストールしようとするとエラーになります。
/var/log/audit/audit.logを確認すると下記のようなログが出ています。
type=AVC msg=audit(1622095859.957:2064): avc:  denied  { name_connect } for  pid=8908 comm="php-fpm" dest=443 scontext=system_u:system_r:httpd_t:s0 tcontext=system_u:object_r:http_port_t:s0 tclass=tcp_socket permissive=0
type=AVC msg=audit(1622095868.397:2065): avc:  denied  { name_connect } for  pid=8313 comm="php-fpm" dest=443 scontext=system_u:system_r:httpd_t:s0 tcontext=system_u:object_r:http_port_t:s0 tclass=tcp_socket permissive=0
type=AVC msg=audit(1622095868.401:2066): avc:  denied  { name_connect } for  pid=8313 comm="php-fpm" dest=80 scontext=system_u:system_r:httpd_t:s0 tcontext=system_u:object_r:http_port_t:s0 tclass=tcp_socket permissive=0
これはhttpd_can_network_connect という値で制御されている
現在の設定値を「sudo getsebool -a |grep httpd_can_network」で確認し、「sudo setsebool -P httpd_can_network_connect on」で有効にする
$ sudo getsebool -a |grep httpd_can_network
httpd_can_network_connect --> off
httpd_can_network_connect_cobbler --> off
httpd_can_network_connect_db --> off
httpd_can_network_memcache --> off
httpd_can_network_relay --> off
$ sudo setsebool -P httpd_can_network_connect on
$ sudo getsebool -a |grep httpd_can_network
httpd_can_network_connect --> on
httpd_can_network_connect_cobbler --> off
httpd_can_network_connect_db --> off
httpd_can_network_memcache --> off
httpd_can_network_relay --> off
$
この変更ではhttpdの再起動は不要。
手順9-2: php-fpmの書き込み権限問題
プラグインやテーマのインストールについては問題なくても、WordPressのアップデートが出来ない。
このときの/var/log/audit/audit.logは下記
type=AVC msg=audit(1622101524.977:177): avc: denied { write } for pid=2964 comm="php-fpm" name="wordpress" dev="dm-0" ino=101235463 scontext=system_u:system_r:httpd_t:s0 tcontext=unconfined_u:object_r:httpd_sys_content_t:s0 tclass=dir permissive=0
こちらは/var/www/html/wordpress に対して httpdから書き込みが行えるような SELinuxのコンテキストをつけることで解決する。
「sudo chcon -R -t httpd_sys_script_rw_t /var/www/html/wordpress」
$ ls -lZ /var/www/html/
total 4
drwxr-xr-x. 5 apache apache unconfined_u:object_r:httpd_sys_content_t:s0 4096 May 27 15:02 wordpress
$ sudo chcon -R -t httpd_sys_script_rw_t /var/www/html/wordpress
$ ls -lZ /var/www/html/
total 4
drwxr-xr-x. 5 apache apache unconfined_u:object_r:httpd_sys_rw_content_t:s0 4096 May 27 15:02 wordpress
$
手順9-3:Wordpressプラグイン追加の動作確認
WordPressプラグインがインストールできる状態になっているかを確認するために「WP Multibyte Patch」をインストールします。
これをインストールするとWordpressの設定画面([Settings]-[General])に「Site language(サイトの言語)」が追加され、「日本語」表示に切り替えることができるようになります。
手順10: WordPressで取り扱えるファイルサイズの拡大
WordPressで取り扱えるファイルは標準状態だと2MBになっている。
WordPressのドキュメントのFile Upload Sizes を見ると、これはphpの設定ファイル /etc/php.ini による制限となっている。
Oracle Linux 8の標準設定では下記の値となっている。
<略>
post_max_size = 8M
<略>
upload_max_filesize = 2M
<略>
で・・・よくある手順だと軽率に /etc/php.ini を書き換えていますが、 /etc/php.d/ 以下にファイルを追加することで、そちらの設定項目を優先させることができる機能があるため、 /etc/php.d/90-wordpress.ini に変更したい2行だけを記載したファイルを作成します。
$ sudo vi /etc/php.d/90-wordpress.ini
$ cat /etc/php.d/90-wordpress.ini
post_max_size = 100M
upload_max_filesize = 100M
$
phpの設定変更を反映させるために「sudo systemctl restart php-fpm」を実行します。
手順11: WordPressのSite Health Status対応
WordPressのサイトステータスを見てみると、いくつかパッケージを要求されている。
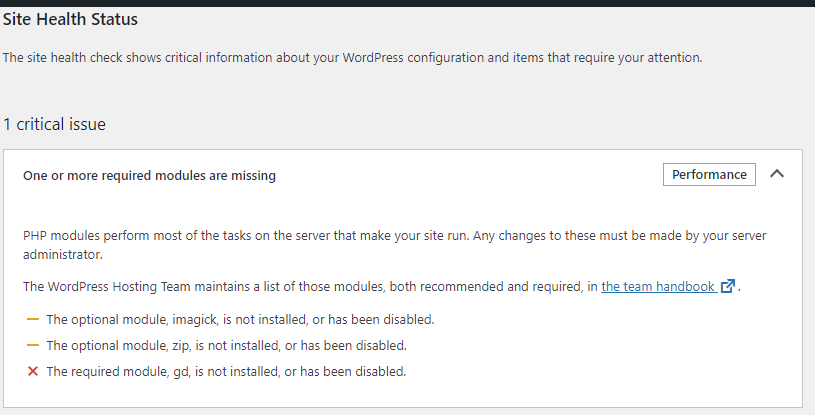
ImageMagickに関するphpモジュールは含まれていない
$ dnf search magick
Last metadata expiration check: 2:56:09 ago on Thu 27 May 2021 01:10:22 PM JST.
======================== Name & Summary Matched: magick ========================
GraphicsMagick.aarch64 : An ImageMagick fork, offering faster image generation
                       : and better quality
GraphicsMagick.src : An ImageMagick fork, offering faster image generation and
                   : better quality
GraphicsMagick-c++.aarch64 : GraphicsMagick Magick++ library (C++ bindings)
GraphicsMagick-c++-devel.aarch64 : C++ bindings for the GraphicsMagick library
GraphicsMagick-debugsource.aarch64 : Debug sources for package GraphicsMagick
GraphicsMagick-devel.aarch64 : Libraries and header files for GraphicsMagick app
                             : development
GraphicsMagick-doc.noarch : GraphicsMagick documentation
GraphicsMagick-perl.aarch64 : GraphicsMagick perl bindings
ImageMagick-c++.aarch64 : ImageMagick Magick++ library (C++ bindings)
ImageMagick-c++-devel.aarch64 : C++ bindings for the ImageMagick library
ImageMagick-devel.aarch64 : Library links and header files for ImageMagick app
                          : development
ImageMagick-doc.aarch64 : ImageMagick html documentation
ImageMagick-libs.aarch64 : ImageMagick libraries to link with
ImageMagick-perl.aarch64 : ImageMagick perl bindings
============================= Name Matched: magick =============================
ImageMagick.aarch64 : An X application for displaying and manipulating images
ImageMagick.src : An X application for displaying and manipulating images
=========================== Summary Matched: magick ============================
converseen.aarch64 : A batch image conversion tool written in C++ with Qt5 and
                   : Magick++
converseen.src : A batch image conversion tool written in C++ with Qt5 and
               : Magick++
$
zipとgdはそれっぽいものがあるので「sudo dnf install php-pecl-zip php-gd -y」で追加
$ sudo dnf install php-pecl-zip php-gd -y
Last metadata expiration check: 3:04:44 ago on Thu 27 May 2021 01:04:16 PM JST.
Dependencies resolved.
================================================================================
 Package      Arch    Version                               Repository     Size
================================================================================
Installing:
 php-gd       aarch64 7.4.6-4.module+el8.3.0+7685+72d70b58  ol8_appstream  83 k
 php-pecl-zip aarch64 1.18.2-1.module+el8.3.0+7685+72d70b58 ol8_appstream  53 k
Installing dependencies:
 gd           aarch64 2.2.5-7.el8                           ol8_appstream 134 k
 jbigkit-libs aarch64 2.1-14.el8                            ol8_appstream  54 k
 libXpm       aarch64 3.5.12-8.el8                          ol8_appstream  56 k
 libjpeg-turbo
              aarch64 1.5.3-10.el8                          ol8_appstream 145 k
 libtiff      aarch64 4.0.9-18.el8                          ol8_appstream 178 k
 libwebp      aarch64 1.0.0-1.el8                           ol8_appstream 246 k
 libzip       aarch64 1.6.1-1.module+el8.3.0+7685+72d70b58  ol8_appstream  62 k

Transaction Summary
================================================================================
Install  9 Packages

Total download size: 1.0 M
Installed size: 3.0 M
Downloading Packages:
<略>
$
こちらは再起動は不要なようで、すぐにSite Healthの状態に反映され、imagickモジュールに関するメッセージのみになった。
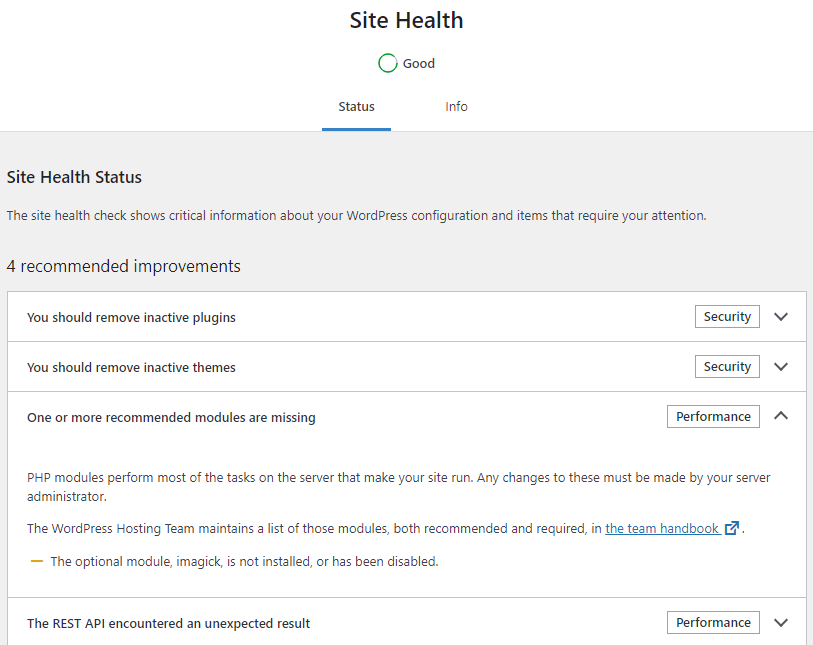
2022/04/06追記: wordpress 5.9.3では推奨phpプラグインに「php-intl」が追加されたので「sudo dnf install php-intl」で追加する
$ sudo dnf install php-intl
This system is receiving updates from OSMS server.
Last metadata expiration check: 0:09:17 ago on Wed 06 Apr 2022 01:29:10 PM JST.
Dependencies resolved.
================================================================================
 Package
     Arch    Version                                Repository             Size
================================================================================
Installing:
 php-intl
     aarch64 7.4.19-1.module+el8.5.0+20354+db97279a ol8_appstream-aarch64 182 k

Transaction Summary
================================================================================
Install  1 Package

Total download size: 182 k
Installed size: 522 k
Is this ok [y/N]: y
Downloading Packages:
php-intl-7.4.19-1.module+el8.5.0+20354+db97279a 2.0 MB/s | 182 kB     00:00
--------------------------------------------------------------------------------
Total                                           1.9 MB/s | 182 kB     00:00
Running transaction check
Transaction check succeeded.
Running transaction test
Transaction test succeeded.
Running transaction
  Preparing        :                                                        1/1
  Installing       : php-intl-7.4.19-1.module+el8.5.0+20354+db97279a.aarc   1/1
  Running scriptlet: php-intl-7.4.19-1.module+el8.5.0+20354+db97279a.aarc   1/1
  Verifying        : php-intl-7.4.19-1.module+el8.5.0+20354+db97279a.aarc   1/1

Installed:
  php-intl-7.4.19-1.module+el8.5.0+20354+db97279a.aarch64

Complete!
$
手順12: WordPressの.htaccess有効化
/var/www/html/wordpress/.htaccess が作成されているが、Oracle Linux 8のhttpd標準設定ではこれを読み込むようにはなっていない。
これが有効になっていないと、パーマリンク設定を「基本」から変えた場合に個別記事にアクセスできなくなる。
/etc/httpd/conf.d/wordpress.conf にファイルを作って設定する。
$ sudo vi /etc/httpd/conf.d/wordpress.conf
$ cat /etc/httpd/conf.d/wordpress.conf
<Directory /var/www/html/wordpress/>
 Allowoverride All
</Directory>
$ sudo systemctl restart httpd
$
手順13: OS自動更新の設定
メンテナンスがめんどくさくなって忘れる可能性があるので、Oracle Linux 8の自動更新設定を実施。
以前はyum-cronでしたが、現在は dnf-automatic に変わったので、パッケージをインストールします。
$ sudo dnf install dnf-automatic -y
Last metadata expiration check: 0:21:33 ago on Wed 02 Jun 2021 05:00:20 PM JST.
Dependencies resolved.
================================================================================
 Package            Arch        Version            Repository              Size
================================================================================
Installing:
 dnf-automatic      noarch      4.4.2-11.el8       ol8_baseos_latest      148 k

Transaction Summary
================================================================================
Install  1 Package

Total download size: 148 k
Installed size: 51 k
Downloading Packages:
<略>
$
/etc/dnf/automatic.conf 内の「apply_updates = no」を「apply_updates = yes」に変更
$ sudo vi /etc/dnf/automatic.conf
$ cat /etc/dnf/automatic.conf
[commands]
#  What kind of upgrade to perform:
# default                            = all available upgrades
# security                           = only the security upgrades
upgrade_type = default
random_sleep = 0

# Maximum time in seconds to wait until the system is on-line and able to
# connect to remote repositories.
network_online_timeout = 60

# To just receive updates use dnf-automatic-notifyonly.timer

# Whether updates should be downloaded when they are available, by
# dnf-automatic.timer. notifyonly.timer, download.timer and
# install.timer override this setting.
download_updates = yes

# Whether updates should be applied when they are available, by
# dnf-automatic.timer. notifyonly.timer, download.timer and
# install.timer override this setting.
apply_updates = yes


[emitters]
# Name to use for this system in messages that are emitted.  Default is the
# hostname.
# system_name = my-host

# How to send messages.  Valid options are stdio, email and motd.  If
# emit_via includes stdio, messages will be sent to stdout; this is useful
# to have cron send the messages.  If emit_via includes email, this
# program will send email itself according to the configured options.
# If emit_via includes motd, /etc/motd file will have the messages. if
# emit_via includes command_email, then messages will be send via a shell
# command compatible with sendmail.
# Default is email,stdio.
# If emit_via is None or left blank, no messages will be sent.
emit_via = stdio


[email]
# The address to send email messages from.
email_from = root@example.com

# List of addresses to send messages to.
email_to = root

# Name of the host to connect to to send email messages.
email_host = localhost


[command]
# The shell command to execute. This is a Python format string, as used in
# str.format(). The format function will pass a shell-quoted argument called
# `body`.
# command_format = "cat"

# The contents of stdin to pass to the command. It is a format string with the
# same arguments as `command_format`.
# stdin_format = "{body}"


[command_email]
# The shell command to use to send email. This is a Python format string,
# as used in str.format(). The format function will pass shell-quoted arguments
# called body, subject, email_from, email_to.
# command_format = "mail -Ssendwait -s {subject} -r {email_from} {email_to}"

# The contents of stdin to pass to the command. It is a format string with the
# same arguments as `command_format`.
# stdin_format = "{body}"

# The address to send email messages from.
email_from = root@example.com

# List of addresses to send messages to.
email_to = root


[base]
# This section overrides dnf.conf

# Use this to filter DNF core messages
debuglevel = 1
$
そしてdnf-automatic.timerを有効化し、開始します。
$ sudo systemctl enable dnf-automatic.timer
Created symlink /etc/systemd/system/timers.target.wants/dnf-automatic.timer → /usr/lib/systemd/system/dnf-automatic.timer.
$ sudo systemctl status dnf-automatic
● dnf-automatic.service - dnf automatic
   Loaded: loaded (/usr/lib/systemd/system/dnf-automatic.service; static; vendo>
   Active: inactive (dead)
$ sudo systemctl start dnf-automatic.timer
$ sudo systemctl status dnf-automatic.timer
● dnf-automatic.timer - dnf-automatic timer
   Loaded: loaded (/usr/lib/systemd/system/dnf-automatic.timer; enabled; vendor>
   Active: active (waiting) since Wed 2021-06-02 17:26:38 JST; 2s ago
  Trigger: Thu 2021-06-03 06:07:23 JST; 12h left

Jun 02 17:26:38 ホスト名 systemd[1]: Started dnf-automatic timer.
$
なお、dnf automaticでアップデートされた場合に、通知メールを送るようにする場合は、「Oracle Cloud上のインスタンスから管理メールを送信する手法」を参照のこと。