ONTAP9.1からONTAP9.7に転送するための手順例
参考になる日本語資料「ETERNUS AX series、ETERNUS HX series ONTAP 9 用SnapMirror 構成およびベストプラクティスガイド」
↑の元となっているTR-4015「SnapMirror configuration and best practices guide for ONTAP 9」
修正履歴
2021/07/29-1 ボリュームの言語が異なっているとsnapmirror initializeが失敗する
2021/07/29-2 ONTAP9.8だとnetwork interface createで-roleオプションがない
注:ONTAP 9.1からONTAP 9.7へのsnapmirrorは公式ではできないことになっている組み合わせだが、検証した限りではONTAP 8.3.2からONTAP 9.8とかもできた。ただ、過去に7-mode 8.2.4からONTAP 9.7へのtransission snapmirror時に有る場所で必ずsnapmirrorが止まりそれ以上進まない、という事象が発生して解決できなかったこともあるので、お薦めはできない。
(1) ONTAP9.1で送り元SVM作成
まず、ONTAP9.1側で送り元となるSVMとボリュームを作成する。
今回はガワだけ作成しており、NFSやCIFS設定などは省略している
ontap91::> vserver create -vserver share206 -aggregate aggr1 -language ja_v1.UTF-8 -subtype default -rootvolume share206_root -rootvolume-security-style mixed
[Job 21] Job succeeded:
Vserver creation completed

ontap91::> vserver show
                               Admin      Operational Root
Vserver     Type    Subtype    State      State       Volume     Aggregate
----------- ------- ---------- ---------- ----------- ---------- ----------
ontap91     admin   -          -          -           -          -
ontap91-01  node    -          -          -           -          -
share206    data    default    running    running     share206_  aggr1
                                                      root
3 entries were displayed.

ontap91::>
続いてボリューム割り当て
ontap91::> volume create -volume sharevol -aggregate aggr1 -size 10G  -vserver share206

Warning: The export-policy "default" has no rules in it. The volume will
         therefore be inaccessible.
Do you want to continue? {y|n}: y
[Job 24] Job succeeded: Successful

ontap91::> volume show
Vserver   Volume       Aggregate    State      Type       Size  Available Used%
--------- ------------ ------------ ---------- ---- ---------- ---------- -----
ontap91-01 vol0        aggr0        online     RW       3.16GB     2.27GB   28%
share206  share206_root aggr1       online     RW         20MB    18.75MB    6%
share206  sharevol      aggr1       online     RW         10GB    10.00GB    0%
3 entries were displayed.

ontap91::>
(2) ONTAP9.7で受け側SVM作成
受け側となるSVMとボリュームを作成する。
注: ボリュームの言語は送り側/受け側で同じとする必要があるため「volume language -volume ボリューム名」で確認すること。異なっているとsnapmirror initializeで失敗する。
受け側のボリュームは「type:DP」で作成する必要がある。
ontap97::> vserver create -vserver share207 -language ja_v1.UTF-8 -aggregate aggr1 -rootvolume share207_root -rootvolume-security-style mixed
[Job 20] Job succeeded:
Vserver creation completed.

ontap97::> vserver show
                               Admin      Operational Root
Vserver     Type    Subtype    State      State       Volume     Aggregate
----------- ------- ---------- ---------- ----------- ---------- ----------
ontap97     admin   -          -          -           -          -
ontap97-01  node    -          -          -           -          -
share207    data    default    running    running     share207_  aggr1
                                                      root
3 entries were displayed.

ontap97::>
type:DPでボリュームを作成する
ontap97::> volume create -volume sharevol_repl -aggregate aggr1 -size 10g -type DP -state online
[Job 23] Job succeeded: Successful

ontap97::> volume show
Vserver   Volume       Aggregate    State      Type       Size  Available Used%
--------- ------------ ------------ ---------- ---- ---------- ---------- -----
ontap97-01 vol0        aggr0_ontap97_01 online RW      807.3MB    430.5MB   43%
share207  share207_root aggr1       online     RW         20MB    18.70MB    1%
share207  sharevol_repl aggr1       online     DP         10GB    10.00GB    0%
3 entries were displayed.

ontap97::>
(3) snapmirror用にrole:interclusterのIPアドレスを割り当て
snapmirrorのrole:interclusterのLIF/IPアドレスを使用するため、送り側/受け側の双方で作成する必要がある。
まず、「network interface show -role intercluster」 もしくは「network interface show -service-policy default-intercluster」を実行してすでに設定されているかを確認する。
ontap91::> network interface show -role intercluster
There are no entries matching your query.

ontap91::>
ontap97::> network interface show -role intercluster
There are no entries matching your query.

ontap97::>
ないので作成する。
ontap91::> network interface create -vserver ontap91 -role intercluster -lif snapmirror_lif -home-node ontap91-01 -home-port e0a -address 172.17.44.222 -netmask 255.255.0.0 -status-admin up

ontap91::> network interface show -role intercluster
            Logical    Status     Network            Current       Current Is
Vserver     Interface  Admin/Oper Address/Mask       Node          Port    Home
----------- ---------- ---------- ------------------ ------------- ------- ----
ontap91
            snapmirror_lif up/up  172.17.44.222/16   ontap91-01    e0a     true

ontap91::>
ONTAP9.5ぐらいから「-service-policy default-intercluster」というオプションが増えている。
ontap97::> network interface create -vserver ontap97 -role intercluster -lif snapmirror_lif -service-policy default-intercluster -address 172.17.44.223 -netmask 255.255.0.0 -home-node ontap97-01 -home-port e0c

ontap97::> network interface show -role intercluster
            Logical    Status     Network            Current       Current Is
Vserver     Interface  Admin/Oper Address/Mask       Node          Port    Home
----------- ---------- ---------- ------------------ ------------- ------- ----
ontap97
            snapmirror_lif up/up  172.17.44.223/16   ontap97-01    e0c     true

ontap97::>
ONTAP 9.8だとnetwork interface createに-roleオプションがなくなっているが、「-service-policy default-intercluster」のみの指定でOKだった(マニュアル確認したらONTAP 9.5から-role interclusterから-service-policy default-intercluster に切り替わっていた)
ontap98::> network interface create -vserver ontap98 -lif snapmirror_lif -service-policy default-intercluster -address 172.17.44.235 -netmask 255.255.0.0 -home-node ontap98-01 -home-port e0c

ontap98::> network interface show -role intercluster
            Logical    Status     Network            Current       Current Is
Vserver     Interface  Admin/Oper Address/Mask       Node          Port    Home
----------- ---------- ---------- ------------------ ------------- ------- ----
ontap98
            snapmirror_lif
                         up/up    172.17.44.235/16   ontap98-01    e0c     true

ontap98::>
(4) cluster peerの作成
snapmirrorの前段階としてONTAP cluster同士を連携させるためのcluster peer(クラスタピア)を設定する。
どちらからやっても良いが「cluster peer create -peer-addrs 相手のinterclusterアドレス」を実行する。
ontap91::> cluster peer create -peer-addrs 172.17.44.223

Notice: Choose a passphrase of 8 or more characters. To ensure the authenticity
        of the peering relationship, use a phrase or sequence of characters
        that would be hard to guess.

Enter the passphrase:
Confirm the passphrase:

Notice: Now use the same passphrase in the "cluster peer create" command in the
        other cluster.

ontap91::>
ONTAP9.5以降では暗号化が標準設定されているため、ONTAP 9.1相手だと暗号化接続を試みるようで、下記の様にエラーとなる。
ontap97::> cluster peer create -peer-addrs 172.17.44.222

Notice: Use a generated passphrase or choose a passphrase of 8 or more
        characters. To ensure the authenticity of the peering relationship, use
        a phrase or sequence of characters that would be hard to guess.

Enter the passphrase:
Confirm the passphrase:

Error: command failed: Remote cluster would not use encryption for this
       relationship.

ontap97::>
これは、暗号化接続に関する設定オプションを明示的に指定することで回避できる。
ontap97::> cluster peer create -peer-addrs 172.17.44.222 -encryption-protocol-proposed none

Notice: Use a generated passphrase or choose a passphrase of 8 or more
        characters. To ensure the authenticity of the peering relationship, use
        a phrase or sequence of characters that would be hard to guess.

Enter the passphrase:
Confirm the passphrase:

ontap97::>
設定完了後「cluster peer show」コマンドで「Availability:Available」となっていることを確認する。
ontap91::> cluster peer show
Peer Cluster Name         Cluster Serial Number Availability   Authentication
------------------------- --------------------- -------------- --------------
ontap97                   1-80-000008           Available      ok
1 entries were displayed.

ontap91::>
ontap97::> cluster peer show
Peer Cluster Name         Cluster Serial Number Availability   Authentication
------------------------- --------------------- -------------- --------------
ontap91                   1-80-000008           Available      ok

ontap97::>
なお、設定完了後すぐはCluster Serial Numberが空欄になっているが、しばらく経つと表示されるはず。
(5) SVM peerの作成
volumeはSVMの配下にあるため、volume snapmirrorを行う場合は、SVMについてもpeer(SVM ピア)を設定する必要がある。
片側から「vserver peer create 」コマンドを実行する。
ontap91::> vserver peer create -vserver share206 -peer-vserver share207 -applications snapmirror -peer-cluster ontap97

Info: [Job 27] 'vserver peer create' job queued

ontap91::> vserver peer show
            Peer        Peer                           Peering        Remote
Vserver     Vserver     State        Peer Cluster      Applications   Vserver
----------- ----------- ------------ ----------------- -------------- ---------
share206    share207    initializing ontap97           snapmirror     share207
1 entries were displayed.

ontap91::> vserver peer show
            Peer        Peer                           Peering        Remote
Vserver     Vserver     State        Peer Cluster      Applications   Vserver
----------- ----------- ------------ ----------------- -------------- ---------
share206    share207    initiated    ontap97           snapmirror     share207
1 entries were displayed.

ontap91::>
上記でvserver peer createを実行したあと、もう片側では、まず「vserver peer show」で「State:pending」というステータスになっていることを確認する。
ontap97::> vserver peer show
            Peer        Peer                           Peering        Remote
Vserver     Vserver     State        Peer Cluster      Applications   Vserver
----------- ----------- ------------ ----------------- -------------- ---------
share207    share206    pending      ontap91           snapmirror     share206

ontap97::>
これをaccpetすることで、SVM peerが成立する。
ontap97::> vserver peer accept -vserver share207 -peer-vserver share206

Info: [Job 24] 'vserver peer accept' job queued

ontap97::> vserver peer show
            Peer        Peer                           Peering        Remote
Vserver     Vserver     State        Peer Cluster      Applications   Vserver
----------- ----------- ------------ ----------------- -------------- ---------
share207    share206    pending      ontap91           snapmirror     share206

ontap97::> vserver peer show
            Peer        Peer                           Peering        Remote
Vserver     Vserver     State        Peer Cluster      Applications   Vserver
----------- ----------- ------------ ----------------- -------------- ---------
share207    share206    peered       ontap91           snapmirror     share206

ontap97::>
成立後、ONTAP 9.1側でも確認すると「peer State:peered」に変化しているはず
ontap91::> vserver peer show
            Peer        Peer                           Peering        Remote
Vserver     Vserver     State        Peer Cluster      Applications   Vserver
----------- ----------- ------------ ----------------- -------------- ---------
share206    share207    peered       ontap97           snapmirror     share207
1 entries were displayed.

ontap91::>
(6) snapmirrorの作成
snapmirrorを作成する。
ontap97::> snapmirror create -source-path share206:sharevol -destination-path share207:sharevol_repl -vserver share207 -throttle unlimited -identity-preserve false -type DP -schedule daily
Operation succeeded: snapmirror create for the relationship with destination "share207:sharevol_repl".

ontap97::> snapmirror show
                                                                       Progress
Source            Destination Mirror  Relationship   Total             Last
Path        Type  Path        State   Status         Progress  Healthy Updated
----------- ---- ------------ ------- -------------- --------- ------- --------
share206:sharevol XDP share207:sharevol_repl Uninitialized Idle - true -

ontap97::>
ONTAP 9.7ではType:DPを指定してもType:XDPに変換されるようだ。
メモ:SVM DRの場合は「-identity-preserve true」とするが、ただのvolume snapmirrorの場合はfalseのままで良い(参考:SVM DRの場合の動作)
(7) snapmirrorの初期化/転送開始
snapmirrorは作成したあと、初期化操作を別途行う必要がある。
ontap97::> snapmirror initialize -destination-path share207:sharevol_repl
Operation is queued: snapmirror initialize of destination "share207:sharevol_repl".

ontap97::> snapmirror show
                                                                       Progress
Source            Destination Mirror  Relationship   Total             Last
Path        Type  Path        State   Status         Progress  Healthy Updated
----------- ---- ------------ ------- -------------- --------- ------- --------
share206:sharevol XDP share207:sharevol_repl Uninitialized Transferring 0B false 03/04 05:57:49

ontap97::>
初期化が終わると、「Mirror State:Snapmirrored」となり、データの転送が開始される「Relationship Status:Transferring」
ontap97::> snapmirror show
                                                                       Progress
Source            Destination Mirror  Relationship   Total             Last
Path        Type  Path        State   Status         Progress  Healthy Updated
----------- ---- ------------ ------- -------------- --------- ------- --------
share206:sharevol XDP share207:sharevol_repl Snapmirrored Transferring 0B true 03/04 05:58:57

ontap97::>
転送が終わると「Relationship Status:Idle」となる。
ontap97::> snapmirror show
                                                                       Progress
Source            Destination Mirror  Relationship   Total             Last
Path        Type  Path        State   Status         Progress  Healthy Updated
----------- ---- ------------ ------- -------------- --------- ------- --------
share206:sharevol XDP share207:sharevol_repl Snapmirrored Idle - true -

ontap97::>
いろいろな追加情報
・3拠点ある時のsnapmirrorネットワークの作り方に注意が必要
NetApp ONTAPドキュメント: カスタム IPspace を使用してレプリケーショントラフィックを分離します
IPspace を使用して、指定したクラスタ間 LIF とのクラスタピアリングを作成および設定する方法
「 Default 」 IPspace に動作しているローカルの IPv4 クラスタ間 LIF がない」というエラーでクラスタピアの作成が失敗する
LIFごとにIPネットワークが違う構成を取っている場合以下のようにIPSpaceを分ける必要がある
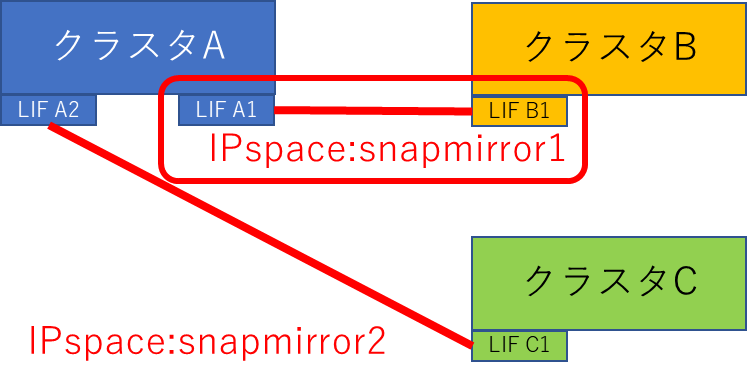
IPSpaceを分けた場合、LIF A1につくるインタークラスタLIFは「network interface create -vserver snapmirror1 -lif A1 -address ~」、LIF A2につくるやつは「network interface create -vserver snapmirror2 -lif A2 -address ~」という感じで作る。
-vserverで指定するのがクラスタ名やSVM名じゃなくて、IPSpace名となることに注意
既に作成済みのインタークラスタLIFのIPspaceを変更することはできないので、作成済みのLIFを削除→NICのIPSpaceとbroadcast domainを変更→インタークラスタLIFを作成、という手順を踏む必要がある。
IPspace インタークラスタLIFを作る際、間違って「network interface create -vserver クラスタ名 -lif A2 ~」で作ってしまった場合に、cluster peerのipspaceを変えようとすると、下記の様なエラーとなる。
netapp9101dr::> cluster peer modify -cluster netapp9101 -ipspace snapmirror2

Error: command failed: No operational intercluster LIFs of the IPv4 address
       family and IPspace "snapmirror2" are available on this node.

netapp9101dr::>
この場合は、LIFを削除して、-vserver IPspace名でLIFを作成し直せばよい