ESXi 7.0 Update 1からSDカード/USBメモリ起動の場合に書き込み回数性能が重要になった件について

2023/05/15追記:「SD card/USB boot device revised guidance (85685)」の2023年2月更新版ではvSphere 8環境での取り扱いについて明記されている。
対処方法1: 普通のローカルディスク起動に変更
対処方法2: SD/USBからブートするが、別途データ保存用ローカルディスクを用意
対処方法3: ESXiをSANのディスクから直接ブートする
対処方法4: SD/USBからブートして、VMFS領域にデータを置く設定
対処方法5: SD/USBからブートして、RAMDISK上にデータを置く設定(再起動すると消える)

基本的にはローカルディスクを使え、という話のようです。


2022/08/05追記:「SD card/USB boot device revised guidance (85685)」にてvSphereの新バージョン(7.0の次)ではSDカード/USBメモリはブートの起点としてしか使えなくなり、別途何らかのストレージにOSDATAを配置する必要がある、ということになる。(新バージョンではRAMDISKは非推奨)


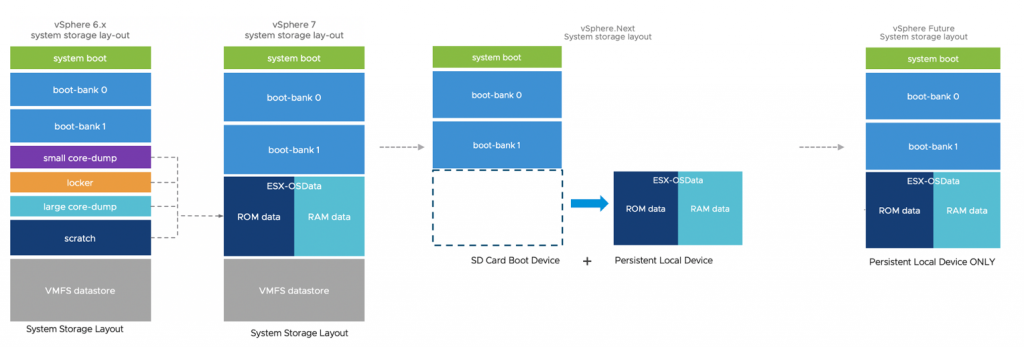
VMware vSphere / ESXi 7.0 から ESXiのブートディスクの構造が変更になった。

VMware vSphere Blog「vSphere 7 – ESXi System Storage Changes
「ESXi のシステム ストレージの概要」の「ESXi 7.0 のシステム ストレージの変更

ESXi 6.0時代 /scratch となっているパーテーションとかあるが、基本的に起動したあとデータ書き込みはあまりないかたちで運用されていた。

ところがESXi 7.0からは細かく分かれていたパーテーションがESX-OSDataパーテーションに統合されている。しかも、ここに書き込みが行われるようになった。

そして、ESXi 7.0 Update 1 / Update 2においてSDカード / USBメモリへの書き込み手法が変更され、起動ディスクに対して従来と比較すると多量の書き込み操作が実行されることになった。

これにより、ESXi 7.0 Update 1 / Update 2において、SDカード/USBメモリ起動にしている場合に、書き換え回数超過によるSDカード/USBメモリのアクセス不可事例が発生しやすくなっているようだ。

VMware KB VMFS-L Locker partition corruption on SD cards in ESXi 7.0 (83376)
VMware Technolopy Network「SD Boot issue Solution in 7.x

上記KB83376を見ると、ESXi 7.0(初期)ではI/O抑制機能があったが、ESXi 7.0 Update 1ではなくなったことが発生しやすくなった要因の1つであるようだ。

しかも、VMware的には「ESXi のシステム ストレージの概要」で、「ESX-OSData は 高耐久性ストレージ デバイス上に作成する必要があります。」と書いてあるから、書き換え回数上限が低いものを使わないのは当然でしょ、というスタンスな模様。

OEMメーカが選定したSDカードなどが死んだとしても、それはその部材を選んだOEMメーカ側の責任だということらしい。

実際、DELLの「VMware vSphere 7.x on Dell EMC PowerEdge Servers Getting Started Guide」の「Getting started with VMware vSphere」をみると、ESXi 7.0ではSDカードは推奨しない、と書いてある。

NOTE: If you had ordered VMware ESXi with your Dell EMC PowerEdge server, it is preinstalled on your server. The ESXi installer media is required for reinstallation. The Boot Optimized Storage Solution (BOSS) card is the preferred non-HDD or SSD device for VMware ESXi 7.0 installation. The Dell Internal Dual SD Module (IDSDM) install is no longer recommended due to write endurance issues with the SD flash media. For more information, see the Storage Requirements for ESXi 7.0 Installation or Upgrade section on the VMware ESXi Installation and Setup Guide or see VMware Knowledge Base article 2145210.

さて、この問題について、とることができる方策は下記の5つが考えられる。

その1) 高耐久性のものに変更する(USB接続のSSDや、MLCチップのSDカードなど)
その2) 普通のSSDやHDD起動に変更する
その3) ESXi 7.0 Update 2用の現象低減パッチが7月中にリリース予定(ただし、低減、である)
      → 2021/08/24リリースのESXi 7.0 U2cで提供開始
その4) メインメモリを消費してRamdiskを作成し、そこに書き込ませる
その5) あきらめて、壊れたら交換&ESXi再セットアップ

その4の手法はVMware KB83376 内にリンクがあり「High frequency of read operations on VMware Tools image may cause SD card corruption (2149257)」で説明されている。

ドキュメント的にはESXi 6.0 と ESXi 6.5用になっているが、ESXi 7.0でも適用できるようだ。

ESXi 7.0のshellに入って、現在の /UserVars/ToolsRamdisk の設定を確認

# esxcli system settings advanced list -o /UserVars/ToolsRamdisk
   Path: /UserVars/ToolsRamdisk
   Type: integer
   Int Value: 0
   Default Int Value: 0
   Min Value: 0
   Max Value: 1
   String Value:
   Default String Value:
   Valid Characters:
   Description: Use VMware Tools repository from /tools ramdisk.
#

「Int Value: 0」ということなので、現在は「0」となっている。

これを1に変更するため、以下を実行する

# esxcli system settings advanced set -o /UserVars/ToolsRamdisk -i 1
#

変更が反映されたか確認

# esxcli system settings advanced list -o /UserVars/ToolsRamdisk
   Path: /UserVars/ToolsRamdisk
   Type: integer
   Int Value: 1
   Default Int Value: 0
   Min Value: 0
   Max Value: 1
   String Value:
   Default String Value:
   Valid Characters:
   Description: Use VMware Tools repository from /tools ramdisk.
#

「Int Value: 1」となっていたら変更されている。

この後、ESXi を再起動して、RAMディスクを実際に稼働させる。

ESXi設定のバックアップ&リストア

SDカード/USBメモリが壊れることを許容する場合、ESXiの設定ファイルをバックアップしておき、再セットアップ時にリストアする、という手法が考えられる。

手法はVMware KB「ESXi ホストの構成のバックアップ方法 (2042141)

リストアの際、ESXiにIPアドレスを割り当てておく必要がある。


具体的にどれくらいの書き込み要求があるんだろう?と調べて見た。

DELL PartnerSEつぶやきブログ「BOSSってなんだろう?」から、ESXiが要求するSSD/Flashデバイスに対する要求要件が書かれた「vSphere SSD and Flash Device Support (2145210)」を発見

それによると下記のようになっている。

Table 1: SSD/Flash Endurance Requirements 

SSD/Flash Device Use CaseJEDEC Endurance RequirementWorkload CharectizationNotes
Host Swap Cache365 TBW or betterRandom, infrequent writesHost memory rarely overcommitted
3650 TBW or betterRandom, frequent writesHost memory routinely overcommitted
Regular Datastore3650 TBW or better1Virtual Machine workload dependentSize >= 1TB needs more endurance
vSphere Flash Read Cache (VFlash)365 TBW or betterVirtual Machine workload dependentSize <= 4TB
ESXi Boot Device0.5 TBW minimum2
2 TBW recommended2,6
Sequential (WAF <10)Size >= 4GB3
ESXi Coredump Device0.1 TBW minimum2,4Extremely sequential (WAF ~1)Size >= 4GB3,4
ESXi Logging Device64 TBW (dedicated device)
128 TBW (colocated) 2,5
Sequential7
(WAF < 100 block mode, WAF < 10 page mode)
Size >= 4GB2,3

ESXi起動デバイスとしては2TBWぐらいだったものが、ログデバイスとしての128TBWぐらいが要求され、USBメモリ上を仮想マシンを置く用のVMFSデータストアとしての使うとなると3650TBWが要求される、などと、起動ディスクとして使うだけの場合より50倍以上の要求がある、ということがわかった。

そりゃ、あっさり死にますね


2022/05/06追記

ESXi 7.0U1 では /UserVars/ToolsRamdisk という変数自体がない。

ESXi 7.0U3 だと /UserVars/ToolsRamdisk はあり、システムのインストール先が HDD か SDカードかによって、「Default Int Value」の値が異なっていた。

HDDでは「0」で、SDカードだと「1」となっていた。

このため、手動で変更する必要性は薄いようだ。(SDカードなら必ず”1″となるかは、ドキュメント上に特に記載されていないため、確認を行うこと)


2022/07/21追記

VMware KBに「SD card/USB boot device revised guidance (85685)」という記事が登場

SDカードやUSBメモリからの起動は可能であるものの推奨しないこととなった。

NVMeやSSDから起動しろ、とのこと。

SDカードやUSBメモリから起動した場合でも、OSDATAパーテーションを別のHDDなどに設定する、ということが推奨される。

ESXi 7.xまではRAMDISKで回避することもできるが、次のESXiではその設定はなくなる、とのこと
Oracle Cloud上のインスタンスから管理メールを送信する手法

Oracle Cloud上に作成したインスタンスのうち、Oracle Autonomouse Linux 7インスタンスだと適切に設定している場合、yum-cronなどが実行された際に 送信者 noreply@notification.~.oci.oraclecloud.com でメールを送信する設定になっている。

Oralce Linux 8インスタンスだとそのような設定にはなっていない。

似たような形でインスタンスのrootから送信されるメールを noreply@notification.~.oci.oraclecloud.com で発信する方法があるかを確認した。

参考ドキュメント
Oracle Cloud Infrastructureドキュメント「電子メール配信の開始
Oracle Cloud Infrastructureドキュメント「Postfixと電子メール配信の統合

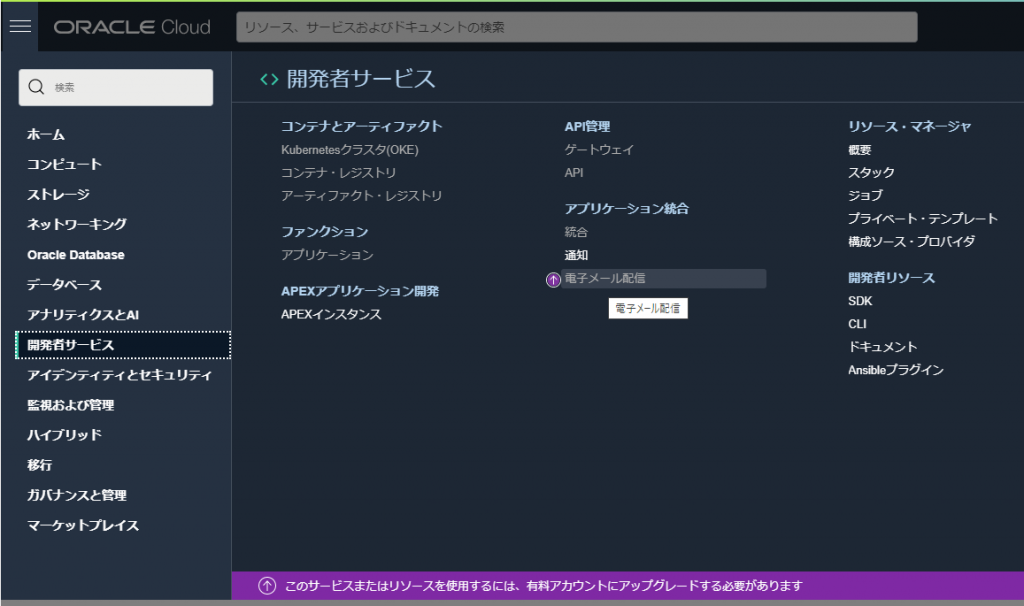
しかし、「電子メール配信」については有料アカウントが必要になるようだ。

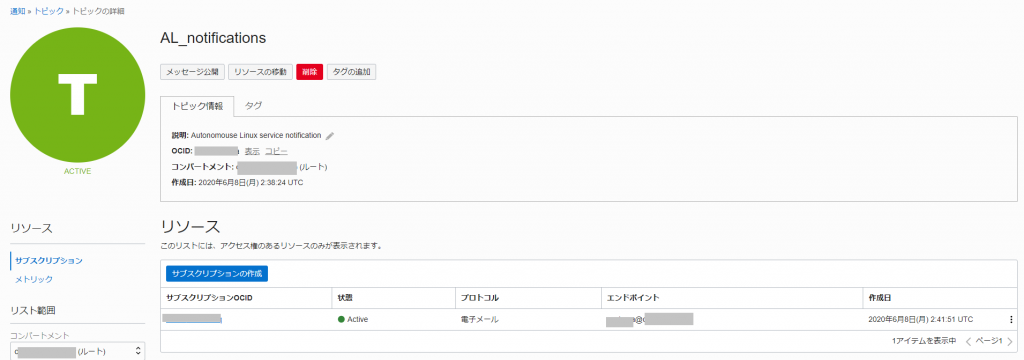
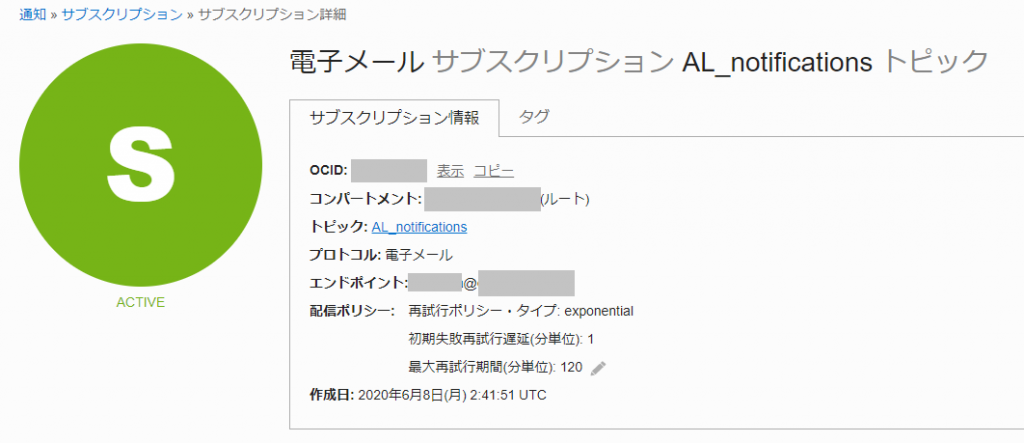
Oracle Autonomouse Linux 7インスタンスが利用しているのは「通知」の方になっている

このサブスクリプション設定が流用できればいいんですけど・・・

Oracle Cloud : 通知サービスとoci-cliを使って一時間ごとにDBCSの状態を通知する

この情報が使えそうです。

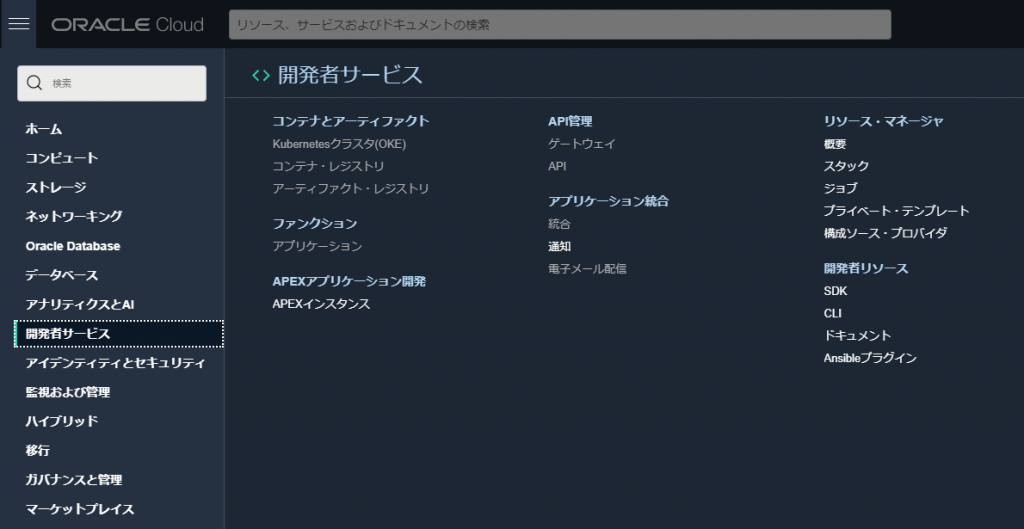
今回の環境ではすでに[開発者サービス]-[アプリケーション統合]-[通知]に

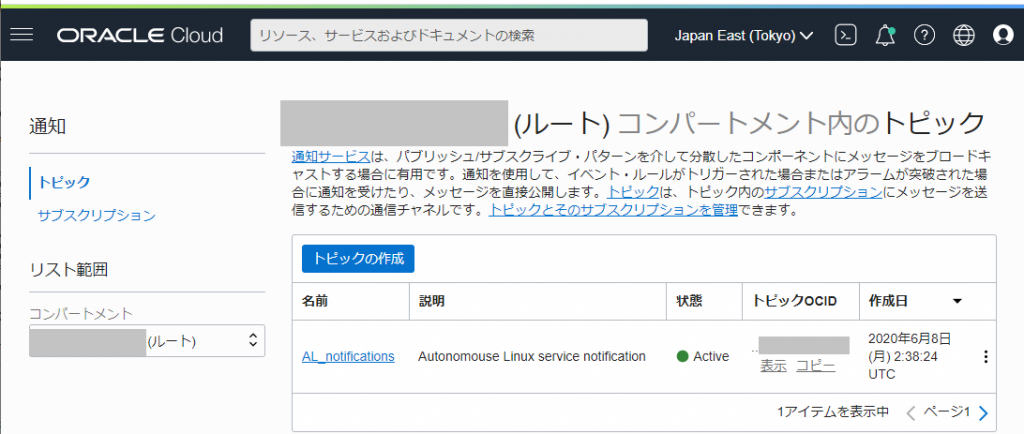
すでにAutonomouse Linux用で作成したトピックが作成されているため、それを流用します。

上記の「AL_notification」のトピックOCIDを使用してコマンドを実行・・・

$ oci ons message publish --topic-id ocid1.onstopic.oc1.ap-tokyo-1.<略> --title "test mail" --body "test mail"
-bash: oci: command not found
$

oci-utilsのパッケージがアップデートされていないとエラーになります。その場合はアップデートします。

2024/10/15: いまは python39-oci-cli か python36-oci-cli にociコマンドが含まれているようなので、 oci-utils と python3?-oci-cli をインストールします。

$ sudo dnf update oci-utils -y
Last metadata expiration check: 4:26:16 ago on Tue 08 Jun 2021 01:30:06 PM JST.
Dependencies resolved.
================================================================================
 Package                  Arch     Version            Repository           Size
================================================================================
Upgrading:
 oci-utils                noarch   0.12.4-1.el8       ol8_oci_included    245 k
Installing dependencies:
 python3-arrow            noarch   0.17.0-1.0.1.el8   ol8_oci_included    101 k
 python3-click            noarch   6.7-8.el8          ol8_appstream       131 k
 python3-convertdate      noarch   2.3.0-1.0.1.el8    ol8_oci_included     83 k
 python3-dateparser       noarch   1.0.0-1.0.1.el8    ol8_oci_included    392 k
 python3-hijri-converter  noarch   2.1.1-1.0.1.el8    ol8_oci_included     30 k
 python3-jmespath         noarch   0.10.0-1.el8       ol8_oci_included     48 k
 python3-pymeeus          noarch   0.3.6-2.0.1.el8    ol8_oci_included    1.1 M
 python3-regex            aarch64  2021.4.4-1.el8     ol8_developer_EPEL  328 k
 python3-retrying         noarch   1.3.3-1.0.1.el8    ol8_oci_included     22 k
 python3-terminaltables   noarch   3.1.0-1.0.1.el8    ol8_oci_included     31 k
 python3-tzlocal          noarch   2.0.0-4.el8        ol8_oci_included     37 k
 python36-oci-cli         noarch   2.22.1-1.el8       ol8_oci_included    6.4 M

Transaction Summary
================================================================================
Install  12 Packages
Upgrade   1 Package

Total download size: 8.9 M
<略>
$

$ oci ons message publish --topic-id ocid1.onstopic.oc1.ap-tokyo-1.<略> --title "test mail" --body "test mail"
ERROR: Could not find config file at /home/opc/.oci/config, please follow the instructions in the link to setup the config file https://docs.cloud.oracle.com/en-us/iaas/Content/API/Concepts/sdkconfig.htm
$

ociコマンドに必要な諸設定を行っていないのでエラーになりました。

まず、キーを作成します。なお、passphraseは何も入力せずエンターキーのみにします(そうしないとスクリプト実行の時にpassphraseを要求される)

$ oci setup keys
Enter a passphrase for your private key (empty for no passphrase):
Public key written to: /home/opc/.oci/oci_api_key_public.pem
Private key written to: /home/opc/.oci/oci_api_key.pem
Public key fingerprint: xx:xx:xx:xx:xx:xx:xx:xx:xx:xx:xx:xx:xx:xx:xx:xx


    If you haven't already uploaded your API Signing public key through the
    console, follow the instructions on the page linked below in the section
    'How to upload the public key':

        https://docs.cloud.oracle.com/Content/API/Concepts/apisigningkey.htm#How2

$  ls -al ~/.oci
total 8
drwx------. 2 opc opc   59 Jun  7 17:32 .
drwx------. 5 opc opc  138 Jun  7 17:32 ..
-rw-------. 1 opc opc 1679 Jun  7 17:32 oci_api_key.pem
-rw-------. 1 opc opc  451 Jun  7 17:32 oci_api_key_public.pem
$

作成された oci_api_key_public.pem の内容を[アイデンティティとセキュリティ]-[アイデンティティ]-[ユーザー]に登録されている各ユーザから、使用するユーザを選択し[リソース]-[APIキー]に登録します。

なお、APIキーは無料アカウントでは3つまで登録可能で、それ以上は登録できませんでした。
使ってないものを消すには面倒くさいですが、各ユーザの~/.oci/oci_api_key.pem のフィンガープリントを計算して、登録されているものを比較する必要があります。

フィンガープリントの計算手法はOracle Cloudドキュメント「キーのフィンガープリントの取得方法」にあるように「openssl rsa -pubout -outform DER -in ~/.oci/oci_api_key.pem | openssl md5 -c」で実施出来ます。

つぎに~/.oci/config ファイル作成のために

[ガバナンスと管理]-[アカウント管理]-[テナンシ詳細]にて、テナントのOCIDを取得

また、ユーザのOCIDと先ほど登録したAPIキーのフィンガープリントを configファイルに記載する。

$ cat ~/.oci/config
[DEFAULT]
key_file=/home/opc/.oci/oci_api_key.pem
region=ap-tokyo-1
tenancy=ocid1.tenancy.oc1..aaaaaaaa7lml<略>
user=ocid1.user.oc1..aaaaaaaamenibh4iny<略>
fingerprint=<略>
$

記載してociコマンドを再実行

$ oci ons message publish --topic-id ocid1.onstopic.oc1.ap-tokyo-1.aa<略> --title "test mail" --body "test mail"
WARNING: Permissions on /home/opc/.oci/config are too open.
To fix this please try executing the following command:
oci setup repair-file-permissions --file /home/opc/.oci/config
Alternatively to hide this warning, you may set the environment variable, OCI_CLI_SUPPRESS_FILE_PERMISSIONS_WARNING:
export OCI_CLI_SUPPRESS_FILE_PERMISSIONS_WARNING=True

{
  "data": {
    "message-id": "56ca7636-1605-7a19-5344-<略>",
    "time-stamp": null
  }
}
$

まず、「WARNING: Permissions on /home/opc/.oci/config are too open.」についてはパーミッション問題なので、書いてある通りに対処する。

$ ls -l /home/opc/.oci/config
-rw-rw-rw-. 1 opc opc 299 Jun  7 17:43 /home/opc/.oci/config
$ oci setup repair-file-permissions --file /home/opc/.oci/config
$ ls -l /home/opc/.oci/config
-rw-------. 1 opc opc 299 Jun  7 17:43 /home/opc/.oci/config
$

再実行

$ oci ons message publish --topic-id ocid1.onstopic.oc1.ap-tokyo-1.aaaaaaaacesi5<略> --title "test mail" --body "test mail"
{
  "data": {
    "message-id": "c491e672-9401-beb3-16f5-<略>",
    "time-stamp": null
  }
}
$

成功か失敗か分かりづらいですが、成功していました。(WARNING: Permissions の時のやつもメール送信は出来ていました)

というわけで、ociコマンドを使用することで、Oracle Cloudの通知を使ってシステムメールを送信することができそうなことがわかりました。

ociコマンドは https://github.com/oracle/oci-cli にソースがある

つぎに dnf automaticでそれを実行するにはどういう手法が最適化の検討です。

DNF Automatic」には「[command] section」と「[command_email] section」があり、利用できそうです。

違いの詳細については「RHEL8/CentOS8のdnf automaticのemitters設定を調べた」に書きましたが、今回の場合は[command_email]sectionを使うことにします。

dnf automaticではメール本文を標準入力で指定することになっていて、そのままではociコマンドのbodyオプションとして渡すことができません。

なので、Oracle Cloud Infrastructure Document Notifications Publish Messages(日本語版) を起点に調べていったところOracle Cloud Infrastructure Documentation / API Reference and Endpoints の「PublishMessage」にて、REST API/Java SDK/Python SDK/Go SDK/TypeScript SDK/.NET SDK/Ruby SDKを使った場合のコードサンプルを発見。

ociコマンドはpyhonを使っているので、Python SDKのサンプルコードを利用した /usr/local/bin/oci-notification-mail を作って使用します。

topic_id=のところは自分の環境に合わせてください。

$ sudo vi /usr/local/bin/oci-notification-mail
$ cat /usr/local/bin/oci-notification-mail
#!/usr/bin/python3
# This is an automatically generated code sample.
# To make this code sample work in your Oracle Cloud tenancy,
# please replace the values for any parameters whose current values do not fit
# your use case (such as resource IDs, strings containing ‘EXAMPLE’ or ‘unique_id’, and
# boolean, number, and enum parameters with values not fitting your use case).

import oci
import sys

argvs=sys.argv
argc = len(argvs)
subject=argvs[1]
textbody="".join(sys.stdin.readlines())

# Create a default config using DEFAULT profile in default location
# Refer to
# https://docs.cloud.oracle.com/en-us/iaas/Content/API/Concepts/sdkconfig.htm#SDK_and_CLI_Configuration_File
# for more info
config = oci.config.from_file()


# Initialize service client with default config file
ons_client = oci.ons.NotificationDataPlaneClient(config)

# Send the request to service, some parameters are not required, see API
# doc for more info
publish_message_response = ons_client.publish_message(
    topic_id="ocid1.onstopic.oc1.ap-tokyo-1.<略>",
    message_details=oci.ons.models.MessageDetails(
        body=textbody,
        title=subject),
    message_type="RAW_TEXT")

# Get the data from response
print(publish_message_response.data)
$ sudo chmod a+x /usr/local/bin/oci-notification-mail
$

まずこれを作成したあと、送信テストをします。

$ cat /etc/hosts | /usr/local/bin/oci-notification-mail testmail
{
  "message_id": "ef1aa15b-98d0-1824-68ef-<略>",
  "time_stamp": null
}
$

これを実行してしばらく待つと、「Subject:testmail」 で、本文が/etc/hostsの中身になっているメールが届きます。

スクリプトが正常に動作することを確認できたら、ociコマンドがrootユーザでも実行できるように .oci ディレクトリの内容を /root/.oci にコピーします。書かれてるpemファイルのパスなどはそのままでかまいません。注意点は /root/.oci ディレクトリの権限を 700 にしておく、ということです。

最後にdnf automaticの設定を変更します。

変更する場所は2つ

「[emitters] セクション」のemit_via を「emit_via=command_email」に変更

「[command_email]セクション」のcommand_formatを「command_format = “/usr/local/bin/oci-notification-mail {subject}”」、「#stdin_format = “{body}”」を「stdin_format = “{body}”」に変更します。

これにより、dnf automaticでパッチが適用された場合に下記の様なメールが届くようになりました。

おまけ

ちなみに、Oracle Linux 8の標準インスタンスではpostfixやsendmailではなく、esmtp というパッケージでメール送信が行われるようです。

$ ls -l /usr/sbin/sendmail
lrwxrwxrwx. 1 root root 21 May 27 13:04 /usr/sbin/sendmail -> /etc/alternatives/mta
$ ls -l /etc/alternatives/mta
lrwxrwxrwx. 1 root root 22 May 27 13:04 /etc/alternatives/mta -> /usr/bin/esmtp-wrapper
$ ls -l /usr/bin/esmtp-wrapper
-rwxr-xr-x. 1 root root 3374 Jul  2  2020 /usr/bin/esmtp-wrapper
$  rpm -qa|grep smtp
esmtp-1.2-15.el8.aarch64
libesmtp-1.0.6-18.el8.aarch64
$ alternatives --display mta
mta - status is auto.
 link currently points to /usr/bin/esmtp-wrapper
/usr/bin/esmtp-wrapper - priority 30
 slave mta-sendmail: /usr/bin/esmtp-wrapper
 slave mta-sendmailman: /usr/share/man/man1/esmtp.1.gz
 slave mta-mailq: /usr/bin/esmtp-wrapper
 slave mta-mailqman: /usr/share/man/man1/esmtp.1.gz
Current `best' version is /usr/bin/esmtp-wrapper.
$

公式ページに「THIS PROJECT IS NO LONGER BEING MAINTAINED. IF IT DOESN’T WORK FOR YOU SEE THESE LINKS.」って書いてあるのにRHEL/CentOS/Oracle Linux 8で使っているのか・・・

Oracle CloudのOracle Linux 8で標準選択されているesmtpでメールを送信する

Oracle Cloud上のOralce Linux 8インスタンスでは、postfixやsendmailではなく、esmtpがインストールされている。

esmtpはRHEL8やCentOS8でも用意されているが、実際に使用している情報があまりない。

esmtp公式ページを見ると「THIS PROJECT IS NO LONGER BEING MAINTAINED. IF IT DOESN’T WORK FOR YOU SEE THESE LINKS.」と書いてあり、本来は利用推奨ではないようだ。

ざっと見たところ日本語情報としてまとまっているのは2010年に書かれた 本を読む の「軽量MTA「esmtp」を試してみた」だった。

esmtpはデーモンではなく、ポート25での待受もせず、/usr/lib/sendmailや/usr/bin/mail を実行する形でのメール送信が実行できるようにするためのソフトウェアです。

ローカルのUNIXユーザ宛にメールを届けたい場合は別途 procmailパッケージをインストールする必要があります。

他のサーバ宛にメールを送りたい場合は、外部のSMTPサーバのアカウント情報を登録し、SMTP AUTHを利用したメール送信が可能です。

難点は、メール送信に関するログがどこにも保存されない、ということ。

設定に失敗してメールが送信できなかった場合でもどう調べればいいのか分からない、という問題点も・・・

また、SMTP AUTHに使うパスワードを平文で設定ファイルに書く必要があるというのも、なかなかな問題点です。

とはいえ、期待通りに動けば簡単に外部SMTPを使用してメール送信ができるし、各サーバに同じ設定を入れておくとシステム系メールの送信元メールアドレスを全て同じにする、ということも容易な感じです。

設定

esmtpの設定は、システム全体に適用される /etc/esmtprc と、各UNIXユーザごとの~/.esmtprc で行います。

とりあえずシステム系メールを送りたいだけであれば /etc/esmtprc を設定しておけばいい感じです。

/etc/esmtprc は用意されていないので /usr/share/doc/esmtp/sample.esmtprc にあるサンプルをコピーして使うか、必要なものだけを書きます。

sample.esmtprcの内容

# Sample configuration file for ESMTP.
#
#       Jose Fonseca

# Set SMTP host and service (port)
#
hostname = localhost:25

# Set the user name
#
username = "USERNAME"

# Set the password
password = "PASSWORD"

# Use the Starttls
#
#starttls = disabled
#
# It can be one of "enabled", "disabled" or "required". It defaults to
# disabled.

# Set the certificate passphrase
#
#certificate_passphrase = "CERTIFICATE_PASSPHRASE"

# Command to run before contacting the SMTP server
#
#preconnect = "ssh -f -L 2025:mail.isp.com:25 user@shell.isp.com 'sleep 5'"


# Same as above but for a different identity which can be selected with the
# '-f' flag. You can have as many you like.
#
identity = myself@somewhere.com
        hostname = smtp.somewhere.com:25
        username = "myself"
        password = "secret"
        #starttls = disabled
#
# NOTE: the default indentity settings aren't shared by the other identities.
# Everything (username, password, etc.) must be specified for every identity
# even if they don't differ from the default identity.


# Set the Mail Delivery Agent (MDA)
#
mda = "/usr/bin/procmail -d %T"
#
# Some possible MDAs are "/usr/bin/procmail -d %T", "/usr/bin/deliver" or
# "/usr/lib/mail.local %T".

これを使ってもいいのですが、必要なものだけを書いた方が簡単ですね。

外部のSMTPサーバを使って送信する設定例

Net@ddressというかれこれ20年以上使っているメールサービスのアカウントを使用してメール送信する設定です。

hostname=smtp.postoffice.net:25
username="ユーザ名@usa.net"
password="パスワード"

mda "/usr/bin/procmail -d %T"

これを /etc/esmtprc に書いたサーバから mailコマンドを使って送信したメールは全て「ユーザ名@usa.net」が発信元となって送られることになります。

また、「mda “/usr/bin/procmail -d %T”」という設定を入れているので、ローカルユーザ宛のメールであれば /var/spool/mail/ に配送されるようにしています。

SMTP送信時にstarttlsが必要な場合は「starttls=enabled」を追加すればいいようなのですが、下記の手順でやったのですが、送信されませんでした。

$ mkdir ~/.authenticate
$ chmod 0700 ~/.authenticate
$ wget http://curl.haxx.se/ca/cacert.pem
$ mv cacert.pem ~/.authenticate/ca.pem
$ chmod 0600 ~/.authenticate/ca.pem
$ mailx メール送り先@ドメイン名
Subject: test mail 5
test mail 5
.
EOT
$ 0 (null)
メール送り先@ドメイン名: 0 (null)
0 (null)
メール送り先@ドメイン名: 0 (null)
procmail: Unknown user "-r"
0 (null)
メール送り先@ドメイン名: 0 (null)
procmail: Unknown user "-r"

とりあえずstarttls対応は保留ですね。

なお、 /etc/esmtprcでは、下記の様な書式を使うこともできます。

identity ユーザ名@usa.net
        hostname smtp.postoffice.net:25
        username "ユーザ名@usa.net"
        password "パスワード"
        default

mda "/usr/bin/procmail -d %T"

ユーザによってアカウントを変える場合はこれを使うようです。


2021/07/02追記

さて、Oracle Linux 7環境でesmtpを設定してみたところ、cronで送られてくるメールが送信できていないようだ。

/etc/cron.daily/0logwatch:

You have old files in your logwatch tmpdir (/var/cache/logwatch):
        logwatch.idrC25J0
        logwatch.Hb7DUNNO
The directories listed above were most likely created by a
logwatch run that failed to complete successfully.  If so, you
may delete these directories.

/bin/mktemp: failed to create directory via template '/root/.esmtp_queue/XXXXXXX
X': Permission denied
unable to create tempdir inside /root/.esmtp_queue
/etc/cron.daily/0yum-daily.cron:

root宛に上記のような一時ファイルが作れないというエラーメールが届いていた。

/var/log/audit/audit.log 内を esmtp で検索してみると、下記の様にSELinuxの権限問題で書き込みが阻止されていた。

# grep esmt /var/log/audit/audit.log
type=AVC msg=audit(1623953887.619:18168): avc:  denied  { write } for  pid=23636 comm="mktemp" name=".esmtp_queue" dev="sda3" ino=2567447 scontext=system_u:system_r:logwatch_t:s0-s0:c0.c1023 tcontext=unconfined_u:object_r:mail_home_rw_t:s0 tclass=dir permissive=0
#

/root/.esmtp_queue のSELinuxコンテキストを確認すると、mail_home_rw_tとなっている。要求はlogwatch

# ls -ldZ /root/.esmtp_queue
drwxr-xr-x. root root unconfined_u:object_r:mail_home_rw_t:s0 /root/.esmtp_queue
#

関係しそうな事例を発見
Bug 1366173 – /root/.esmtp_queue has bad context when created from a cron job
Bug 1592083 – SELinux is preventing touch from ‘create’ accesses on the archivo mail.
Bug 1295923 – SELinux is preventing sendmail from ‘read’ accesses on the directory .esmtp_queue.
Bug 1303305 – errors from esmtp in /var/log/messages every time my cron job runs
Bug 1149164 – SELinux is preventing esmtp from ‘read’ accesses on the file /.esmtp_queue/4PVJsKZY/mail.

ただ、上記は調査方法や解決方法に関して直接の記載がない。

また、Bug 1303305 には、esmtpはローカル配送にのみ使え、なんて書かれている。

Fedora MaillingList「Trying to use mailx for logwatch」に確認してくヒントがあった。

まず、「logwatch_t」で設定されている内容の確認してみる

# sesearch -T -s logwatch_t
Found 12 semantic te rules:
   type_transition logwatch_t postfix_postdrop_t : process logwatch_mail_t;
   type_transition logwatch_t abrt_helper_exec_t : process abrt_helper_t;
   type_transition logwatch_t ntpd_exec_t : process ntpd_t;
   type_transition logwatch_t postfix_postqueue_exec_t : process postfix_postqueue_t;
   type_transition logwatch_t sendmail_exec_t : process logwatch_mail_t;
   type_transition logwatch_t var_lock_t : file logwatch_lock_t;
   type_transition logwatch_t courier_exec_t : process logwatch_mail_t;
   type_transition logwatch_t mdadm_exec_t : process mdadm_t;
   type_transition logwatch_t tmp_t : dir logwatch_tmp_t;
   type_transition logwatch_t tmp_t : file logwatch_tmp_t;
   type_transition logwatch_t exim_exec_t : process logwatch_mail_t;
   type_transition logwatch_t var_run_t : file logwatch_var_run_t;

#

ターゲット側が mail_home_rw_t なものを調べて見ると

# sesearch -T | grep mail_home_rw_t
type_transition cups_pdf_t user_home_dir_t : dir mail_home_rw_t "Maildir";
type_transition cinder_backup_t user_home_dir_t : dir mail_home_rw_t "Maildir";
type_transition conman_unconfined_script_t admin_home_t : file mail_home_rw_t ".esmtp_queue";
<略>
type_transition samba_unconfined_script_t user_home_dir_t : dir mail_home_rw_t ".esmtp_queue";
type_transition vmtools_unconfined_t admin_home_t : dir mail_home_rw_t ".maildir";
# sesearch -T |grep mail_home_rw_t |wc
    886    6202   72157
#

886個設定されているようだ。

「logwatch」が関連しているものに限定してみると

# sesearch -T |grep mail_home_rw_t |grep logwatch
type_transition logwatch_mail_t admin_home_t : dir mail_home_rw_t ".esmtp_queue";
type_transition logwatch_mail_t user_home_dir_t : file mail_home_rw_t ".esmtp_queue";
type_transition logwatch_mail_t user_home_dir_t : dir mail_home_rw_t ".maildir";
type_transition logwatch_mail_t admin_home_t : dir mail_home_rw_t ".maildir";
type_transition logwatch_mail_t user_home_dir_t : dir mail_home_rw_t "Maildir";
type_transition logwatch_mail_t admin_home_t : file mail_home_rw_t ".esmtp_queue";
type_transition logwatch_mail_t user_home_dir_t : dir mail_home_rw_t ".esmtp_queue";
type_transition logwatch_mail_t admin_home_t : dir mail_home_rw_t "Maildir";
#

ソースターゲットが logwatch_mail_t でいろいろ設定されているようなので、「logwatch_mail_t」で調べて見る

# sesearch -T -s logwatch_mail_t
Found 15 semantic te rules:
   type_transition logwatch_mail_t postfix_etc_t : file etc_aliases_t;
   type_transition logwatch_mail_t postfix_postqueue_exec_t : process postfix_postqueue_t;
   type_transition logwatch_mail_t abrt_helper_exec_t : process abrt_helper_t;
   type_transition logwatch_mail_t tmp_t : file logwatch_mail_tmp_t;
   type_transition logwatch_mail_t postfix_etc_t : lnk_file etc_aliases_t;
   type_transition logwatch_mail_t tmp_t : dir logwatch_mail_tmp_t;
   type_transition logwatch_mail_t var_log_t : file sendmail_log_t;
   type_transition logwatch_mail_t postfix_showq_exec_t : process postfix_showq_t;
   type_transition logwatch_mail_t postfix_etc_t : sock_file etc_aliases_t;
   type_transition logwatch_mail_t qmail_inject_exec_t : process qmail_inject_t;
   type_transition logwatch_mail_t exim_exec_t : process exim_t;
   type_transition logwatch_mail_t postfix_postdrop_exec_t : process postfix_postdrop_t;
   type_transition logwatch_mail_t postfix_etc_t : dir etc_aliases_t;
   type_transition logwatch_mail_t qmail_queue_exec_t : process qmail_queue_t;
   type_transition logwatch_mail_t postfix_etc_t : fifo_file etc_aliases_t;

Found 14 named file transition filename_trans:
type_transition logwatch_mail_t admin_home_t : dir mail_home_rw_t ".esmtp_queue";
type_transition logwatch_mail_t user_home_dir_t : file mail_home_rw_t ".esmtp_queue";
type_transition logwatch_mail_t user_home_dir_t : dir mail_home_rw_t ".maildir";
type_transition logwatch_mail_t admin_home_t : dir mail_home_rw_t ".maildir";
type_transition logwatch_mail_t user_home_dir_t : file mail_home_t "dead.letter";
type_transition logwatch_mail_t user_home_dir_t : dir mail_home_rw_t "Maildir";
type_transition logwatch_mail_t user_home_dir_t : file mail_home_t ".mailrc";
type_transition logwatch_mail_t admin_home_t : file mail_home_t "dead.letter";
type_transition logwatch_mail_t admin_home_t : file mail_home_rw_t ".esmtp_queue";
type_transition logwatch_mail_t user_home_dir_t : dir mail_home_rw_t ".esmtp_queue";
type_transition logwatch_mail_t admin_home_t : file mail_home_t ".forward";
type_transition logwatch_mail_t admin_home_t : dir mail_home_rw_t "Maildir";
type_transition logwatch_mail_t admin_home_t : file mail_home_t ".mailrc";
type_transition logwatch_mail_t user_home_dir_t : file mail_home_t ".forward";
#

最初に実行した sesearch -T -s logwatch_t の結果内にいくつか logwatch_mail_t への定義が描かれているがcronからのメール送信には適用されていない?

仕方がないので /var/log/audit/audit.log* の出力結果から書き込みなどの操作エラーの発生対象である mail_home_rw_t について抜き出す

# grep deni /var/log/audit/audit.log*|grep mail_home_rw_t
<略>
/var/log/audit/audit.log.4:type=AVC msg=audit(1623953887.619:18168): avc:  denied  { write } for  pid=23636 comm="mktemp" name=".esmtp_queue" dev="sda3" ino=2567447 scontext=system_u:system_r:logwatch_t:s0-s0:c0.c1023 tcontext=unconfined_u:object_r:mail_home_rw_t:s0 tclass=dir permissive=0
/var/log/audit/audit.log.4:type=AVC msg=audit(1624041848.311:27261): avc:  denied  { add_name } for  pid=5082 comm="mktemp" name="PcKUa8QZ" scontext=system_u:system_r:logwatch_t:s0-s0:c0.c1023 tcontext=unconfined_u:object_r:mail_home_rw_t:s0 tclass=dir permissive=0
/var/log/audit/audit.log.4:type=AVC msg=audit(1624126686.899:34916): avc:  denied  { add_name } for  pid=15196 comm="mktemp" name="jiIjNaug" scontext=system_u:system_r:logwatch_t:s0-s0:c0.c1023 tcontext=unconfined_u:object_r:mail_home_rw_t:s0 tclass=dir permissive=0
#

これをaudit2allowコマンドでSELinuxのモジュール化して、読み込む。

# grep deni /var/log/audit/audit.log*|grep mail_home_rw_t

#============= logwatch_t ==============

#!!!! This avc is allowed in the current policy
allow logwatch_t mail_home_rw_t:dir create;
allow logwatch_t mail_home_rw_t:file create;
# grep deni /var/log/audit/audit.log*|grep mail_home_rw_t | audit2allow -M mktemp

******************** IMPORTANT ***********************
To make this policy package active, execute:

semodule -i mktemp.pp

# semodule -i mktemp.pp
# semodule -l | mktemp
mktemp  1.0
#

ただ、1回だけではだめで、何回か追加を繰り替えすことになった。

最終的に作成された mktemp.te ファイルは下記となった。

module mktemp 1.0.8;

require {
        type logwatch_t;
        type mail_home_rw_t;
        class file { create link open read setattr unlink write };
        class dir { add_name create read remove_name rmdir write };
}

#============= logwatch_t ==============

#!!!! This avc is allowed in the current policy
allow logwatch_t mail_home_rw_t:dir { add_name create read remove_name rmdir write };

#!!!! This avc is allowed in the current policy
allow logwatch_t mail_home_rw_t:file { create link open read setattr unlink write };

こうやって作成したテキストのteファイルを modファイル経由で pp形式に出力

# checkmodule -M -m -o mktemp.mod mktemp.te
checkmodule:  loading policy configuration from mktemp.te
checkmodule:  policy configuration loaded
checkmodule:  writing binary representation (version 19) to mktemp.mod
# semodule_package -o mktemp.pp -m mktemp.mod
#

現在のモジュール状況を確認して、読み込み

# semodule -l | grep mktemp
mktemp  1.0.7
# semodule -i mktemp.pp
# semodule -l | grep mktemp
mktemp  1.0.8
#

モジュールのバージョンが変更されたことを確認。

なお、不要になったモジュールは「semodule -r モジュール名」で削除できる。

RHEL8/CentOS8のdnf automaticのemitters設定を調べた

RHEL8/CetnOS8/Oracle Linux 8でのパッケージ自動アップデートはdnf-automaticで提供されることになった。

[RHEL8基本的なシステム設定の構成]-[第12章 ソフトウェアパッケージの管理]の「12.1. Red Hat Enterprise Linux 8 におけるソフトウェア管理ツール」にある説明と「DNF Automaticドキュメント」を見てみたが、いまいち分からない点があった。

それは[emitters]セクションのemit_viaで指定する文字列と、[email]セクション、[command]セクション、[command_mail]セクションの関係性である。

/etc/dnf/automatic.conf のRHEL8インストール時点でのemit_viaは「emit_via = stdio」となっている。
その上に「Default is email,stdio」なんて書いてあるけど、stdioで設定されている。

emit_via=stdioの場合

「emit_via=stdio」の場合、標準出力にdnf automaticでの実行結果が出力される。

出力された先はシステムログになっているので journalctlコマンドで確認できる。設定によっては /var/log/messages にも出力されることになる。

emit_via=emailの場合

「emit_via=email」の場合、[email]セクションに行われている設定が使用される。

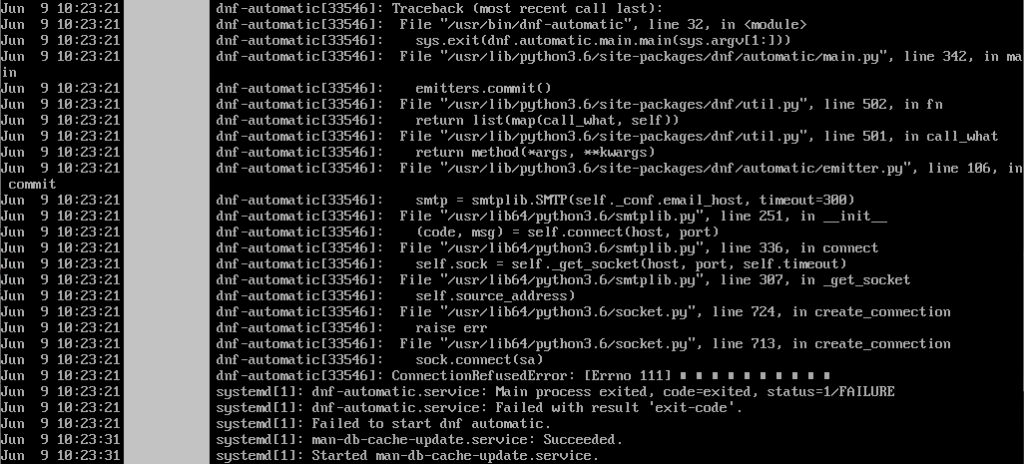
メール送信は pythonのsmtplibを使用したSMTPプロトコルによって行われるため、適切に設定されていない場合は下記の様なエラーになる。

emit_via=commandの場合

「emit_via=command」の場合、[command]セクションにある設定が使用される。

command_formatとstdin_formatを調整して、コマンド実行オプションとそのコマンドに対する標準入力設定を調整する必要がある。

emit_via=command_emailの場合

「emit_via=command_email」の場合、[command_email]セクションにある設定が使用される。

やってること自体は[command]の場合とほぼ同じで、追加設定としてemail_fromとemail_toが指定できるようになっている感じである。

わざわざcommandとcommand_emailを分けている理由がわからない・・・

emit_via=motdの場合

「emit_via=motd」の場合、/etc/motdファイルに結果を出力することが出来る。

どう設定すればいいのか?

動作確認のやりやすさとしては、「emit_via=stdio,command_email」として、[command_email]セクションでメールを送る設定が良いでしょう。

メールが送れない場合、command_formatに書かれている「”mail -Ssendwait -s {subject} -r {email_from} {email_to}”」を元に、例えば下記の様な形で実行して確認をすることが出来ます。

$ cat /etc/hosts | mail -Ssendwait -s testmail -r root@localhost root
-bash: mail: command not found
$

あ・・・最小インストールだとmailコマンドが入ってないですね・・・

command_emailを使用する場合は「sudo dnf install mailx」でmailxパッケージを追加インストールしてください。

CentOS8/RHEL8でNVIDIA GPUドライバをレポジトリで適用する手法

2023/09/19追記

NVIDIA Tesla用の「NVIDIA Driver Installation Quickstart Guide」を確認したところ、RHEL8/CentOS8におけるレポジトリを使うインストール方法(Package Managerによるインストール)が記載されていることを確認した。

RHEL8の場合 の手順を確認すると、epelレポジトリも追加されていた。

まず、RHEL系のレポジトリを追加

$ sudo dnf install -y https://dl.fedoraproject.org/pub/epel/epel-release-latest-8.noarch.rpm
$ sudo subscription-manager repos --enable=rhel-8-for-x86_64-appstream-rpms
$ sudo subscription-manager repos --enable=rhel-8-for-x86_64-baseos-rpms
$ sudo subscription-manager repos --enable=codeready-builder-for-rhel-8-x86_64-rpms
$

CUDAのレポジトリを追加

$ sudo dnf config-manager --add-repo https://developer.download.nvidia.com/compute/cuda/repos/rhel8/x86_64/cuda-rhel8.repo
$ 

nvidia kernelモジュールのコンパイル用にkernel-develとheadersを追加

$ sudo dnf install -y kernel-devel-$(uname -r) kernel-headers-$(uname -r)
$

ドライバインストール

$ sudo dnf clean all
$ sudo dnf -y module install nvidia-driver:latest-dkms
$

以下は以前の記述


Linux OSでNVIDIA GPUドライバを導入するには「Linux, FreeBSD, and Solarisドライバ」のページから「NVIDIA-Linux-x86_64-460.84.run」という実行形式のドライバを入手してインストール、というのが通例になっている。

しかし、同じNVDIA GPUを利用するCUDAの方の「CUDA Toolkitインストール」を見ると、下記の様にレポジトリを追加してのインストールを行っている。

Installation Instructions:
$ sudo dnf config-manager --add-repo https://developer.download.nvidia.com/compute/cuda/repos/rhel8/x86_64/cuda-rhel8.repo
$ sudo dnf clean all
$ sudo dnf -y module install nvidia-driver:latest-dkms
$ sudo dnf -y install cuda

上記で使用している https://developer.download.nvidia.com/compute/cuda/repos/rhel8/x86_64/ を確認すると nvidia-driver-460.73.01-1.el8.x86_64.rpm などもあり、なんか使えそうな雰囲気が・・・

調べて見るとNVIDIA DEVELOPER BLOGに「Streamlining NVIDIA Driver Deployment on RHEL 8 with Modularity Streams」という記事を発見。

RHEL8の場合、レポジトリを3つ購読設定した上で

$ subscription-manager repos --enable=rhel-8-for-x86_64-appstream-rpms
$ subscription-manager repos --enable=rhel-8-for-x86_64-baseos-rpms
$ subscription-manager repos --enable=codeready-builder-for-rhel-8-x86_64-rpms
$

NVIDIAのCUDAレポジトリを追加して

$ sudo dnf config-manager --add-repo=https://developer.download.nvidia.com/compute/cuda/repos/rhel8/x86_64/cuda-rhel8.repo

最新版のnvidia-driverを選択してインストールする、となっている。

$ sudo dnf module install nvidia-driver:latest

また、dnfのモジュールシステムにより、複数バージョンのnvidia-driverが提供されているので、たとえば「460.xx」のドライバを使い続けたい、という指定も可能になっている模様。

おそらく「dnf module list | grep nvidia」で検索すると、指定できるバージョンが確認できるはずです。