久しぶりに稼働させたOracle VM環境を操作するため、Oracle VM Managerにブラウザからログインしようとしたら応答がない・・・
Oracle VM Managerを稼働させているLinuxにログインして「systemctl status」を実行してもサービスの起動に失敗しているわけでもなさそうだ。
「systemctl status ovmm」でも特にコレといったものはない。
/var/log 以下にそれっぽいログがないので、ドキュメントを確認・・・Oracle VM 管理者ガイド「13.3 Oracle VM Managerのトラブルシューティング」に /u01/app/oracle/ovm-manager-3/domains/ovm_domain/servers/AdminServer/logs ディレクトリにログが出力されている、ということなので確認
ざらざらーっと、AdminServer.log ログを見ていくと、「com.oracle.appfw.ovm.coreinferface.ventprocessing.EventPollerTask」で「com.sun.jersey.api.client.ClientHandlerException: jav a.net.ConnectException: 接続を拒否されました (Connection refused)」といったものが多数見受けられる。
おそらくなにかサービスがうまく動作していないんだろうなぁ、とさらに見ていくと、SSL証明書を読み込んだログのあたりで「Identity certificate has expired:」とか「Signature: ~ の期限が切れています。」といったものが・・・
お?これが問題か?とさらに深掘り
Oracle VM 管理者ガイド「2.2.2 証明書構成の表示」に/u01/app/oracle/ovm-manager-3/ovm_upgrade/bin/ovmkeytool.sh show コマンドで状態確認などができる、ということがわかった。
[root@ovm security]# /u01/app/oracle/ovm-manager-3/ovm_upgrade/bin/ovmkeytool.sh setup
6 12, 2024 1:22:41 午後 oracle.security.jps.JpsStartup start
情報: JPSの初期化中です。
6 12, 2024 1:22:42 午後 oracle.security.jps.JpsStartup start
情報: Jpsが開始されました。
Oracle VM Manager is currently configured to use CA keystore at:
        /u01/app/oracle/ovm-manager-3/domains/ovm_domain/security/ovmca.jks
Do you wish to generate a new key and/or specify a different keystore? [yes]
Generate new CA keystore (as opposed to specifying an existing keystore)? [yes]
Path for CA keystore: [/u01/app/oracle/ovm-manager-3/domains/ovm_domain/security/ovmca.jks]
A file already exists at the path /u01/app/oracle/ovm-manager-3/domains/ovm_domain/security/ovmca.jks
Is it ok to ovewrite this file with your new keystore? [no] yes
1個目が↑の既存ファイルを置き換えるか、というもの
置き換えるので「yes」と入力
Oracle VM Manager is currently configured to use the SSL Trust-store at:
        /u01/app/oracle/ovm-manager-3/domains/ovm_domain/security/ovmtrust.jks
Do you wish to use this existing trust-store location? [yes]
Validity in months: [120]
Key distinguished name is "CN=OVM CA 0004fb0000010000615876ff13b9da0d, OU=Oracle VM Manager, O=Oracle Corporation, L=Redwood City, ST=California, C=US".  Use these values? [yes]
You may either specify passwords or use random passwords.
If you choose to use a random password, only WebLogic, the Oracle VM Manager,
and this application will have access to the information stored in this
keystore.
Use random passwords? [yes]
Generating CA key and certificate and persisting them to the keystore...

Oracle VM Manager is currently configured to use SSL keystore at:
        /u01/app/oracle/ovm-manager-3/domains/ovm_domain/security/ovmssl.jks
Do you wish to generate a new key and/or specify a different keystore? [yes]
Generate new SSL keystore (as opposed to specifying an existing keystore)? [yes]
Path for SSL keystore: [/u01/app/oracle/ovm-manager-3/domains/ovm_domain/security/ovmssl.jks]
A file already exists at the path /u01/app/oracle/ovm-manager-3/domains/ovm_domain/security/ovmssl.jks
Is it ok to ovewrite this file with your new keystore? [no] yes
2個目も上書きするか、なので「yes」
The hostname should be the fully qualified hostname of the system
(this is the hostname you'd use to access this system from outside the
local domain).  Depending on your machine setup the value below may not be
correct.
Fully qualified hostname: [ovm]
Validity in months: [27] 120
で、3つ目が最大の罠でした。
証明書の有効期限、初期値が「27ヶ月」でした。
これを設定した関係者に聞くと、あー、たしかにそれくらいの時期にインストールしてたな、とのこと・・・
このせいで止まってたのか。
とりあえず120ヶ月を指定して進めた
Key distinguished name is "CN=ovm, OU=Oracle VM Manager, O=Oracle Corporation, L=Redwood City, ST=California, C=US".  Use these values? [yes]
Alternate hostnames (separated by commas): [ovm]
Generating SSL key and certificate and persisting them to the keystore...

Updating keystore information in WebLogic
Oracle MiddleWare Home (MW_HOME): [/u01/app/oracle/Middleware]
WebLogic domain directory: [/u01/app/oracle/ovm-manager-3/domains/ovm_domain]
WebLogic server name: [AdminServer]
WebLogic username: [weblogic]
WebLogic password: [********]
WLST session logged at: /tmp/wlst-session138870891195064865.log

[root@ovm security]#
[opc@oci8 ~]$ sudo dnf check-update
Ksplice for Oracle Linux 8 (x86_64)                                                                                                                                                                                                                                                      293 kB/s |  31 MB     01:46
MySQL 8.4 Server Community for Oracle Linux 8 (x86_64)                                                                                                                                                                                                                                   6.1 MB/s | 1.2 MB     00:00
MySQL 8.4 Tools Community for Oracle Linux 8 (x86_64)                                                                                                                                                                                                                                    4.3 MB/s | 538 kB     00:00
MySQL Connectors Community for Oracle Linux 8 (x86_64)                                                                                                                                                                                                                                   285 kB/s |  48 kB     00:00
Oracle Software for OCI users on Oracle Linux 8 (x86_64)                                                                                                                                                                                                                                  35 MB/s | 238 MB     00:06

Killed
[opc@oci8 ~]$
2025/10/27
Oracle-Linux-9.6-2025.09.16-0
[opc@ocimail ~]$ cat /proc/swaps
Filename                                Type            Size            Used            Priority
/.swapfile                              file            515068          148096          -2
[opc@ocimail ~]$ ls -l /.swapfile
-rw-------. 1 root root 527433728 Oct 26 14:34 /.swapfile
[opc@ocimail ~]$ swapon --show
NAME       TYPE SIZE   USED PRIO
/.swapfile file 503M 144.4M   -2
[opc@ocimail ~]$
root@zstack137:~# ceph -v
ceph version 18.2.2 (e9fe820e7fffd1b7cde143a9f77653b73fcec748) reef (stable)
root@zstack137:~# pveversion
pve-manager/8.1.4/ec5affc9e41f1d79 (running kernel: 6.5.11-8-pve)
root@zstack137:~# pveceph pool ls
lqqqqqqqqqqqqqqqqqwqqqqqqwqqqqqqqqqqwqqqqqqqqwqqqqqqqqqqqqqwqqqqqqqqqqqqqqqqwqqqqqqqqqqqqqqqqqqqwqqqqqqqqqqqqqqqqqqqqqqqqqqwqqqqqqqqqqqqqqqqqqqqqqqqqqqwqqqqqqqqqqqqqqqqqwqqqqqqqqqqqqqqqqqqqqqqwqqqqqqqqqqqqk
x Name            x Size x Min Size x PG Num x min. PG Num x Optimal PG Num x PG Autoscale Mode x PG Autoscale Target Size x PG Autoscale Target Ratio x Crush Rule Name x               %-Used x       Used x
tqqqqqqqqqqqqqqqqqnqqqqqqnqqqqqqqqqqnqqqqqqqqnqqqqqqqqqqqqqnqqqqqqqqqqqqqqqqnqqqqqqqqqqqqqqqqqqqnqqqqqqqqqqqqqqqqqqqqqqqqqqnqqqqqqqqqqqqqqqqqqqqqqqqqqqnqqqqqqqqqqqqqqqqqnqqqqqqqqqqqqqqqqqqqqqqnqqqqqqqqqqqqu
x .mgr            x    3 x        2 x      1 x           1 x              1 x on                x                          x                           x replicated_rule x 3.08950029648258e-06 x    1388544 x
tqqqqqqqqqqqqqqqqqnqqqqqqnqqqqqqqqqqnqqqqqqqqnqqqqqqqqqqqqqnqqqqqqqqqqqqqqqqnqqqqqqqqqqqqqqqqqqqnqqqqqqqqqqqqqqqqqqqqqqqqqqnqqqqqqqqqqqqqqqqqqqqqqqqqqqnqqqqqqqqqqqqqqqqqnqqqqqqqqqqqqqqqqqqqqqqnqqqqqqqqqqqqu
x cephfs_data     x    3 x        2 x     32 x             x             32 x on                x                          x                           x replicated_rule x                    0 x          0 x
tqqqqqqqqqqqqqqqqqnqqqqqqnqqqqqqqqqqnqqqqqqqqnqqqqqqqqqqqqqnqqqqqqqqqqqqqqqqnqqqqqqqqqqqqqqqqqqqnqqqqqqqqqqqqqqqqqqqqqqqqqqnqqqqqqqqqqqqqqqqqqqqqqqqqqqnqqqqqqqqqqqqqqqqqnqqqqqqqqqqqqqqqqqqqqqqnqqqqqqqqqqqqu
x cephfs_metadata x    3 x        2 x     32 x          16 x             16 x on                x                          x                           x replicated_rule x 4.41906962578287e-07 x     198610 x
tqqqqqqqqqqqqqqqqqnqqqqqqnqqqqqqqqqqnqqqqqqqqnqqqqqqqqqqqqqnqqqqqqqqqqqqqqqqnqqqqqqqqqqqqqqqqqqqnqqqqqqqqqqqqqqqqqqqqqqqqqqnqqqqqqqqqqqqqqqqqqqqqqqqqqqnqqqqqqqqqqqqqqqqqnqqqqqqqqqqqqqqqqqqqqqqnqqqqqqqqqqqqu
x storagepool     x    3 x        2 x    128 x             x             32 x warn              x                          x                           x replicated_rule x   0.0184257291257381 x 8436679796 x
mqqqqqqqqqqqqqqqqqvqqqqqqvqqqqqqqqqqvqqqqqqqqvqqqqqqqqqqqqqvqqqqqqqqqqqqqqqqvqqqqqqqqqqqqqqqqqqqvqqqqqqqqqqqqqqqqqqqqqqqqqqvqqqqqqqqqqqqqqqqqqqqqqqqqqqvqqqqqqqqqqqqqqqqqvqqqqqqqqqqqqqqqqqqqqqqvqqqqqqqqqqqqj
root@zstack137:~#
「ceph osd pool autoscale-status」
root@zstack137:~# ceph osd pool autoscale-status
POOL               SIZE  TARGET SIZE  RATE  RAW CAPACITY   RATIO  TARGET RATIO  EFFECTIVE RATIO  BIAS  PG_NUM  NEW PG_NUM  AUTOSCALE  BULK
.mgr             452.0k                3.0        449.9G  0.0000                                  1.0       1              on         False
cephfs_data          0                 3.0        449.9G  0.0000                                  1.0      32              on         False
cephfs_metadata  66203                 3.0        449.9G  0.0000                                  4.0      32              on         False
storagepool       2681M                3.0        449.9G  0.0175                                  1.0     128              warn       False
root@zstack137:~#
root@zstack137:~# ceph health
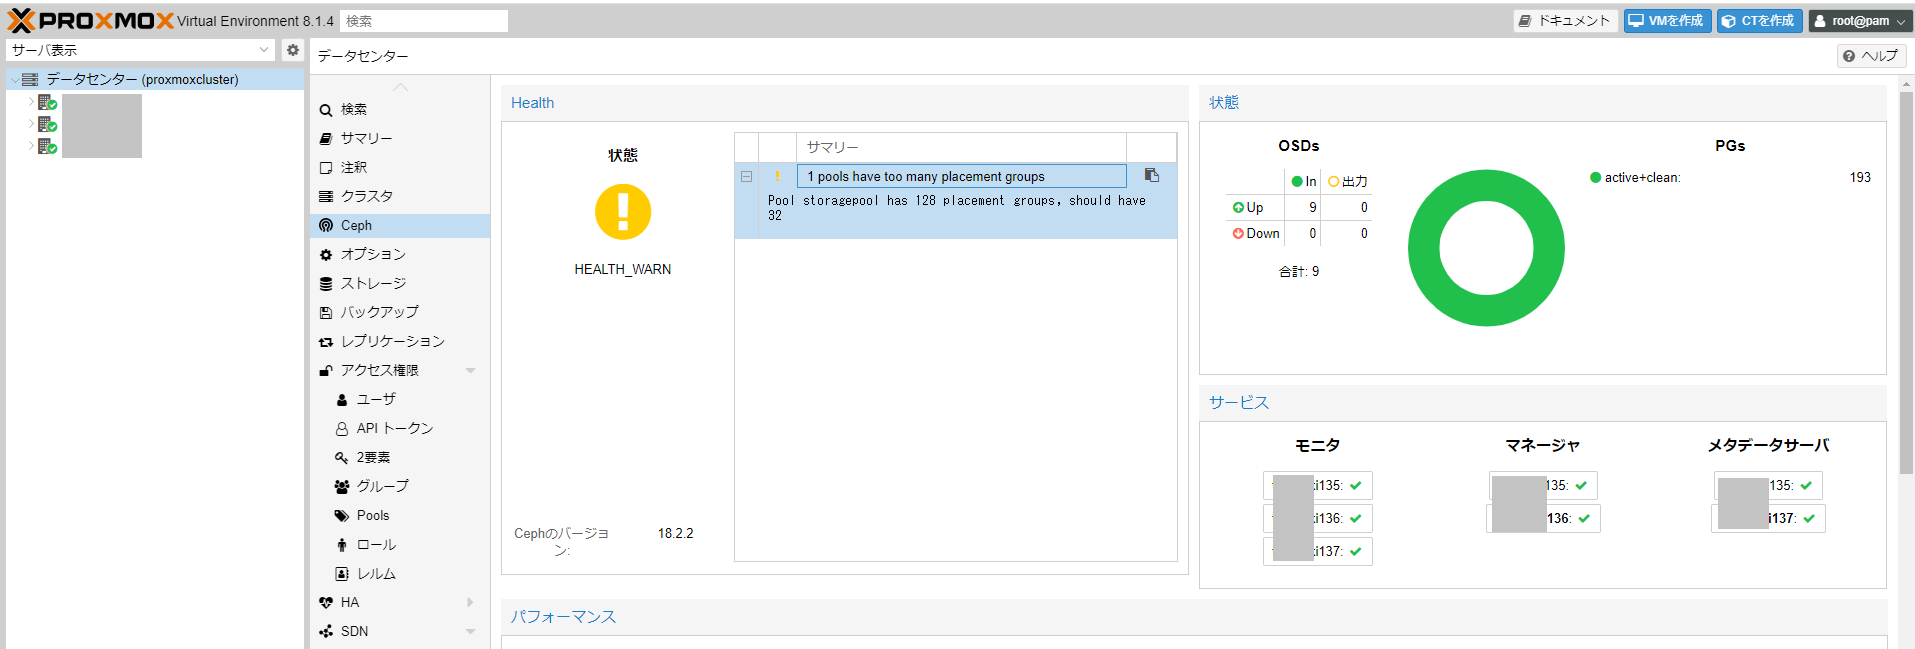
HEALTH_WARN 1 pools have too many placement groups
root@zstack137:~# ceph health detail
HEALTH_WARN 1 pools have too many placement groups
[WRN] POOL_TOO_MANY_PGS: 1 pools have too many placement groups
Pool storagepool has 128 placement groups, should have 32
root@zstack137:~#
root@zstack137:~# ceph -s
  cluster:
    id:     9e085d6a-77f3-41f1-8f6d-71fadc9c011b
    health: HEALTH_WARN
            1 pools have too many placement groups

  services:
    mon: 3 daemons, quorum zstack136,zstack135,zstack137 (age 3h)
    mgr: zstack136(active, since 3h), standbys: zstack135
    mds: 1/1 daemons up, 1 standby
    osd: 9 osds: 9 up (since 3h), 9 in (since 3d)

  data:
    volumes: 1/1 healthy
    pools:   4 pools, 193 pgs
    objects: 716 objects, 2.7 GiB
    usage:   8.3 GiB used, 442 GiB / 450 GiB avail
    pgs:     193 active+clean

root@zstack137:~#
ceph pg dump | awk '
BEGIN { IGNORECASE = 1 }
 /^PG_STAT/ { col=1; while($col!="UP") {col++}; col++ }
 /^[0-9a-f]+\.[0-9a-f]+/ { match($0,/^[0-9a-f]+/); pool=substr($0, RSTART, RLENGTH); poollist[pool]=0;
 up=$col; i=0; RSTART=0; RLENGTH=0; delete osds; while(match(up,/[0-9]+/)>0) { osds[++i]=substr(up,RSTART,RLENGTH); up = substr(up, RSTART+RLENGTH) }
 for(i in osds) {array[osds[i],pool]++; osdlist[osds[i]];}
}
END {
 printf("\n");
 printf("pool :\t"); for (i in poollist) printf("%s\t",i); printf("| SUM \n");
 for (i in poollist) printf("--------"); printf("----------------\n");
 for (i in osdlist) { printf("osd.%i\t", i); sum=0;
   for (j in poollist) { printf("%i\t", array[i,j]); sum+=array[i,j]; sumpool[j]+=array[i,j] }; printf("| %i\n",sum) }
 for (i in poollist) printf("--------"); printf("----------------\n");
 printf("SUM :\t"); for (i in poollist) printf("%s\t",sumpool[i]); printf("|\n");
}'
無事実行できた。
root@zstack137:~# ceph pg dump | awk '
BEGIN { IGNORECASE = 1 }
 /^PG_STAT/ { col=1; while($col!="UP") {col++}; col++ }
 /^[0-9a-f]+\.[0-9a-f]+/ { match($0,/^[0-9a-f]+/); pool=substr($0, RSTART, RLENGTH); poollist[pool]=0;
 up=$col; i=0; RSTART=0; RLENGTH=0; delete osds; while(match(up,/[0-9]+/)>0) { osds[++i]=substr(up,RSTART,RLENGTH); up = substr(up, RSTART+RLENGTH) }
 for(i in osds) {array[osds[i],pool]++; osdlist[osds[i]];}
}
END {
 printf("\n");
 printf("pool :\t"); for (i in poollist) printf("%s\t",i); printf("| SUM \n");
 for (i in poollist) printf("--------"); printf("----------------\n");
 for (i in osdlist) { printf("osd.%i\t", i); sum=0;
   for (j in poollist) { printf("%i\t", array[i,j]); sum+=array[i,j]; sumpool[j]+=array[i,j] }; printf("| %i\n",sum) }
 for (i in poollist) printf("--------"); printf("----------------\n");
 printf("SUM :\t"); for (i in poollist) printf("%s\t",sumpool[i]); printf("|\n");
}'
dumped all

pool :  3       2       1       4       | SUM
------------------------------------------------
osd.3   4       5       1       13      | 23
osd.8   4       6       0       12      | 22
osd.6   2       4       0       15      | 21
osd.5   6       4       0       16      | 26
osd.2   3       3       0       15      | 21
osd.1   4       3       0       10      | 17
osd.4   1       1       0       16      | 18
osd.0   5       2       0       10      | 17
osd.7   3       4       0       21      | 28
------------------------------------------------
SUM :   32      32      1       128     |
root@zstack137:~#
poolによって差がありすぎている?
中国語のページで「ceph使用问题积累」というところがあって「HEALTH_WARN:pools have too many placement groups」と「HEALTH_WARN: mons are allowing insecure global_id reclaim」についての対処方法が載っている。
後者については「ceph config set mon auth_allow_insecure_global_id_reclaim false」となっていた。
module設定変える前に「ceph mgr module ls」で状態確認
root@zstack137:~# ceph mgr module ls
MODULE
balancer           on (always on)
crash              on (always on)
devicehealth       on (always on)
orchestrator       on (always on)
pg_autoscaler      on (always on)
progress           on (always on)
rbd_support        on (always on)
status             on (always on)
telemetry          on (always on)
volumes            on (always on)
iostat             on
nfs                on
restful            on
alerts             -
influx             -
insights           -
localpool          -
mirroring          -
osd_perf_query     -
osd_support        -
prometheus         -
selftest           -
snap_schedule      -
stats              -
telegraf           -
test_orchestrator  -
zabbix             -
root@zstack137:~#
SUSEのページにあるSUSE Enterprise Storage 7 DocumentationのAdministration and Operations Guide「12 Determine the cluster state」を見るといろいろな状態確認コマンドがあった。
root@zstack137:~# ceph df
--- RAW STORAGE ---
CLASS     SIZE    AVAIL     USED  RAW USED  %RAW USED
hdd    450 GiB  442 GiB  8.3 GiB   8.3 GiB       1.85
TOTAL  450 GiB  442 GiB  8.3 GiB   8.3 GiB       1.85

--- POOLS ---
POOL             ID  PGS   STORED  OBJECTS     USED  %USED  MAX AVAIL
.mgr              1    1  449 KiB        2  1.3 MiB      0    140 GiB
cephfs_data       2   32      0 B        0      0 B      0    140 GiB
cephfs_metadata   3   32   35 KiB       22  194 KiB      0    140 GiB
storagepool       4  128  2.6 GiB      692  7.9 GiB   1.84    140 GiB
root@zstack137:~#  ceph df detail
--- RAW STORAGE ---
CLASS     SIZE    AVAIL     USED  RAW USED  %RAW USED
hdd    450 GiB  442 GiB  8.3 GiB   8.3 GiB       1.85
TOTAL  450 GiB  442 GiB  8.3 GiB   8.3 GiB       1.85

--- POOLS ---
POOL             ID  PGS   STORED   (DATA)   (OMAP)  OBJECTS     USED   (DATA)   (OMAP)  %USED  MAX AVAIL  QUOTA OBJECTS  QUOTA BYTES  DIRTY  USED COMPR  UNDER COMPR
.mgr              1    1  449 KiB  449 KiB      0 B        2  1.3 MiB  1.3 MiB      0 B      0    140 GiB            N/A          N/A    N/A         0 B          0 B
cephfs_data       2   32      0 B      0 B      0 B        0      0 B      0 B      0 B      0    140 GiB            N/A          N/A    N/A         0 B          0 B
cephfs_metadata   3   32   35 KiB   18 KiB   17 KiB       22  194 KiB  144 KiB   50 KiB      0    140 GiB            N/A          N/A    N/A         0 B          0 B
storagepool       4  128  2.6 GiB  2.6 GiB  3.0 KiB      692  7.9 GiB  7.9 GiB  9.1 KiB   1.84    140 GiB            N/A          N/A    N/A         0 B          0 B
root@zstack137:~#
TOO_MANY_PGSの時の対処としていかが書かれている
TOO_MANY_PGS The number of PGs in use is above the configurable threshold of mon_pg_warn_max_per_osd PGs per OSD. This can lead to higher memory usage for OSD daemons, slower peering after cluster state changes (for example OSD restarts, additions, or removals), and higher load on the Ceph Managers and Ceph Monitors.
While the pg_num value for existing pools cannot be reduced, the pgp_num value can. This effectively co-locates some PGs on the same sets of OSDs, mitigating some of the negative impacts described above. The pgp_num value can be adjusted with:
じゃあ、「ceph osd pool set storagepool pgp_num 32」を実行してpgp_numを128から32に変更してみる
root@zstack137:~# ceph osd pool stats
pool .mgr id 1
  nothing is going on

pool cephfs_data id 2
  nothing is going on

pool cephfs_metadata id 3
  nothing is going on

pool storagepool id 4
  nothing is going on

root@zstack137:~# ceph osd pool get storagepool pgp_num
pgp_num: 128
root@zstack137:~# ceph osd pool set storagepool pgp_num 32
set pool 4 pgp_num to 32
root@zstack137:~# ceph osd pool get storagepool pgp_num
pgp_num: 125
root@zstack137:~# ceph osd pool get storagepool pgp_num
pgp_num: 119
root@zstack137:~#
徐々に変更されていく模様
root@zstack137:~# ceph -s
  cluster:
    id:     9e085d6a-77f3-41f1-8f6d-71fadc9c011b
    health: HEALTH_WARN
            Reduced data availability: 1 pg peering
            1 pools have too many placement groups
            1 pools have pg_num > pgp_num

  services:
    mon: 3 daemons, quorum zstack136,zstack135,zstack137 (age 5h)
    mgr: zstack136(active, since 5h), standbys: zstack135
    mds: 1/1 daemons up, 1 standby
    osd: 9 osds: 9 up (since 5h), 9 in (since 3d); 2 remapped pgs

  data:
    volumes: 1/1 healthy
    pools:   4 pools, 193 pgs
    objects: 716 objects, 2.7 GiB
    usage:   8.4 GiB used, 442 GiB / 450 GiB avail
    pgs:     0.518% pgs not active
             16/2148 objects misplaced (0.745%)
             190 active+clean
             2   active+recovering
             1   remapped+peering

  io:
    recovery: 2.0 MiB/s, 0 objects/s

root@zstack137:~# ceph health
HEALTH_WARN Reduced data availability: 1 pg peering; 1 pools have too many placement groups; 1 pools have pg_num > pgp_num
root@zstack137:~# ceph health detail
HEALTH_WARN 1 pools have too many placement groups; 1 pools have pg_num > pgp_num
[WRN] POOL_TOO_MANY_PGS: 1 pools have too many placement groups
    Pool storagepool has 128 placement groups, should have 32
[WRN] SMALLER_PGP_NUM: 1 pools have pg_num > pgp_num
    pool storagepool pg_num 128 > pgp_num 32
root@zstack137:~#
ある程度時間が経過したあと
root@zstack137:~# ceph health detail
HEALTH_WARN 1 pools have too many placement groups; 1 pools have pg_num > pgp_num
[WRN] POOL_TOO_MANY_PGS: 1 pools have too many placement groups
    Pool storagepool has 128 placement groups, should have 32
[WRN] SMALLER_PGP_NUM: 1 pools have pg_num > pgp_num
    pool storagepool pg_num 128 > pgp_num 32
root@zstack137:~# ceph pg dump | awk '
BEGIN { IGNORECASE = 1 }
 /^PG_STAT/ { col=1; while($col!="UP") {col++}; col++ }
 /^[0-9a-f]+\.[0-9a-f]+/ { match($0,/^[0-9a-f]+/); pool=substr($0, RSTART, RLENGTH); poollist[pool]=0;
 up=$col; i=0; RSTART=0; RLENGTH=0; delete osds; while(match(up,/[0-9]+/)>0) { osds[++i]=substr(up,RSTART,RLENGTH); up = substr(up, RSTART+RLENGTH) }
 for(i in osds) {array[osds[i],pool]++; osdlist[osds[i]];}
}
END {
 printf("\n");
 printf("pool :\t"); for (i in poollist) printf("%s\t",i); printf("| SUM \n");
 for (i in poollist) printf("--------"); printf("----------------\n");
 for (i in osdlist) { printf("osd.%i\t", i); sum=0;
   for (j in poollist) { printf("%i\t", array[i,j]); sum+=array[i,j]; sumpool[j]+=array[i,j] }; printf("| %i\n",sum) }
 for (i in poollist) printf("--------"); printf("----------------\n");
 printf("SUM :\t"); for (i in poollist) printf("%s\t",sumpool[i]); printf("|\n");
}'
dumped all

pool :  3       2       1       4       | SUM
------------------------------------------------
osd.3   4       5       1       15      | 25
osd.8   4       6       0       16      | 26
osd.6   2       4       0       16      | 22
osd.5   6       4       0       4       | 14
osd.2   3       3       0       11      | 17
osd.1   4       3       0       13      | 20
osd.4   1       1       0       17      | 19
osd.0   5       2       0       20      | 27
osd.7   3       4       0       16      | 23
------------------------------------------------
SUM :   32      32      1       128     |
root@zstack137:~# ceph osd pool autoscale-status
POOL               SIZE  TARGET SIZE  RATE  RAW CAPACITY   RATIO  TARGET RATIO  EFFECTIVE RATIO  BIAS  PG_NUM  NEW PG_NUM  AUTOSCALE  BULK
.mgr             452.0k                3.0        449.9G  0.0000                                  1.0       1              on         False
cephfs_data          0                 3.0        449.9G  0.0000                                  1.0      32              on         False
cephfs_metadata  66203                 3.0        449.9G  0.0000                                  4.0      32              on         False
storagepool       2681M                3.0        449.9G  0.0175                                  1.0     128              warn       False
root@zstack137:~# pveceph pool ls
lqqqqqqqqqqqqqqqqqwqqqqqqwqqqqqqqqqqwqqqqqqqqwqqqqqqqqqqqqqwqqqqqqqqqqqqqqqqwqqqqqqqqqqqqqqqqqqqwqqqqqqqqqqqqqqqqqqqqqqqqqqwqqqqqqqqqqqqqqqqqqqqqqqqqqqwqqqqqqqqqqqqqqqqqwqqqqqqqqqqqqqqqqqqqqqqwqqqqqqqqqqqqk
x Name            x Size x Min Size x PG Num x min. PG Num x Optimal PG Num x PG Autoscale Mode x PG Autoscale Target Size x PG Autoscale Target Ratio x Crush Rule Name x               %-Used x       Used x
tqqqqqqqqqqqqqqqqqnqqqqqqnqqqqqqqqqqnqqqqqqqqnqqqqqqqqqqqqqnqqqqqqqqqqqqqqqqnqqqqqqqqqqqqqqqqqqqnqqqqqqqqqqqqqqqqqqqqqqqqqqnqqqqqqqqqqqqqqqqqqqqqqqqqqqnqqqqqqqqqqqqqqqqqnqqqqqqqqqqqqqqqqqqqqqqnqqqqqqqqqqqqu
x .mgr            x    3 x        2 x      1 x           1 x              1 x on                x                          x                           x replicated_rule x 3.09735719383752e-06 x    1388544 x
tqqqqqqqqqqqqqqqqqnqqqqqqnqqqqqqqqqqnqqqqqqqqnqqqqqqqqqqqqqnqqqqqqqqqqqqqqqqnqqqqqqqqqqqqqqqqqqqnqqqqqqqqqqqqqqqqqqqqqqqqqqnqqqqqqqqqqqqqqqqqqqqqqqqqqqnqqqqqqqqqqqqqqqqqnqqqqqqqqqqqqqqqqqqqqqqnqqqqqqqqqqqqu
x cephfs_data     x    3 x        2 x     32 x             x             32 x on                x                          x                           x replicated_rule x                    0 x          0 x
tqqqqqqqqqqqqqqqqqnqqqqqqnqqqqqqqqqqnqqqqqqqqnqqqqqqqqqqqqqnqqqqqqqqqqqqqqqqnqqqqqqqqqqqqqqqqqqqnqqqqqqqqqqqqqqqqqqqqqqqqqqnqqqqqqqqqqqqqqqqqqqqqqqqqqqnqqqqqqqqqqqqqqqqqnqqqqqqqqqqqqqqqqqqqqqqnqqqqqqqqqqqqu
x cephfs_metadata x    3 x        2 x     32 x          16 x             16 x on                x                          x                           x replicated_rule x 4.43030785390874e-07 x     198610 x
tqqqqqqqqqqqqqqqqqnqqqqqqnqqqqqqqqqqnqqqqqqqqnqqqqqqqqqqqqqnqqqqqqqqqqqqqqqqnqqqqqqqqqqqqqqqqqqqnqqqqqqqqqqqqqqqqqqqqqqqqqqnqqqqqqqqqqqqqqqqqqqqqqqqqqqnqqqqqqqqqqqqqqqqqnqqqqqqqqqqqqqqqqqqqqqqnqqqqqqqqqqqqu
x storagepool     x    3 x        2 x    128 x             x             32 x warn              x                          x                           x replicated_rule x    0.018471721559763 x 8436679796 x
mqqqqqqqqqqqqqqqqqvqqqqqqvqqqqqqqqqqvqqqqqqqqvqqqqqqqqqqqqqvqqqqqqqqqqqqqqqqvqqqqqqqqqqqqqqqqqqqvqqqqqqqqqqqqqqqqqqqqqqqqqqvqqqqqqqqqqqqqqqqqqqqqqqqqqqvqqqqqqqqqqqqqqqqqvqqqqqqqqqqqqqqqqqqqqqqvqqqqqqqqqqqqj
root@zstack137:~#
pg_numを減らせる?
root@zstack137:~# ceph osd pool get storagepool pg_num
pg_num: 128
root@zstack137:~# ceph osd pool set storagepool pg_num 32
set pool 4 pg_num to 32
root@zstack137:~# ceph osd pool get storagepool pg_num
pg_num: 128
root@zstack137:~# ceph osd pool get storagepool pg_num
pg_num: 124
root@zstack137:~#
徐々に減ってる
ステータスはHEALTH_OLに変わった
root@zstack137:~# ceph osd pool get storagepool pg_num
pg_num: 119
root@zstack137:~# ceph health detail
HEALTH_OK
root@zstack137:~# pveceph pool ls
lqqqqqqqqqqqqqqqqqwqqqqqqwqqqqqqqqqqwqqqqqqqqwqqqqqqqqqqqqqwqqqqqqqqqqqqqqqqwqqqqqqqqqqqqqqqqqqqwqqqqqqqqqqqqqqqqqqqqqqqqqqwqqqqqqqqqqqqqqqqqqqqqqqqqqqwqqqqqqqqqqqqqqqqqwqqqqqqqqqqqqqqqqqqqqqqwqqqqqqqqqqqqk
x Name            x Size x Min Size x PG Num x min. PG Num x Optimal PG Num x PG Autoscale Mode x PG Autoscale Target Size x PG Autoscale Target Ratio x Crush Rule Name x               %-Used x       Used x
tqqqqqqqqqqqqqqqqqnqqqqqqnqqqqqqqqqqnqqqqqqqqnqqqqqqqqqqqqqnqqqqqqqqqqqqqqqqnqqqqqqqqqqqqqqqqqqqnqqqqqqqqqqqqqqqqqqqqqqqqqqnqqqqqqqqqqqqqqqqqqqqqqqqqqqnqqqqqqqqqqqqqqqqqnqqqqqqqqqqqqqqqqqqqqqqnqqqqqqqqqqqqu
x .mgr            x    3 x        2 x      1 x           1 x              1 x on                x                          x                           x replicated_rule x 3.10063592223742e-06 x    1388544 x
tqqqqqqqqqqqqqqqqqnqqqqqqnqqqqqqqqqqnqqqqqqqqnqqqqqqqqqqqqqnqqqqqqqqqqqqqqqqnqqqqqqqqqqqqqqqqqqqnqqqqqqqqqqqqqqqqqqqqqqqqqqnqqqqqqqqqqqqqqqqqqqqqqqqqqqnqqqqqqqqqqqqqqqqqnqqqqqqqqqqqqqqqqqqqqqqnqqqqqqqqqqqqu
x cephfs_data     x    3 x        2 x     32 x             x             32 x on                x                          x                           x replicated_rule x                    0 x          0 x
tqqqqqqqqqqqqqqqqqnqqqqqqnqqqqqqqqqqnqqqqqqqqnqqqqqqqqqqqqqnqqqqqqqqqqqqqqqqnqqqqqqqqqqqqqqqqqqqnqqqqqqqqqqqqqqqqqqqqqqqqqqnqqqqqqqqqqqqqqqqqqqqqqqqqqqnqqqqqqqqqqqqqqqqqnqqqqqqqqqqqqqqqqqqqqqqnqqqqqqqqqqqqu
x cephfs_metadata x    3 x        2 x     32 x          16 x             16 x on                x                          x                           x replicated_rule x 4.43499772018185e-07 x     198610 x
tqqqqqqqqqqqqqqqqqnqqqqqqnqqqqqqqqqqnqqqqqqqqnqqqqqqqqqqqqqnqqqqqqqqqqqqqqqqnqqqqqqqqqqqqqqqqqqqnqqqqqqqqqqqqqqqqqqqqqqqqqqnqqqqqqqqqqqqqqqqqqqqqqqqqqqnqqqqqqqqqqqqqqqqqnqqqqqqqqqqqqqqqqqqqqqqnqqqqqqqqqqqqu
x storagepool     x    3 x        2 x    117 x             x             32 x warn              x                          x                           x replicated_rule x   0.0184909123927355 x 8436679796 x
mqqqqqqqqqqqqqqqqqvqqqqqqvqqqqqqqqqqvqqqqqqqqvqqqqqqqqqqqqqvqqqqqqqqqqqqqqqqvqqqqqqqqqqqqqqqqqqqvqqqqqqqqqqqqqqqqqqqqqqqqqqvqqqqqqqqqqqqqqqqqqqqqqqqqqqvqqqqqqqqqqqqqqqqqvqqqqqqqqqqqqqqqqqqqqqqvqqqqqqqqqqqqj
root@zstack137:~#
「ceph osd pool autoscale-status」の方のPG_NUMは即反映
root@zstack137:~# ceph osd pool autoscale-status
POOL               SIZE  TARGET SIZE  RATE  RAW CAPACITY   RATIO  TARGET RATIO  EFFECTIVE RATIO  BIAS  PG_NUM  NEW PG_NUM  AUTOSCALE  BULK
.mgr             452.0k                3.0        449.9G  0.0000                                  1.0       1              on         False
cephfs_data          0                 3.0        449.9G  0.0000                                  1.0      32              on         False
cephfs_metadata  66203                 3.0        449.9G  0.0000                                  4.0      32              on         False
storagepool       2705M                3.0        449.9G  0.0176                                  1.0      32              warn       False
root@zstack137:~#
root@zstack137:~# ceph health detail
HEALTH_WARN Reduced data availability: 2 pgs inactive, 2 pgs peering
[WRN] PG_AVAILABILITY: Reduced data availability: 2 pgs inactive, 2 pgs peering
    pg 4.22 is stuck peering for 2d, current state peering, last acting [6,5,2]
    pg 4.62 is stuck peering for 6h, current state peering, last acting [6,5,2]
root@zstack137:~#
しばらく時間がたって変更が終わったあとに状態をとってみた
root@zstack137:~# ceph health detail
HEALTH_OK
root@zstack137:~# pveceph pool ls
lqqqqqqqqqqqqqqqqqwqqqqqqwqqqqqqqqqqwqqqqqqqqwqqqqqqqqqqqqqwqqqqqqqqqqqqqqqqwqqqqqqqqqqqqqqqqqqqwqqqqqqqqqqqqqqqqqqqqqqqqqqwqqqqqqqqqqqqqqqqqqqqqqqqqqqwqqqqqqqqqqqqqqqqqwqqqqqqqqqqqqqqqqqqqqqqwqqqqqqqqqqqqk
x Name            x Size x Min Size x PG Num x min. PG Num x Optimal PG Num x PG Autoscale Mode x PG Autoscale Target Size x PG Autoscale Target Ratio x Crush Rule Name x               %-Used x       Used x
tqqqqqqqqqqqqqqqqqnqqqqqqnqqqqqqqqqqnqqqqqqqqnqqqqqqqqqqqqqnqqqqqqqqqqqqqqqqnqqqqqqqqqqqqqqqqqqqnqqqqqqqqqqqqqqqqqqqqqqqqqqnqqqqqqqqqqqqqqqqqqqqqqqqqqqnqqqqqqqqqqqqqqqqqnqqqqqqqqqqqqqqqqqqqqqqnqqqqqqqqqqqqu
x .mgr            x    3 x        2 x      1 x           1 x              1 x on                x                          x                           x replicated_rule x 3.13595910483855e-06 x    1388544 x
tqqqqqqqqqqqqqqqqqnqqqqqqnqqqqqqqqqqnqqqqqqqqnqqqqqqqqqqqqqnqqqqqqqqqqqqqqqqnqqqqqqqqqqqqqqqqqqqnqqqqqqqqqqqqqqqqqqqqqqqqqqnqqqqqqqqqqqqqqqqqqqqqqqqqqqnqqqqqqqqqqqqqqqqqnqqqqqqqqqqqqqqqqqqqqqqnqqqqqqqqqqqqu
x cephfs_data     x    3 x        2 x     32 x             x             32 x on                x                          x                           x replicated_rule x                    0 x          0 x
tqqqqqqqqqqqqqqqqqnqqqqqqnqqqqqqqqqqnqqqqqqqqnqqqqqqqqqqqqqnqqqqqqqqqqqqqqqqnqqqqqqqqqqqqqqqqqqqnqqqqqqqqqqqqqqqqqqqqqqqqqqnqqqqqqqqqqqqqqqqqqqqqqqqqqqnqqqqqqqqqqqqqqqqqnqqqqqqqqqqqqqqqqqqqqqqnqqqqqqqqqqqqu
x cephfs_metadata x    3 x        2 x     32 x          16 x             16 x on                x                          x                           x replicated_rule x  4.4855224246021e-07 x     198610 x
tqqqqqqqqqqqqqqqqqnqqqqqqnqqqqqqqqqqnqqqqqqqqnqqqqqqqqqqqqqnqqqqqqqqqqqqqqqqnqqqqqqqqqqqqqqqqqqqnqqqqqqqqqqqqqqqqqqqqqqqqqqnqqqqqqqqqqqqqqqqqqqqqqqqqqqnqqqqqqqqqqqqqqqqqnqqqqqqqqqqqqqqqqqqqqqqnqqqqqqqqqqqqu
x storagepool     x    3 x        2 x     32 x             x             32 x warn              x                          x                           x replicated_rule x   0.0186976287513971 x 8436679796 x
mqqqqqqqqqqqqqqqqqvqqqqqqvqqqqqqqqqqvqqqqqqqqvqqqqqqqqqqqqqvqqqqqqqqqqqqqqqqvqqqqqqqqqqqqqqqqqqqvqqqqqqqqqqqqqqqqqqqqqqqqqqvqqqqqqqqqqqqqqqqqqqqqqqqqqqvqqqqqqqqqqqqqqqqqvqqqqqqqqqqqqqqqqqqqqqqvqqqqqqqqqqqqj
root@zstack137:~# ceph -s
  cluster:
    id:     9e085d6a-77f3-41f1-8f6d-71fadc9c011b
    health: HEALTH_OK

  services:
    mon: 3 daemons, quorum zstack136,zstack135,zstack137 (age 6h)
    mgr: zstack136(active, since 6h), standbys: zstack135
    mds: 1/1 daemons up, 1 standby
    osd: 9 osds: 9 up (since 6h), 9 in (since 3d)

  data:
    volumes: 1/1 healthy
    pools:   4 pools, 97 pgs
    objects: 716 objects, 2.7 GiB
    usage:   8.6 GiB used, 441 GiB / 450 GiB avail
    pgs:     97 active+clean

root@zstack137:~# ceph df
--- RAW STORAGE ---
CLASS     SIZE    AVAIL     USED  RAW USED  %RAW USED
hdd    450 GiB  441 GiB  8.7 GiB   8.7 GiB       1.94
TOTAL  450 GiB  441 GiB  8.7 GiB   8.7 GiB       1.94

--- POOLS ---
POOL             ID  PGS   STORED  OBJECTS     USED  %USED  MAX AVAIL
.mgr              1    1  449 KiB        2  1.3 MiB      0    137 GiB
cephfs_data       2   32      0 B        0      0 B      0    137 GiB
cephfs_metadata   3   32   35 KiB       22  194 KiB      0    137 GiB
storagepool       4   32  2.7 GiB      692  8.0 GiB   1.89    137 GiB
root@zstack137:~#
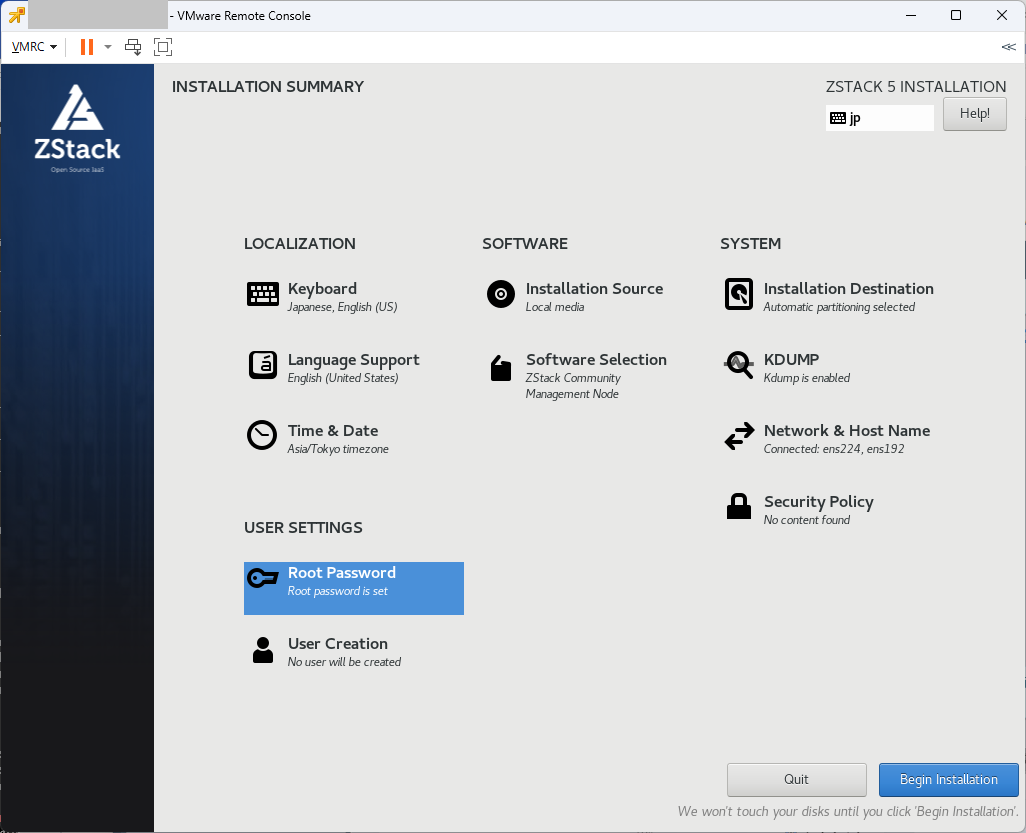
Applicable only to the installation of management nodes of the Enterprise edition.
Community Management Node Mode
Applicable only to the installation of management nodes of the Community edition.
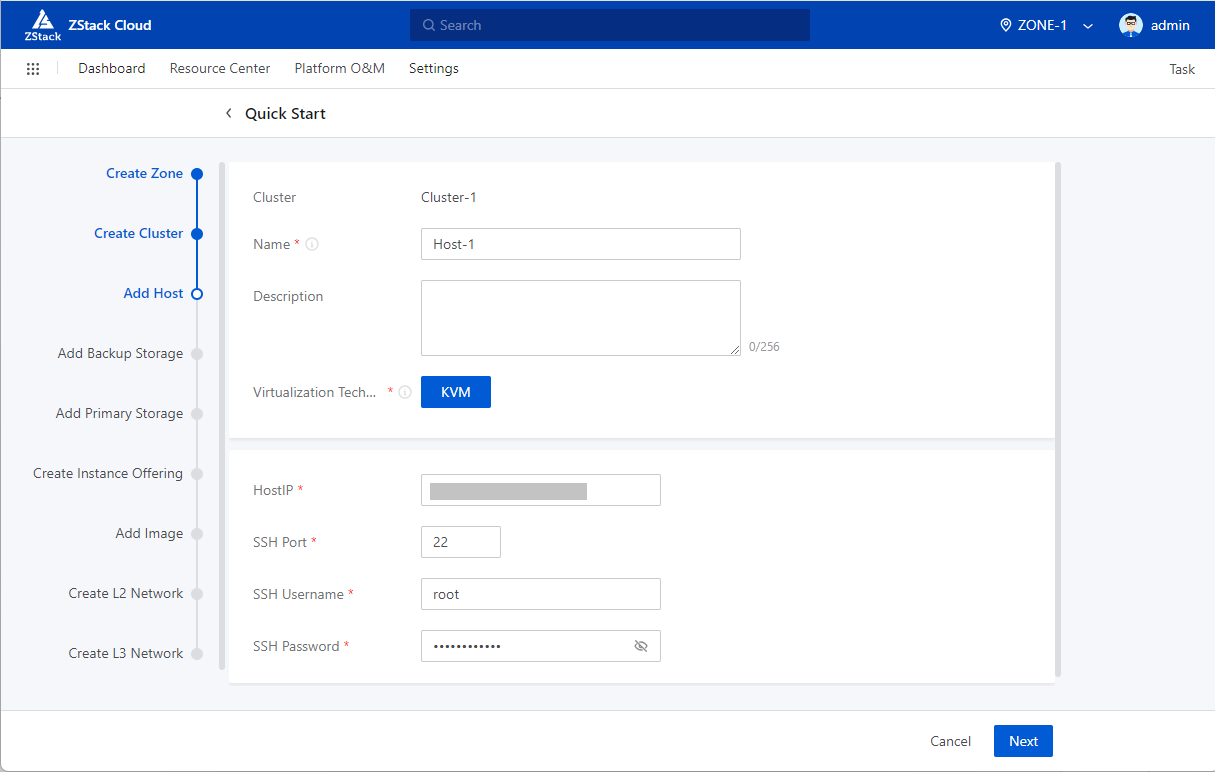
Compute Node Mode
Applicable to the installation of all nodes except the management nodes, such asCompute nodeImageStore, Ceph backup storage node, and Ceph backup storage mount nodeCeph primary storage node, and Ceph primary storage mount nodePXE deployment server node, local backup server node, and remote backup server node in another data center
Expert Mode
Enterprise Management Node ModeとCommunity Management Node Modeの違いは「terms of the license type, which decides the features available on the Cloud」とのこと