注:NetApp ONTAPシミュレータを新規で作成する人向けに別の記事がありますONTAPシミュレータの新規導入手順 」を参照ください。
下記の点について考慮しているものとなります
NetApp ONTAPシミュレータの初期構成は1024MB HDDが28本接続されている、という構成になっている。
使いにくいので、9GB HDD構成に変更して使用することにする。
ONTAPシミュレータのデータディスクのありか
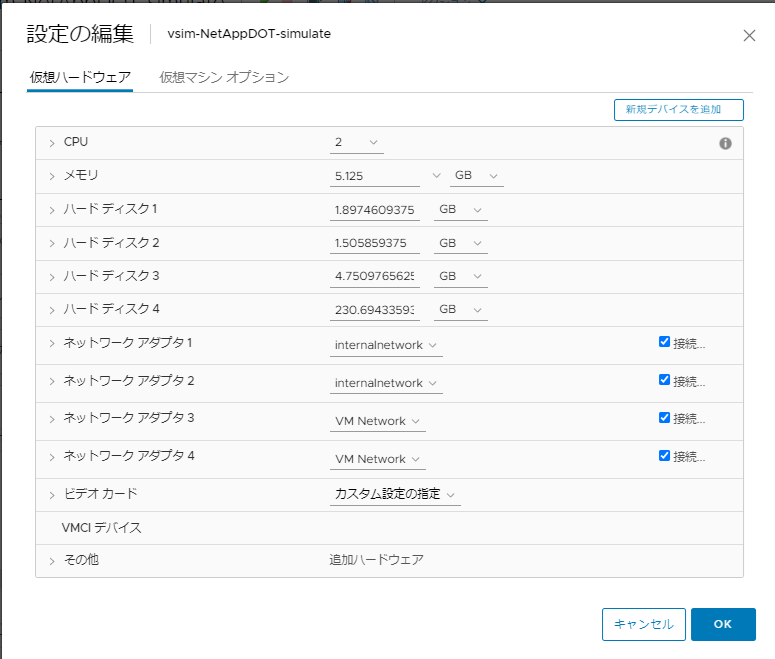
vSphere上で vsim-netapp-DOT9.7-cm_nodar.ova をデプロイした場合、下記の様な構成になっている。
このとき、ハードディスク4の230GBの中にファイルとして1024MBディスクのイメージファイルが作成されている。
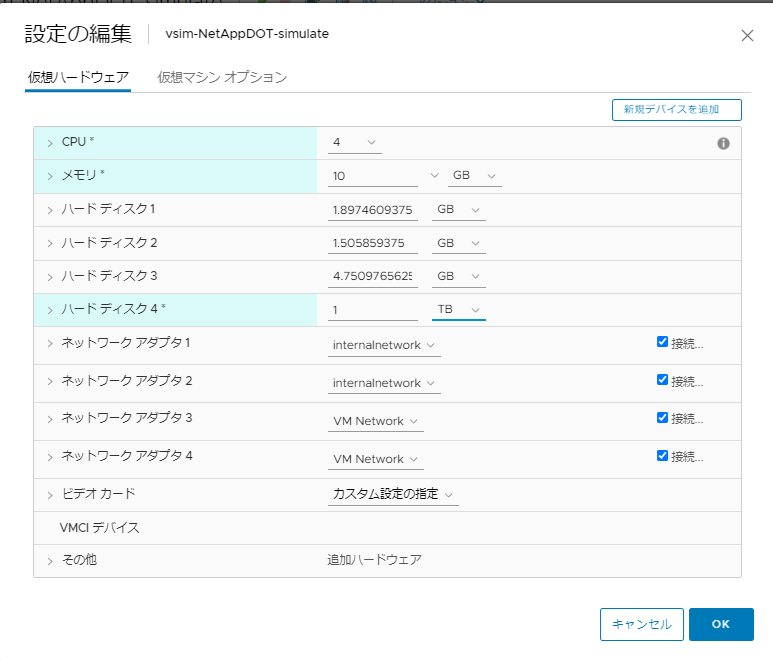
もし、200GB以上のデータを書き込みたい場合は、初回起動前にハードディスク4の容量を増やす必要がある。初回起動時はUFSファイルシステムを作成してくれるので対応できるのだが、シミュレータ内にはファイルシステム拡張用のコマンドが用意されていないので初回起動時以外に拡張しようとすると、FreeBSD 12のDVDで起動してgrowfsコマンドで拡張する、といった操作が必要になる。
ハードディスク4のサイズを「1TB」に変更した場合はこんな感じです。(ついでにCPUとメモリを増量している)
ディスク削除
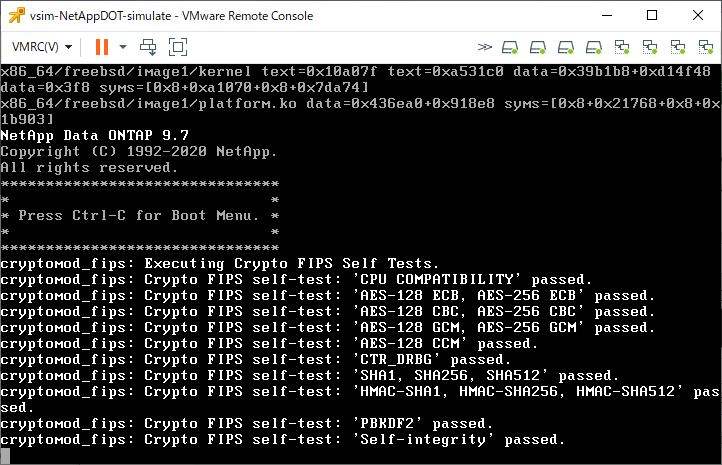
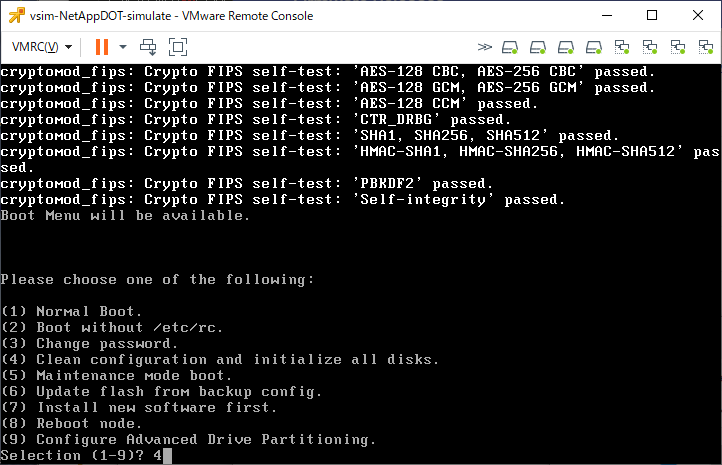
ONTAPシミュレータ仮想マシンの電源を入れ、下記の「Press Ctrl-C for Boot Menu」が出たらCtrlキーとCキーを同時押しする。
しばらく待つと下記の様なメニューが表示されるので「4」のClean Configuration and initialize all disks」を選択する。
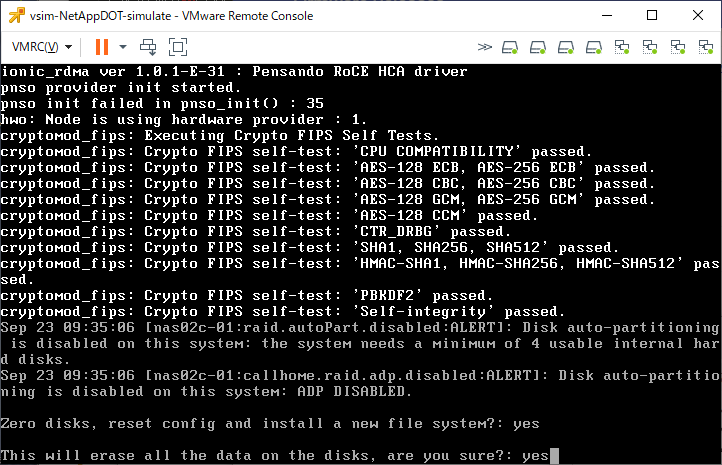
初期化確認は「yes」で答える。
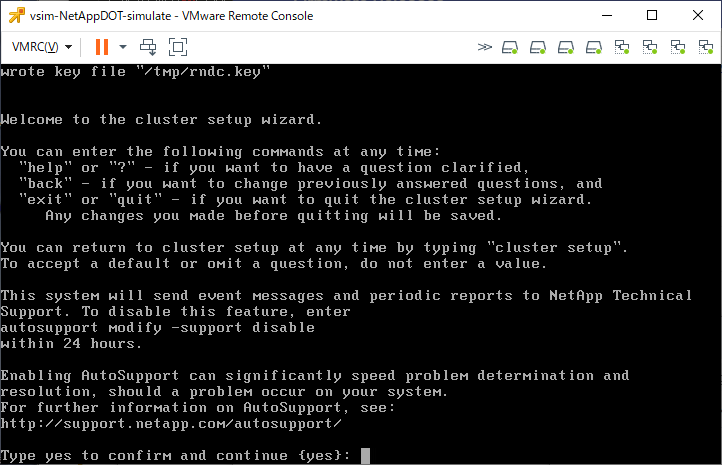
しばらく待つと再起動して、下記の様な初期セットアップが始まる。
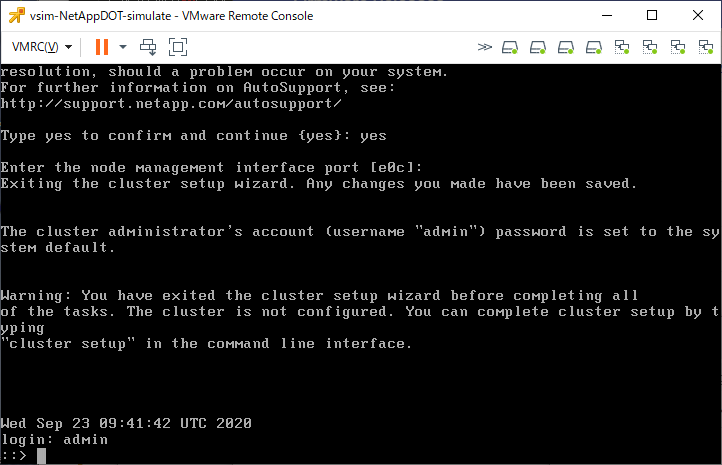
これはyesと入力しないで、Ctrl+Cで強制中断すると下記の様にログインプロンプトが現れるので「admin」ユーザでログインする。(パスワードは聞かれない)
「set diag」を実行すると「systemshellコマンド」が利用できるようになる。これはONTAP OS上でUNIXコマンドを実行できるようになるものです。(“system node systemshell”が正式コマンド名なのですが、ONTAP 9.7ではsystemshellでも実行できます)
「systemshell localhost “df -h /sim/dev”」と実行すると、UNIXで「df -h /sim/dev」を実行する、というような動作になります。
なお、日本語配列キーボードを使う場合、「”」は「Shift+8」で入力します。
::> set diag

Warning: These diagnostic commands are for use by NetApp personnel only.
Do you want to continue? {y|n}: y

::*> system node systemshell local "df -h /sim/dev"
Filesystem    Size    Used   Avail Capacity  Mounted on
/dev/ad3      223G     11G    194G     5%    /sim
::*>
上記のdfコマンドの実行がlockされているとしてエラーになる場合があります。これはONTAP設定が2023年に変わったことによる影響です。その場合はロックを解除 します。
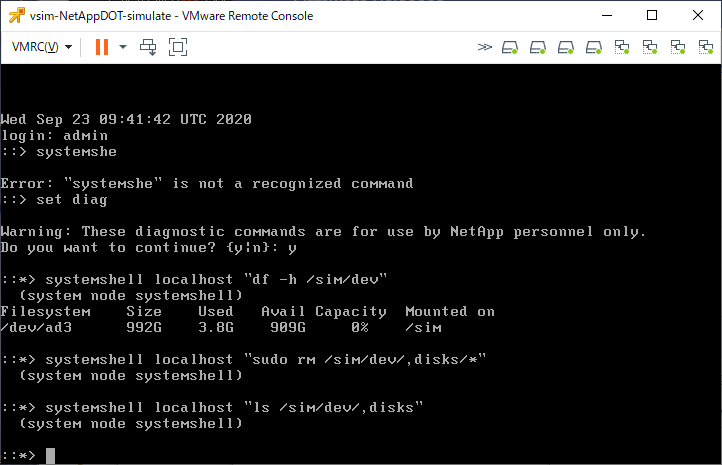
ONTAPシミュレータ上で認識するディスクのイメージファイルは「/sim/dev/,disks」というディレクトリにあります(「,」は誤字ではない)
現状あるファイルを確認するには「systemshell localhost “ls -l /sim/dev/,disks”」と実行します。
(画像はないです)
::*> systemshell local "ls -l /sim/dev/,disks"
total 11024296
-rwxr-xr-x  1 root  wheel         912 Sep  2 13:56 ,reservations
-rw-r--r--  1 root  wheel        1372 Sep  2 13:56 Shelf:DiskShelf14
-rw-r--r--  1 root  wheel  1094312960 Sep 24 13:27 v0.16:NETAPP__:VD-1000MB-FZ-520:14001600:2104448
-rw-r--r--  1 root  wheel  1094312960 Sep 24 13:27 v0.17:NETAPP__:VD-1000MB-FZ-520:14001601:2104448
-rw-r--r--  1 root  wheel  1094312960 Sep 24 13:27 v0.18:NETAPP__:VD-1000MB-FZ-520:14001602:2104448
-rw-r--r--  1 root  wheel  1094312960 Sep 24 13:27 v0.19:NETAPP__:VD-1000MB-FZ-520:14001603:2104448
-rw-r--r--  1 root  wheel  1094312960 Sep 24 13:27 v0.20:NETAPP__:VD-1000MB-FZ-520:14001604:2104448
-rw-r--r--  1 root  wheel  1094312960 Sep 24 13:27 v0.21:NETAPP__:VD-1000MB-FZ-520:14001605:2104448
-rw-r--r--  1 root  wheel  1094312960 Sep 24 13:10 v0.22:NETAPP__:VD-1000MB-FZ-520:14001606:2104448
-rw-r--r--  1 root  wheel  1094312960 Sep 24 13:05 v0.24:NETAPP__:VD-1000MB-FZ-520:14001607:2104448
-rw-r--r--  1 root  wheel  1094312960 Sep 24 13:05 v0.25:NETAPP__:VD-1000MB-FZ-520:14001608:2104448
-rw-r--r--  1 root  wheel  1094312960 Sep 24 13:05 v0.26:NETAPP__:VD-1000MB-FZ-520:14001709:2104448
-rw-r--r--  1 root  wheel  1094312960 Sep 24 13:05 v0.27:NETAPP__:VD-1000MB-FZ-520:14001710:2104448
-rw-r--r--  1 root  wheel  1094312960 Sep 24 13:05 v0.28:NETAPP__:VD-1000MB-FZ-520:14001711:2104448
-rw-r--r--  1 root  wheel  1094312960 Sep 24 13:05 v0.29:NETAPP__:VD-1000MB-FZ-520:14001712:2104448
-rw-r--r--  1 root  wheel  1094312960 Sep 24 13:05 v0.32:NETAPP__:VD-1000MB-FZ-520:14001713:2104448
-rw-r--r--  1 root  wheel  1094312960 Sep 24 13:27 v1.16:NETAPP__:VD-1000MB-FZ-520:16391700:2104448
-rw-r--r--  1 root  wheel  1094312960 Sep 24 13:27 v1.17:NETAPP__:VD-1000MB-FZ-520:16391701:2104448
-rw-r--r--  1 root  wheel  1094312960 Sep 24 13:27 v1.18:NETAPP__:VD-1000MB-FZ-520:16391702:2104448
-rw-r--r--  1 root  wheel  1094312960 Sep 24 13:27 v1.19:NETAPP__:VD-1000MB-FZ-520:16391703:2104448
-rw-r--r--  1 root  wheel  1094312960 Sep 24 13:05 v1.20:NETAPP__:VD-1000MB-FZ-520:16391704:2104448
-rw-r--r--  1 root  wheel  1094312960 Sep 24 13:05 v1.21:NETAPP__:VD-1000MB-FZ-520:16391705:2104448
-rw-r--r--  1 root  wheel  1094312960 Sep 24 13:05 v1.22:NETAPP__:VD-1000MB-FZ-520:16391706:2104448
-rw-r--r--  1 root  wheel  1094312960 Sep 24 13:05 v1.24:NETAPP__:VD-1000MB-FZ-520:16391707:2104448
-rw-r--r--  1 root  wheel  1094312960 Sep 24 13:05 v1.25:NETAPP__:VD-1000MB-FZ-520:16391708:2104448
-rw-r--r--  1 root  wheel  1094312960 Sep 24 13:05 v1.26:NETAPP__:VD-1000MB-FZ-520:16391709:2104448
-rw-r--r--  1 root  wheel  1094312960 Sep 24 13:05 v1.27:NETAPP__:VD-1000MB-FZ-520:16391710:2104448
-rw-r--r--  1 root  wheel  1094312960 Sep 24 13:05 v1.28:NETAPP__:VD-1000MB-FZ-520:16391711:2104448
-rw-r--r--  1 root  wheel  1094312960 Sep 24 11:50 v1.29:NETAPP__:VD-1000MB-FZ-520:16391712:2104448
-rw-r--r--  1 root  wheel  1094312960 Sep 24 11:50 v1.32:NETAPP__:VD-1000MB-FZ-520:16391713:2104448
::*>
いまある仮想ディスクを削除する場合は「systemshell localhost “sudo rm /sim/dev/,disks/*”」と実行します。
削除した後の、ディスク再作成はvsim_makedisksというコマンドで実行します。
いろいろオプションがあるのでまずは「systemshell local “vsim_makedisks -h”」と実行して確認します。
::*> systemshell local "vsim_makedisks -h"
Usage: /usr/sbin/vsim_makedisks [ -n <additional number of disks to create> ]
          [ -t <disk type ID> ]
          [ -e <additional sectors> ]
          [ -a <adapter on which to start populating disks ]
          [ -h ]

By default 5 disks will be added. The <disk type ID> can be one
of the following: (NOTE, 0 is the default)
                                                               Fast
Type Vendor ID Product ID       Usable Size[B] Actual Size[B]  Zero  BPS   RPM
  0  NETAPP__  VD-16MB_________     16,777,216     38,273,024   No   512  10000
  1  NETAPP__  VD-35MB_________     35,913,728     57,409,536   No   512  10000
  2  NETAPP__  VD-50MB_________     52,428,800     73,924,608   No   512  10000
  3  NETAPP__  VD-100MB________    104,857,600    126,353,408   No   512  10000
  4  NETAPP__  VD-500MB________    524,288,000    545,783,808   No   512  10000
  5  NETAPP__  VD-1000MB_______  1,048,576,000  1,070,071,808   No   512  10000
  6  NETAPP__  VD-16MB-FZ______     16,777,216     38,273,024   Yes  512  15000
  7  NETAPP__  VD-35MB-FZ______     35,913,728     57,409,536   Yes  512  15000
  8  NETAPP__  VD-50MB-FZ______     52,428,800     73,924,608   Yes  512  15000
  9  NETAPP__  VD-100MB-FZ_____    104,857,600    126,353,408   Yes  512  15000
 10  NETAPP__  VD-500MB-FZ_____    524,288,000    545,783,808   Yes  512  15000
 11  NETAPP__  VD-1000MB-FZ____  1,048,576,000  1,070,071,808   Yes  512  15000
 12  NETAPP__  VD-16MB-520_____     16,777,216     38,273,024   No   520  10000
 13  NETAPP__  VD-35MB-520_____     35,913,728     57,409,536   No   520  10000
 14  NETAPP__  VD-50MB-520_____     52,428,800     73,924,608   No   520  10000
 15  NETAPP__  VD-100MB-520____    104,857,600    126,353,408   No   520  10000
 16  NETAPP__  VD-500MB-520____    524,288,000    545,783,808   No   520  10000
 17  NETAPP__  VD-1000MB-520___  1,048,576,000  1,070,071,808   No   520  10000
 18  NETAPP__  VD-16MB-FZ-520__     16,777,216     38,273,024   Yes  520  15000
 19  NETAPP__  VD-35MB-FZ-520__     35,913,728     57,409,536   Yes  520  15000
 20  NETAPP__  VD-50MB-FZ-520__     52,428,800     73,924,608   Yes  520  15000
 21  NETAPP__  VD-100MB-FZ-520_    104,857,600    126,353,408   Yes  520  15000
 22  NETAPP__  VD-500MB-FZ-520_    524,288,000    545,783,808   Yes  520  15000
 23  NETAPP__  VD-1000MB-FZ-520  1,048,576,000  1,070,071,808   Yes  520  15000
 24  NETAPP__  VD-16MB-FZ-ATA__     16,777,216     51,388,416   Yes  512   7200
 25  NETAPP__  VD-35MB-FZ-ATA__     36,700,160     73,801,728   Yes  512   7200
 26  NETAPP__  VD-50MB-FZ-ATA__     52,428,800     91,496,448   Yes  512   7200
 27  NETAPP__  VD-100MB-FZ-ATA_    104,857,600    150,478,848   Yes  512   7200
 28  NETAPP__  VD-500MB-FZ-ATA_    524,288,000    622,338,048   Yes  512   7200
 29  NETAPP__  VD-1000MB-FZ-ATA  1,048,576,000  1,212,162,048   Yes  512   7200
 30  NETAPP__  VD-2000MB-FZ-520  2,097,512,000  2,119,007,808   Yes  520  15000
 31  NETAPP__  VD-4000MB-FZ-520  4,194,304,000  4,215,799,808   Yes  520  15000
 32  NETAPP__  VD-2000MB-FZ-ATA  2,097,512,000  2,391,810,048   Yes  512   7200
 33  NETAPP__  VD-4000MB-FZ-ATA  4,194,304,000  4,751,106,048   Yes  512   7200
 34  NETAPP__  VD-100MB-SS-512_    104,857,600    126,353,408   Yes  512  15000
 35  NETAPP__  VD-500MB-SS-520_    524,288,000    545,783,808   Yes  520  15000
 36  NETAPP__  VD-9000MB-FZ-520  9,437,184,000  9,458,679,808   Yes  520  15000
 37  NETAPP__  VD-9000MB-FZ-ATA  9,437,184,000 10,649,346,048   Yes  512   7200

::*>
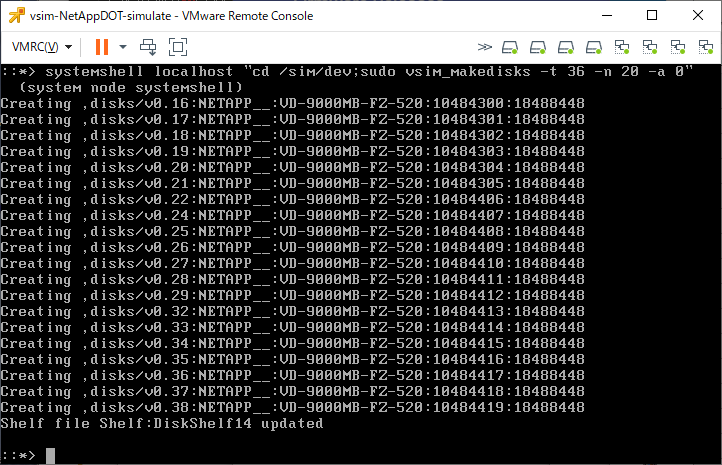
いろんなディスクタイプが選択できますが、BPSが520になっているものを優先して選びます。
その中で一番容量が大きいのは36番なので、「-t 36」というオプションを使います。
今回は60本を増設してみます(なお、あとで分かりますが、56本までしか認識してくれませんでした)
アダプタ0配下に20本追加するコマンド「systemshell localhost “cd /sim/dev;sudo vsim_makedisks -t 36 -n 20 -a 0″」を実行します。
アダプタ1配下に20本追加するコマンド「systemshell localhost “cd /sim/dev;sudo vsim_makedisks -t 36 -n 20 -a 1″」を実行します。
アダプタ2配下に20本追加するコマンド「systemshell localhost “cd /sim/dev;sudo vsim_makedisks -t 36 -n 20 -a 2″」を実行します。
作成したら「halt local」で停止をして、再起動します。
これで起動すればOKです。