Samba 4.10.xでActive Directoryを1から立てる

Samba 4.10.2に更新した際に、python関連で修正点があったので更新。なお、この記事は、Active Directoryサーバとして使用することについてのみ解説しています。ファイルサーバとして使用することについては記述していません。

Samba 4.10.xにおける大きな変更点は「python3がデフォルト」「python2サポートの最終バージョン」です。RHEL7/CentOS7環境はpython2なので、あまり変更せずに使える最終バージョンといった感じです。なお、RHEL7/CentOS7のEPELには「python36」というパッケージ名でpython 3.6があるので、それを追加インストールすることはできます。

なお、過去バージョンの履歴。2018年12月版「Samba 4.9.xでActive Directoryを1から立てる」、2018年3月版「Samba 4.7.xでActive Directoryを1から立てる」、2016年7月版「Samba 4.4.xでActive Directoryを1から立てる」、2014年2月版「Samba 4.xでActive Directoryを1から立てる

さて、Linux上でSambaを使ってActive Directoryサーバを立てるメリットは以下の点です。

その1:Windows Serverを買わなくてもActive Directoryを作れる

WindowsのCALを買わずにActive Directory環境の構築ができるため、ライセンス費用の低減になります。

その2:Active Directoryユーザの作成などのユーザ管理をWindowsマシンからWindows標準ツールで行える

ユーザーの作成/変更、コンピューターアカウントの作成、DNSの管理など、Active Directoryの管理を行う際に頻繁に使う操作については、WindowsのActive Directory管理ツールやDNS管理ツールを使用することができる。このため、普段はLinuxのCLIコマンド(samba-toolsやnetコマンドなど)を使う必要はない。

Active Directoryに参加しているWindowsマシンに、Windows機能のActive Directory管理ツールを追加インストールし、Active Directoryの管理者にてログオンすることで、管理ができる。

その3:sambaの設定は難しくない

10年ぐらい前のsambaでは、DNSサーバやLDAPサーバをsambaとは別に用意し、連携する必要がありました。いまのsambaはDNSサーバとLDAPサーバの機能が統合されているため設定が容易になりました。

Active Directory名とActive Directory上の役割、管理者パスワードを設定するぐらいで環境を作成することができます。

逆にデメリットとしてどのようなものがあるか?

その1:Active Directoryの全機能が搭載されていない

ドメイン/フォレストの機能レベルがWindows Server 2012R2レベルまで対応になったものの、「Kerberos関連機能が未搭載」となっています。(samba公式wiki「Raising the Functional Levels」)

「Windows Server 2008 R2」レベルまでであればフルサポートしています。このレベルであれば、Windows Server 2016環境でフェイルオーバークラスターマネージャーでクラスタを組むこともできました。(samba 4.7ぐらいから可能になった)


手順は、公式の「Setting up Samba as an Active Directory Domain Controller」と「Package Dependencies Required to Build Samba」を参照しながら実施していきます。

1. CentOS7の最小インストールを実施

2. /etc/hostsの修正

自ホスト名を/etc/hostsに追加。
追加の際は、ショートのホスト名と、ドメイン付きのFQDNの両方を列挙すること。

[root@adserver ~]# cat /etc/hosts
127.0.0.1   localhost localhost.localdomain localhost4 localhost4.localdomain4
::1         localhost localhost.localdomain localhost6 localhost6.localdomain6
172.17.44.40    adserver adserver.adosakana.local
[root@adserver ~]#

3. 好みに応じて使うツールをインストール

セッションが途中で切れても良い様に「screen」か「tmux」と、ファイルダウンロードするためにwgetかcurlをインストールします。

[root@adserver ~]# yum install wget screen
<略>
[root@adserver ~]#

4. 必要なパッケージをインストール

Samba公式の「Package Dependencies Required to Build Samba」に記載されているパッケージをインストール

[root@adserver ~]# yum install attr bind-utils docbook-style-xsl gcc gdb krb5-workstation \
       libsemanage-python libxslt perl perl-ExtUtils-MakeMaker \
       perl-Parse-Yapp perl-Test-Base pkgconfig policycoreutils-python \
       python2-crypto gnutls-devel libattr-devel keyutils-libs-devel \
       libacl-devel libaio-devel libblkid-devel libxml2-devel openldap-devel \
       pam-devel popt-devel python-devel readline-devel zlib-devel systemd-devel \
       lmdb-devel jansson-devel gpgme-devel pygpgme libarchive-devel
<略>
[root@adserver ~]#

ここで問題発生・・・上記の説明に「RHEL7ではEPELレポジトリを追加する必要があるが、CentOS7とScientific Linux7では不要」とあるが、CentOS7環境で試してみると「perl-Test-Base」と「lmdb-devel」は無い。

EPELレポジトリを追加してから、必要なパッケージのインストールをやり直します。(なお、perl-Test-Baseに関連付いていろいろパッケージが追加されます。)

[root@adserver ~]# yum install epel-release.noarch
<略>
[root@adserver ~]#

5. sambaのtar.gzをダウンロード

samba.orgからsambaをダウンロードします。

[root@adserver ~]# wget https://download.samba.org/pub/samba/stable/samba-4.10.2.tar.gz
--2018-12-28 13:10:22--  https://download.samba.org/pub/samba/stable/samba-4.10.2.tar.gz
download.samba.org (download.samba.org) をDNSに問いあわせています... 144.76.82.156, 2a01:4f8:192:486::443:2
download.samba.org (download.samba.org)|144.76.82.156|:443 に接続しています...  接続しました。
HTTP による接続要求を送信しました、応答を待っています... 200 OK
長さ: 18053738 (17M) [application/gzip]
`samba-4.10.2.tar.gz' に保存中

100%[======================================>] 18,053,738  3.65MB/s 時間 5.9s

2018-12-28 13:10:29 (2.93 MB/s) - `samba-4.10.2.tar.gz' へ保存完了 [18053738/18053738]

[root@adserver ~]# 

6. configure実施

samba 4.10.0より、標準で使用されるpythonのバージョンが3になりました。このため、RHEL7/CentOS7環境では「python3」が無いことにより下記の様なエラーとなります。

[root@adserver samba-4.10.2]# ./configure
/usr/bin/env: python3: そのようなファイルやディレクトリはありません
[root@adserver samba-4.10.2]#

これを避けるために「PYTHON=python2 ./configure」というような形で実行します。(Samba 4.10.0リリースノートより)

[root@adserver ~]# tar xfz samba-4.10.2.tar.gz
[root@adserver ~]# cd samba-4.10.2/
[root@adserver samba-4.10.2]# PYTHON=python2 ./configure
Setting top to                           : /root/samba-4.10.2
Setting out to                           : /root/samba-4.10.2/bin
Checking for 'gcc' (C compiler)          : /usr/bin/gcc
Checking for program 'git'               : /usr/bin/git
Checking for c flags '-MMD'              : yes
Checking for program 'gdb'               : /usr/bin/gdb
Checking for header sys/utsname.h        : yes

<略>
Checking if compiler accepts -fstack-protector                                                  : no
Checking if compiler accepts -fstack-clash-protection                                           : yes
'configure' finished successfully (1m43.247s)
[root@adserver samba-4.10.2]#

7. make & make install

こちらもRHEL7/CentOS7の場合は「PYTHON=python2 make」、「PYTHON=python2 make install」と実行します。

[root@adserver samba-4.10.2]# PYTHON=python2 make
PYTHONHASHSEED=1 WAF_MAKE=1 python2 ./buildtools/bin/waf build
Waf: Entering directory `/root/samba-4.10.2/bin/default'
<略>
[4112/4118] Compiling source4/scripting/man/samba-gpupdate.8.xml
Note: Writing samba-gpupdate.8

[4113/4118] Compiling pidl/lib/Parse/Pidl/Wireshark/NDR.pm
[4114/4118] Compiling pidl/lib/Parse/Pidl/Dump.pm
[4115/4118] Compiling pidl/lib/Parse/Pidl/Wireshark/Conformance.pm
[4116/4118] Compiling pidl/pidl
[4117/4118] Compiling pidl/lib/Parse/Pidl/NDR.pm
[4118/4118] Compiling pidl/lib/Parse/Pidl/Util.pm
Waf: Leaving directory `/root/samba-4.10.2/bin/default'
'build' finished successfully (19m50.933s)
[root@adserver samba-4.10.2]# PYTHON=python2 make install
PYTHONHASHSEED=1 WAF_MAKE=1 python2 ./buildtools/bin/waf install
Waf: Entering directory `/root/samba-4.10.2/bin/default'
        Selected embedded Heimdal build
Checking project rules ...
<略>
+ install /usr/local/samba/share/man/man3/Parse::Pidl::NDR.3pm (from bin/default/pidl/Parse::Pidl::NDR.3pm)
+ install /usr/local/samba/share/man/man3/Parse::Pidl::Util.3pm (from bin/default/pidl/Parse::Pidl::Util.3pm)
Waf: Leaving directory `/root/samba-4.10.2/bin/default'
'install' finished successfully (5m24.784s)
[root@adserver samba-4.10.2]#

8. インストール完了確認

インストールされたsambaのバージョンを確認します。

[root@adserver samba-4.10.2]# /usr/local/samba/sbin/samba -V
Version 4.10.2
[root@adserver samba-4.10.2]#

9. Active Directoryのセットアップ

ドメイン「adosakana.local」を作成します。
また、sambaの機能を使ってAD DNSを構築するので「SAMBA_INTERNAL」を選択します。

なお、「–use-rfc2307」はADにNIS連携機能を追加するオプションです。AD上にUnix用のUID/GID/shell情報なども格納できるようにします。Samba環境では有効にしておくべきものです。

また、セットアップ中、「Merge the contents of this file with your system krb5.conf or replace it with this one. Do not create a symlink!」とメッセージが出ますが、これは、この手順で自動生成されたkrb5.confをシステムのもつkrb5.confと統合しろ、というお知らせです。後の手順で対処します。

[root@adserver samba-4.10.2]# /usr/local/samba/bin/samba-tool domain provision --use-rfc2307 --interactive
Realm [example.com]:  ADOSAKANA.LOCAL
Domain [ADOSAKANA]:
Server Role (dc, member, standalone) [dc]:
DNS backend (SAMBA_INTERNAL, BIND9_FLATFILE, BIND9_DLZ, NONE) [SAMBA_INTERNAL]: 
DNS forwarder IP address (write 'none' to disable forwarding) [172.30.50.100]:  172.30.50.100
Administrator password:
Retype password:
Looking up IPv4 addresses
Looking up IPv6 addresses
No IPv6 address will be assigned
Setting up share.ldb
Setting up secrets.ldb
Setting up the registry
Setting up the privileges database
Setting up idmap db
Setting up SAM db
Setting up sam.ldb partitions and settings
Setting up sam.ldb rootDSE
Pre-loading the Samba 4 and AD schema
Unable to determine the DomainSID, can not enforce uniqueness constraint on local domainSIDs

Adding DomainDN: DC=adosakana,DC=local
Adding configuration container
Setting up sam.ldb schema
Setting up sam.ldb configuration data
Setting up display specifiers
Modifying display specifiers and extended rights
Adding users container
Modifying users container
Adding computers container
Modifying computers container
Setting up sam.ldb data
Setting up well known security principals
Setting up sam.ldb users and groups
Setting up self join
Adding DNS accounts
Creating CN=MicrosoftDNS,CN=System,DC=adosakana,DC=local
Creating DomainDnsZones and ForestDnsZones partitions
Populating DomainDnsZones and ForestDnsZones partitions
Setting up sam.ldb rootDSE marking as synchronized
Fixing provision GUIDs
A Kerberos configuration suitable for Samba AD has been generated at /usr/local/samba/private/krb5.conf
Merge the contents of this file with your system krb5.conf or replace it with this one. Do not create a symlink!
Setting up fake yp server settings
Once the above files are installed, your Samba AD server will be ready to use
Server Role:           active directory domain controller
Hostname:              wk70
NetBIOS Domain:        ADOSAKANA
DNS Domain:            adosakana.local
DOMAIN SID:            S-1-5-21-3471449246-245784766-327389652
[root@adserver samba-4.10.2]#

10. sambaを起動

sambaが起動していないことを確認した上で、sambaを起動します。

[root@adserver samba-4.10.2]# ps -ef|grep samba
root      30118   5011  0 18:40 pts/0    00:00:00 grep --color=auto samba
[root@adserver samba-4.10.2]# /usr/local/samba/sbin/samba
[root@adserver samba-4.10.2]# ps -ef|grep samba
root      30120      1 12 18:41 ?        00:00:00 /usr/local/samba/sbin/samba
root      30121  30120  0 18:41 ?        00:00:00 /usr/local/samba/sbin/samba
root      30122  30120  1 18:41 ?        00:00:00 /usr/local/samba/sbin/samba
root      30123  30120  0 18:41 ?        00:00:00 /usr/local/samba/sbin/samba
root      30124  30120  0 18:41 ?        00:00:00 /usr/local/samba/sbin/samba
root      30125  30120 11 18:41 ?        00:00:00 /usr/local/samba/sbin/samba
root      30126  30120  0 18:41 ?        00:00:00 /usr/local/samba/sbin/samba
root      30127  30120  0 18:41 ?        00:00:00 /usr/local/samba/sbin/samba
root      30128  30120  0 18:41 ?        00:00:00 /usr/local/samba/sbin/samba
root      30129  30120  0 18:41 ?        00:00:00 /usr/local/samba/sbin/samba
root      30130  30120  0 18:41 ?        00:00:00 /usr/local/samba/sbin/samba
root      30131  30120  0 18:41 ?        00:00:00 /usr/local/samba/sbin/samba
root      30132  30120  0 18:41 ?        00:00:00 /usr/local/samba/sbin/samba
root      30133  30120  0 18:41 ?        00:00:00 /usr/local/samba/sbin/samba
root      30134  30121  0 18:41 ?        00:00:00 /usr/local/samba/sbin/samba
root      30136  30129  0 18:41 ?        00:00:00 /usr/local/samba/sbin/samba
root      30137  30134 17 18:41 ?        00:00:00 /usr/local/samba/sbin/smbd -D --option=server role check:inhibit=yes --foreground
root      30140  30136 16 18:41 ?        00:00:00 /usr/local/samba/sbin/winbindd -D --option=server role check:inhibit=yes --foreground
root      30144  30137  0 18:41 ?        00:00:00 /usr/local/samba/sbin/smbd -D --option=server role check:inhibit=yes --foreground
root      30145  30137  0 18:41 ?        00:00:00 /usr/local/samba/sbin/smbd -D --option=server role check:inhibit=yes --foreground
root      30146  30140  1 18:41 ?        00:00:00 /usr/local/samba/sbin/winbindd -D --option=server role check:inhibit=yes --foreground
root      30151  30140  0 18:41 ?        00:00:00 /usr/local/samba/sbin/winbindd -D --option=server role check:inhibit=yes --foreground
root      30152  30140  0 18:41 ?        00:00:00 /usr/local/samba/sbin/winbindd -D --option=server role check:inhibit=yes --foreground
root      30153  30137  0 18:41 ?        00:00:00 /usr/local/samba/sbin/smbd -D --option=server role check:inhibit=yes --foreground
root      30155   5011  0 18:41 pts/0    00:00:00 grep --color=auto samba
[root@adserver samba-4.10.2]#

11. 動作確認

CentOS内部からSMB接続を行うテストを実施。

[root@adserver samba-4.10.2]# /usr/local/samba/bin/smbclient --version
Version 4.10.2
[root@adserver samba-4.10.2]# /usr/local/samba/bin/smbclient -L localhost -U%

        Sharename       Type      Comment
        ---------       ----      -------
        netlogon        Disk
        sysvol          Disk
        IPC$            IPC       IPC Service (Samba 4.10.2)
Reconnecting with SMB1 for workgroup listing.

        Server               Comment
        ---------            -------

        Workgroup            Master
        ---------            -------
[root@adserver samba-4.10.2]#

以前は「Domain=[ADOSAKANA.LOCAL] OS=[Unix] Server=[Samba x.y.z]」という出力もあったのですが、Samba 4.7以降では無くなっています。

netlogon共有にAdministrator権限でアクセスできるか確認。

[root@adserver samba-4.10.2]# /usr/local/samba/bin/smbclient //localhost/netlogon -UAdministrator -c 'ls'
Enter ADOSAKANA\Administrator's password:
  .                                   D        0  Tue Mar 27 17:47:04 2018
  ..                                  D        0  Tue Mar 27 17:47:51 2018

                17811456 blocks of size 1024. 12499620 blocks available
[root@adserver samba-4.10.2]#

12. AD DNSの動作テスト

AD DNSが想定通りに動作しているかテストします。

まず、どんなzoneが登録されているのか確認します。

[root@adserver samba-4.10.2]# /usr/local/samba/bin/samba-tool dns zonelist 127.0.0.1 -U Administrator
Password for [ADOSAKANA\Administrator]:
  2 zone(s) found

  pszZoneName                 : adosakana.local
  Flags                       : DNS_RPC_ZONE_DSINTEGRATED DNS_RPC_ZONE_UPDATE_SECURE
  ZoneType                    : DNS_ZONE_TYPE_PRIMARY
  Version                     : 50
  dwDpFlags                   : DNS_DP_AUTOCREATED DNS_DP_DOMAIN_DEFAULT DNS_DP_ENLISTED
  pszDpFqdn                   : DomainDnsZones.adosakana.local

  pszZoneName                 : _msdcs.adosakana.local
  Flags                       : DNS_RPC_ZONE_DSINTEGRATED DNS_RPC_ZONE_UPDATE_SECURE
  ZoneType                    : DNS_ZONE_TYPE_PRIMARY
  Version                     : 50
  dwDpFlags                   : DNS_DP_AUTOCREATED DNS_DP_FOREST_DEFAULT DNS_DP_ENLISTED
  pszDpFqdn                   : ForestDnsZones.adosakana.local
[root@adserver samba-4.10.2]#

Active Directoryで使用するDNSのSRVレコードが登録されているかをhostコマンドを使って確認します。

[root@adserver samba-4.10.2]# host -t SRV _ldap._tcp.adosakana.local 127.0.0.1
Using domain server:
Name: 127.0.0.1
Address: 127.0.0.1#53
Aliases:

_ldap._tcp.adosakana.local has SRV record 0 100 389 adserver.adosakana.local.
[root@adserver samba-4.10.2]# host -t SRV _kerberos._udp.adosakana.local 127.0.0.1
Using domain server:
Name: 127.0.0.1
Address: 127.0.0.1#53
Aliases:

_kerberos._udp.adosakana.local has SRV record 0 100 88 adserver.adosakana.local.
[root@adserver samba-4.10.2]#

ADサーバのホスト名が登録されているか確認します。

[root@adserver samba-4.10.2]# host -t A adserver.adosakana.local 127.0.0.1
Using domain server:
Name: 127.0.0.1
Address: 127.0.0.1#53
Aliases:

adserver.adosakana.local has address 172.17.15.70
[root@adserver samba-4.10.2]#

13. DNSサーバの変更

ADサーバの/etc/resolv.confを、ADサーバ自身を使う様に書き換えます。

14. /etc/krb5.conf の変更

/usr/local/samba/private/krb5.conf に元となるものが自動生成されているので、それを使用する。

[root@adserver samba-4.10.2]# ls -l /etc/krb5.conf /usr/local/samba/private/krb5.conf
-rw-r--r--. 1 root root 641 10月 30 23:40 /etc/krb5.conf
-rw-rw-rw-. 1 root root  96 12月 28 14:13 /usr/local/samba/private/krb5.conf
[root@adserver samba-4.10.2]# cat /usr/local/samba/private/krb5.conf
[libdefaults]
        default_realm = ADOSAKANA.LOCAL
        dns_lookup_realm = false
        dns_lookup_kdc = true
[root@adserver samba-4.10.2]# cp /usr/local/samba/private/krb5.conf /etc/krb5.conf
cp: `/etc/krb5.conf' を上書きしますか? y
[root@adserver samba-4.10.2]#

15. Kerberosの動作確認

「kinit administrator@ドメイン名」を実行して確認します。

[root@adserver samba-4.10.2]# kinit administrator@ADOSAKANA.LOCAL
Password for administrator@ADOSAKANA.LOCAL:
Warning: Your password will expire in 41 days on 2019年02月08日 14時13分15秒
[root@adserver samba-4.10.2]#

正常に設定されていれば、上記の様にAdministratorユーザのパスワード有効期限が表示されます。

「klist」コマンドでも確認することが出来ます。

[root@adserver samba-4.10.2]# klist
Ticket cache: FILE:/tmp/krb5cc_0
Default principal: administrator@ADOSAKANA.LOCAL

Valid starting       Expires              Service principal
2018-12-28T14:26:25  2018-12-29T00:26:25  krbtgt/ADOSAKANA.LOCAL@ADOSAKANA.LOCAL
        renew until 2018-12-29T14:26:22
[root@adserver samba-4.10.2]#

なお、ドメイン名指定の大文字/小文字を間違えると下記の様なエラーとなります。

[root@adserver ~]# kinit administrator@adosakana.local
Password for administrator@adosakana.local:
kinit: KDC reply did not match expectations while getting initial credentials
[root@adserver ~]#

DNSサーバ指定が誤っている場合は下記の様なエラーです。

[root@adserver ~]# kinit administrator@ADOSAKANA.LOCAL
kinit: Cannot resolve servers for KDC in realm "ADOSAKANA.LOCAL" while getting initial credentials
[root@adserver ~]#

16. フォレストとドメインの機能レベル確認

作成したActive Directoryのドメインの機能レベルとフォレストの機能レベルを確認します。

[root@adserver samba-4.10.2]# /usr/local/samba/bin/samba-tool domain level show
Domain and forest function level for domain 'DC=adosakana,DC=local'

Forest function level: (Windows) 2008 R2
Domain function level: (Windows) 2008 R2
Lowest function level of a DC: (Windows) 2008 R2
[root@adserver samba-4.10.2]#

Samba 4.10.2でもWindows Server 2008R2が標準設定となっています。

17. firewalldの設定

CentOS7ではfirewalldによりポートが制限されています。
現状を「firewall-cmd –list-all」で確認します。

[root@adserver samba-4.10.2]# firewall-cmd --list-all
public (active)
  target: default
  icmp-block-inversion: no
  interfaces: ens160
  sources:
  services: ssh dhcpv6-client
  ports:
  protocols:
  masquerade: no
  forward-ports:
  source-ports:
  icmp-blocks:
  rich rules:
[root@adserver samba-4.10.2]#

開けるべきポートのテンプレートがあらかじめ用意されているので「firewall-cmd –get-services」を実行して確認します 。

[root@adserver samba-4.10.2]# firewall-cmd --get-services
RH-Satellite-6 amanda-client amanda-k5-client bacula bacula-client bgp bitcoin bitcoin-rpc bitcoin-testnet bitcoin-testnet-rpc ceph ceph-mon cfengine condor-collector ctdb dhcp dhcpv6 dhcpv6-client dns docker-registry docker-swarm dropbox-lansync elasticsearch freeipa-ldap freeipa-ldaps freeipa-replication freeipa-trust ftp ganglia-client ganglia-master git gre high-availability http https imap imaps ipp ipp-client ipsec irc ircs iscsi-target jenkins kadmin kerberos kibana klogin kpasswd kprop kshell ldap ldaps libvirt libvirt-tls managesieve mdns minidlna mongodb mosh mountd ms-wbt mssql murmur mysql nfs nfs3 nmea-0183 nrpe ntp openvpn ovirt-imageio ovirt-storageconsole ovirt-vmconsole pmcd pmproxy pmwebapi pmwebapis pop3 pop3s postgresql privoxy proxy-dhcp ptp pulseaudio puppetmaster quassel radius redis rpc-bind rsh rsyncd samba samba-client sane sip sips smtp smtp-submission smtps snmp snmptrap spideroak-lansync squid ssh syncthing syncthing-gui synergy syslog syslog-tls telnet tftp tftp-client tinc tor-socks transmission-client upnp-client vdsm vnc-server wbem-https xmpp-bosh xmpp-client xmpp-local xmpp-server zabbix-agent zabbix-server
[root@adserver samba-4.10.2]#
サービス ポート プロトコル firewalld定義
DNS 53 tcp/udp dns
Kerberos 88 tcp/udp kerberos,freeipa-ldap,freeipa-ldaps
End Point Mapper (DCE/RPC Locator Service) 135 tcp freeipa-trust
NetBIOS Name Service 137 udp samba,samba-client
NetBIOS Datagram 138 udp samba,samba-client,freeipa-trust
NetBIOS Session 139 tcp samba,freeipa-trust
LDAP 389 tcp/udp freeipa-trust(ldap,freeipa-ldapはtcpのみ)
SMB over TCP 445 tcp samba,freeipa-trust(freeipa-trustはudpも含む)
Kerberos kpasswd 464 tcp/udp kpasswd,freeipa-ldap,freeipa-ldaps
LDAPS 636 tcp ldaps,freeipa-ldaps
Dynamic RPC Ports(4.7以前) 1024-1300 tcp freeipa-trust
Dynamic RPC Ports(samba 4.7以降) 49152-65535 tcp ?
Global Catalog 3268 tcp freeipa-trust
Global Catalog SSL 3269 tcp なし

・firewalldの定義「samba」「dns」「freeipa-ldaps」「freeipa-trust」を使用
・「Dynamic RPC Ports(samba 4.7以降):49152-65535」を追加するか、smb.confで「rpc server port」を定義するか。
・「Global Catalog SSL:3269」を追加

[root@adserver samba-4.10.2]# firewall-cmd --permanent --zone=public --add-service=samba
success
[root@adserver samba-4.10.2]# firewall-cmd --permanent --zone=public --add-service=dns
success
[root@adserver samba-4.10.2]# firewall-cmd --permanent --zone=public --add-service=freeipa-ldaps
success
[root@adserver samba-4.10.2# firewall-cmd --permanent --zone=public --add-service=freeipa-trust
success
[root@adserver samba-4.10.2]# firewall-cmd --reload
success
[root@adserver samba-4.10.2]# firewall-cmd --list-all
public (active)
  target: default
  icmp-block-inversion: no
  interfaces: eth0
  sources:
  services: ssh dhcpv6-client samba dns freeipa-ldaps freeipa-trust
  ports:
  protocols:
  masquerade: no
  forward-ports:
  source-ports:
  icmp-blocks:
  rich rules:

[root@adserver samba-4.10.2#
[root@adserver samba-4.10.2]# firewall-cmd --permanent --zone=public --add-port=49152-65535/tcp
success
[root@adserver samba-4.10.2]# firewall-cmd --permanent --zone=public --add-port=3269/tcp
success
[root@adserver samba-4.10.2]# firewall-cmd --reload
success
[root@adserver samba-4.10.2]# firewall-cmd --list-all
public (active)
  target: default
  icmp-block-inversion: no
  interfaces: eth0
  sources:
  services: ssh dhcpv6-client samba dns freeipa-ldaps freeipa-trust
  ports: 49152-65535/tcp 3269/tcp
  protocols:
  masquerade: no
  forward-ports:
  source-ports:
  icmp-blocks:
  rich rules:

[root@adserver samba-4.10.2]#

18. systemdへの登録

systemdへの登録については「Managing the Samba AD DC Service Using Systemd」を参照のこと
CentOS6の場合は「Managing the Samba AD DC Service Using an Init Script

以上で設定は終了です。

最小インストールのRHEL7環境で文字化けせずにNetBackup管理画面を表示するために必要なパッケージ

最小インストールのRHEL7環境で文字化けせずにNetBackup管理画面を表示するために必要なパッケージを確認した。

なお、表示させるのはLinuxサーバローカルのディスプレイではなく、同一ネットワーク上にあるWindows10にインストールされた「VcXSrv

# yum install libXext libXrender libXtst xorg-x11-fonts-Type1 vlgothic-fonts vlgothic-p-fonts

なお、「vlgothic-p-fonts」は入れなくても表示はされるが、文字がゴツゴツした感じとなる。

・vlgothic-fonts vlgothic-p-fontsの両方をインストールした場合


vlgothic-fonts vlgothic-p-fontsの両方をインストールした場合

・vlgothic-fontsのみインストールした場合


vlgothic-fontsのみインストールした場合

NetBackup GUIはJavaを使って表示している。

フォントに関する指定はJREのlibにfontconfig~.srcというファイルで保存されている。

# ls /usr/openv/java/jre/lib/fontconfig*.src
/usr/openv/java/jre/lib/fontconfig.RedHat.5.properties.src
/usr/openv/java/jre/lib/fontconfig.RedHat.6.properties.src
/usr/openv/java/jre/lib/fontconfig.SuSE.10.properties.src
/usr/openv/java/jre/lib/fontconfig.SuSE.11.properties.src
/usr/openv/java/jre/lib/fontconfig.Turbo.properties.src
/usr/openv/java/jre/lib/fontconfig.properties.src
#

「fontconfig.RedHat.6.properties.src」の中を見てみると、関係しそうな記述として以下を発見

# Font File Names
filename.-misc-kochi_gothic-medium-r-normal--*-%d-*-*-c-*-iso10646-1=/usr/share/fonts/vlgothic/VL-Gothic-Regular.ttf
filename.-misc-kochi_mincho-medium-r-normal--*-%d-*-*-c-*-iso10646-1=/usr/share/fonts/ipa-mincho/ipam.ttf
filename.-misc-zysong18030-medium-r-normal--*-%d-*-*-c-*-iso10646-1=/usr/share/fonts/cjkuni-uming/uming.ttc


# AWT X11 font paths
awtfontpath.chinese-tw-iso10646=/usr/share/fonts/cjkuni-uming
awtfontpath.chinese-cn-iso10646=/usr/share/fonts/cjkuni-uming
awtfontpath.japanese-iso10646=/usr/share/fonts/vlgothic
awtfontpath.korean-iso10646=/usr/share/fonts/un-core

どうやら明朝体は「ipa-mincho-fonts.noarch 」 に含まれる /usr/share/fonts/ipa-mincho/ipam.ttf、ゴシック体は「vlgothic-fonts」 に含まれる /usr/share/fonts/vlgothic/VL-Gothic-Regular.ttf を使っているようだ。


2022/07/10追記

最小インストールのOracle Linux 8でブラウザを動かす場合FirefoxとChromeのどっちが容量少ないか」 で検証した結果を踏まえると、RHEL8の標準状態で使えるフォントは「google-noto-cjk-fonts-common google-noto-sans-cjk-ttc-fonts google-noto-serif-cjk-ttc-fonts」になるんじゃないかと思われる。

もしくはEPELレポジトリを追加して、「vlgothic-fonts vlgothic-p-fonts」

NetBackupクライアントの接続エラーに関して調査

Veritas NetBackupにおいて、NetBackupクライアントとの接続に問題があった場合の調査手法についてメモ書き

1.1 マスタサーバ/メディアサーバ上での名前解決確認

マスタサーバ/メディアサーバ上で、/usr/openv/netbackup/bin/bpclntcmd もしくは C:\Program Files\Veritas\NetBacku\bin\bpclntcmd.cmd を実行して、自身の名前解決状況を確認する。

# bpclntcmd -hn マスタサーバ/メディアサーバ名
# bpclntcmd -hn ドメイン名付きのマスタサーバ/メディアサーバ名
# bpclntcmd -ip IPアドレス

ここで予期しないIPアドレスが出てきてしまうのであれば、ホスト名/IPアドレス/DNS設定を見直すこと。

続いて問題が発生しているクライアントについての名前解決状況を確認する。

# bpclntcmd -hn クライアントホスト名
# bpclntcmd -hn ドメイン名付きのクライアントホスト名
# bpclntcmd -ip クライアントのIPアドレス

クライアントホスト名からIPアドレスが取得できないようであれば、DNS設定を見直し、DNS関連の設定変更ができない場合は hostsファイル(/etc/hosts, C:\Windows\System32\drivers\etc\hosts)にクライアントホスト名のエントリを追加すること。

追加後は、再度bpclntcmdを実行して、状況が変化したことを確認する。

1.2. クライアント上での名前解決確認

クライアント上で、/usr/openv/netbackup/bin/bpclntcmd もしくは C:\Program Files\Veritas\NetBacku\bin\bpclntcmd.cmd を実行して、自身の名前解決状況を確認する。

# bpclntcmd -hn クライアントホスト名
# bpclntcmd -hn ドメイン名付きのクライアントホスト名
# bpclntcmd -ip クライアントのIPアドレス

通常はクライアント自身については正常に情報が取得できるはずです。

続いてマスタサーバ/メディアサーバについての名前解決状況を確認

# bpclntcmd -hn マスタサーバ/メディアサーバ名
# bpclntcmd -hn ドメイン名付きのマスタサーバ/メディアサーバ名
# bpclntcmd -ip IPアドレス

マスタサーバ上で実行した結果と異なる場合は、名前解決情報のキャッシュが残存している可能性があるため、「bpclntcmd -clear_host_cache」を実行してキャッシュ削除した上で、再度、名前解決状況を確認する。

マスタサーバ/メディアサーバ名からIPアドレスが取得できないようであれば、DNS設定を見直し、DNS関連の設定変更ができない場合は hostsファイル(/etc/hosts, C:\Windows\System32\drivers\etc\hosts)にマスタサーバ/メディアサーバ 名のエントリを追加すること。

1.3. クライアント上でマスタサーバが認識している情報の確認

クライアント上で、/usr/openv/netbackup/bin/bpclntcmd もしくは C:\Program Files\Veritas\NetBacku\bin\bpclntcmd.cmd を実行して、NetBackupが認識しているホスト名情報を確認する。

# bpclntcmd -pn -verbose

2.1. 接続テストを実施

マスタサーバ上で、/usr/openv/netbackup/bin/admincmd/bptestbpcd もしくは C:\Program Files\Veritas\NetBacku\bin\admin\bptestbpcd を実行して、 マスターサーバからクライアントへの接続テストを実施します。

# bptestbpcd -client クライアントホスト名 -verbose -debug

(Veritas KB: How to test client connections using the bptestbpcd command)

2.2 接続テスト2

マスタサーバ上で /usr/openv/netbackup/bin/bptestnetconn もしくは C:\Program Files\Veritas\NetBacku\bin\bptestnetconn.exe を実行して、接続を確認

# bptestnetconn -asp -H クライアントホスト名

(Veritas KB: Best Practices for bptestnetconn including arguments and outputs by NetBackup version )
(Veritas KB: Using bptestnetconn to test connectivity between NetBackup hosts )


おまけ: クライアントの情報が取得できるか確認

マスタサーバ上で、/usr/openv/netbackup/bin/admincmd か C:\Program Files\Veritas\NetBacku\bin\admin にある bpgetconfig を実行して、マスタサーバからクライアント上のNetBackup Agentのインストール情報を確認します。

# bpgetconfig -g クライアントホスト名 -L

出力内に、Agentのインストール先やバージョンが表示されれば接続できています。

(Veritas KB: Command line option to get client NetBackup version, OS, and hardware type)


おまけ2: 複数NICがある場合の設定に関する資料

How to follow best practices when using Preferred Network entries
 調査時に使うbplocaladdrsコマンド, bptestnetconnコマンド, bptestbpcdコマンドの出力サンプルあり

Best Practices when assigning an IP address to the appliance management interface
 bp.confにPREFERRED_NETWORK=~というエントリを追加する、という話

Required Interface or Preferred Network settings seem to cause connections between non-routed networks on weakhost platforms
 bp.confにPREFERRED_NETWORKかREQUIRED_INTERFACE設定をする
 (PREFERRED_NETWORKはNBU7.xで追加された設定項目)

How to force backups over multiple specific networks interfaces instead of all those available.


NetBackup 8.xでの証明書関連エラー対応

クライアントインストール時にサーバとの通信がうまくいかなかったけど、無視してインストールを完了した場合、サーバの証明書が、クライアント側に保存されておらず、バックアップを行うとエラーになる。

1: (7660) ピアプロキシは証明書プロトコルの使用可能な証明書を見つけることができません 

2022/10/24 10:28:10 - エラー bpbrm (pid=1956) [PROXY] Connecting host:  NBUサーバ
2022/10/24 10:28:10 - エラー bpbrm (pid=1956) [PROXY] ConnectionId: {149DAA97-CA51-4AC8-8E38-F4F253D9B113}:OUTBOUND
2022/10/24 10:28:10 - エラー bpbrm (pid=1956) [PROXY] pid: 2556
2022/10/24 10:28:10 - エラー bpbrm (pid=1956) [PROXY] Received status: 7660 with message 証明書のマッピングファイルを読み込めません。
2022/10/24 10:28:10 - エラー bpbrm (pid=1956) ホスト ( NBUクライアント) 上のピアプロキシで使用可能な証明書が見つかりませんでした。 証明書が正常に配備されていない可能性があります。
2022/10/24 10:28:10 - エラー bpbrm (pid=1956) [PROXY] 処理中 (CertProtocol) にエラーが発生しました (CERT_PROTOCOL_SELECT_COMMON_CA_ROOT)。
2022/10/24 10:28:10 - エラー bpbrm (pid=1956)  NBUクライアント の bpcd が状態 7660 で終了しました: ピアプロキシは証明書プロトコルの使用可能な証明書を見つけることができません
2022/10/24 10:28:10 - エラー bpbrm (pid=1956) [PROXY] Connecting host:  NBUサーバ
2022/10/24 10:28:10 - エラー bpbrm (pid=1956) [PROXY] ConnectionId: {84C7C072-EC87-4247-AE80-9066320C5EA5}:OUTBOUND
2022/10/24 10:28:10 - エラー bpbrm (pid=1956) [PROXY] pid: 2556
2022/10/24 10:28:10 - エラー bpbrm (pid=1956) [PROXY] Received status: 7660 with message 証明書のマッピングファイルを読み込めません。
2022/10/24 10:28:10 - エラー bpbrm (pid=1956) ホスト ( NBUクライアント) 上のピアプロキシで使用可能な証明書が見つかりませんでした。 証明書が正常に配備されていない可能性があります。
2022/10/24 10:28:10 - エラー bpbrm (pid=1956) [PROXY] 処理中 (CertProtocol) にエラーが発生しました (CERT_PROTOCOL_SELECT_COMMON_CA_ROOT)。
2022/10/24 10:28:10 - エラー bpbrm (pid=1956)  NBUクライアント の BPCD が状態 61 で終了したため、メールを送信できません: VNETD プロキシでエラーが発生しました
2022/10/24 10:28:10 - 情報 bpbkar32 (pid=0) done. status: 7660: ピアプロキシは証明書プロトコルの使用可能な証明書を見つけることができません
2022/10/24 10:28:10 - 推定で 0 KB 必要です
2022/10/24 10:28:10 - 情報 nbjm (pid=4240) started backup (backupid= NBUクライアント_1666574889) job for client  NBUクライアント, policy  NBUクライアント, schedule Full on storage unit diskstorage
2022/10/24 10:28:10 - 開始されたプロセス bpbrm (pid=1956)
2022/10/24 10:28:10 - 書き込みの終了
ピアプロキシは証明書プロトコルの使用可能な証明書を見つけることができません  (7660)

このエラーに関するKB 「How to resolve communication problems due to certificate errors after upgrading to 8.1 from a previously re-installed 8.0 host」「How to manually obtain a host ID Certificate.」「How to re-issue a token on a NetBackup 8.1.x client that has been reinstalled

上記からNetBackupクライアントから証明書取得のコマンドを実行してみる

# /usr/openv/netbackup/bin/nbcertcmd  -getCertificate -host  NBUクライアント -server NBUサーバ
nbcertcmd: The -getCertificate operation failed for server NBUサーバ
EXIT STATUS 8500: Connection with the web service was not established.
#

これはNetBackupサーバ側でポートが正しく空いていないためだった(Status Code:8500 Error when trying to install agent on new server)

今回はWindows Server上だったので、Windows FIrewallに対して、ポート1556とポート13724を開けた。(NetBackup master server portsをみるともポート 13782 もあった方がよさそう)

再実行すると下記となる

# /usr/openv/netbackup/bin/nbcertcmd  -getCertificate -host  NBUクライアント -server NBUサーバ
nbcertcmd: The -getCertificate operation failed for server NBUサーバ.
EXIT STATUS 8508: List of trusted Certificate Authorities could not be fetched.
#

これは証明書管理にホストが登録されていないために発生しています

新規トークンを発行します

ここで表示されるトークン値を使います

# /usr/openv/netbackup/bin/nbcertcmd -getCertificate -token QWRNKOHALAKDPAGF
nbcertcmd: The -getCertificate operation failed for server NBUサーバ.
EXIT STATUS 8508: List of trusted Certificate Authorities could not be fetched.
#

なんだろと調査をいろいろしてみるとnbcertcmd -displayCACertDetailの実行結果で問題が・・・

# /usr/openv/netbackup/bin/nbcertcmd -displayCACertDetail -server NBUサーバ

CA Certificate received successfully from server NBUサーバ.

         Subject Name : /CN=nbatd/OU=root@NBUサーバ/O=vx
           Start Date : 10月 20 04:36:48 2022 GMT
          Expiry Date : 10月 15 05:51:48 2042 GMT
     SHA1 Fingerprint : E4:3C:2E:12:4C:66:DF:62:28:98:C1:D3:EB:5A:E0:44:4F:52:64:62
 CA Certificate State : Not Trusted

# /usr/openv/netbackup/bin/nbcertcmd -displayCACertDetail -server NBUサーバ.adosakana.local
The target server NBUサーバ.adosakana.local could not be authenticated.
The server name does not match any of the host names listed in the server's certificate.
Names listed in the server's certificate are:
DNS:NBUサーバ
Failed to display CA certificate details

nbcertcmd: The -displayCACertDetail operation failed.
EXIT STATUS 8509: The specified server name was not found in the web service certificate
#

NetBackupサーバ上の証明書がドメイン無しで発行されているのにたいして、NetBackupクライアント側からはドメイン有りで接続しようとしているのでエラーとなっていた模様。

NetBackupサーバ側の証明書変更手法が分からないのでNetBackupクライアント側のbp.confのSERVER記述をドメイン無しに書き換えて再実行

# /usr/openv/netbackup/bin/nbcertcmd -getCertificate -token QWRNKOHALAKDPAGF -force
nbcertcmd: The -getCertificate operation failed for server NBUサーバ.
EXIT STATUS 8508: List of trusted Certificate Authorities could not be fetched.
#

これだけではなかった模様

「nbcertcmd -getCACertificate」を実行して取り込みした上で「nbcertcmd -getCertificate -token」で成功

# /usr/openv/netbackup/bin/nbcertcmd -getCACertificate
Authenticity of root certificate cannot be established.
The SHA1 fingerprint of root certificate is E4:3C:2E:12:4C:66:DF:62:28:98:C1:D3:EB:5A:E0:44:4F:52:64:62.
Are you sure you want to continue using this certificate ? (y/n): y
The validation of root certificate fingerprint is successful.
CA certificate stored successfully from server NBUサーバ.
# /usr/openv/netbackup/bin/nbcertcmd -getCertificate -token
QWRNKOHALAKDPAGF -force
Host certificate and certificate revocation list received successfully from server NBUサーバ
#

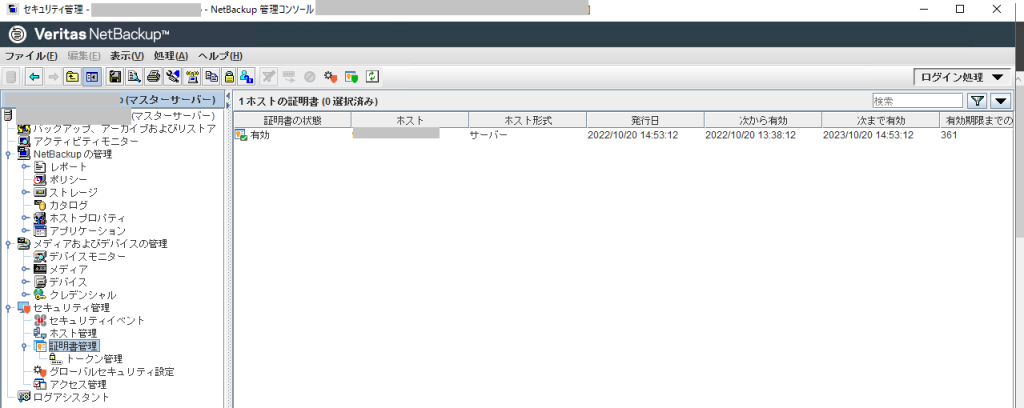
GUI上にも登録できた

Ubuntu18.04で信頼できないレポジトリを使う

DELLのOpenManageをUbuntu 18.04にインストールしようとした。

Dell EMC OpenManage Ubuntu and Debian Repositories」にある手順にしたがって、/etc/apt/sources.list.d/linux.dell.com.sources.listファイルを作って、gpgコマンドでキーを取得・・・としようとしたところ、環境のfirwall設定の問題で pool.sks-keyservers.net にアクセスができず、「W: GPG error ~: The following singnatures couldn’t be verified because the public key is not available: NO_PUBKEY 1285491434D8786F」「E: The repository ~ is not signed」と言われる。

署名が確認できない場合でも動作するようにならないのか確認した。

bionic (5) sources.list.5.gz」より、「deb」と「url」の間に「[ オプション=値 ]」という形で設定すればよいことが分かった。

deb [ allow-insecure=yes trusted=yes ] http://linux.dell.com/repo/community/openmanage/920/bionic bionic main

上記を設定した後「apt-get update –allow-insecure-repositories」で情報を取得する。

そうすると、いままで「E: The repository ~ is not signed 」と言われていたところが「W: The repository ~ is not signed 」に変化する。

これにより「apt install srvadmin-base」などでインストールできるようになる。

DELL PowerEdgeサーバにLinuxを入れる際の追加ソフト

2024/09/24 全面改定
2021/12/20 修正
2021/01/09 修正
2019/01/09 初版

DELL PowerEdgeサーバにLinuxをインストールする際に、DELLが配布しているソフトウェアレポジトリ Dell Linux repository がある。

以前は、Dell System Update (DSU)OpenManage Server Administrator (OMSA) をインストールする、ということになっていたが、2024年になりOMSAは終了(2027年までサポートは続くけど)し、iDRACとOS側にインストールするiDRAC Service Module(iSM)で代替されることとなった。

上記ドキュメント群から触れられていないがLinux OS側からiDRACの操作を行うための「Linux向けDell iDRACツール」というのもリリースされている。(racadmとIPMItools)

このため、手順としては下記となるようだ。

1) レポジトリ登録

2) DSUインストール

3) 各PowerEdgeのサポートページのダウンロードから「Linux用Dell iDRAC Service Module」を入手しインストール

    Linux用Dell iDRAC Service Module は、例えば2024/09/24時点では「Linux用Dell iDRAC Service Module、v5.3.1.0」(OM-iSM-Dell-Web-LX-5310-3503_A00.tar.gz)もしくは「OS DUP用Dell iDRAC Service Moduleインストーラー、v5.3.1.0」(Systems-Management_Application_7152M_LN64_5.3.1.0_A00.BIN)をインストールした後に、「Linux用Dell iDRAC Service Module (iSM)ホットフィックス306929」(SysMgmt_iSM-Hotfix306929_A00.tar.gz)を適用することが最新であるようだ。

    4) 各PowerEdgeのサポートページのダウンロードから「Linux向けDell iDRACツール」を入手しインストール

    例えば2024/09/24時点では「Linux向けDell iDRACツール、v11.2.0.0」(Dell-iDRACTools-Web-LX-11.2.0.0-213_A00.tar.gz) から racadmコマンドと、IPMItoolsをインストールできる。

    5) DELL系RAIDの管理コマンド perccli

    すべてのDell HBA/PERCコントローラー用PERCCLIユーティリティー(Linux向け)」(PERCCLI_7.211.0_Linux.tar.gz) により、PERC RAIDを管理するperccliコマンドをインストールできる。


    以下は2019年/2021年記載のものをアーカイブのために残している


    DELL PowerEdgeサーバにRedHat Enterprise Linux (RHEL)やCentOSをインストールする場合、OSインストール後に、DELL用の管理ソフトウェア OMSAとシステムアップデートツール DSUをインストールする。

    RHEL/CentOS系の手順

    Dell EMC System Update (DSU)」用のYUMレポジトリを登録し、その後、「OpenManage Server Administrator」をインストールする形となるので、以下の様な流れとなる。

    1. レポジトリ登録
    2. DSUインストール
    3. OSMAインストール
    4. DTKをインストール DTKは現状必須ではない模様
    5. dsuを使ってfirmware類をアップデート

    上記を実施するためのコマンド群は以下の様な形となる。

    2021年1月時点での手順 ( 2021/12/20修正 )

    # curl -O https://linux.dell.com/repo/hardware/dsu/bootstrap.cgi
    # bash bootstrap.cgi
    # yum install dell-system-update
    # yum install srvadmin-all
    # dsu --apply-upgrades --non-interactive
    

    syscfgとraidcfgはracadmコマンドに統合された。

    RAIDのvdisk構成を見るのであれば「racadm storage get vdisks -o」などとなる。

    2019年1月時点での旧手順

    # curl -s http://linux.dell.com/repo/hardware/dsu/bootstrap.cgi | bash
    # yum install dell-system-update
    # yum install srvadmin-all
    # yum install syscfg raidcfg
    # dsu --apply-upgrades --non-interactive
    

    上記手順はインターネット接続環境にある場合のもので、接続出来ない環境で行う場合は手順が変わる

    オフラインで行いたい場合は「tarballをダウンロードしてインストール」「rsyncでミラーレポジトリを作る」と「ISOを作る」から選択する。

    tarballは「Dell EMC OpenManage Server Administrator 9.1.0」から入手することができる・・・ただ、2019/01/09時点ではDSUレポジトリからインストールすると9.2.0になるので若干遅れている。

    rsyncの場合は「rsync -avHz linux.dell.com::repo/hardware .」でコピーしてくる。

    ISOをつくる場合は「dsucreateiso」をダウンロードして実行する。事前に「yum install mkisofs」でmkisofsをインストールしておく必要はある。

    また、標準状態だと/tmpにダウンロードしてきたファイル群を置いた上で、そこで展開も行うので十分な容量を確保しておく必要がある。もしくは「–workspace=/ディレクトリ」で作業領域を指定する

    [root@rhelserver7 dsu]# mkdir tmp
    [root@rhelserver7 dsu]# ./dsucreateiso  --workspace=`pwd`/tmp
    Log file:/var/log/dsucreateiso.log
    Downloading: ftp://ftp.dell.com/sysman/DSUPlugins.tar
    Invalid dellbootplugin location: ftp://downloads.dell.com/FOLDER05328537M/1/dellbootplugin.tar.gz
    Downloading: https://downloads.dell.com/FOLDER05328537M/1/dellbootplugin.tar.gz
    Extracting dellbootplugin: dellbootplugin.tar.gz
    Downloading: https://downloads.dell.com/catalog/Catalog.gz
    Extracting catalog: Catalog.gz
    Parsing Catalog File...
    

    Ubuntuの手順

    Ubuntu 20.04の場合もほぼ手順で設定するが、若干の細工が必要となる

    2021/12/20にPower Edge R650にインストールした際のメモつきで記載する。

    1. DELL System Update (DSU)のインストール

    DELL PowerEdgeのfirmware周りをアップデートできるDELL System Update(dsu)はlibssl1.0.0を必要とするのだが、Ubuntu 20.04の標準レポジトリには含まれていない。このため、実行すると下記のエラーが表示される。

    root@ubuntu:~# dsu
    dsu: error while loading shared libraries: libssl.so.1.0.0: cannot open shared object file: No such file or directory
    root@ubuntu:~#
    

    対処方法は「DELL EMC System Update Version 1.9.1.0 User’s Guide」掲載のUbuntu 16.04(xenial)レポジトリから持ってこれるようにする、というもの

    1.1. libssl1.0.0インストール

    /etc/apt/sources.list.d/for-dsu.list というファイルを作成し、下記の内容で記述する。

    deb http://security.ubuntu.com/ubuntu xenial-security main
    

    上記実施後「apt update」でレポジトリ情報を更新したあと、「apt install libssl1.0.0」でインストールする。

    1.2. dsuを入手

    2021/12/20時点では文書000130590「Dell EMC System Update(DSU)」からリンクされている「Dell EMC System Update、v.1.9.2.0」が最新。

    ダウンロードするものは「Red Hat Linux用更新パッケージ」の Systems-Management_Application_5C2CW_LN64_1.9.2.0_A00.BIN

    個別ダウンロードの説明には Ubuntu 20.04 LTSといった記載はないが、下部にある「サポート対象のオペレーションシステム」には含まれている。

    1.3. DSUのインストール

    ダウンロードしたファイルに実行権限を与えてインストールする。

    root@ubuntu:~# chmod a+x /usr/local/src/Systems-Management_Application_5C2CW_LN64_1.9.2.0_A00.BIN
    root@ubuntu:~# /usr/local/src/Systems-Management_Application_5C2CW_LN64_1.9.2.0_A00.BIN
    Collecting inventory...
    .
    Running validation...
    
    DELL System Update
    
    No version of this Update Package is currently installed.
    Software application name: DSU
    Package version: 1.9.2.0
    
    
    Continue? Y/N:y
    Executing update...
    WARNING: DO NOT STOP THIS PROCESS OR INSTALL OTHER PRODUCTS WHILE UPDATE IS IN PROGRESS.
    THESE ACTIONS MAY CAUSE YOUR SYSTEM TO BECOME UNSTABLE!
    .
    DELL EMC System Update installed successfully.
    The update completed successfully.
    root@ubuntu:~#
    

    1.4. DSUによるアップデート

    dsuコマンドはインターネット接続して最新のfirmwareカタログおよびfirmware実体をダウンロードします。

    アップデートは「dsu」で行います。

    「dsu –apply-upgrades –non-interactive」で実行すると対象となるものをすべて適用する形となります。

    今回は確認しながら進めるため「dsu」をオプションなしで実行しました。

    root@ubuntu:~# dsu
    DELL EMC System Update 1.9.2.0
    Copyright (C) 2014 -- 2021 DELL EMC Proprietary.
    Do you want to import public key(s) on the system (Y/N)? : y
    Import Public Key(s)
    Importing key 1019CED6 is successful
    Importing key 23B66A9D is successful
    Importing key 34D8786F is successful
    Importing key 46770C59 is successful
    Downloading the Index catalog
    Extracting /usr/libexec/dell_dup/CatalogIndex.gz
    Reading the Index catalog
    Downloading the catalog
    Extracting /usr/libexec/dell_dup/Catalog.gz
    Reading the catalog ...
    Fetching invcol_8YPK7_LN64_21_12_200_1196_A00 ...
    Verifying inventory collector installation
    Trying to connect using https
    Fetching invcol_8YPK7_LN64_21_12_200_1196_A00.BIN ...
    Getting System Inventory ...
    Determining Applicable Updates ...
    
    |--------DELL EMC System Update-----------|
    [ ] represents 'not selected'
    [*] represents 'selected'
    [-] represents 'Component already at repository version (can be selected only if -e option is used)'
    Choose:  q - Quit without update, c to Commit, <number> - To Select/Deselect, a - Select All, n - Select None
    [-]1 BIOS
    Current Version : 1.3.8 Same as : 1.3.8, Criticality : Recommended, Type : BIOS
    
    [ ]2 SEP Firmware, BayID: 1
    Current Version : 3.56 Upgrade to : 3.57, Criticality : Optional, Type : Firmware
    
    [-]3 Firmware for  - Disk 0 of PERC H755 Front Controller 0
    Current Version : BA08 Same as : BA08, Criticality : Recommended, Type : Firmware
    
    [-]4 Firmware for  - Disk 1 of PERC H755 Front Controller 0
    Current Version : BA08 Same as : BA08, Criticality : Recommended, Type : Firmware
    
    [-]5 Firmware for  - Disk 2 of PERC H755 Front Controller 0
    Current Version : BA08 Same as : BA08, Criticality : Recommended, Type : Firmware
    
    [-]6 Firmware for  - Disk 3 of PERC H755 Front Controller 0
    Current Version : BA08 Same as : BA08, Criticality : Recommended, Type : Firmware
    
    [ ]7 PERC H755 Front Controller 0 Firmware
    Current Version : 52.16.1-4074 Upgrade to : 52.16.1-4158, Criticality : Urgent, Type : Firmware
    
    [-]8 NetXtreme BCM5720 Gigabit Ethernet PCIe (eno8403)
    Current Version : 21.81.3 Same as : 21.81.3, Criticality : Optional, Type : Firmware
    
    [-]9 NetXtreme BCM5720 Gigabit Ethernet PCIe (eno8303)
    Current Version : 21.81.3 Same as : 21.81.3, Criticality : Optional, Type : Firmware
    
    [-]10 Intel(R) Ethernet 10G 2P X710-T2L-t OCP
    Current Version : 20.5.13 Same as : 20.5.13, Criticality : Recommended, Type : Firmware
    
    [-]11 Intel(R) Ethernet Network Adapter X710-TL
    Current Version : 20.5.13 Same as : 20.5.13, Criticality : Recommended, Type : Firmware
    
    [-]12 Intel(R) Ethernet 10G 2P X710-T2L-t Adapter
    Current Version : 20.5.13 Same as : 20.5.13, Criticality : Recommended, Type : Firmware
    
    [ ]13  iDRAC
    Current Version : 5.00.10.10 Upgrade to : 5.00.20.00, Criticality : Recommended, Type : Firmware
    
    [ ]14 NVMePCISSD Model Number: Dell Ent NVMe v2 AGN MU U.2 3.2TB
    Current Version : 2.0.0 Upgrade to : 2.2.0, Criticality : Recommended, Type : Firmware
    
    [-]15 Dell 64 Bit uEFI Diagnostics, version 4301, 4301A61, 4301.62
    Current Version : 4301A61 Same as : 4301A61, Criticality : Optional, Type : Application
    
    [-]16 Dell OS Driver Pack, 21.07.07, A00
    Current Version : 21.07.07 Same as : 21.07.07, Criticality : Optional, Type : Application
    
    [-]17 Dell EMC iDRAC Service Module Embedded Package v4.1.0.0, A00
    Current Version : 4.1.0.0 Same as : 4.1.0.0, Criticality : Recommended, Type : Application
    
    Enter your choice : 
    

    firmwareの現状が表示されて、選択肢入力となります。

    基本的には必要なもの全てに適用するため「a」を入力します。

    Enter your choice : a
    
    |--------DELL EMC System Update-----------|
    [ ] represents 'not selected'
    [*] represents 'selected'
    [-] represents 'Component already at repository version (can be selected only if -e option is used)'
    Choose:  q - Quit without update, c to Commit, <number> - To Select/Deselect, a - Select All, n - Select None
    [-]1 BIOS
    Current Version : 1.3.8 Same as : 1.3.8, Criticality : Recommended, Type : BIOS
    
    [*]2 SEP Firmware, BayID: 1
    Current Version : 3.56 Upgrade to : 3.57, Criticality : Optional, Type : Firmware
    
    [-]3 Firmware for  - Disk 0 of PERC H755 Front Controller 0
    Current Version : BA08 Same as : BA08, Criticality : Recommended, Type : Firmware
    
    [-]4 Firmware for  - Disk 1 of PERC H755 Front Controller 0
    Current Version : BA08 Same as : BA08, Criticality : Recommended, Type : Firmware
    
    [-]5 Firmware for  - Disk 2 of PERC H755 Front Controller 0
    Current Version : BA08 Same as : BA08, Criticality : Recommended, Type : Firmware
    
    [-]6 Firmware for  - Disk 3 of PERC H755 Front Controller 0
    Current Version : BA08 Same as : BA08, Criticality : Recommended, Type : Firmware
    
    [*]7 PERC H755 Front Controller 0 Firmware
    Current Version : 52.16.1-4074 Upgrade to : 52.16.1-4158, Criticality : Urgent, Type : Firmware
    
    [-]8 NetXtreme BCM5720 Gigabit Ethernet PCIe (eno8403)
    Current Version : 21.81.3 Same as : 21.81.3, Criticality : Optional, Type : Firmware
    
    [-]9 NetXtreme BCM5720 Gigabit Ethernet PCIe (eno8303)
    Current Version : 21.81.3 Same as : 21.81.3, Criticality : Optional, Type : Firmware
    
    [-]10 Intel(R) Ethernet 10G 2P X710-T2L-t OCP
    Current Version : 20.5.13 Same as : 20.5.13, Criticality : Recommended, Type : Firmware
    
    [-]11 Intel(R) Ethernet Network Adapter X710-TL
    Current Version : 20.5.13 Same as : 20.5.13, Criticality : Recommended, Type : Firmware
    
    [-]12 Intel(R) Ethernet 10G 2P X710-T2L-t Adapter
    Current Version : 20.5.13 Same as : 20.5.13, Criticality : Recommended, Type : Firmware
    
    [*]13  iDRAC
    Current Version : 5.00.10.10 Upgrade to : 5.00.20.00, Criticality : Recommended, Type : Firmware
    
    [*]14 NVMePCISSD Model Number: Dell Ent NVMe v2 AGN MU U.2 3.2TB
    Current Version : 2.0.0 Upgrade to : 2.2.0, Criticality : Recommended, Type : Firmware
    
    [-]15 Dell 64 Bit uEFI Diagnostics, version 4301, 4301A61, 4301.62
    Current Version : 4301A61 Same as : 4301A61, Criticality : Optional, Type : Application
    
    [-]16 Dell OS Driver Pack, 21.07.07, A00
    Current Version : 21.07.07 Same as : 21.07.07, Criticality : Optional, Type : Application
    
    [-]17 Dell EMC iDRAC Service Module Embedded Package v4.1.0.0, A00
    Current Version : 4.1.0.0 Same as : 4.1.0.0, Criticality : Recommended, Type : Application
    
    Enter your choice : 
    

    そうするとインストールが必要なものについては「[*]」という表示に変わります。

    インストールするものを選択したら「c」と入力し、ダウンロードと適用を開始します。

    Enter your choice : c
    Trying to connect using https
    Fetching iDRAC-with-Lifecycle-Controller_Firmware_19C2M_LN64_5.00.20.00_A00 ...
    Trying to connect using https
    Fetching iDRAC-with-Lifecycle-Controller_Firmware_19C2M_LN64_5.00.20.00_A00.BIN ...
    Trying to connect using https
    Fetching SAS-RAID_Firmware_6MTTK_LN64_52.16.1-4158_A05_01 ...
    Trying to connect using https
    Fetching SAS-RAID_Firmware_6MTTK_LN64_52.16.1-4158_A05_01.BIN ...
    Trying to connect using https
    Fetching Express-Flash-PCIe-SSD_Firmware_FJK0C_LN64_2.2.0_A01 ...
    Trying to connect using https
    Fetching Express-Flash-PCIe-SSD_Firmware_FJK0C_LN64_2.2.0_A01.BIN ...
    Trying to connect using https
    Fetching Firmware_TKKM5_LN64_3.57_A00 ...
    Trying to connect using https
    Fetching Firmware_TKKM5_LN64_3.57_A00.BIN ...
    Installing iDRAC-with-Lifecycle-Controller_Firmware_19C2M_LN64_5.00.20.00_A00
    Installed successfully
    Installing SAS-RAID_Firmware_6MTTK_LN64_52.16.1-4158_A05_01
    Installed successfully
    Installing Express-Flash-PCIe-SSD_Firmware_FJK0C_LN64_2.2.0_A01
    Installed successfully
    Installing Firmware_TKKM5_LN64_3.57_A00
    Installed successfully
    Please restart the system for successful update(s) to take effect
    Done! Please run 'dsu --inventory' to check the inventory
    Exiting DSU!
    root@ubuntu:~#
    

    1.5. 再起動

    firmwareは再起動時に適用されるため、再起動します。

    1.6. 確認

    root@ubuntu:~# dsu --inventory
    DELL EMC System Update 1.9.2.0
    Copyright (C) 2014 -- 2021 DELL EMC Proprietary.
    Downloading the Index catalog
    Extracting /usr/libexec/dell_dup/CatalogIndex.gz
    Reading the Index catalog
    Downloading the catalog
    Extracting /usr/libexec/dell_dup/Catalog.gz
    Reading the catalog ...
    Verifying inventory collector installation
    Trying to connect using https
    Fetching invcol_8YPK7_LN64_21_12_200_1196_A00.BIN ...
    Getting System Inventory ...
    
    1. BIOS, BIOS  ( Version : 1.3.8 )
    
    2. FRMW, Power Supply  ( Version : 00.2A.2A )
    
    3. FRMW, Power Supply  ( Version : 00.2A.2A )
    
    4. FRMW, SEP Firmware, BayID: 1  ( Version : 3.57 )
    
    5. FRMW, Firmware for  - Disk 0 of PERC H755 Front Controller 0    ( Version : BA08 )
    
    6. FRMW, Firmware for  - Disk 1 of PERC H755 Front Controller 0    ( Version : BA08 )
    
    7. FRMW, Firmware for  - Disk 2 of PERC H755 Front Controller 0    ( Version : BA08 )
    
    8. FRMW, Firmware for  - Disk 3 of PERC H755 Front Controller 0    ( Version : BA08 )
    
    9. FRMW, PERC H755 Front Controller 0 Firmware  ( Version : 52.16.1-4074 )
    
    10. FRMW, NetXtreme BCM5720 Gigabit Ethernet PCIe (eno8403)  ( Version : 21.81.3 )
    
    11. FRMW, NetXtreme BCM5720 Gigabit Ethernet PCIe (eno8303)  ( Version : 21.81.3 )
    
    12. FRMW, Intel(R) Ethernet 10G 2P X710-T2L-t OCP  ( Version : 20.5.13 )
    
    13. FRMW, Intel(R) Ethernet Network Adapter X710-TL  ( Version : 20.5.13 )
    
    14. FRMW, Intel(R) Ethernet 10G 2P X710-T2L-t Adapter  ( Version : 20.5.13 )
    
    15. FRMW, Intel(R) Ethernet Network Adapter X710-TL  ( Version : 20.5.13 )
    
    16. FRMW,  iDRAC  ( Version : 5.00.20.00 )
    
    17. FRMW, NVMePCISSD Model Number: Dell Ent NVMe v2 AGN MU U.2 3.2TB  ( Version : 2.2.0 )
    
    18. FRMW, NVMePCISSD Model Number: Dell Ent NVMe v2 AGN MU U.2 3.2TB  ( Version : 2.2.0 )
    
    19. APAC, Lifecycle Controller  ( Version : 5.00.20.00 )
    
    20. APAC, Dell 64 Bit uEFI Diagnostics, version 4301, 4301A61, 4301.62  ( Version : 4301A61 )
    
    21. APAC, Dell OS Driver Pack, 21.07.07, A00  ( Version : 21.07.07 )
    
    22. APAC, Dell EMC iDRAC Service Module Embedded Package v4.1.0.0, A00  ( Version : 4.1.0.0 )
    
    23. FRMW, System CPLD  ( Version : 1.0.5 )
    
    
    Progress report is available at:/usr/libexec/dell_dup/DSU_STATUS.json
    Exiting DSU!
    root@ubuntu:~#
    

    2. ドライバインストール

    上記のDSUで「Dell OS Driver Pack」が導入されているのだが、バージョンが最新ではないことの方が多いようだ。

    このため、別途手動でドライバをダウンロードしてきてインストールする必要がある。

    2.1. ドライバ入手

    入手方法は若干面倒で各機種のドライバダウンロードページ、たとえばPowerEdge R650ならここにアクセス。

    オペレーションシステムを「Ubuntu 20.04 LTS」と限定し、ソート基準を「リリース日: 最も新しい」に変更します。

    表示されるなかから「カテゴリ: OS導入用のドライバ」の「Dell OS Driver Pack」の最新版をダウンロードします。

    2021/12/20時点では Drivers-for-OS-Deployment_Application_CF52W_LN_21.10.02_A00.BIN でした。

    こちらもDSUと同様に「サポートされているOSのリスト」にUbuntu 20.04 LTSが含まれていませんが、問題ありません。

    2.2. ドライバ適用

    ダウンロードしたファイルに実行権限を与えてインストールします。

    root@ubuntu:~# chmod a+x /usr/local/src/Drivers-for-OS-Deployment_Application_CF52W_LN_21.10.02_A00.BIN
    root@ubuntu:~# /usr/local/src/Drivers-for-OS-Deployment_Application_CF52W_LN_21.10.02_A00.BIN
    Collecting inventory...
    ....................................................
    Running validation...
    
    Dell OS Driver Pack, 21.07.07, A00
    
    The version of this Update Package is newer than the currently installed version.
    Software application name: Dell OS Driver Pack, 21.07.07, A00
    Package version: 21.10.02
    Installed version: 21.07.07


    Continue? Y/N:y
    Executing update...
    WARNING: DO NOT STOP THIS PROCESS OR INSTALL OTHER PRODUCTS WHILE UPDATE IS IN PROGRESS.
    THESE ACTIONS MAY CAUSE YOUR SYSTEM TO BECOME UNSTABLE!
    ..............................................................................................................................................................................
     Update Success
    The update completed successfully.
    root@ubuntu:~#
    

    DSUにより「21.07.07」がインストールされていたものが「21.10.02」にアップデートされました。

    3. OSMAインストール

    3.1. OSMAのレポジトリ確認

    Ubuntu用 Dell OpenManage は Dell EMC OpenManage Ubuntu and Debian Repositories にて必要なレポジトリ情報を確認する。

    機種によって変わってくるので、Availability Matrixをよく見ること。

    例えばPowerEdge R640だと OMSA v10.1.0.1 だが、PowerEdge R650では OMSA v10.0.1 + iSM v4.0.1 違いがあることに注意。

    3.2. OMSAレポジトリファイル登録

    /etc/apt/sources.list.d/linux.dell.com.sources.list にレポジトリ記述を書く。

    PowerEdge R640だったら下記

    deb http://linux.dell.com/repo/community/openmanage/10101/focal focal main
    

    PowerEdhe R650なら下記

    deb http://linux.dell.com/repo/community/openmanage/1001/focal focal main
    deb http://linux.dell.com/repo/community/openmanage/iSM/401/focal focal main
    

    3.3. レポジトリの公開鍵登録

    最近はレポジトリの公開鍵を登録しないといけないので、DELL OMSAレポジトリで使用される公開鍵をダウンロードして、aptに登録する。

    root@ubuntu:~# wget https://linux.dell.com/repo/pgp_pubkeys/0x1285491434D8786F.asc
    --2021-12-20 01:20:41--  https://linux.dell.com/repo/pgp_pubkeys/0x1285491434D8786F.asc
    Resolving linux.dell.com (linux.dell.com)... 143.166.156.113
    Connecting to linux.dell.com (linux.dell.com)|143.166.156.113|:443... connected.
    HTTP request sent, awaiting response... 200 OK
    Length: 4250 (4.2K) [text/plain]
    Saving to: ‘0x1285491434D8786F.asc’
    
    0x1285491434D8786F. 100%[===================>]   4.15K  --.-KB/s    in 0s
    
    2021-12-20 01:20:41 (364 MB/s) - ‘0x1285491434D8786F.asc’ saved [4250/4250]
    
    root@ubuntu:~# apt-key add 0x1285491434D8786F.asc
    OK
    root@ubuntu:~#
    

    3.4. レポジトリ更新

    「apt update」でレポジトリ情報を更新する

    3.5. OSMAインストール

    「apt install srvadmin-all」でOMSAをインストール

    3.6 iSMインストール(オプション)

    レポジトリ一覧に「iSM」がある場合、「apt install dcism」でインストールする。

    インストール後iSMを動作させるには再起動するか「systemctl start dcismeng.service」を実行する。

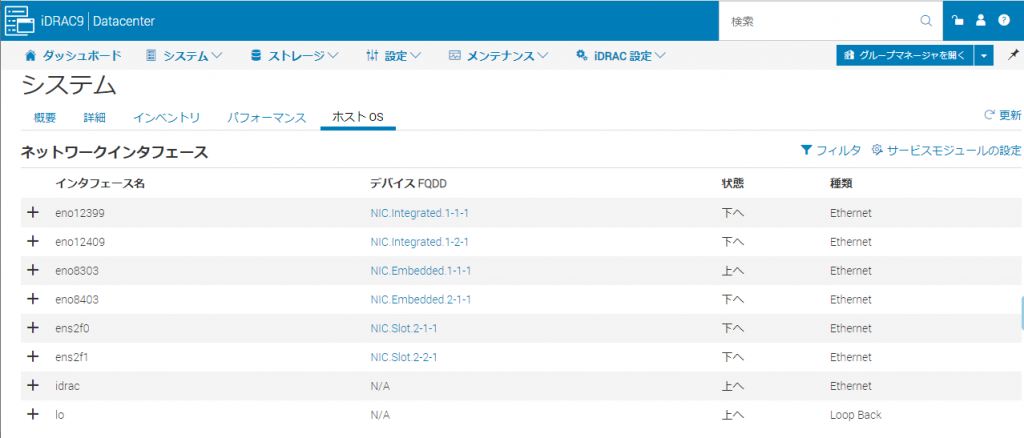
    iSMがインストールされていて、動作している場合、iDRACの[システム]-[ホストOS]で下記の様な表示がある。

    動作していない場合は「RAC0690」というエラーが表示される。なお、手動でdcismeng.serviceを起動した場合、iDRAC側に反映されるまで30秒程度かかる。