Amazonにて4280円で買ったNVMe SSDが2週間経たずに死んだ
ちなみに買ったやつはコレ
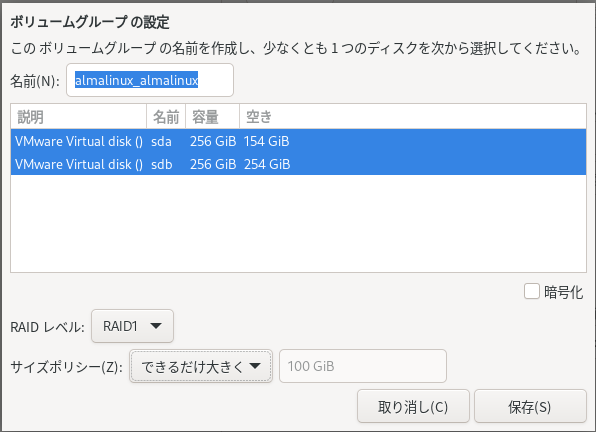
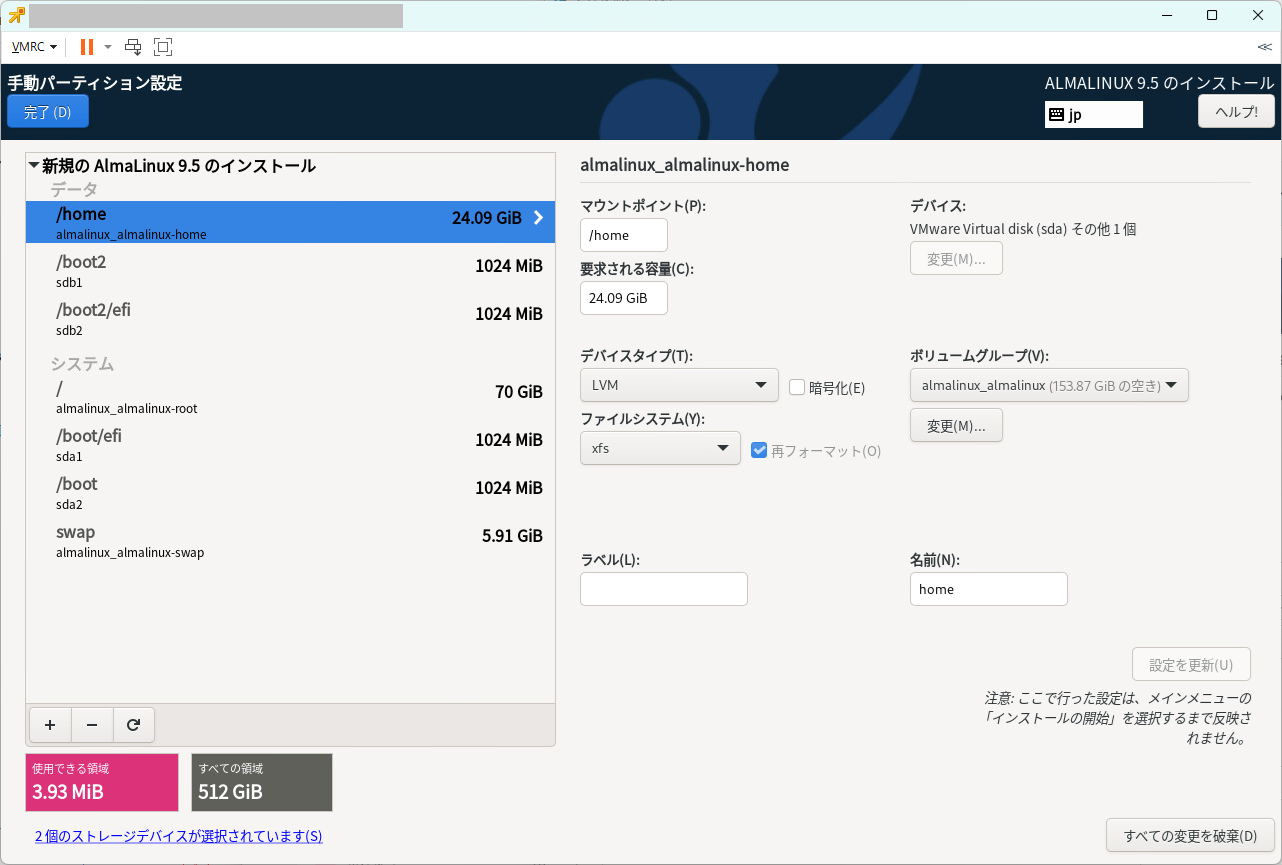
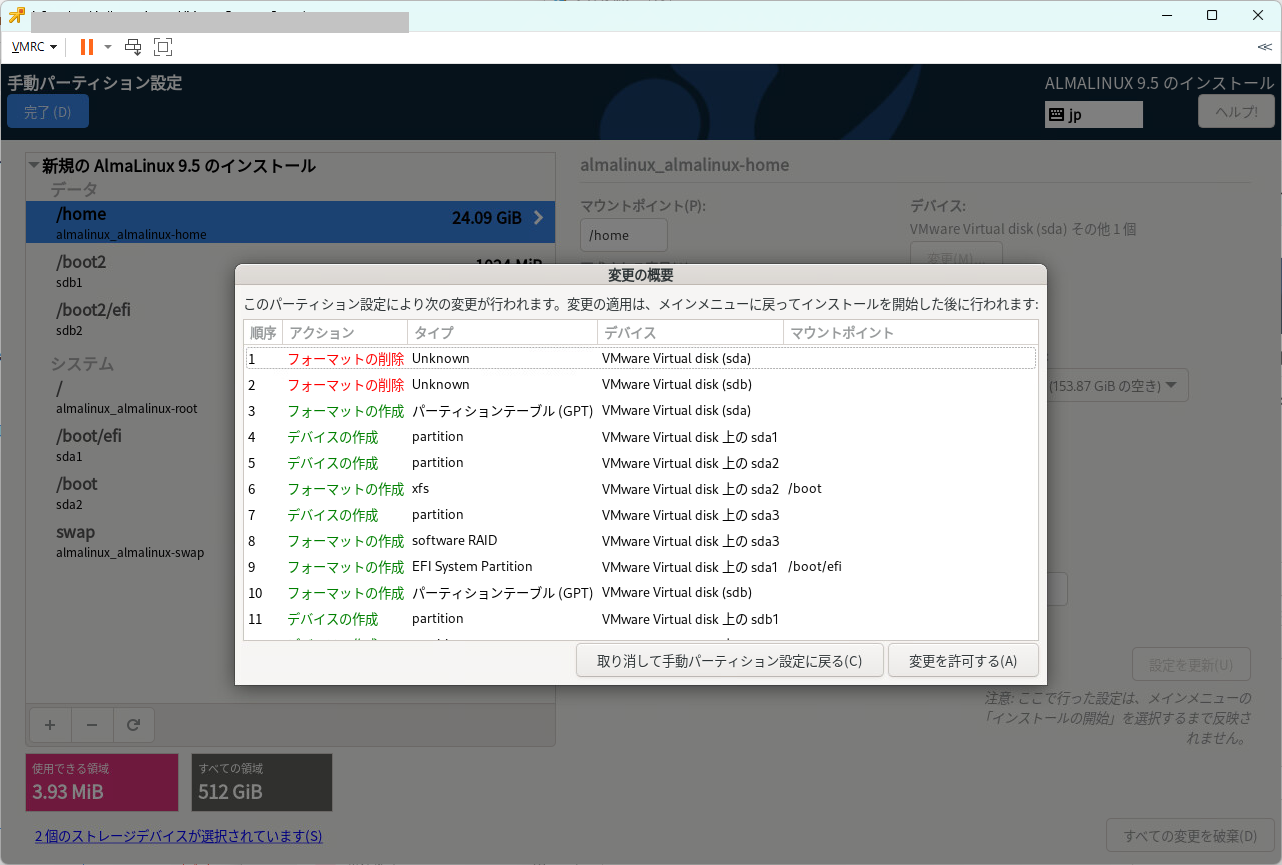
別記事にしているようにミニPCにてNVMe SSDとSATA SSDでミラーするように設定している環境だったので、まだ影響は出ていないが、早すぎでは??
まずは状態確認
cat /proc/mdstat
# cat /proc/mdstat
Personalities : [raid1]
md127 : active raid1 sdc3[1] nvme0n1p3[0](F)
      497876992 blocks super 1.2 [2/1] [_U]
      bitmap: 2/4 pages [8KB], 65536KB chunk

unused devices: <none>
#
mdadmでdatail表示
# mdadm --query /dev/md127
/dev/md127: 474.81GiB raid1 2 devices, 0 spares. Use mdadm --detail for more detail.
# mdadm --detail /dev/md127
/dev/md127:
           Version : 1.2
     Creation Time : Mon Nov 25 22:23:15 2024
        Raid Level : raid1
        Array Size : 497876992 (474.81 GiB 509.83 GB)
     Used Dev Size : 497876992 (474.81 GiB 509.83 GB)
      Raid Devices : 2
     Total Devices : 2
       Persistence : Superblock is persistent

     Intent Bitmap : Internal

       Update Time : Fri Dec  6 11:27:27 2024
             State : clean, degraded
    Active Devices : 1
   Working Devices : 1
    Failed Devices : 1
     Spare Devices : 0

Consistency Policy : bitmap

              Name : niselog.dyndns.ws:pv00  (local to host niselog.dyndns.ws)
              UUID : 44d77e34:c9af4167:1c6031a7:b047cdb0
            Events : 56525

    Number   Major   Minor   RaidDevice State
       -       0        0        0      removed
       1       8       35        1      active sync   /dev/sdc3

       0     259        3        -      faulty   /dev/nvme0n1p3
#
mdを構成する各デバイスの状態をmdadm –examineで取得
# mdadm --examine /dev/sdc3
/dev/sdc3:
          Magic : a92b4efc
        Version : 1.2
    Feature Map : 0x1
     Array UUID : 44d77e34:c9af4167:1c6031a7:b047cdb0
           Name : niselog.dyndns.ws:pv00  (local to host niselog.dyndns.ws)
  Creation Time : Mon Nov 25 22:23:15 2024
     Raid Level : raid1
   Raid Devices : 2

 Avail Dev Size : 995753984 sectors (474.81 GiB 509.83 GB)
     Array Size : 497876992 KiB (474.81 GiB 509.83 GB)
    Data Offset : 264192 sectors
   Super Offset : 8 sectors
   Unused Space : before=264112 sectors, after=0 sectors
          State : clean
    Device UUID : 622cd160:74e95f66:6266ee0d:85ba3287

Internal Bitmap : 8 sectors from superblock
    Update Time : Fri Dec  6 11:29:02 2024
  Bad Block Log : 512 entries available at offset 16 sectors
       Checksum : 247ea644 - correct
         Events : 56583


   Device Role : Active device 1
   Array State : .A ('A' == active, '.' == missing, 'R' == replacing)
# mdadm --examine /dev/nvme0n1p3
mdadm: No md superblock detected on /dev/nvme0n1p3.
#
NVMe側のデバイスが見えていない
関連するdmesg
[251879.751800] systemd-rc-local-generator[882428]: /etc/rc.d/rc.local is not marked executable, skipping.
[345055.452619] nvme nvme0: I/O tag 322 (0142) opcode 0x0 (Flush) QID 4 timeout, aborting req_op:FLUSH(2) size:0
[345057.437597] nvme nvme0: I/O tag 210 (a0d2) opcode 0x2 (Read) QID 2 timeout, aborting req_op:READ(0) size:32768
[345057.437643] nvme nvme0: I/O tag 706 (c2c2) opcode 0x2 (Read) QID 3 timeout, aborting req_op:READ(0) size:32768
[345085.664306] nvme nvme0: I/O tag 322 (0142) opcode 0x0 (Flush) QID 4 timeout, reset controller
[345167.062438] INFO: task md127_raid1:603 blocked for more than 122 seconds.
[345167.062449]       Tainted: G               X  -------  ---  5.14.0-503.14.1.el9_5.x86_64 #1
[345167.062452] "echo 0 > /proc/sys/kernel/hung_task_timeout_secs" disables this message.
[345167.062454] task:md127_raid1     state:D stack:0     pid:603   tgid:603   ppid:2      flags:0x00004000
[345167.062460] Call Trace:
[345167.062462]  <TASK>
[345167.062466]  __schedule+0x229/0x550
[345167.062473]  ? __schedule+0x231/0x550
[345167.062477]  schedule+0x2e/0xd0
[345167.062480]  md_super_wait+0x72/0xa0
[345167.062484]  ? __pfx_autoremove_wake_function+0x10/0x10
[345167.062489]  write_sb_page+0x8a/0x110
[345167.062492]  md_update_sb.part.0+0x2eb/0x800
[345167.062494]  md_check_recovery+0x232/0x390
[345167.062500]  raid1d+0x40/0x580 [raid1]
[345167.062508]  ? __timer_delete_sync+0x2c/0x40
[345167.062511]  ? schedule_timeout+0x92/0x160
[345167.062514]  ? prepare_to_wait_event+0x5d/0x180
[345167.062517]  md_thread+0xa8/0x160
[345167.062520]  ? __pfx_autoremove_wake_function+0x10/0x10
[345167.062523]  ? __pfx_md_thread+0x10/0x10
[345167.062525]  kthread+0xdd/0x100
[345167.062529]  ? __pfx_kthread+0x10/0x10
[345167.062532]  ret_from_fork+0x29/0x50
[345167.062536]  </TASK>
[345167.062539] INFO: task xfsaild/dm-0:715 blocked for more than 122 seconds.
[345167.062542]       Tainted: G               X  -------  ---  5.14.0-503.14.1.el9_5.x86_64 #1
[345167.062544] "echo 0 > /proc/sys/kernel/hung_task_timeout_secs" disables this message.
[345167.062546] task:xfsaild/dm-0    state:D stack:0     pid:715   tgid:715   ppid:2      flags:0x00004000
[345167.062550] Call Trace:
[345167.062552]  <TASK>
[345167.062553]  __schedule+0x229/0x550
[345167.062556]  ? bio_associate_blkg_from_css+0xf5/0x320
[345167.062561]  schedule+0x2e/0xd0
[345167.062564]  md_write_start.part.0+0x195/0x250
[345167.062566]  ? __pfx_autoremove_wake_function+0x10/0x10
[345167.062570]  raid1_make_request+0x5b/0xbb [raid1]
[345167.062575]  md_handle_request+0x150/0x270
[345167.062578]  ? __bio_split_to_limits+0x8e/0x280
[345167.062582]  __submit_bio+0x94/0x130
[345167.062584]  __submit_bio_noacct+0x7e/0x1e0
[345167.062587]  xfs_buf_ioapply_map+0x1cb/0x270 [xfs]
[345167.062725]  _xfs_buf_ioapply+0xcf/0x1b0 [xfs]
[345167.062821]  ? __pfx_default_wake_function+0x10/0x10
[345167.062824]  __xfs_buf_submit+0x6e/0x1e0 [xfs]
[345167.062916]  xfs_buf_delwri_submit_buffers+0xe3/0x230 [xfs]
[345167.063005]  xfsaild_push+0x1aa/0x740 [xfs]
[345167.063122]  xfsaild+0xb2/0x150 [xfs]
[345167.063230]  ? __pfx_xfsaild+0x10/0x10 [xfs]
[345167.063333]  kthread+0xdd/0x100
[345167.063336]  ? __pfx_kthread+0x10/0x10
[345167.063339]  ret_from_fork+0x29/0x50
[345167.063342]  </TASK>
[345167.063353] INFO: task xfsaild/dm-12:1051 blocked for more than 122 seconds.
[345167.063356]       Tainted: G               X  -------  ---  5.14.0-503.14.1.el9_5.x86_64 #1
[345167.063358] "echo 0 > /proc/sys/kernel/hung_task_timeout_secs" disables this message.
[345167.063360] task:xfsaild/dm-12   state:D stack:0     pid:1051  tgid:1051  ppid:2      flags:0x00004000
[345167.063364] Call Trace:
[345167.063365]  <TASK>
[345167.063366]  __schedule+0x229/0x550
[345167.063369]  ? bio_associate_blkg_from_css+0xf5/0x320
[345167.063373]  schedule+0x2e/0xd0
[345167.063376]  md_write_start.part.0+0x195/0x250
[345167.063378]  ? __pfx_autoremove_wake_function+0x10/0x10
[345167.063382]  raid1_make_request+0x5b/0xbb [raid1]
[345167.063387]  md_handle_request+0x150/0x270
[345167.063390]  ? __bio_split_to_limits+0x8e/0x280
[345167.063393]  __submit_bio+0x94/0x130
[345167.063395]  __submit_bio_noacct+0x7e/0x1e0
[345167.063397]  xfs_buf_ioapply_map+0x1cb/0x270 [xfs]
[345167.063503]  _xfs_buf_ioapply+0xcf/0x1b0 [xfs]
[345167.063598]  ? __pfx_default_wake_function+0x10/0x10
[345167.063602]  __xfs_buf_submit+0x6e/0x1e0 [xfs]
[345167.063693]  xfs_buf_delwri_submit_buffers+0xe3/0x230 [xfs]
[345167.063783]  xfsaild_push+0x1aa/0x740 [xfs]
[345167.063893]  xfsaild+0xb2/0x150 [xfs]
[345167.063996]  ? __pfx_xfsaild+0x10/0x10 [xfs]
[345167.064096]  kthread+0xdd/0x100
[345167.064099]  ? __pfx_kthread+0x10/0x10
[345167.064102]  ret_from_fork+0x29/0x50
[345167.064105]  </TASK>
[345167.064149] INFO: task UV_WORKER[13]:882664 blocked for more than 122 seconds.
[345167.064152]       Tainted: G               X  -------  ---  5.14.0-503.14.1.el9_5.x86_64 #1
[345167.064154] "echo 0 > /proc/sys/kernel/hung_task_timeout_secs" disables this message.
[345167.064156] task:UV_WORKER[13]   state:D stack:0     pid:882664 tgid:882471 ppid:1      flags:0x00000002
[345167.064160] Call Trace:
[345167.064161]  <TASK>
[345167.064163]  __schedule+0x229/0x550
[345167.064166]  ? bio_associate_blkg_from_css+0xf5/0x320
[345167.064170]  schedule+0x2e/0xd0
[345167.064172]  md_write_start.part.0+0x195/0x250
[345167.064175]  ? __pfx_autoremove_wake_function+0x10/0x10
[345167.064178]  raid1_make_request+0x5b/0xbb [raid1]
[345167.064184]  md_handle_request+0x150/0x270
[345167.064187]  ? __bio_split_to_limits+0x8e/0x280
[345167.064190]  __submit_bio+0x94/0x130
[345167.064192]  __submit_bio_noacct+0x7e/0x1e0
[345167.064194]  iomap_submit_ioend+0x4e/0x80
[345167.064199]  xfs_vm_writepages+0x7a/0xb0 [xfs]
[345167.064305]  do_writepages+0xcc/0x1a0
[345167.064308]  filemap_fdatawrite_wbc+0x66/0x90
[345167.064312]  __filemap_fdatawrite_range+0x54/0x80
[345167.064317]  file_write_and_wait_range+0x48/0xb0
[345167.064319]  xfs_file_fsync+0x5a/0x240 [xfs]
[345167.064425]  __x64_sys_fsync+0x33/0x60
[345167.064430]  do_syscall_64+0x5c/0xf0
[345167.064433]  ? fcntl_setlk+0x1cb/0x3b0
[345167.064437]  ? do_fcntl+0x458/0x670
[345167.064440]  ? syscall_exit_work+0x103/0x130
[345167.064443]  ? syscall_exit_to_user_mode+0x19/0x40
[345167.064446]  ? do_syscall_64+0x6b/0xf0
[345167.064448]  ? __count_memcg_events+0x4f/0xb0
[345167.064451]  ? mm_account_fault+0x6c/0x100
[345167.064455]  ? handle_mm_fault+0x116/0x270
[345167.064458]  ? do_user_addr_fault+0x1b4/0x6a0
[345167.064461]  ? exc_page_fault+0x62/0x150
[345167.064465]  entry_SYSCALL_64_after_hwframe+0x78/0x80
[345167.064468] RIP: 0033:0x7f36adb0459b
[345167.064496] RSP: 002b:00007f36a0ce4c20 EFLAGS: 00000293 ORIG_RAX: 000000000000004a
[345167.064500] RAX: ffffffffffffffda RBX: 0000563b7f63af38 RCX: 00007f36adb0459b
[345167.064502] RDX: 0000000000000002 RSI: 0000000000000002 RDI: 000000000000000d
[345167.064504] RBP: 0000000000000008 R08: 0000000000000000 R09: 0000000000000000
[345167.064506] R10: 0000000000000000 R11: 0000000000000293 R12: 0000563b7f63aea8
[345167.064508] R13: 0000563b82320850 R14: 0000000000000000 R15: 00007f36a0ce4ce0
[345167.064512]  </TASK>
[345167.064562] INFO: task kworker/u16:2:1205595 blocked for more than 122 seconds.
[345167.064565]       Tainted: G               X  -------  ---  5.14.0-503.14.1.el9_5.x86_64 #1
[345167.064567] "echo 0 > /proc/sys/kernel/hung_task_timeout_secs" disables this message.
[345167.064569] task:kworker/u16:2   state:D stack:0     pid:1205595 tgid:1205595 ppid:2      flags:0x00004000
[345167.064574] Workqueue: writeback wb_workfn (flush-253:6)
[345167.064578] Call Trace:
[345167.064579]  <TASK>
[345167.064581]  __schedule+0x229/0x550
[345167.064584]  ? bio_associate_blkg_from_css+0xf5/0x320
[345167.064587]  schedule+0x2e/0xd0
[345167.064590]  md_write_start.part.0+0x195/0x250
[345167.064593]  ? __pfx_autoremove_wake_function+0x10/0x10
[345167.064596]  raid1_make_request+0x5b/0xbb [raid1]
[345167.064602]  md_handle_request+0x150/0x270
[345167.064605]  ? __bio_split_to_limits+0x8e/0x280
[345167.064608]  __submit_bio+0x94/0x130
[345167.064610]  __submit_bio_noacct+0x7e/0x1e0
[345167.064612]  iomap_submit_ioend+0x4e/0x80
[345167.064616]  iomap_writepage_map+0x30a/0x4c0
[345167.064618]  write_cache_pages+0x13c/0x3a0
[345167.064620]  ? __pfx_iomap_do_writepage+0x10/0x10
[345167.064623]  ? scsi_dispatch_cmd+0x8d/0x240
[345167.064626]  ? scsi_queue_rq+0x1ad/0x610
[345167.064631]  ? update_sg_lb_stats+0xb6/0x460
[345167.064635]  iomap_writepages+0x1c/0x40
[345167.064638]  xfs_vm_writepages+0x7a/0xb0 [xfs]
[345167.064739]  do_writepages+0xcc/0x1a0
[345167.064742]  ? __percpu_counter_sum_mask+0x6f/0x80
[345167.064747]  __writeback_single_inode+0x41/0x270
[345167.064750]  writeback_sb_inodes+0x209/0x4a0
[345167.064753]  __writeback_inodes_wb+0x4c/0xe0
[345167.064755]  wb_writeback+0x1d7/0x2d0
[345167.064758]  wb_do_writeback+0x1d1/0x2b0
[345167.064760]  wb_workfn+0x5e/0x290
[345167.064763]  ? try_to_wake_up+0x1ca/0x530
[345167.064766]  process_one_work+0x194/0x380
[345167.064769]  worker_thread+0x2fe/0x410
[345167.064772]  ? __pfx_worker_thread+0x10/0x10
[345167.064775]  kthread+0xdd/0x100
[345167.064778]  ? __pfx_kthread+0x10/0x10
[345167.064781]  ret_from_fork+0x29/0x50
[345167.064784]  </TASK>
[345167.064786] INFO: task kworker/u16:0:1209123 blocked for more than 122 seconds.
[345167.064788]       Tainted: G               X  -------  ---  5.14.0-503.14.1.el9_5.x86_64 #1
[345167.064790] "echo 0 > /proc/sys/kernel/hung_task_timeout_secs" disables this message.
[345167.064792] task:kworker/u16:0   state:D stack:0     pid:1209123 tgid:1209123 ppid:2      flags:0x00004000
[345167.064796] Workqueue: writeback wb_workfn (flush-253:6)
[345167.064799] Call Trace:
[345167.064801]  <TASK>
[345167.064802]  __schedule+0x229/0x550
[345167.064805]  ? bio_associate_blkg_from_css+0xf5/0x320
[345167.064808]  schedule+0x2e/0xd0
[345167.064811]  md_write_start.part.0+0x195/0x250
[345167.064813]  ? __pfx_autoremove_wake_function+0x10/0x10
[345167.064817]  raid1_make_request+0x5b/0xbb [raid1]
[345167.064822]  md_handle_request+0x150/0x270
[345167.064825]  ? __bio_split_to_limits+0x8e/0x280
[345167.064828]  __submit_bio+0x94/0x130
[345167.064830]  __submit_bio_noacct+0x7e/0x1e0
[345167.064832]  iomap_submit_ioend+0x4e/0x80
[345167.064835]  iomap_writepage_map+0x30a/0x4c0
[345167.064838]  write_cache_pages+0x13c/0x3a0
[345167.064840]  ? __pfx_iomap_do_writepage+0x10/0x10
[345167.064843]  ? scsi_dispatch_cmd+0x8d/0x240
[345167.064845]  ? scsi_queue_rq+0x1ad/0x610
[345167.064848]  ? update_sg_lb_stats+0xb6/0x460
[345167.064851]  iomap_writepages+0x1c/0x40
[345167.064854]  xfs_vm_writepages+0x7a/0xb0 [xfs]
[345167.064949]  do_writepages+0xcc/0x1a0
[345167.064952]  ? __percpu_counter_sum_mask+0x6f/0x80
[345167.064955]  __writeback_single_inode+0x41/0x270
[345167.064958]  writeback_sb_inodes+0x209/0x4a0
[345167.064961]  __writeback_inodes_wb+0x4c/0xe0
[345167.064963]  wb_writeback+0x1d7/0x2d0
[345167.064965]  wb_do_writeback+0x1d1/0x2b0
[345167.064968]  wb_workfn+0x5e/0x290
[345167.064970]  ? __switch_to_asm+0x3a/0x80
[345167.064972]  ? finish_task_switch.isra.0+0x8c/0x2a0
[345167.064976]  ? __schedule+0x231/0x550
[345167.064979]  process_one_work+0x194/0x380
[345167.064982]  worker_thread+0x2fe/0x410
[345167.064985]  ? __pfx_worker_thread+0x10/0x10
[345167.064987]  kthread+0xdd/0x100
[345167.064990]  ? __pfx_kthread+0x10/0x10
[345167.064994]  ret_from_fork+0x29/0x50
[345167.064996]  </TASK>
[345167.064999] INFO: task kworker/u16:4:1216782 blocked for more than 122 seconds.
[345167.065001]       Tainted: G               X  -------  ---  5.14.0-503.14.1.el9_5.x86_64 #1
[345167.065004] "echo 0 > /proc/sys/kernel/hung_task_timeout_secs" disables this message.
[345167.065005] task:kworker/u16:4   state:D stack:0     pid:1216782 tgid:1216782 ppid:2      flags:0x00004000
[345167.065009] Workqueue: writeback wb_workfn (flush-253:6)
[345167.065012] Call Trace:
[345167.065014]  <TASK>
[345167.065015]  __schedule+0x229/0x550
[345167.065018]  ? bio_associate_blkg_from_css+0xf5/0x320
[345167.065021]  schedule+0x2e/0xd0
[345167.065024]  md_write_start.part.0+0x195/0x250
[345167.065026]  ? __pfx_autoremove_wake_function+0x10/0x10
[345167.065030]  raid1_make_request+0x5b/0xbb [raid1]
[345167.065035]  md_handle_request+0x150/0x270
[345167.065038]  ? __bio_split_to_limits+0x8e/0x280
[345167.065041]  __submit_bio+0x94/0x130
[345167.065043]  __submit_bio_noacct+0x7e/0x1e0
[345167.065045]  iomap_submit_ioend+0x4e/0x80
[345167.065048]  xfs_vm_writepages+0x7a/0xb0 [xfs]
[345167.065140]  do_writepages+0xcc/0x1a0
[345167.065143]  ? __wb_calc_thresh+0x3a/0x120
[345167.065145]  __writeback_single_inode+0x41/0x270
[345167.065147]  writeback_sb_inodes+0x209/0x4a0
[345167.065150]  __writeback_inodes_wb+0x4c/0xe0
[345167.065153]  wb_writeback+0x1d7/0x2d0
[345167.065155]  wb_do_writeback+0x22a/0x2b0
[345167.065157]  wb_workfn+0x5e/0x290
[345167.065160]  ? try_to_wake_up+0x1ca/0x530
[345167.065163]  process_one_work+0x194/0x380
[345167.065166]  worker_thread+0x2fe/0x410
[345167.065168]  ? __pfx_worker_thread+0x10/0x10
[345167.065171]  kthread+0xdd/0x100
[345167.065174]  ? __pfx_kthread+0x10/0x10
[345167.065177]  ret_from_fork+0x29/0x50
[345167.065180]  </TASK>
[345167.065181] INFO: task kworker/1:0:1217700 blocked for more than 122 seconds.
[345167.065184]       Tainted: G               X  -------  ---  5.14.0-503.14.1.el9_5.x86_64 #1
[345167.065186] "echo 0 > /proc/sys/kernel/hung_task_timeout_secs" disables this message.
[345167.065188] task:kworker/1:0     state:D stack:0     pid:1217700 tgid:1217700 ppid:2      flags:0x00004000
[345167.065192] Workqueue: xfs-sync/dm-4 xfs_log_worker [xfs]
[345167.065302] Call Trace:
[345167.065304]  <TASK>
[345167.065305]  __schedule+0x229/0x550
[345167.065309]  ? __send_empty_flush+0xea/0x120 [dm_mod]
[345167.065324]  schedule+0x2e/0xd0
[345167.065327]  md_flush_request+0x9b/0x1e0
[345167.065331]  ? __pfx_autoremove_wake_function+0x10/0x10
[345167.065335]  raid1_make_request+0xa8/0xbb [raid1]
[345167.065340]  md_handle_request+0x150/0x270
[345167.065343]  ? __bio_split_to_limits+0x8e/0x280
[345167.065346]  __submit_bio+0x94/0x130
[345167.065348]  __submit_bio_noacct+0x7e/0x1e0
[345167.065350]  xlog_state_release_iclog+0xe6/0x1c0 [xfs]
[345167.065464]  xfs_log_force+0x172/0x230 [xfs]
[345167.065566]  xfs_log_worker+0x3b/0xd0 [xfs]
[345167.065664]  process_one_work+0x194/0x380
[345167.065667]  worker_thread+0x2fe/0x410
[345167.065669]  ? __pfx_worker_thread+0x10/0x10
[345167.065672]  kthread+0xdd/0x100
[345167.065675]  ? __pfx_kthread+0x10/0x10
[345167.065678]  ret_from_fork+0x29/0x50
[345167.065681]  </TASK>
[345167.065683] INFO: task kworker/0:2:1219498 blocked for more than 122 seconds.
[345167.065685]       Tainted: G               X  -------  ---  5.14.0-503.14.1.el9_5.x86_64 #1
[345167.065687] "echo 0 > /proc/sys/kernel/hung_task_timeout_secs" disables this message.
[345167.065689] task:kworker/0:2     state:D stack:0     pid:1219498 tgid:1219498 ppid:2      flags:0x00004000
[345167.065693] Workqueue: xfs-sync/dm-6 xfs_log_worker [xfs]
[345167.065790] Call Trace:
[345167.065791]  <TASK>
[345167.065793]  __schedule+0x229/0x550
[345167.065796]  ? __send_empty_flush+0xea/0x120 [dm_mod]
[345167.065810]  schedule+0x2e/0xd0
[345167.065812]  md_flush_request+0x9b/0x1e0
[345167.065816]  ? __pfx_autoremove_wake_function+0x10/0x10
[345167.065819]  raid1_make_request+0xa8/0xbb [raid1]
[345167.065825]  md_handle_request+0x150/0x270
[345167.065827]  ? __bio_split_to_limits+0x8e/0x280
[345167.065830]  __submit_bio+0x94/0x130
[345167.065832]  __submit_bio_noacct+0x7e/0x1e0
[345167.065835]  xlog_state_release_iclog+0xe6/0x1c0 [xfs]
[345167.065931]  xfs_log_force+0x172/0x230 [xfs]
[345167.066027]  xfs_log_worker+0x3b/0xd0 [xfs]
[345167.066122]  process_one_work+0x194/0x380
[345167.066125]  worker_thread+0x2fe/0x410
[345167.066128]  ? __pfx_worker_thread+0x10/0x10
[345167.066131]  kthread+0xdd/0x100
[345167.066134]  ? __pfx_kthread+0x10/0x10
[345167.066137]  ret_from_fork+0x29/0x50
[345167.066140]  </TASK>
[345167.066141] INFO: task kworker/u16:1:1220633 blocked for more than 122 seconds.
[345167.066144]       Tainted: G               X  -------  ---  5.14.0-503.14.1.el9_5.x86_64 #1
[345167.066146] "echo 0 > /proc/sys/kernel/hung_task_timeout_secs" disables this message.
[345167.066148] task:kworker/u16:1   state:D stack:0     pid:1220633 tgid:1220633 ppid:2      flags:0x00004000
[345167.066152] Workqueue: writeback wb_workfn (flush-253:6)
[345167.066155] Call Trace:
[345167.066157]  <TASK>
[345167.066158]  __schedule+0x229/0x550
[345167.066162]  schedule+0x2e/0xd0
[345167.066165]  md_write_start.part.0+0x195/0x250
[345167.066167]  ? __pfx_autoremove_wake_function+0x10/0x10
[345167.066171]  raid1_make_request+0x5b/0xbb [raid1]
[345167.066177]  md_handle_request+0x150/0x270
[345167.066179]  ? __bio_split_to_limits+0x8e/0x280
[345167.066182]  __submit_bio+0x94/0x130
[345167.066185]  __submit_bio_noacct+0x7e/0x1e0
[345167.066187]  iomap_submit_ioend+0x4e/0x80
[345167.066191]  xfs_vm_writepages+0x7a/0xb0 [xfs]
[345167.066299]  do_writepages+0xcc/0x1a0
[345167.066301]  ? find_busiest_group+0x43/0x240
[345167.066304]  __writeback_single_inode+0x41/0x270
[345167.066306]  writeback_sb_inodes+0x209/0x4a0
[345167.066309]  __writeback_inodes_wb+0x4c/0xe0
[345167.066312]  wb_writeback+0x1d7/0x2d0
[345167.066314]  wb_do_writeback+0x1d1/0x2b0
[345167.066317]  wb_workfn+0x5e/0x290
[345167.066319]  ? try_to_wake_up+0x1ca/0x530
[345167.066322]  process_one_work+0x194/0x380
[345167.066325]  worker_thread+0x2fe/0x410
[345167.066328]  ? __pfx_worker_thread+0x10/0x10
[345167.066330]  kthread+0xdd/0x100
[345167.066333]  ? __pfx_kthread+0x10/0x10
[345167.066336]  ret_from_fork+0x29/0x50
[345167.066339]  </TASK>
[345274.582484] nvme nvme0: Device not ready; aborting reset, CSTS=0x1
[345274.588547] nvme nvme0: Abort status: 0x371
[345274.588554] nvme nvme0: Abort status: 0x371
[345274.588556] nvme nvme0: Abort status: 0x371
[345402.595930] nvme nvme0: Device not ready; aborting reset, CSTS=0x1
[345402.596168] nvme nvme0: Disabling device after reset failure: -19
[345402.603001] I/O error, dev nvme0n1, sector 31757592 op 0x0:(READ) flags 0x0 phys_seg 1 prio class 2
[345402.603001] I/O error, dev nvme0n1, sector 31745656 op 0x0:(READ) flags 0x0 phys_seg 1 prio class 2
[345402.603005] I/O error, dev nvme0n1, sector 4196368 op 0x1:(WRITE) flags 0x29800 phys_seg 1 prio class 2
[345402.603011] md: super_written gets error=-5
[345402.603011] md/raid1:md127: nvme0n1p3: rescheduling sector 27297048
[345402.603017] I/O error, dev nvme0n1, sector 0 op 0x1:(WRITE) flags 0x800 phys_seg 0 prio class 2
[345402.603018] md/raid1:md127: nvme0n1p3: rescheduling sector 27285112
[345402.603021] md/raid1:md127: Disk failure on nvme0n1p3, disabling device.
                md/raid1:md127: Operation continuing on 1 devices.
[345402.603021] I/O error, dev nvme0n1, sector 31835944 op 0x0:(READ) flags 0x0 phys_seg 1 prio class 2
[345402.603024] md/raid1:md127: nvme0n1p3: rescheduling sector 27375400
[345402.603025] I/O error, dev nvme0n1, sector 31772336 op 0x0:(READ) flags 0x0 phys_seg 1 prio class 2
[345402.603027] md/raid1:md127: nvme0n1p3: rescheduling sector 27311792
[345402.603037] I/O error, dev nvme0n1, sector 31790576 op 0x0:(READ) flags 0x0 phys_seg 1 prio class 2
[345402.603040] md/raid1:md127: nvme0n1p3: rescheduling sector 27330032
[345402.603066] I/O error, dev nvme0n1, sector 31750480 op 0x0:(READ) flags 0x0 phys_seg 1 prio class 2
[345402.603071] md/raid1:md127: nvme0n1p3: rescheduling sector 27289936
[345402.603073] I/O error, dev nvme0n1, sector 31831344 op 0x0:(READ) flags 0x0 phys_seg 1 prio class 2
[345402.603076] md/raid1:md127: nvme0n1p3: rescheduling sector 27370800
[345402.603100] nvme nvme0: Identify namespace failed (-5)
[345402.606121] md/raid1:md127: redirecting sector 27297048 to other mirror: sdc3
[345402.616231] md/raid1:md127: redirecting sector 27285112 to other mirror: sdc3
[345402.618772] md/raid1:md127: redirecting sector 27375400 to other mirror: sdc3
[345402.620045] md/raid1:md127: redirecting sector 27311792 to other mirror: sdc3
[345402.621385] md/raid1:md127: redirecting sector 27330032 to other mirror: sdc3
[345402.623214] md/raid1:md127: redirecting sector 27289936 to other mirror: sdc3
[345402.625367] md/raid1:md127: redirecting sector 27370800 to other mirror: sdc3
[345415.911236] nvme nvme0: Identify namespace failed (-5)
[346065.904105] nvme nvme0: Identify namespace failed (-5)
[346705.897901] nvme nvme0: Identify namespace failed (-5)
[347330.890137] nvme nvme0: Identify namespace failed (-5)
[348045.882527] nvme nvme0: Identify namespace failed (-5)
[348825.874978] nvme nvme0: Identify namespace failed (-5)
[349535.866785] nvme nvme0: Identify namespace failed (-5)
[350350.858851] nvme nvme0: Identify namespace failed (-5)
[351205.849071] nvme nvme0: Identify namespace failed (-5)
[351985.841745] nvme nvme0: Identify namespace failed (-5)
[352775.833593] nvme nvme0: Identify namespace failed (-5)
[353565.825575] nvme nvme0: Identify namespace failed (-5)
[354185.819012] nvme nvme0: Identify namespace failed (-5)
[354805.812068] nvme nvme0: Identify namespace failed (-5)
[355735.801917] nvme nvme0: Identify namespace failed (-5)
[356405.795685] nvme nvme0: Identify namespace failed (-5)
[357365.784744] nvme nvme0: Identify namespace failed (-5)
[358085.778398] nvme nvme0: Identify namespace failed (-5)
[358915.770064] nvme nvme0: Identify namespace failed (-5)
[359685.761817] nvme nvme0: Identify namespace failed (-5)
[360535.752860] nvme nvme0: Identify namespace failed (-5)
[361355.743738] nvme nvme0: Identify namespace failed (-5)
[362375.733015] nvme nvme0: Identify namespace failed (-5)
[363245.724684] nvme nvme0: Identify namespace failed (-5)
[364125.714801] nvme nvme0: Identify namespace failed (-5)
[365045.706093] nvme nvme0: Identify namespace failed (-5)
[365860.696897] nvme nvme0: Identify namespace failed (-5)
[366830.687532] nvme nvme0: Identify namespace failed (-5)
[367800.677730] nvme nvme0: Identify namespace failed (-5)
[368675.667759] nvme nvme0: Identify namespace failed (-5)
[369695.658067] nvme nvme0: Identify namespace failed (-5)
[370655.647552] nvme nvme0: Identify namespace failed (-5)
[371725.636876] nvme nvme0: Identify namespace failed (-5)
[372795.625832] nvme nvme0: Identify namespace failed (-5)
[373405.619870] nvme nvme0: Identify namespace failed (-5)
[374525.607754] nvme nvme0: Identify namespace failed (-5)
[375320.600472] nvme nvme0: Identify namespace failed (-5)
[376490.587461] nvme nvme0: Identify namespace failed (-5)
[377660.575315] nvme nvme0: Identify namespace failed (-5)
[378765.564104] nvme nvme0: Identify namespace failed (-5)
[379375.558613] nvme nvme0: Identify namespace failed (-5)
[379985.552536] nvme nvme0: Identify namespace failed (-5)
[380595.546287] nvme nvme0: Identify namespace failed (-5)
[380894.663810] systemd-rc-local-generator[1347729]: /etc/rc.d/rc.local is not marked executable, skipping.
[380902.636127] nvme nvme0: Identify namespace failed (-5)
[469038.217996] systemd-rc-local-generator[1658780]: /etc/rc.d/rc.local is not marked executable, skipping.
[469041.391405] nvme nvme0: Identify namespace failed (-5)
うーん・・・
代替のSSDをどうするか悩みどころ・・・
TBWの値はどうなってるか確認しつつ選定かな
CRUCIAL P1 (1900MB/950MB)
CRUCIAL P3 PLUS SSD 512GB 500TBW (5000MB/4200MB)
CRUCIAL T500 SSD 500GB 300TBW
Crucial P310 500GB 110TBW
Crucial P3 500GB 110TBW
Lexor LNM620X512G-RNNNG 512GB 250TBW
fanxiang S500 Pro 500GB 320TBW (3500MB/2700MB)
fanxiang S501Q 512GB 160TBW (3600MB/2700MB) ← 今回壊れたやつ
fanxiang S660 500GB 350TBW (4600MB/2650MB)
fanxiang S880E 500GB 300TBW (6300MB/3100MB)
Fikwot FN960 512GB 350TBW (7400MB/2750MB)
Fikwot FX991 500GB 300TBW (6300MB/3100MB)
Samsung 980 500GB 300TBW
Ediloca EN600 PRO 500GB 320TBW (3200MB/2800MB)
EDILOCA EN605 500GB 300TBW (2150MB/1600MB)
Ediloca EN760 500GB 350TBW (4800MB/2650MB)
Ediloca EN855 500GB 350TBW (7400MB/2750MB)
WD Blue SN580 500GB 300TBW
ADATA LEGEND 800シリーズ 500GB 300TBW
Acclamator N20 500GB 250TBW (2500MB/2000MB)
Acclamator N30 500GB 300TBW (3500MB/3000MB)
ORICO J10 512GB 150TBW (2800MB/1300MB)
NVMeの状態を見れる「nvme」コマンドってあったな、とarchlinuxの「ソリッドステートドライブ/NVMe」を見ながらコマンドを入れてみる
現状、「nvme list」ではデバイスは出てこない
[root@niselog ~]# nvme list
Node                  Generic               SN                   Model                                    Namespace  Usage                      Format           FW Rev
--------------------- --------------------- -------------------- ---------------------------------------- ---------- -------------------------- ---------------- --------
[root@niselog ~]#
エラーログを見れるか「nvme error-log」を実行してみるがデバイスが見えないのでダメっぽい
[root@niselog ~]# nvme error-log  /dev/nvme0n1
identify controller: Input/output error
[root@niselog ~]#
リセットも同様にダメ
[root@niselog ~]# nvme reset /dev/nvme0n1
Reset: Block device required
[root@niselog ~]#
じゃあ、再検索かな?と「nvme discover」を実行したところ、再認識に成功
[root@niselog ~]# nvme discover
[root@niselog ~]# nvme list
Node                  Generic               SN                   Model                                    Namespace  Usage                      Format           FW Rev
--------------------- --------------------- -------------------- ---------------------------------------- ---------- -------------------------- ---------------- --------
/dev/nvme0n1          /dev/ng0n1            FXS501Q244110889     Fanxiang S501Q 512GB                     0x1        512.11  GB /   0.00   B    512   B +  0 B   SN22751
[root@niselog ~]#
ん????
[root@niselog ~]# nvme error-log  /dev/nvme0n1
identify controller: Input/output error
[root@niselog ~]# nvme list
Node                  Generic               SN                   Model                                    Namespace  Usage                      Format           FW Rev
--------------------- --------------------- -------------------- ---------------------------------------- ---------- -------------------------- ---------------- --------
[root@niselog ~]#
即オフラインになっていた
dmesg上は特になし
[518981.064372] nvme nvme0: Identify namespace failed (-5)
[519070.106359] nvme nvme0: Identify namespace failed (-5)
[519106.607320] nvme nvme0: Identify namespace failed (-5)
[519392.028895] nvme nvme0: Identify namespace failed (-5)
[519430.063154] nvme nvme0: Identify namespace failed (-5)
[519439.241555] nvme nvme0: Identify namespace failed (-5)
だめっぽい?
で、archlinuxのページの下の方にある「APST サポートの問題によるコントローラの機能不全」に似たようなログが出ている
[345055.452619] nvme nvme0: I/O tag 322 (0142) opcode 0x0 (Flush) QID 4 timeout, aborting req_op:FLUSH(2) size:0
[345057.437597] nvme nvme0: I/O tag 210 (a0d2) opcode 0x2 (Read) QID 2 timeout, aborting req_op:READ(0) size:32768
[345057.437643] nvme nvme0: I/O tag 706 (c2c2) opcode 0x2 (Read) QID 3 timeout, aborting req_op:READ(0) size:32768
[345085.664306] nvme nvme0: I/O tag 322 (0142) opcode 0x0 (Flush) QID 4 timeout, reset controller
[345274.582484] nvme nvme0: Device not ready; aborting reset, CSTS=0x1
[345274.588547] nvme nvme0: Abort status: 0x371
[345274.588554] nvme nvme0: Abort status: 0x371
[345274.588556] nvme nvme0: Abort status: 0x371
[345402.595930] nvme nvme0: Device not ready; aborting reset, CSTS=0x1
[345402.596168] nvme nvme0: Disabling device after reset failure: -19
[345402.603001] I/O error, dev nvme0n1, sector 31757592 op 0x0:(READ) flags 0x0 phys_seg 1 prio class 2
[345402.603001] I/O error, dev nvme0n1, sector 31745656 op 0x0:(READ) flags 0x0 phys_seg 1 prio class 2
[345402.603005] I/O error, dev nvme0n1, sector 4196368 op 0x1:(WRITE) flags 0x29800 phys_seg 1 prio class 2
[345402.603011] md/raid1:md127: nvme0n1p3: rescheduling sector 27297048
[345402.603017] I/O error, dev nvme0n1, sector 0 op 0x1:(WRITE) flags 0x800 phys_seg 0 prio class 2
[345402.603018] md/raid1:md127: nvme0n1p3: rescheduling sector 27285112
[345402.603021] md/raid1:md127: Disk failure on nvme0n1p3, disabling device.
ただ、いまのkenrel は 5.14.0-503.14.1.el9_5.x86_64 なので、これは対策されてるはずの問題のはず
とはいえ、現状の値がどうなってるかを確認してみる
[root@niselog sys]# find /sys -print|grep nvme|grep latency
/sys/devices/pci0000:00/0000:00:1c.0/0000:01:00.0/nvme/nvme0/power/pm_qos_latency_tolerance_us
/sys/module/nvme_core/parameters/apst_primary_latency_tol_us
/sys/module/nvme_core/parameters/apst_secondary_latency_tol_us
/sys/module/nvme_core/parameters/default_ps_max_latency_us
[root@niselog sys]# cat /sys/module/nvme_core/parameters/apst_primary_latency_tol_us
15000
[root@niselog sys]# cat /sys/module/nvme_core/parameters/apst_secondary_latency_tol_us
100000
[root@niselog sys]# cat /sys/module/nvme_core/parameters/default_ps_max_latency_us
100000
[root@niselog sys]# cat /sys/devices/pci0000:00/0000:00:1c.0/0000:01:00.0/nvme/nvme0/power/pm_qos_latency_tolerance_us
100000
[root@niselog sys]#
とりあえず値を0にしてみる
[root@niselog sys]# echo 0 > /sys/module/nvme_core/parameters/default_ps_max_latency_us
[root@niselog sys]# cat /sys/module/nvme_core/parameters/default_ps_max_latency_us
0
[root@niselog sys]#
やっぱりすぐ消えるな
[root@niselog sys]# nvme list
Node                  Generic               SN                   Model                                    Namespace  Usage                      Format           FW Rev
--------------------- --------------------- -------------------- ---------------------------------------- ---------- -------------------------- ---------------- --------
[root@niselog sys]# nvme discover
[root@niselog sys]# nvme list
Node                  Generic               SN                   Model                                    Namespace  Usage                      Format           FW Rev
--------------------- --------------------- -------------------- ---------------------------------------- ---------- -------------------------- ---------------- --------
/dev/nvme0n1          /dev/ng0n1            FXS501Q244110889     Fanxiang S501Q 512GB                     0x1        512.11  GB /   0.00   B    512   B +  0 B   SN22751
[root@niselog sys]# nvme list
Node                  Generic               SN                   Model                                    Namespace  Usage                      Format           FW Rev
--------------------- --------------------- -------------------- ---------------------------------------- ---------- -------------------------- ---------------- --------
[root@niselog sys]#
2024/12/26追記
一度電源を落として起動しなおしたら、問題のNVMeストレージは再認識できた。
「APST サポートの問題によるコントローラの機能不全」の疑いがあるので /etc/default/grub の「GRUB_CMDLINE_LINUX=」に「nvme_core.default_ps_max_latency_us=0」を 追加した。
追加後再起動して /sys/module/nvme_core/parameters/default_ps_max_latency_us の値が0であることを確認
NVMeも正常に認識している
# cat /sys/module/nvme_core/parameters/default_ps_max_latency_us
0
# nvme list
Node                  Generic               SN                   Model                                    Namespace  Usage                      Format           FW Rev
--------------------- --------------------- -------------------- ---------------------------------------- ---------- -------------------------- ---------------- --------
/dev/nvme0n1          /dev/ng0n1            FXS501Q244110889     Fanxiang S501Q 512GB                     0x1        512.11  GB / 512.11  GB    512   B +  0 B   SN22751
#
smart-logをとってみる
# nvme smart-log /dev/nvme0n1
Smart Log for NVME device:nvme0n1 namespace-id:ffffffff
critical_warning                        : 0
temperature                             : 42 °C (315 K)
available_spare                         : 85%
available_spare_threshold               : 1%
percentage_used                         : 0%
endurance group critical warning summary: 0
Data Units Read                         : 2671220 (1.37 TB)
Data Units Written                      : 594263 (304.26 GB)
host_read_commands                      : 8060270
host_write_commands                     : 5860715
controller_busy_time                    : 61
power_cycles                            : 24
power_on_hours                          : 305
unsafe_shutdowns                        : 8
media_errors                            : 0
num_err_log_entries                     : 0
Warning Temperature Time                : 0
Critical Composite Temperature Time     : 0
Temperature Sensor 1           : 42 °C (315 K)
Temperature Sensor 2           : 40 °C (313 K)
Thermal Management T1 Trans Count       : 0
Thermal Management T2 Trans Count       : 0
Thermal Management T1 Total Time        : 0
Thermal Management T2 Total Time        : 0
#
NVMeの持つ機能確認
# nvme get-feature /dev/nvme0n1
get-feature:0x01 (Arbitration), Current value:0x00000006
get-feature:0x02 (Power Management), Current value:00000000
get-feature:0x04 (Temperature Threshold), Current value:0x0000016b
get-feature:0x05 (Error Recovery), Current value:00000000
get-feature:0x06 (Volatile Write Cache), Current value:0x00000001
get-feature:0x07 (Number of Queues), Current value:0x00030003
get-feature:0x08 (Interrupt Coalescing), Current value:00000000
get-feature:0x09 (Interrupt Vector Configuration), Current value:0x00010000
get-feature:0x0a (Write Atomicity Normal), Current value:00000000
get-feature:0x0b (Async Event Configuration), Current value:0x00000200
get-feature:0x0c (Autonomous Power State Transition), Current value:00000000
       0  1  2  3  4  5  6  7  8  9  a  b  c  d  e  f
0000: 18 f4 01 00 00 00 00 00 18 f4 01 00 00 00 00 00 "................"
0010: 18 f4 01 00 00 00 00 00 20 70 17 00 00 00 00 00 ".........p......"
0020: 00 00 00 00 00 00 00 00 00 00 00 00 00 00 00 00 "................"
0030: 00 00 00 00 00 00 00 00 00 00 00 00 00 00 00 00 "................"
0040: 00 00 00 00 00 00 00 00 00 00 00 00 00 00 00 00 "................"
0050: 00 00 00 00 00 00 00 00 00 00 00 00 00 00 00 00 "................"
0060: 00 00 00 00 00 00 00 00 00 00 00 00 00 00 00 00 "................"
0070: 00 00 00 00 00 00 00 00 00 00 00 00 00 00 00 00 "................"
0080: 00 00 00 00 00 00 00 00 00 00 00 00 00 00 00 00 "................"
0090: 00 00 00 00 00 00 00 00 00 00 00 00 00 00 00 00 "................"
00a0: 00 00 00 00 00 00 00 00 00 00 00 00 00 00 00 00 "................"
00b0: 00 00 00 00 00 00 00 00 00 00 00 00 00 00 00 00 "................"
00c0: 00 00 00 00 00 00 00 00 00 00 00 00 00 00 00 00 "................"
00d0: 00 00 00 00 00 00 00 00 00 00 00 00 00 00 00 00 "................"
00e0: 00 00 00 00 00 00 00 00 00 00 00 00 00 00 00 00 "................"
00f0: 00 00 00 00 00 00 00 00 00 00 00 00 00 00 00 00 "................"
get-feature:0x0d (Host Memory Buffer), Current value:0x00000001
       0  1  2  3  4  5  6  7  8  9  a  b  c  d  e  f
0000: 00 10 00 00 00 00 e7 07 01 00 00 00 04 00 00 00 "................"
0010: 00 00 00 00 00 00 00 00 00 00 00 00 00 00 00 00 "................"
0020: 00 00 00 00 00 00 00 00 00 00 00 00 00 00 00 00 "................"
0030: 00 00 00 00 00 00 00 00 00 00 00 00 00 00 00 00 "................"
0040: 00 00 00 00 00 00 00 00 00 00 00 00 00 00 00 00 "................"
0050: 00 00 00 00 00 00 00 00 00 00 00 00 00 00 00 00 "................"
0060: 00 00 00 00 00 00 00 00 00 00 00 00 00 00 00 00 "................"
0070: 00 00 00 00 00 00 00 00 00 00 00 00 00 00 00 00 "................"
0080: 00 00 00 00 00 00 00 00 00 00 00 00 00 00 00 00 "................"
0090: 00 00 00 00 00 00 00 00 00 00 00 00 00 00 00 00 "................"
00a0: 00 00 00 00 00 00 00 00 00 00 00 00 00 00 00 00 "................"
00b0: 00 00 00 00 00 00 00 00 00 00 00 00 00 00 00 00 "................"
00c0: 00 00 00 00 00 00 00 00 00 00 00 00 00 00 00 00 "................"
00d0: 00 00 00 00 00 00 00 00 00 00 00 00 00 00 00 00 "................"
00e0: 00 00 00 00 00 00 00 00 00 00 00 00 00 00 00 00 "................"
00f0: 00 00 00 00 00 00 00 00 00 00 00 00 00 00 00 00 "................"
0100: 00 00 00 00 00 00 00 00 00 00 00 00 00 00 00 00 "................"
0110: 00 00 00 00 00 00 00 00 00 00 00 00 00 00 00 00 "................"
0120: 00 00 00 00 00 00 00 00 00 00 00 00 00 00 00 00 "................"
0130: 00 00 00 00 00 00 00 00 00 00 00 00 00 00 00 00 "................"
0140: 00 00 00 00 00 00 00 00 00 00 00 00 00 00 00 00 "................"
0150: 00 00 00 00 00 00 00 00 00 00 00 00 00 00 00 00 "................"
0160: 00 00 00 00 00 00 00 00 00 00 00 00 00 00 00 00 "................"
0170: 00 00 00 00 00 00 00 00 00 00 00 00 00 00 00 00 "................"
0180: 00 00 00 00 00 00 00 00 00 00 00 00 00 00 00 00 "................"
0190: 00 00 00 00 00 00 00 00 00 00 00 00 00 00 00 00 "................"
01a0: 00 00 00 00 00 00 00 00 00 00 00 00 00 00 00 00 "................"
01b0: 00 00 00 00 00 00 00 00 00 00 00 00 00 00 00 00 "................"
01c0: 00 00 00 00 00 00 00 00 00 00 00 00 00 00 00 00 "................"
01d0: 00 00 00 00 00 00 00 00 00 00 00 00 00 00 00 00 "................"
01e0: 00 00 00 00 00 00 00 00 00 00 00 00 00 00 00 00 "................"
01f0: 00 00 00 00 00 00 00 00 00 00 00 00 00 00 00 00 "................"
0200: 00 00 00 00 00 00 00 00 00 00 00 00 00 00 00 00 "................"
0210: 00 00 00 00 00 00 00 00 00 00 00 00 00 00 00 00 "................"
0220: 00 00 00 00 00 00 00 00 00 00 00 00 00 00 00 00 "................"
0230: 00 00 00 00 00 00 00 00 00 00 00 00 00 00 00 00 "................"
0240: 00 00 00 00 00 00 00 00 00 00 00 00 00 00 00 00 "................"
0250: 00 00 00 00 00 00 00 00 00 00 00 00 00 00 00 00 "................"
0260: 00 00 00 00 00 00 00 00 00 00 00 00 00 00 00 00 "................"
0270: 00 00 00 00 00 00 00 00 00 00 00 00 00 00 00 00 "................"
0280: 00 00 00 00 00 00 00 00 00 00 00 00 00 00 00 00 "................"
0290: 00 00 00 00 00 00 00 00 00 00 00 00 00 00 00 00 "................"
02a0: 00 00 00 00 00 00 00 00 00 00 00 00 00 00 00 00 "................"
02b0: 00 00 00 00 00 00 00 00 00 00 00 00 00 00 00 00 "................"
02c0: 00 00 00 00 00 00 00 00 00 00 00 00 00 00 00 00 "................"
02d0: 00 00 00 00 00 00 00 00 00 00 00 00 00 00 00 00 "................"
02e0: 00 00 00 00 00 00 00 00 00 00 00 00 00 00 00 00 "................"
02f0: 00 00 00 00 00 00 00 00 00 00 00 00 00 00 00 00 "................"
0300: 00 00 00 00 00 00 00 00 00 00 00 00 00 00 00 00 "................"
0310: 00 00 00 00 00 00 00 00 00 00 00 00 00 00 00 00 "................"
0320: 00 00 00 00 00 00 00 00 00 00 00 00 00 00 00 00 "................"
0330: 00 00 00 00 00 00 00 00 00 00 00 00 00 00 00 00 "................"
0340: 00 00 00 00 00 00 00 00 00 00 00 00 00 00 00 00 "................"
0350: 00 00 00 00 00 00 00 00 00 00 00 00 00 00 00 00 "................"
0360: 00 00 00 00 00 00 00 00 00 00 00 00 00 00 00 00 "................"
0370: 00 00 00 00 00 00 00 00 00 00 00 00 00 00 00 00 "................"
0380: 00 00 00 00 00 00 00 00 00 00 00 00 00 00 00 00 "................"
0390: 00 00 00 00 00 00 00 00 00 00 00 00 00 00 00 00 "................"
03a0: 00 00 00 00 00 00 00 00 00 00 00 00 00 00 00 00 "................"
03b0: 00 00 00 00 00 00 00 00 00 00 00 00 00 00 00 00 "................"
03c0: 00 00 00 00 00 00 00 00 00 00 00 00 00 00 00 00 "................"
03d0: 00 00 00 00 00 00 00 00 00 00 00 00 00 00 00 00 "................"
03e0: 00 00 00 00 00 00 00 00 00 00 00 00 00 00 00 00 "................"
03f0: 00 00 00 00 00 00 00 00 00 00 00 00 00 00 00 00 "................"
0400: 00 00 00 00 00 00 00 00 00 00 00 00 00 00 00 00 "................"
0410: 00 00 00 00 00 00 00 00 00 00 00 00 00 00 00 00 "................"
0420: 00 00 00 00 00 00 00 00 00 00 00 00 00 00 00 00 "................"
0430: 00 00 00 00 00 00 00 00 00 00 00 00 00 00 00 00 "................"
0440: 00 00 00 00 00 00 00 00 00 00 00 00 00 00 00 00 "................"
0450: 00 00 00 00 00 00 00 00 00 00 00 00 00 00 00 00 "................"
0460: 00 00 00 00 00 00 00 00 00 00 00 00 00 00 00 00 "................"
0470: 00 00 00 00 00 00 00 00 00 00 00 00 00 00 00 00 "................"
0480: 00 00 00 00 00 00 00 00 00 00 00 00 00 00 00 00 "................"
0490: 00 00 00 00 00 00 00 00 00 00 00 00 00 00 00 00 "................"
04a0: 00 00 00 00 00 00 00 00 00 00 00 00 00 00 00 00 "................"
04b0: 00 00 00 00 00 00 00 00 00 00 00 00 00 00 00 00 "................"
04c0: 00 00 00 00 00 00 00 00 00 00 00 00 00 00 00 00 "................"
04d0: 00 00 00 00 00 00 00 00 00 00 00 00 00 00 00 00 "................"
04e0: 00 00 00 00 00 00 00 00 00 00 00 00 00 00 00 00 "................"
04f0: 00 00 00 00 00 00 00 00 00 00 00 00 00 00 00 00 "................"
0500: 00 00 00 00 00 00 00 00 00 00 00 00 00 00 00 00 "................"
0510: 00 00 00 00 00 00 00 00 00 00 00 00 00 00 00 00 "................"
0520: 00 00 00 00 00 00 00 00 00 00 00 00 00 00 00 00 "................"
0530: 00 00 00 00 00 00 00 00 00 00 00 00 00 00 00 00 "................"
0540: 00 00 00 00 00 00 00 00 00 00 00 00 00 00 00 00 "................"
0550: 00 00 00 00 00 00 00 00 00 00 00 00 00 00 00 00 "................"
0560: 00 00 00 00 00 00 00 00 00 00 00 00 00 00 00 00 "................"
0570: 00 00 00 00 00 00 00 00 00 00 00 00 00 00 00 00 "................"
0580: 00 00 00 00 00 00 00 00 00 00 00 00 00 00 00 00 "................"
0590: 00 00 00 00 00 00 00 00 00 00 00 00 00 00 00 00 "................"
05a0: 00 00 00 00 00 00 00 00 00 00 00 00 00 00 00 00 "................"
05b0: 00 00 00 00 00 00 00 00 00 00 00 00 00 00 00 00 "................"
05c0: 00 00 00 00 00 00 00 00 00 00 00 00 00 00 00 00 "................"
05d0: 00 00 00 00 00 00 00 00 00 00 00 00 00 00 00 00 "................"
05e0: 00 00 00 00 00 00 00 00 00 00 00 00 00 00 00 00 "................"
05f0: 00 00 00 00 00 00 00 00 00 00 00 00 00 00 00 00 "................"
0600: 00 00 00 00 00 00 00 00 00 00 00 00 00 00 00 00 "................"
0610: 00 00 00 00 00 00 00 00 00 00 00 00 00 00 00 00 "................"
0620: 00 00 00 00 00 00 00 00 00 00 00 00 00 00 00 00 "................"
0630: 00 00 00 00 00 00 00 00 00 00 00 00 00 00 00 00 "................"
0640: 00 00 00 00 00 00 00 00 00 00 00 00 00 00 00 00 "................"
0650: 00 00 00 00 00 00 00 00 00 00 00 00 00 00 00 00 "................"
0660: 00 00 00 00 00 00 00 00 00 00 00 00 00 00 00 00 "................"
0670: 00 00 00 00 00 00 00 00 00 00 00 00 00 00 00 00 "................"
0680: 00 00 00 00 00 00 00 00 00 00 00 00 00 00 00 00 "................"
0690: 00 00 00 00 00 00 00 00 00 00 00 00 00 00 00 00 "................"
06a0: 00 00 00 00 00 00 00 00 00 00 00 00 00 00 00 00 "................"
06b0: 00 00 00 00 00 00 00 00 00 00 00 00 00 00 00 00 "................"
06c0: 00 00 00 00 00 00 00 00 00 00 00 00 00 00 00 00 "................"
06d0: 00 00 00 00 00 00 00 00 00 00 00 00 00 00 00 00 "................"
06e0: 00 00 00 00 00 00 00 00 00 00 00 00 00 00 00 00 "................"
06f0: 00 00 00 00 00 00 00 00 00 00 00 00 00 00 00 00 "................"
0700: 00 00 00 00 00 00 00 00 00 00 00 00 00 00 00 00 "................"
0710: 00 00 00 00 00 00 00 00 00 00 00 00 00 00 00 00 "................"
0720: 00 00 00 00 00 00 00 00 00 00 00 00 00 00 00 00 "................"
0730: 00 00 00 00 00 00 00 00 00 00 00 00 00 00 00 00 "................"
0740: 00 00 00 00 00 00 00 00 00 00 00 00 00 00 00 00 "................"
0750: 00 00 00 00 00 00 00 00 00 00 00 00 00 00 00 00 "................"
0760: 00 00 00 00 00 00 00 00 00 00 00 00 00 00 00 00 "................"
0770: 00 00 00 00 00 00 00 00 00 00 00 00 00 00 00 00 "................"
0780: 00 00 00 00 00 00 00 00 00 00 00 00 00 00 00 00 "................"
0790: 00 00 00 00 00 00 00 00 00 00 00 00 00 00 00 00 "................"
07a0: 00 00 00 00 00 00 00 00 00 00 00 00 00 00 00 00 "................"
07b0: 00 00 00 00 00 00 00 00 00 00 00 00 00 00 00 00 "................"
07c0: 00 00 00 00 00 00 00 00 00 00 00 00 00 00 00 00 "................"
07d0: 00 00 00 00 00 00 00 00 00 00 00 00 00 00 00 00 "................"
07e0: 00 00 00 00 00 00 00 00 00 00 00 00 00 00 00 00 "................"
07f0: 00 00 00 00 00 00 00 00 00 00 00 00 00 00 00 00 "................"
0800: 00 00 00 00 00 00 00 00 00 00 00 00 00 00 00 00 "................"
0810: 00 00 00 00 00 00 00 00 00 00 00 00 00 00 00 00 "................"
0820: 00 00 00 00 00 00 00 00 00 00 00 00 00 00 00 00 "................"
0830: 00 00 00 00 00 00 00 00 00 00 00 00 00 00 00 00 "................"
0840: 00 00 00 00 00 00 00 00 00 00 00 00 00 00 00 00 "................"
0850: 00 00 00 00 00 00 00 00 00 00 00 00 00 00 00 00 "................"
0860: 00 00 00 00 00 00 00 00 00 00 00 00 00 00 00 00 "................"
0870: 00 00 00 00 00 00 00 00 00 00 00 00 00 00 00 00 "................"
0880: 00 00 00 00 00 00 00 00 00 00 00 00 00 00 00 00 "................"
0890: 00 00 00 00 00 00 00 00 00 00 00 00 00 00 00 00 "................"
08a0: 00 00 00 00 00 00 00 00 00 00 00 00 00 00 00 00 "................"
08b0: 00 00 00 00 00 00 00 00 00 00 00 00 00 00 00 00 "................"
08c0: 00 00 00 00 00 00 00 00 00 00 00 00 00 00 00 00 "................"
08d0: 00 00 00 00 00 00 00 00 00 00 00 00 00 00 00 00 "................"
08e0: 00 00 00 00 00 00 00 00 00 00 00 00 00 00 00 00 "................"
08f0: 00 00 00 00 00 00 00 00 00 00 00 00 00 00 00 00 "................"
0900: 00 00 00 00 00 00 00 00 00 00 00 00 00 00 00 00 "................"
0910: 00 00 00 00 00 00 00 00 00 00 00 00 00 00 00 00 "................"
0920: 00 00 00 00 00 00 00 00 00 00 00 00 00 00 00 00 "................"
0930: 00 00 00 00 00 00 00 00 00 00 00 00 00 00 00 00 "................"
0940: 00 00 00 00 00 00 00 00 00 00 00 00 00 00 00 00 "................"
0950: 00 00 00 00 00 00 00 00 00 00 00 00 00 00 00 00 "................"
0960: 00 00 00 00 00 00 00 00 00 00 00 00 00 00 00 00 "................"
0970: 00 00 00 00 00 00 00 00 00 00 00 00 00 00 00 00 "................"
0980: 00 00 00 00 00 00 00 00 00 00 00 00 00 00 00 00 "................"
0990: 00 00 00 00 00 00 00 00 00 00 00 00 00 00 00 00 "................"
09a0: 00 00 00 00 00 00 00 00 00 00 00 00 00 00 00 00 "................"
09b0: 00 00 00 00 00 00 00 00 00 00 00 00 00 00 00 00 "................"
09c0: 00 00 00 00 00 00 00 00 00 00 00 00 00 00 00 00 "................"
09d0: 00 00 00 00 00 00 00 00 00 00 00 00 00 00 00 00 "................"
09e0: 00 00 00 00 00 00 00 00 00 00 00 00 00 00 00 00 "................"
09f0: 00 00 00 00 00 00 00 00 00 00 00 00 00 00 00 00 "................"
0a00: 00 00 00 00 00 00 00 00 00 00 00 00 00 00 00 00 "................"
0a10: 00 00 00 00 00 00 00 00 00 00 00 00 00 00 00 00 "................"
0a20: 00 00 00 00 00 00 00 00 00 00 00 00 00 00 00 00 "................"
0a30: 00 00 00 00 00 00 00 00 00 00 00 00 00 00 00 00 "................"
0a40: 00 00 00 00 00 00 00 00 00 00 00 00 00 00 00 00 "................"
0a50: 00 00 00 00 00 00 00 00 00 00 00 00 00 00 00 00 "................"
0a60: 00 00 00 00 00 00 00 00 00 00 00 00 00 00 00 00 "................"
0a70: 00 00 00 00 00 00 00 00 00 00 00 00 00 00 00 00 "................"
0a80: 00 00 00 00 00 00 00 00 00 00 00 00 00 00 00 00 "................"
0a90: 00 00 00 00 00 00 00 00 00 00 00 00 00 00 00 00 "................"
0aa0: 00 00 00 00 00 00 00 00 00 00 00 00 00 00 00 00 "................"
0ab0: 00 00 00 00 00 00 00 00 00 00 00 00 00 00 00 00 "................"
0ac0: 00 00 00 00 00 00 00 00 00 00 00 00 00 00 00 00 "................"
0ad0: 00 00 00 00 00 00 00 00 00 00 00 00 00 00 00 00 "................"
0ae0: 00 00 00 00 00 00 00 00 00 00 00 00 00 00 00 00 "................"
0af0: 00 00 00 00 00 00 00 00 00 00 00 00 00 00 00 00 "................"
0b00: 00 00 00 00 00 00 00 00 00 00 00 00 00 00 00 00 "................"
0b10: 00 00 00 00 00 00 00 00 00 00 00 00 00 00 00 00 "................"
0b20: 00 00 00 00 00 00 00 00 00 00 00 00 00 00 00 00 "................"
0b30: 00 00 00 00 00 00 00 00 00 00 00 00 00 00 00 00 "................"
0b40: 00 00 00 00 00 00 00 00 00 00 00 00 00 00 00 00 "................"
0b50: 00 00 00 00 00 00 00 00 00 00 00 00 00 00 00 00 "................"
0b60: 00 00 00 00 00 00 00 00 00 00 00 00 00 00 00 00 "................"
0b70: 00 00 00 00 00 00 00 00 00 00 00 00 00 00 00 00 "................"
0b80: 00 00 00 00 00 00 00 00 00 00 00 00 00 00 00 00 "................"
0b90: 00 00 00 00 00 00 00 00 00 00 00 00 00 00 00 00 "................"
0ba0: 00 00 00 00 00 00 00 00 00 00 00 00 00 00 00 00 "................"
0bb0: 00 00 00 00 00 00 00 00 00 00 00 00 00 00 00 00 "................"
0bc0: 00 00 00 00 00 00 00 00 00 00 00 00 00 00 00 00 "................"
0bd0: 00 00 00 00 00 00 00 00 00 00 00 00 00 00 00 00 "................"
0be0: 00 00 00 00 00 00 00 00 00 00 00 00 00 00 00 00 "................"
0bf0: 00 00 00 00 00 00 00 00 00 00 00 00 00 00 00 00 "................"
0c00: 00 00 00 00 00 00 00 00 00 00 00 00 00 00 00 00 "................"
0c10: 00 00 00 00 00 00 00 00 00 00 00 00 00 00 00 00 "................"
0c20: 00 00 00 00 00 00 00 00 00 00 00 00 00 00 00 00 "................"
0c30: 00 00 00 00 00 00 00 00 00 00 00 00 00 00 00 00 "................"
0c40: 00 00 00 00 00 00 00 00 00 00 00 00 00 00 00 00 "................"
0c50: 00 00 00 00 00 00 00 00 00 00 00 00 00 00 00 00 "................"
0c60: 00 00 00 00 00 00 00 00 00 00 00 00 00 00 00 00 "................"
0c70: 00 00 00 00 00 00 00 00 00 00 00 00 00 00 00 00 "................"
0c80: 00 00 00 00 00 00 00 00 00 00 00 00 00 00 00 00 "................"
0c90: 00 00 00 00 00 00 00 00 00 00 00 00 00 00 00 00 "................"
0ca0: 00 00 00 00 00 00 00 00 00 00 00 00 00 00 00 00 "................"
0cb0: 00 00 00 00 00 00 00 00 00 00 00 00 00 00 00 00 "................"
0cc0: 00 00 00 00 00 00 00 00 00 00 00 00 00 00 00 00 "................"
0cd0: 00 00 00 00 00 00 00 00 00 00 00 00 00 00 00 00 "................"
0ce0: 00 00 00 00 00 00 00 00 00 00 00 00 00 00 00 00 "................"
0cf0: 00 00 00 00 00 00 00 00 00 00 00 00 00 00 00 00 "................"
0d00: 00 00 00 00 00 00 00 00 00 00 00 00 00 00 00 00 "................"
0d10: 00 00 00 00 00 00 00 00 00 00 00 00 00 00 00 00 "................"
0d20: 00 00 00 00 00 00 00 00 00 00 00 00 00 00 00 00 "................"
0d30: 00 00 00 00 00 00 00 00 00 00 00 00 00 00 00 00 "................"
0d40: 00 00 00 00 00 00 00 00 00 00 00 00 00 00 00 00 "................"
0d50: 00 00 00 00 00 00 00 00 00 00 00 00 00 00 00 00 "................"
0d60: 00 00 00 00 00 00 00 00 00 00 00 00 00 00 00 00 "................"
0d70: 00 00 00 00 00 00 00 00 00 00 00 00 00 00 00 00 "................"
0d80: 00 00 00 00 00 00 00 00 00 00 00 00 00 00 00 00 "................"
0d90: 00 00 00 00 00 00 00 00 00 00 00 00 00 00 00 00 "................"
0da0: 00 00 00 00 00 00 00 00 00 00 00 00 00 00 00 00 "................"
0db0: 00 00 00 00 00 00 00 00 00 00 00 00 00 00 00 00 "................"
0dc0: 00 00 00 00 00 00 00 00 00 00 00 00 00 00 00 00 "................"
0dd0: 00 00 00 00 00 00 00 00 00 00 00 00 00 00 00 00 "................"
0de0: 00 00 00 00 00 00 00 00 00 00 00 00 00 00 00 00 "................"
0df0: 00 00 00 00 00 00 00 00 00 00 00 00 00 00 00 00 "................"
0e00: 00 00 00 00 00 00 00 00 00 00 00 00 00 00 00 00 "................"
0e10: 00 00 00 00 00 00 00 00 00 00 00 00 00 00 00 00 "................"
0e20: 00 00 00 00 00 00 00 00 00 00 00 00 00 00 00 00 "................"
0e30: 00 00 00 00 00 00 00 00 00 00 00 00 00 00 00 00 "................"
0e40: 00 00 00 00 00 00 00 00 00 00 00 00 00 00 00 00 "................"
0e50: 00 00 00 00 00 00 00 00 00 00 00 00 00 00 00 00 "................"
0e60: 00 00 00 00 00 00 00 00 00 00 00 00 00 00 00 00 "................"
0e70: 00 00 00 00 00 00 00 00 00 00 00 00 00 00 00 00 "................"
0e80: 00 00 00 00 00 00 00 00 00 00 00 00 00 00 00 00 "................"
0e90: 00 00 00 00 00 00 00 00 00 00 00 00 00 00 00 00 "................"
0ea0: 00 00 00 00 00 00 00 00 00 00 00 00 00 00 00 00 "................"
0eb0: 00 00 00 00 00 00 00 00 00 00 00 00 00 00 00 00 "................"
0ec0: 00 00 00 00 00 00 00 00 00 00 00 00 00 00 00 00 "................"
0ed0: 00 00 00 00 00 00 00 00 00 00 00 00 00 00 00 00 "................"
0ee0: 00 00 00 00 00 00 00 00 00 00 00 00 00 00 00 00 "................"
0ef0: 00 00 00 00 00 00 00 00 00 00 00 00 00 00 00 00 "................"
0f00: 00 00 00 00 00 00 00 00 00 00 00 00 00 00 00 00 "................"
0f10: 00 00 00 00 00 00 00 00 00 00 00 00 00 00 00 00 "................"
0f20: 00 00 00 00 00 00 00 00 00 00 00 00 00 00 00 00 "................"
0f30: 00 00 00 00 00 00 00 00 00 00 00 00 00 00 00 00 "................"
0f40: 00 00 00 00 00 00 00 00 00 00 00 00 00 00 00 00 "................"
0f50: 00 00 00 00 00 00 00 00 00 00 00 00 00 00 00 00 "................"
0f60: 00 00 00 00 00 00 00 00 00 00 00 00 00 00 00 00 "................"
0f70: 00 00 00 00 00 00 00 00 00 00 00 00 00 00 00 00 "................"
0f80: 00 00 00 00 00 00 00 00 00 00 00 00 00 00 00 00 "................"
0f90: 00 00 00 00 00 00 00 00 00 00 00 00 00 00 00 00 "................"
0fa0: 00 00 00 00 00 00 00 00 00 00 00 00 00 00 00 00 "................"
0fb0: 00 00 00 00 00 00 00 00 00 00 00 00 00 00 00 00 "................"
0fc0: 00 00 00 00 00 00 00 00 00 00 00 00 00 00 00 00 "................"
0fd0: 00 00 00 00 00 00 00 00 00 00 00 00 00 00 00 00 "................"
0fe0: 00 00 00 00 00 00 00 00 00 00 00 00 00 00 00 00 "................"
0ff0: 00 00 00 00 00 00 00 00 00 00 00 00 00 00 00 00 "................"
get-feature:0x10 (Host Controlled Thermal Management), Current value:0x01750184
get-feature:0x11 (Non-Operational Power State Config), Current value:0x00000001
get-feature:0x80 (Software Progress), Current value:0x0000003b
get-feature:0xc2 (Unknown), Current value:00000000
get-feature:0xcb (Unknown), Current value:00000000
#
2025/04/03 追記
またnvme側が死んでいた。
nvmeの取り扱いが微妙なんだろうか?SATAとするべきか?
Feb 17 18:58:52 niselog kernel: nvme nvme0: I/O tag 566 (0236) opcode 0x2 (Read) QID 4 timeout, aborting req_op:READ(0) size:49152
Feb 17 18:58:53 niselog kernel: nvme nvme0: I/O tag 381 (717d) opcode 0x0 (Flush) QID 1 timeout, aborting req_op:FLUSH(2) size:0
Feb 17 18:59:10 niselog kernel: nvme nvme0: I/O tag 567 (1237) opcode 0x0 (Flush) QID 4 timeout, aborting req_op:FLUSH(2) size:0
Feb 17 18:59:22 niselog kernel: nvme nvme0: I/O tag 566 (0236) opcode 0x2 (Read) QID 4 timeout, reset controller

Feb 17 19:04:39 niselog kernel: INFO: task md127_raid1:588 blocked for more than 122 seconds.
Feb 17 19:04:39 niselog kernel:      Tainted: G               X  -------  ---  5.14.0-503.15.1.el9_5.x86_64 #1
Feb 17 19:04:39 niselog kernel: "echo 0 > /proc/sys/kernel/hung_task_timeout_secs" disables this message.
Feb 17 19:04:39 niselog kernel: task:md127_raid1     state:D stack:0     pid:588   tgid:588   ppid:2      flags:0x00004000
Feb 17 19:04:39 niselog kernel: Call Trace:
Feb 17 19:04:39 niselog kernel: <TASK>
Feb 17 19:04:39 niselog kernel: __schedule+0x229/0x550
Feb 17 19:04:39 niselog kernel: schedule+0x2e/0xd0
Feb 17 19:04:39 niselog kernel: md_super_wait+0x72/0xa0
Feb 17 19:04:39 niselog kernel: ? __pfx_autoremove_wake_function+0x10/0x10
Feb 17 19:04:39 niselog kernel: md_bitmap_daemon_work+0x16d/0x3b0
Feb 17 19:04:39 niselog kernel: md_check_recovery+0x1d/0x390
Feb 17 19:04:39 niselog kernel: raid1d+0x40/0x580 [raid1]
Feb 17 19:04:39 niselog kernel: ? __timer_delete_sync+0x2c/0x40
Feb 17 19:04:39 niselog kernel: ? schedule_timeout+0x92/0x160
Feb 17 19:04:39 niselog kernel: ? prepare_to_wait_event+0x5d/0x180
Feb 17 19:04:39 niselog kernel: md_thread+0xa8/0x160
Feb 17 19:04:39 niselog kernel: ? __pfx_autoremove_wake_function+0x10/0x10
Feb 17 19:04:39 niselog kernel: ? __pfx_md_thread+0x10/0x10
Feb 17 19:04:39 niselog kernel: kthread+0xdd/0x100
Feb 17 19:04:39 niselog kernel: ? __pfx_kthread+0x10/0x10
Feb 17 19:04:39 niselog kernel: ret_from_fork+0x29/0x50
Feb 17 19:04:39 niselog kernel: </TASK>
Feb 17 19:04:39 niselog kernel: INFO: task journal-offline:2923856 blocked for more than 122 seconds.
Feb 17 19:04:39 niselog kernel:      Tainted: G               X  -------  ---  5.14.0-503.15.1.el9_5.x86_64 #1
Feb 17 19:04:39 niselog kernel: "echo 0 > /proc/sys/kernel/hung_task_timeout_secs" disables this message.
Feb 17 19:04:39 niselog kernel: task:journal-offline state:D stack:0     pid:2923856 tgid:814   ppid:1      flags:0x00000002
Feb 17 19:04:39 niselog kernel: Call Trace:
Feb 17 19:04:39 niselog kernel: <TASK>
Feb 17 19:04:39 niselog kernel: __schedule+0x229/0x550
Feb 17 19:04:39 niselog kernel: schedule+0x2e/0xd0
Feb 17 19:04:39 niselog kernel: io_schedule+0x42/0x70
Feb 17 19:04:39 niselog kernel: folio_wait_bit+0xe9/0x200
Feb 17 19:04:39 niselog kernel: ? __pfx_wake_page_function+0x10/0x10
Feb 17 19:04:39 niselog kernel: folio_wait_writeback+0x28/0x80
Feb 17 19:04:39 niselog kernel: write_cache_pages+0x101/0x3a0
Feb 17 19:04:39 niselog kernel: ? __pfx_iomap_do_writepage+0x10/0x10
Feb 17 19:04:39 niselog kernel: iomap_writepages+0x1c/0x40
Feb 17 19:04:39 niselog kernel: xfs_vm_writepages+0x7a/0xb0 [xfs]
Feb 17 19:04:39 niselog kernel: do_writepages+0xcc/0x1a0
Feb 17 19:04:39 niselog kernel: filemap_fdatawrite_wbc+0x66/0x90
Feb 17 19:04:39 niselog kernel: __filemap_fdatawrite_range+0x54/0x80
Feb 17 19:04:39 niselog kernel: file_write_and_wait_range+0x48/0xb0
Feb 17 19:04:39 niselog kernel: xfs_file_fsync+0x5a/0x240 [xfs]
Feb 17 19:04:39 niselog kernel: __x64_sys_fsync+0x33/0x60
Feb 17 19:04:39 niselog kernel: do_syscall_64+0x5c/0xf0
Feb 17 19:04:39 niselog kernel: ? syscall_exit_work+0x103/0x130
Feb 17 19:04:39 niselog kernel: ? syscall_exit_to_user_mode+0x19/0x40
Feb 17 19:04:39 niselog kernel: ? do_syscall_64+0x6b/0xf0
Feb 17 19:04:39 niselog kernel: ? syscall_exit_work+0x103/0x130
Feb 17 19:04:39 niselog kernel: ? syscall_exit_to_user_mode+0x19/0x40
Feb 17 19:04:39 niselog kernel: ? do_syscall_64+0x6b/0xf0
Feb 17 19:04:39 niselog kernel: ? fpregs_restore_userregs+0x47/0xd0
Feb 17 19:04:39 niselog kernel: ? exit_to_user_mode_prepare+0xef/0x100
Feb 17 19:04:39 niselog kernel: entry_SYSCALL_64_after_hwframe+0x78/0x80
Feb 17 19:04:39 niselog kernel: RIP: 0033:0x7f787bf0459b
Feb 17 19:04:39 niselog kernel: RSP: 002b:00007f787a1fe9b0 EFLAGS: 00000293 ORIG_RAX: 000000000000004a
Feb 17 19:04:39 niselog kernel: RAX: ffffffffffffffda RBX: 0000558ae4556ca0 RCX: 00007f787bf0459b
Feb 17 19:04:39 niselog kernel: RDX: 0000000000000002 RSI: 0000000000000002 RDI: 0000000000000021
Feb 17 19:04:39 niselog kernel: RBP: 0000558ae4574190 R08: 0000000000000000 R09: 00007f787a1ff640
Feb 17 19:04:39 niselog kernel: R10: 00007f787be89bc6 R11: 0000000000000293 R12: 0000558ae2568343
Feb 17 19:04:39 niselog kernel: R13: 0000558ae256d8a0 R14: 00007f787be89a50 R15: 0000000000000021
Feb 17 19:04:39 niselog kernel: </TASK>
Feb 17 19:04:39 niselog kernel: INFO: task auditd:1117 blocked for more than 122 seconds.
Feb 17 19:04:39 niselog kernel:      Tainted: G               X  -------  ---  5.14.0-503.15.1.el9_5.x86_64 #1
Feb 17 19:04:39 niselog kernel: "echo 0 > /proc/sys/kernel/hung_task_timeout_secs" disables this message.
Feb 17 19:04:39 niselog kernel: task:auditd          state:D stack:0     pid:1117  tgid:1116  ppid:1      flags:0x00000002
Feb 17 19:04:39 niselog kernel: Call Trace:
Feb 17 19:04:39 niselog kernel: <TASK>
Feb 17 19:04:39 niselog kernel: __schedule+0x229/0x550
Feb 17 19:04:39 niselog kernel: ? bio_associate_blkg_from_css+0xf5/0x320
Feb 17 19:04:39 niselog kernel: schedule+0x2e/0xd0
Feb 17 19:04:39 niselog kernel: md_write_start.part.0+0x195/0x250
Feb 17 19:04:39 niselog kernel: ? __pfx_autoremove_wake_function+0x10/0x10
Feb 17 19:04:39 niselog kernel: raid1_make_request+0x5b/0xbb [raid1]
Feb 17 19:04:39 niselog kernel: md_handle_request+0x150/0x270
Feb 17 19:04:39 niselog kernel: ? __bio_split_to_limits+0x8e/0x280
Feb 17 19:04:39 niselog kernel: __submit_bio+0x94/0x130
Feb 17 19:04:39 niselog kernel: __submit_bio_noacct+0x7e/0x1e0
Feb 17 19:04:39 niselog kernel: iomap_submit_ioend+0x4e/0x80
Feb 17 19:04:39 niselog kernel: iomap_writepage_map+0x30a/0x4c0
Feb 17 19:04:39 niselog kernel: write_cache_pages+0x13c/0x3a0
Feb 17 19:04:39 niselog kernel: ? __pfx_iomap_do_writepage+0x10/0x10
Feb 17 19:04:39 niselog kernel: ? wakeup_preempt+0x5a/0x70
Feb 17 19:04:39 niselog kernel: ? ttwu_do_activate+0x112/0x1f0
Feb 17 19:04:39 niselog kernel: iomap_writepages+0x1c/0x40
Feb 17 19:04:39 niselog kernel: xfs_vm_writepages+0x7a/0xb0 [xfs]
Feb 17 19:04:39 niselog kernel: do_writepages+0xcc/0x1a0
Feb 17 19:04:39 niselog kernel: ? pick_next_task_fair+0x1dc/0x4f0
Feb 17 19:04:39 niselog kernel: filemap_fdatawrite_wbc+0x66/0x90
Feb 17 19:04:39 niselog kernel: __filemap_fdatawrite_range+0x54/0x80
Feb 17 19:04:39 niselog kernel: file_write_and_wait_range+0x48/0xb0
Feb 17 19:04:39 niselog kernel: xfs_file_fsync+0x5a/0x240 [xfs]
Feb 17 19:04:39 niselog kernel: __x64_sys_fsync+0x33/0x60
Feb 17 19:04:39 niselog kernel: do_syscall_64+0x5c/0xf0
Feb 17 19:04:39 niselog kernel: ? futex_wait+0x67/0x100
Feb 17 19:04:39 niselog kernel: ? futex_wake+0x155/0x190
Feb 17 19:04:39 niselog kernel: ? do_futex+0xbe/0x1d0
Feb 17 19:04:39 niselog kernel: ? __x64_sys_futex+0x73/0x1d0
Feb 17 19:04:39 niselog kernel: ? syscall_exit_to_user_mode+0x19/0x40
Feb 17 19:04:39 niselog kernel: ? do_syscall_64+0x6b/0xf0
Feb 17 19:04:39 niselog kernel: ? rseq_get_rseq_cs+0x1d/0x240
Feb 17 19:04:39 niselog kernel: ? syscall_exit_to_user_mode+0x19/0x40
Feb 17 19:04:39 niselog kernel: ? rseq_ip_fixup+0x6e/0x1a0
Feb 17 19:04:39 niselog kernel: ? fpregs_restore_userregs+0x47/0xd0
Feb 17 19:04:39 niselog kernel: ? exit_to_user_mode_prepare+0xef/0x100
Feb 17 19:04:39 niselog kernel: ? syscall_exit_to_user_mode+0x19/0x40
Feb 17 19:04:39 niselog kernel: ? do_syscall_64+0x6b/0xf0
Feb 17 19:04:39 niselog kernel: ? do_syscall_64+0x6b/0xf0
Feb 17 19:04:39 niselog kernel: ? do_syscall_64+0x6b/0xf0
Feb 17 19:04:39 niselog kernel: ? sysvec_apic_timer_interrupt+0x3c/0x90
Feb 17 19:04:39 niselog kernel: entry_SYSCALL_64_after_hwframe+0x78/0x80
Feb 17 19:04:39 niselog kernel: RIP: 0033:0x7f9b61d0459b
Feb 17 19:04:39 niselog kernel: RSP: 002b:00007f9b615fec50 EFLAGS: 00000293 ORIG_RAX: 000000000000004a
Feb 17 19:04:39 niselog kernel: RAX: ffffffffffffffda RBX: 000055956ea42020 RCX: 00007f9b61d0459b
Feb 17 19:04:39 niselog kernel: RDX: 0000000000000002 RSI: 0000000000000002 RDI: 0000000000000004
Feb 17 19:04:39 niselog kernel: RBP: 000055956ea42060 R08: 0000000000000000 R09: 00000000ffffffff
Feb 17 19:04:39 niselog kernel: R10: 0000000000000000 R11: 0000000000000293 R12: 00007f9b615ff640
Feb 17 19:04:39 niselog kernel: R13: 0000000000000002 R14: 00007f9b61c89a50 R15: 0000000000000000
Feb 17 19:04:39 niselog kernel: </TASK>
Feb 17 19:04:39 niselog kernel: INFO: task systemd-journal:1567 blocked for more than 122 seconds.
Feb 17 19:04:39 niselog kernel:      Tainted: G               X  -------  ---  5.14.0-503.15.1.el9_5.x86_64 #1
Feb 17 19:04:39 niselog kernel: "echo 0 > /proc/sys/kernel/hung_task_timeout_secs" disables this message.
Feb 17 19:04:39 niselog kernel: task:systemd-journal state:D stack:0     pid:1567  tgid:1567  ppid:1      flags:0x00000002
Feb 17 19:04:39 niselog kernel: Call Trace:
Feb 17 19:04:39 niselog kernel: <TASK>
Feb 17 19:04:39 niselog kernel: __schedule+0x229/0x550
Feb 17 19:04:39 niselog kernel: ? bio_associate_blkg_from_css+0xf5/0x320
Feb 17 19:04:39 niselog kernel: schedule+0x2e/0xd0
Feb 17 19:04:39 niselog kernel: md_write_start.part.0+0x195/0x250
Feb 17 19:04:39 niselog kernel: ? __pfx_autoremove_wake_function+0x10/0x10
Feb 17 19:04:39 niselog kernel: raid1_make_request+0x5b/0xbb [raid1]
Feb 17 19:04:39 niselog kernel: md_handle_request+0x150/0x270
Feb 17 19:04:39 niselog kernel: ? __bio_split_to_limits+0x8e/0x280
Feb 17 19:04:39 niselog kernel: __submit_bio+0x94/0x130
Feb 17 19:04:39 niselog kernel: __submit_bio_noacct+0x7e/0x1e0
Feb 17 19:04:39 niselog kernel: iomap_submit_ioend+0x4e/0x80
Feb 17 19:04:39 niselog kernel: xfs_vm_writepages+0x7a/0xb0 [xfs]
Feb 17 19:04:39 niselog kernel: do_writepages+0xcc/0x1a0
Feb 17 19:04:39 niselog kernel: ? xfs_buffered_write_iomap_begin+0x5da/0xa90 [xfs]
Feb 17 19:04:39 niselog kernel: ? xfs_inode_to_log_dinode+0x210/0x410 [xfs]
Feb 17 19:04:39 niselog kernel: filemap_fdatawrite_wbc+0x66/0x90
Feb 17 19:04:39 niselog kernel: __filemap_fdatawrite_range+0x54/0x80
Feb 17 19:04:39 niselog kernel: file_write_and_wait_range+0x48/0xb0
Feb 17 19:04:39 niselog kernel: xfs_file_fsync+0x5a/0x240 [xfs]
Feb 17 19:04:39 niselog kernel: __x64_sys_fsync+0x33/0x60
Feb 17 19:04:39 niselog kernel: do_syscall_64+0x5c/0xf0
Feb 17 19:04:39 niselog kernel: ? xfs_iunlock+0xb9/0x110 [xfs]
Feb 17 19:04:39 niselog kernel: ? balance_dirty_pages_ratelimited_flags+0x132/0x380
Feb 17 19:04:39 niselog kernel: ? fault_dirty_shared_page+0x8c/0xf0
Feb 17 19:04:39 niselog kernel: ? do_wp_page+0xe7/0x4b0
Feb 17 19:04:39 niselog kernel: ? pte_offset_map_nolock+0x2b/0xb0
Feb 17 19:04:39 niselog kernel: ? __handle_mm_fault+0x2fb/0x690
Feb 17 19:04:39 niselog kernel: ? __count_memcg_events+0x4f/0xb0
Feb 17 19:04:39 niselog kernel: ? mm_account_fault+0x6c/0x100
Feb 17 19:04:39 niselog kernel: ? handle_mm_fault+0x116/0x270
Feb 17 19:04:39 niselog kernel: ? do_user_addr_fault+0x1b4/0x6a0
Feb 17 19:04:39 niselog kernel: ? exc_page_fault+0x62/0x150
Feb 17 19:04:39 niselog kernel: entry_SYSCALL_64_after_hwframe+0x78/0x80
Feb 17 19:04:39 niselog kernel: RIP: 0033:0x7f032590459b
Feb 17 19:04:39 niselog kernel: RSP: 002b:00007fff98e01f50 EFLAGS: 00000293 ORIG_RAX: 000000000000004a
Feb 17 19:04:39 niselog kernel: RAX: ffffffffffffffda RBX: 000055bb10cfdbb0 RCX: 00007f032590459b
Feb 17 19:04:39 niselog kernel: RDX: 0000000000000002 RSI: 0000000000000002 RDI: 0000000000000011
Feb 17 19:04:39 niselog kernel: RBP: 0000000000000098 R08: 0000000000000000 R09: 00007fff98e02cb0
Feb 17 19:04:39 niselog kernel: R10: 00007fff98e01f10 R11: 0000000000000293 R12: 0000000000000003
Feb 17 19:04:39 niselog kernel: R13: 00007fff98e020a0 R14: 00007fff98e02098 R15: 00007fff98e02590
Feb 17 19:04:39 niselog kernel: </TASK>
Feb 17 19:04:39 niselog kernel: INFO: task kworker/3:0:2573918 blocked for more than 122 seconds.
Feb 17 19:04:39 niselog kernel:      Tainted: G               X  -------  ---  5.14.0-503.15.1.el9_5.x86_64 #1
Feb 17 19:04:39 niselog kernel: "echo 0 > /proc/sys/kernel/hung_task_timeout_secs" disables this message.
Feb 17 19:04:39 niselog kernel: task:kworker/3:0     state:D stack:0     pid:2573918 tgid:2573918 ppid:2      flags:0x00004000
Feb 17 19:04:39 niselog kernel: Workqueue: xfs-sync/dm-0 xfs_log_worker [xfs]
Feb 17 19:04:39 niselog kernel: Call Trace:
Feb 17 19:04:39 niselog kernel: <TASK>
Feb 17 19:04:39 niselog kernel: __schedule+0x229/0x550
Feb 17 19:04:39 niselog kernel: schedule+0x2e/0xd0
Feb 17 19:04:39 niselog kernel: xlog_wait_on_iclog+0x16b/0x180 [xfs]
Feb 17 19:04:39 niselog kernel: ? __pfx_default_wake_function+0x10/0x10
Feb 17 19:04:39 niselog kernel: xfs_log_force_seq+0x8f/0x160 [xfs]
Feb 17 19:04:39 niselog kernel: __xfs_trans_commit+0x2a2/0x360 [xfs]
Feb 17 19:04:39 niselog kernel: xfs_sync_sb+0x6d/0x80 [xfs]
Feb 17 19:04:39 niselog kernel: xfs_log_worker+0x9f/0xd0 [xfs]
Feb 17 19:04:39 niselog kernel: process_one_work+0x194/0x380
Feb 17 19:04:39 niselog kernel: worker_thread+0x2fe/0x410
Feb 17 19:04:39 niselog kernel: ? __pfx_worker_thread+0x10/0x10
Feb 17 19:04:39 niselog kernel: kthread+0xdd/0x100
Feb 17 19:04:39 niselog kernel: ? __pfx_kthread+0x10/0x10
Feb 17 19:04:39 niselog kernel: ret_from_fork+0x29/0x50
Feb 17 19:04:39 niselog kernel: </TASK>
Feb 17 19:04:39 niselog kernel: INFO: task UV_WORKER[5]:2732216 blocked for more than 122 seconds.
Feb 17 19:04:39 niselog kernel:      Tainted: G               X  -------  ---  5.14.0-503.15.1.el9_5.x86_64 #1
Feb 17 19:04:39 niselog kernel: "echo 0 > /proc/sys/kernel/hung_task_timeout_secs" disables this message.
Feb 17 19:04:39 niselog kernel: task:UV_WORKER[5]    state:D stack:0     pid:2732216 tgid:2732033 ppid:1      flags:0x00000002
Feb 17 19:04:39 niselog kernel: Call Trace:
Feb 17 19:04:39 niselog kernel: <TASK>
Feb 17 19:04:39 niselog kernel: __schedule+0x229/0x550
Feb 17 19:04:39 niselog kernel: schedule+0x2e/0xd0
Feb 17 19:04:39 niselog kernel: schedule_preempt_disabled+0x11/0x20
Feb 17 19:04:39 niselog kernel: rwsem_down_write_slowpath+0x23d/0x500
Feb 17 19:04:39 niselog kernel: down_write+0x58/0x60
Feb 17 19:04:39 niselog kernel: xfs_ilock+0xef/0x100 [xfs]
Feb 17 19:04:39 niselog kernel: xfs_file_write_checks+0x215/0x2e0 [xfs]
Feb 17 19:04:39 niselog kernel: xfs_file_dio_write_aligned+0x65/0x160 [xfs]
Feb 17 19:04:39 niselog kernel: xfs_file_write_iter+0xce/0x110 [xfs]
Feb 17 19:04:39 niselog kernel: vfs_write+0x2cb/0x410
Feb 17 19:04:39 niselog kernel: __x64_sys_pwrite64+0x90/0xc0
Feb 17 19:04:39 niselog kernel: do_syscall_64+0x5c/0xf0
Feb 17 19:04:39 niselog kernel: ? __count_memcg_events+0x4f/0xb0
Feb 17 19:04:39 niselog kernel: ? mm_account_fault+0x6c/0x100
Feb 17 19:04:39 niselog kernel: ? handle_mm_fault+0x116/0x270
Feb 17 19:04:39 niselog kernel: ? do_user_addr_fault+0x1d6/0x6a0
Feb 17 19:04:39 niselog kernel: ? exc_page_fault+0x62/0x150
Feb 17 19:04:39 niselog kernel: entry_SYSCALL_64_after_hwframe+0x78/0x80
Feb 17 19:04:39 niselog kernel: RIP: 0033:0x7f7e034fbc4f
Feb 17 19:04:39 niselog kernel: RSP: 002b:00007f7dfb87cc90 EFLAGS: 00000293 ORIG_RAX: 0000000000000012
Feb 17 19:04:39 niselog kernel: RAX: ffffffffffffffda RBX: 00007f7dfb87df28 RCX: 00007f7e034fbc4f
Feb 17 19:04:39 niselog kernel: RDX: 000000000000b000 RSI: 00005631c116b000 RDI: 000000000000003b
Feb 17 19:04:39 niselog kernel: RBP: 0000000000000000 R08: 0000000000000000 R09: 0000000000059000
Feb 17 19:04:39 niselog kernel: R10: 0000000000059000 R11: 0000000000000293 R12: 00007f7e043fa658
Feb 17 19:04:39 niselog kernel: R13: 00007f7dfb87d038 R14: 0000000000000001 R15: 00007f7dfb87d010
Feb 17 19:04:39 niselog kernel: </TASK>
Feb 17 19:04:39 niselog kernel: INFO: task UV_WORKER[9]:2732222 blocked for more than 122 seconds.
Feb 17 19:04:39 niselog kernel:      Tainted: G               X  -------  ---  5.14.0-503.15.1.el9_5.x86_64 #1
Feb 17 19:04:39 niselog kernel: "echo 0 > /proc/sys/kernel/hung_task_timeout_secs" disables this message.
Feb 17 19:04:39 niselog kernel: task:UV_WORKER[9]    state:D stack:0     pid:2732222 tgid:2732033 ppid:1      flags:0x00000002
Feb 17 19:04:39 niselog kernel: Call Trace:
Feb 17 19:04:39 niselog kernel: <TASK>
Feb 17 19:04:39 niselog kernel: __schedule+0x229/0x550
Feb 17 19:04:39 niselog kernel: ? bio_associate_blkg_from_css+0xf5/0x320
Feb 17 19:04:39 niselog kernel: schedule+0x2e/0xd0
Feb 17 19:04:39 niselog kernel: md_write_start.part.0+0x195/0x250
Feb 17 19:04:39 niselog kernel: ? __pfx_autoremove_wake_function+0x10/0x10
Feb 17 19:04:39 niselog kernel: raid1_make_request+0x5b/0xbb [raid1]
Feb 17 19:04:39 niselog kernel: md_handle_request+0x150/0x270
Feb 17 19:04:39 niselog kernel: ? __bio_split_to_limits+0x8e/0x280
Feb 17 19:04:39 niselog kernel: __submit_bio+0x94/0x130
Feb 17 19:04:39 niselog kernel: __submit_bio_noacct+0x7e/0x1e0
Feb 17 19:04:39 niselog kernel: iomap_dio_bio_iter+0x3bb/0x550
Feb 17 19:04:39 niselog kernel: __iomap_dio_rw+0x305/0x590
Feb 17 19:04:39 niselog kernel: iomap_dio_rw+0xa/0x30
Feb 17 19:04:39 niselog kernel: xfs_file_dio_write_aligned+0x96/0x160 [xfs]
Feb 17 19:04:39 niselog kernel: xfs_file_write_iter+0xce/0x110 [xfs]
Feb 17 19:04:39 niselog kernel: vfs_write+0x2cb/0x410
Feb 17 19:04:39 niselog kernel: __x64_sys_pwrite64+0x90/0xc0
Feb 17 19:04:39 niselog kernel: do_syscall_64+0x5c/0xf0
Feb 17 19:04:39 niselog kernel: ? __mod_memcg_lruvec_state+0x76/0xc0
Feb 17 19:04:39 niselog kernel: ? __mod_lruvec_page_state+0x97/0x160
Feb 17 19:04:39 niselog kernel: ? folio_add_new_anon_rmap+0x44/0xe0
Feb 17 19:04:39 niselog kernel: ? do_anonymous_page+0x25a/0x410
Feb 17 19:04:39 niselog kernel: ? __handle_mm_fault+0x2fb/0x690
Feb 17 19:04:39 niselog kernel: ? __count_memcg_events+0x4f/0xb0
Feb 17 19:04:39 niselog kernel: ? mm_account_fault+0x6c/0x100
Feb 17 19:04:39 niselog kernel: ? handle_mm_fault+0x116/0x270
Feb 17 19:04:39 niselog kernel: ? do_user_addr_fault+0x1d6/0x6a0
Feb 17 19:04:39 niselog kernel: ? exc_page_fault+0x62/0x150
Feb 17 19:04:39 niselog kernel: entry_SYSCALL_64_after_hwframe+0x78/0x80
Feb 17 19:04:39 niselog kernel: RIP: 0033:0x7f7e034fbc4f
Feb 17 19:04:39 niselog kernel: RSP: 002b:00007f7df8876c90 EFLAGS: 00000293 ORIG_RAX: 0000000000000012
Feb 17 19:04:39 niselog kernel: RAX: ffffffffffffffda RBX: 00007f7df8877f28 RCX: 00007f7e034fbc4f
Feb 17 19:04:39 niselog kernel: RDX: 0000000000009000 RSI: 00005631c102d000 RDI: 000000000000003b
Feb 17 19:04:39 niselog kernel: RBP: 0000000000000000 R08: 0000000000000000 R09: 0000000000050000
Feb 17 19:04:39 niselog kernel: R10: 0000000000050000 R11: 0000000000000293 R12: 00007f7e043fa658
Feb 17 19:04:39 niselog kernel: R13: 00007f7df8877038 R14: 0000000000000001 R15: 00007f7df8877010
Feb 17 19:04:39 niselog kernel: </TASK>
Feb 17 19:04:39 niselog kernel: INFO: task UV_WORKER[14]:2732230 blocked for more than 122 seconds.
Feb 17 19:04:39 niselog kernel:      Tainted: G               X  -------  ---  5.14.0-503.15.1.el9_5.x86_64 #1
Feb 17 19:04:39 niselog kernel: "echo 0 > /proc/sys/kernel/hung_task_timeout_secs" disables this message.
Feb 17 19:04:39 niselog kernel: task:UV_WORKER[14]   state:D stack:0     pid:2732230 tgid:2732033 ppid:1      flags:0x00000002
Feb 17 19:04:39 niselog kernel: Call Trace:
Feb 17 19:04:39 niselog kernel: <TASK>
Feb 17 19:04:39 niselog kernel: __schedule+0x229/0x550
Feb 17 19:04:39 niselog kernel: ? bio_associate_blkg_from_css+0xf5/0x320
Feb 17 19:04:39 niselog kernel: schedule+0x2e/0xd0
Feb 17 19:04:39 niselog kernel: md_write_start.part.0+0x195/0x250
Feb 17 19:04:39 niselog kernel: ? __pfx_autoremove_wake_function+0x10/0x10
Feb 17 19:04:39 niselog kernel: raid1_make_request+0x5b/0xbb [raid1]
Feb 17 19:04:39 niselog kernel: md_handle_request+0x150/0x270
Feb 17 19:04:39 niselog kernel: ? __bio_split_to_limits+0x8e/0x280
Feb 17 19:04:39 niselog kernel: __submit_bio+0x94/0x130
Feb 17 19:04:39 niselog kernel: __submit_bio_noacct+0x7e/0x1e0
Feb 17 19:04:39 niselog kernel: iomap_dio_bio_iter+0x3bb/0x550
Feb 17 19:04:39 niselog kernel: __iomap_dio_rw+0x305/0x590
Feb 17 19:04:39 niselog kernel: iomap_dio_rw+0xa/0x30
Feb 17 19:04:39 niselog kernel: xfs_file_dio_write_aligned+0x96/0x160 [xfs]
Feb 17 19:04:39 niselog kernel: xfs_file_write_iter+0xce/0x110 [xfs]
Feb 17 19:04:39 niselog kernel: vfs_write+0x2cb/0x410
Feb 17 19:04:39 niselog kernel: __x64_sys_pwrite64+0x90/0xc0
Feb 17 19:04:39 niselog kernel: do_syscall_64+0x5c/0xf0
Feb 17 19:04:39 niselog kernel: ? __mod_memcg_lruvec_state+0x76/0xc0
Feb 17 19:04:39 niselog kernel: ? __mod_lruvec_page_state+0x97/0x160
Feb 17 19:04:39 niselog kernel: ? folio_add_new_anon_rmap+0x44/0xe0
Feb 17 19:04:39 niselog kernel: ? do_anonymous_page+0x25a/0x410
Feb 17 19:04:39 niselog kernel: ? __handle_mm_fault+0x2fb/0x690
Feb 17 19:04:39 niselog kernel: ? __count_memcg_events+0x4f/0xb0
Feb 17 19:04:39 niselog kernel: ? mm_account_fault+0x6c/0x100
Feb 17 19:04:39 niselog kernel: ? handle_mm_fault+0x116/0x270
Feb 17 19:04:39 niselog kernel: ? do_user_addr_fault+0x1d6/0x6a0
Feb 17 19:04:39 niselog kernel: ? exc_page_fault+0x62/0x150
Feb 17 19:04:39 niselog kernel: entry_SYSCALL_64_after_hwframe+0x78/0x80
Feb 17 19:04:39 niselog kernel: RIP: 0033:0x7f7e034fbc4f
Feb 17 19:04:39 niselog kernel: RSP: 002b:00007f7df486ec90 EFLAGS: 00000293 ORIG_RAX: 0000000000000012
Feb 17 19:04:39 niselog kernel: RAX: ffffffffffffffda RBX: 00007f7df486ff28 RCX: 00007f7e034fbc4f
Feb 17 19:04:39 niselog kernel: RDX: 0000000000002000 RSI: 00005631c0325000 RDI: 000000000000008a
Feb 17 19:04:39 niselog kernel: RBP: 0000000000000000 R08: 0000000000000000 R09: 0000000000295000
Feb 17 19:04:39 niselog kernel: R10: 0000000000295000 R11: 0000000000000293 R12: 00007f7e043fa658
Feb 17 19:04:39 niselog kernel: R13: 00007f7df486f038 R14: 0000000000000001 R15: 00007f7df486f010
Feb 17 19:04:39 niselog kernel: </TASK>
Feb 17 19:04:39 niselog kernel: INFO: task UV_WORKER[18]:2732233 blocked for more than 122 seconds.
Feb 17 19:04:39 niselog kernel:      Tainted: G               X  -------  ---  5.14.0-503.15.1.el9_5.x86_64 #1
Feb 17 19:04:39 niselog kernel: "echo 0 > /proc/sys/kernel/hung_task_timeout_secs" disables this message.
Feb 17 19:04:39 niselog kernel: task:UV_WORKER[18]   state:D stack:0     pid:2732233 tgid:2732033 ppid:1      flags:0x00000002
Feb 17 19:04:39 niselog kernel: Call Trace:
Feb 17 19:04:39 niselog kernel: <TASK>
Feb 17 19:04:39 niselog kernel: __schedule+0x229/0x550
Feb 17 19:04:39 niselog kernel: schedule+0x2e/0xd0
Feb 17 19:04:39 niselog kernel: schedule_preempt_disabled+0x11/0x20
Feb 17 19:04:39 niselog kernel: rwsem_down_read_slowpath+0x37f/0x4f0
Feb 17 19:04:39 niselog kernel: down_read+0x45/0xa0
Feb 17 19:04:39 niselog kernel: xfs_ilock+0x79/0x100 [xfs]
Feb 17 19:04:39 niselog kernel: xfs_file_dio_write_aligned+0xc5/0x160 [xfs]
Feb 17 19:04:39 niselog kernel: xfs_file_write_iter+0xce/0x110 [xfs]
Feb 17 19:04:39 niselog kernel: vfs_write+0x2cb/0x410
Feb 17 19:04:39 niselog kernel: __x64_sys_pwrite64+0x90/0xc0
Feb 17 19:04:39 niselog kernel: do_syscall_64+0x5c/0xf0
Feb 17 19:04:39 niselog kernel: ? do_user_addr_fault+0x1d6/0x6a0
Feb 17 19:04:39 niselog kernel: ? syscall_exit_work+0x103/0x130
Feb 17 19:04:39 niselog kernel: ? exc_page_fault+0x62/0x150
Feb 17 19:04:39 niselog kernel: entry_SYSCALL_64_after_hwframe+0x78/0x80
Feb 17 19:04:39 niselog kernel: RIP: 0033:0x7f7e034fbc4f
Feb 17 19:04:39 niselog kernel: RSP: 002b:00007f7df306bc90 EFLAGS: 00000293 ORIG_RAX: 0000000000000012
Feb 17 19:04:39 niselog kernel: RAX: ffffffffffffffda RBX: 00007f7df306cf28 RCX: 00007f7e034fbc4f
Feb 17 19:04:39 niselog kernel: RDX: 0000000000006000 RSI: 00005631c110d000 RDI: 000000000000003b
Feb 17 19:04:39 niselog kernel: RBP: 0000000000000000 R08: 0000000000000000 R09: 0000000000064000
Feb 17 19:04:39 niselog kernel: R10: 0000000000064000 R11: 0000000000000293 R12: 00007f7e043fa658
Feb 17 19:04:39 niselog kernel: R13: 00007f7df306c038 R14: 0000000000000001 R15: 00007f7df306c010
Feb 17 19:04:39 niselog kernel: </TASK>
Feb 17 19:04:39 niselog kernel: INFO: task kworker/u16:2:2888985 blocked for more than 122 seconds.
Feb 17 19:04:39 niselog kernel:      Tainted: G               X  -------  ---  5.14.0-503.15.1.el9_5.x86_64 #1
Feb 17 19:04:39 niselog kernel: "echo 0 > /proc/sys/kernel/hung_task_timeout_secs" disables this message.
Feb 17 19:04:39 niselog kernel: task:kworker/u16:2   state:D stack:0     pid:2888985 tgid:2888985 ppid:2      flags:0x00004000
Feb 17 19:04:39 niselog kernel: Workqueue: writeback wb_workfn (flush-253:6)
Feb 17 19:04:39 niselog kernel: Call Trace:
Feb 17 19:04:39 niselog kernel: <TASK>
Feb 17 19:04:39 niselog kernel: __schedule+0x229/0x550
Feb 17 19:04:39 niselog kernel: schedule+0x2e/0xd0
Feb 17 19:04:39 niselog kernel: md_write_start.part.0+0x195/0x250
Feb 17 19:04:39 niselog kernel: ? __pfx_autoremove_wake_function+0x10/0x10
Feb 17 19:04:39 niselog kernel: raid1_make_request+0x5b/0xbb [raid1]
Feb 17 19:04:39 niselog kernel: md_handle_request+0x150/0x270
Feb 17 19:04:39 niselog kernel: ? __bio_split_to_limits+0x8e/0x280
Feb 17 19:04:39 niselog kernel: __submit_bio+0x94/0x130
Feb 17 19:04:39 niselog kernel: __submit_bio_noacct+0x7e/0x1e0
Feb 17 19:04:39 niselog kernel: iomap_submit_ioend+0x4e/0x80
Feb 17 19:04:39 niselog kernel: xfs_vm_writepages+0x7a/0xb0 [xfs]
Feb 17 19:04:39 niselog kernel: do_writepages+0xcc/0x1a0
Feb 17 19:04:39 niselog kernel: ? __percpu_counter_sum_mask+0x6f/0x80
Feb 17 19:04:39 niselog kernel: __writeback_single_inode+0x41/0x270
Feb 17 19:04:39 niselog kernel: writeback_sb_inodes+0x209/0x4a0
Feb 17 19:04:39 niselog kernel: __writeback_inodes_wb+0x4c/0xe0
Feb 17 19:04:39 niselog kernel: wb_writeback+0x1d7/0x2d0
Feb 17 19:04:39 niselog kernel: wb_do_writeback+0x1d1/0x2b0
Feb 17 19:04:39 niselog kernel: wb_workfn+0x5e/0x290
Feb 17 19:04:39 niselog kernel: ? __switch_to_asm+0x3a/0x80
Feb 17 19:04:39 niselog kernel: ? finish_task_switch.isra.0+0x8c/0x2a0
Feb 17 19:04:39 niselog kernel: ? __schedule+0x231/0x550
Feb 17 19:04:39 niselog kernel: process_one_work+0x194/0x380
Feb 17 19:04:39 niselog kernel: worker_thread+0x2fe/0x410
Feb 17 19:04:39 niselog kernel: ? __pfx_worker_thread+0x10/0x10
Feb 17 19:04:39 niselog kernel: kthread+0xdd/0x100
Feb 17 19:04:39 niselog kernel: ? __pfx_kthread+0x10/0x10
Feb 17 19:04:39 niselog kernel: ret_from_fork+0x29/0x50
Feb 17 19:04:39 niselog kernel: </TASK>
Feb 17 19:04:39 niselog kernel: nvme nvme0: Device not ready; aborting reset, CSTS=0x1
Feb 17 19:04:39 niselog kernel: nvme nvme0: Abort status: 0x371
Feb 17 19:04:39 niselog kernel: nvme nvme0: Abort status: 0x371
Feb 17 19:04:39 niselog kernel: nvme nvme0: Abort status: 0x371
Feb 17 19:04:39 niselog systemd: systemd-journald@netdata.service: Watchdog timeout (limit 3min)!
Feb 17 19:04:39 niselog systemd: systemd-journald@netdata.service: Killing process 1567 (systemd-journal) with signal SIGABRT.
Feb 17 19:04:39 niselog systemd: systemd-journald.service: State 'stop-watchdog' timed out. Killing.
Feb 17 19:04:39 niselog systemd: systemd-journald.service: Killing process 814 (systemd-journal) with signal SIGKILL.
Feb 17 19:04:39 niselog systemd: systemd-journald.service: Killing process 2923856 (journal-offline) with signal SIGKILL.
Feb 17 19:04:39 niselog systemd: systemd-journald@netdata.service: State 'stop-watchdog' timed out. Killing.
Feb 17 19:04:39 niselog systemd: systemd-journald@netdata.service: Killing process 1567 (systemd-journal) with signal SIGKILL.
Feb 17 19:04:39 niselog kernel: nvme nvme0: Device not ready; aborting reset, CSTS=0x1
Feb 17 19:04:39 niselog kernel: nvme nvme0: Disabling device after reset failure: -19
Feb 17 19:04:39 niselog kernel: md: super_written gets error=-5
Feb 17 19:04:39 niselog kernel: md/raid1:md127: nvme0n1p3: rescheduling sector 26697928
Feb 17 19:04:39 niselog kernel: md/raid1:md127: Disk failure on nvme0n1p3, disabling device.#012md/raid1:md127: Operation continuing on 1 devices.
Feb 17 19:04:39 niselog kernel: nvme nvme0: Identify namespace failed (-5)
Feb 17 19:04:39 niselog kernel: XFS (nvme0n1p2): Block device removal (0x20) detected at fs_bdev_mark_dead+0x40/0x60 (fs/xfs/xfs_super.c:1179).  Shutting down filesystem.
Feb 17 19:04:39 niselog kernel: XFS (nvme0n1p2): Please unmount the filesystem and rectify the problem(s)
Feb 17 19:04:39 niselog kernel: md/raid1:md127: redirecting sector 26697928 to other mirror: sda3
Feb 17 19:04:39 niselog systemd: session-49532.scope: Deactivated successfully.
Feb 17 19:04:39 niselog systemd: session-49535.scope: Deactivated successfully.
Feb 17 19:04:39 niselog systemd: session-49534.scope: Deactivated successfully.
Feb 17 19:04:39 niselog systemd: systemd-journald@netdata.service: Main process exited, code=killed, status=9/KILL
Feb 17 19:04:39 niselog systemd: systemd-journald@netdata.service: Failed with result 'watchdog'.
Feb 17 19:04:39 niselog systemd: systemd-journald@netdata.service: Consumed 25.882s CPU time.
Feb 17 19:04:39 niselog systemd: Starting Journal Service for Namespace netdata...
Feb 17 19:04:39 niselog systemd-coredump: Failed to get EXE, ignoring: No such process
Feb 17 19:04:39 niselog systemd: systemd-journald.service: Main process exited, code=killed, status=9/KILL
Feb 17 19:04:39 niselog systemd: systemd-journald.service: Failed with result 'watchdog'.
Feb 17 19:04:39 niselog systemd-coredump: Failed to pread from coredump fd: Unexpected EOF
Feb 17 19:04:39 niselog systemd: systemd-journald.service: Consumed 1min 34.909s CPU time.
Feb 17 19:04:39 niselog systemd: systemd-journald.service: Scheduled restart job, restart counter is at 2.
Feb 17 19:04:39 niselog systemd: Stopped Journal Service.
Feb 17 19:04:39 niselog systemd: systemd-journald.service: Consumed 1min 34.909s CPU time.
Feb 17 19:04:39 niselog systemd: Starting Journal Service...
Feb 17 19:04:39 niselog : Could not parse ELF file, gelf_getehdr() failed: invalid `Elf' handle
Feb 17 19:04:39 niselog systemd-coredump: Process 814 (systemd-journal) of user 0 dumped core.
Feb 17 19:04:39 niselog systemd-coredump: Coredump diverted to /var/lib/systemd/coredump/core.systemd-journal.0.f0f07d48bddb405c8f54476773709261.814.1739786679000000.zst
Feb 17 19:04:39 niselog systemd: Started Journal Service for Namespace netdata.
Feb 17 19:04:39 niselog systemd-journald[2924825]: File /var/log/journal/cd9cc679cd964f349e957629b0d52cb2/system.journal corrupted or uncleanly shut down, renaming and replacing.
Feb 17 19:04:39 niselog systemd-journald[2924825]: Journal started
Feb 17 19:04:39 niselog systemd-journald[2924825]: System Journal (/var/log/journal/cd9cc679cd964f349e957629b0d52cb2) is 350.8M, max 1017.6M, 666.7M free.
Feb 17 19:04:39 niselog systemd[1]: session-49533.scope: Deactivated successfully.
Feb 17 19:04:39 niselog systemd[1]: systemd-journald.service: Watchdog timeout (limit 3min)!
Feb 17 19:04:39 niselog systemd[1]: systemd-journald.service: Killing process 814 (systemd-journal) with signal SIGABRT.
Feb 17 19:04:39 niselog systemd: Started Journal Service.
Feb 17 19:04:39 niselog systemd-journald[2924823]: Failed to open /dev/kmsg, ignoring: Operation not permitted
Feb 17 19:04:39 niselog systemd-journald[2924823]: File /var/log/journal/cd9cc679cd964f349e957629b0d52cb2.netdata/system.journal corrupted or uncleanly shut down, renaming and replacing.
Feb 17 19:04:39 niselog systemd-coredump[2924822]: Process 814 (systemd-journal) of user 0 dumped core.
Feb 17 19:04:39 niselog rsyslogd[1566]: imjournal: journal files changed, reloading...  [v8.2310.0-4.el9 try https://www.rsyslog.com/e/0 ]
Feb 17 19:04:56 niselog mdadm[1151]: Fail event detected on md device /dev/md/pv00, component device /dev/nvme0n1p3
2025/06/19追記
結局1か月以内にNVMe SSDが認識できなくなって、再起動レベルではだめで、電源切って再投入するまでNVMe SSDが認識されないという状況が続きました。
このため、M.2 SATA SSD 2枚構成に変更し、まずは1か月無事運用ができています。