iRedMail という postfix+dovecot で構成された複数ドメインのメールサーバを運用できるツールがある。
いにしえのqmailを使用するvpopmail みたいな感じで使えるのだが、各ドメインごとに管理者を置きたいとかになるとiRedMail 有償版(iRedAdmin-Pro)が必要になる。
2018年にvpopmailからiredmail/CentOS7環境に移行してつかっていたのだが、この度ようやく新しいサーバiredmail/AlmaLinux 9環境への移行が完了した。
というわけで、 iRedMailサーバをCentOS7からAlmaLinux 9ベースに置き換えた時に設定した内容のメモ書きです。
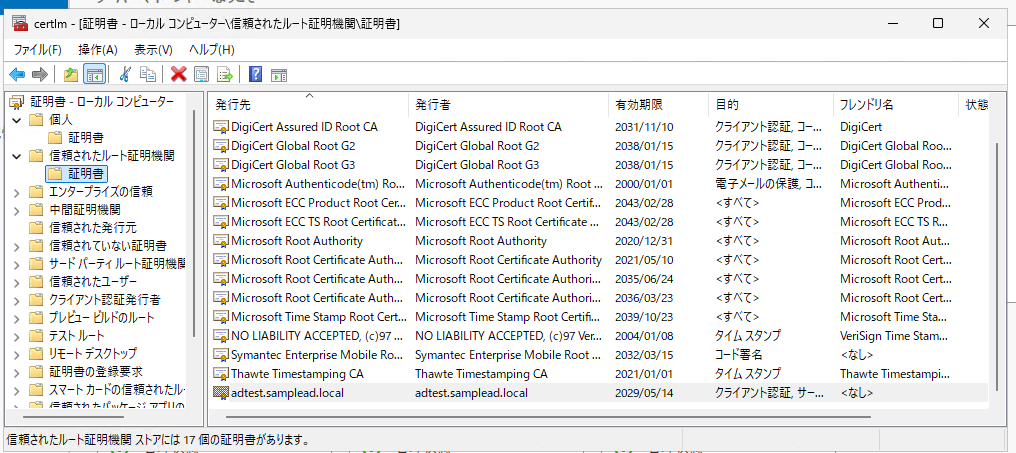
iRedMailのインストールについては公式 Install iRedMail on Red Hat Enterprise Linux, CentOS を参照のこと。SSL対応の追加作業は Request a free cert from Let’s Encrypt (for servers deployed with downloadable iRedMail installer)
トピック
(0) mysql DBを移行することについて
(1)いま新規作成すると全メールDKIM署名ありになるけど罠あり
(2)メール同期にrsyncの追加インストールを忘れずに
(3) greylisting情報の移植
(4)旧仕様クライアント対策
(5) 他サーバで送信された自ドメインが受信拒否される
(6) Barracudacentralがメールを拒否しすぎる問題
(7) mail.goo.ne.jp メールの拒否解除
(8) IPアドレスが入ったホスト名拒否設定の一部解除
(9) heloでDNSに登録されていないホスト名しゃべるメールサーバの取り扱い
(10) SOGoのタイムゾーン変更
(11) 切り替え後の運用状況確認
(12) spamasssasin の設定移植
(13) logwatchの設定調整
(14) logwatchのdovecotスクリプトカスタマイズ
(15) logrotateの設定調整
(16) Let’s Encrypt によるSSL対応を dehydrated を使って行う
(17) logwatchに spamhaus 登録検知?
(0) mysql DBを移行することについて
メール本文は /var/vmail/vmail1 以下の各ドメインディレクトリをまるごとrsyncでコピーすればOK
mysql dbについては「/var/vmail/backup/backup_mysql.sh」を実行すると、/var/vmail/backup/mysql/ 以下に/var/vmail/backup/mysql/20xx/月/日」というディレクトリが作成され、以下のようなデータが保存されている。
# ls /var/vmail/backup/mysql/2024/12/15
2024-12-15-03-30-01.log
amavisd-2024-12-15-03-30-01.sql.bz2
iredadmin-2024-12-15-03-30-01.sql.bz2
iredapd-2024-12-15-03-30-01.sql.bz2
mysql-2024-12-15-03-30-01.sql.bz2
roundcubemail-2024-12-15-03-30-01.sql.bz2
sogo-2024-12-15-03-30-01.sql.bz2
vmail-2024-12-15-03-30-01.sql.bz2
#
このうち、mysqlについては、これを移植してしまうとmysql dbにアクセスするためのユーザ情報が変わってしまうため、移行不要
移行するmyql dbは以下
vmail : postfix/dovecotが利用するユーザ情報が保管されている
iredadmin: iredamilの管理情報が保管されている
iredapd: greylist情報などの管理情報が保管されている
amavisd: 届いたメールの検査などを行うamavisdが使用
手法は「Backup and restore」を参考に
1) 「systemctl stop postfix」「systemctl stop dovecot」を実行してメールサービス停止
2) rsyncで/var/vmail/vmail1 を新サーバにコピー
3) /var/vmail/backup/backup_mysql.sh を実行して最新のバックアップ取得
4) /var/vmail/backup/mysql/20xx/月/日 を新サーバにコピー
5) 新サーバにコピーしたmysql dbのbzip2 圧縮を展開
6) 「mysql -u root データベース名」で起動して「source データベース名-日付-sql」でSQLリストア
(1) いま新規作成すると全メールDKIM署名ありになるけど罠あり
Sign DKIM signature on outgoing emails for new mail domain の「Use one DKIM key for all mail domains」に書かれている全ドメインのメールに対して、メインドメインのメールとしての署名を付けるような設定がされている。
しかし、DKIM署名は、同じドメインでないと有効とはならないので、ちゃんと設定しないとgmailでFAILとなる。
例えば、メインドメインが osakana.net だとした場合、出て行くメールにはすべて osakana.net としての署名がつく設定になっている。
( dkim._domainkey.osakana.net のTXT で v=DKIM1; p=</var/lib/dkim/osakana.pemを元にした内容> を登録。値はamavisd -c /etc/amavisd/amavisd.conf showkeys で確認する)
adosakana.local のドメインが載っていても、特に設定しない限りは osakana.net の署名を付けて出て行く設定になっているのだが、gmailでFAILとなる。
これは、 dkim._domainkey.adosakana.local の TXT に v=DKIM1; p=</var/lib/dkim/osakana.pemを元にした内容> で 登録してあったとしてもダメ。なぜかと言えば、各メールのヘッダに付与されるdkimドメイン情報は d=osakana.net となっていて、メールアドレスのドメイン adosakana.local と ヘッダのdkimドメインosakana.net は異なるため検証が失敗することになる。
これを防ぐには amavisd.conf の dkim_key と@dkim_signature_options_bysender_maps の間に以下を追加する必要がある。
dkim_key('osakana.net', "dkim", "/var/lib/dkim/osakana.net.pem");
dkim_key('adosakana.local', "dkim", "/var/lib/dkim/osakana.net.pem");
pemファイル自体はメインドメインと同じでもかまわない。
この場合は、 dkim._domainkey.adosakana.local の TXT に登録するデータ自体は dkim._domainkey.osakana.net と全く同一で問題無かった。
で、@dkim_signature_options_bysender_maps = ({ のあとに下記のようにdkim keyを実際に追加させるための処理を入れる
"osakana.net" => { d => "osakana.net", a => 'rsa-sha256', ttl => 10*24*3600 },
"adosakana.local" => { d => "adosakana.local", a => 'rsa-sha256', ttl => 10*24*3600 },
(2)メール同期に使うrsyncのインストールを忘れずに
最小インストールではrsyncがインストールされないので、rsyncを使って新旧サーバ間で /var/vmail/vmail1の同期を行う場合は、両サーバに rsyncを追加インストールするのを忘れないこと。
また、ホスト名/IPアドレス確認でnslookupコマンド, dig コマンドを使うことがあるので bind-utils も追加しておいた
(3) greylisting情報の移植
iredapdによるgreylisting設定の移植が必要
mysql dbのiredapd に含まれているので、それを移植すれば大丈夫
内容の確認については以下で行える
グレイリスト処理を行わないドメインやIPアドレスを確認するため「/opt/iredapd/tools/greylisting_admin.py –list」を実行
# /opt/iredapd/tools/greylisting_admin.py --list
Status   Sender                             -> Local Account
------------------------------------------------------------------------------
disabled 1xx.xx.xxx.230                     -> @. (anyone)
disabled 1xx.xxx.xxx.84                     -> @. (anyone)
disabled @.salesforce.com                   -> @. (anyone)
enabled  @. (anyone)                        -> @. (anyone)
#
上記だとsalesforce.com のメールと、特定のIPアドレスからのメールがグレイリスト処理対象外(disabled)となっている。
続いてホワイトリストとして登録しているドメインや具体的なメールアドレスがあるかを以下を実行して確認する
/opt/iredapd/tools/greylisting_admin.py --list-whitelist-domains
/opt/iredapd/tools/greylisting_admin.py --list-whitelists
ちなみに、現行のデフォルトは以下となっていた。
# /opt/iredapd/tools/greylisting_admin.py --list-whitelist-domains
amazon.com
aol.com
cloudfiltering.com
cloudflare.com
constantcontact.com
craigslist.org
cust-spf.exacttarget.com
ebay.com
exacttarget.com
facebook.com
facebookmail.com
fbmta.com
fishbowl.com
github.com
gmx.com
google.com
hotmail.com
icloud.com
icontact.com
inbox.com
instagram.com
iredmail.org
linkedin.com
mail.com
mailchimp.com
mailgun.com
mailjet.com
messagelabs.com
microsoft.com
outlook.com
paypal.com
pinterest.com
reddit.com
salesforce.com
sbcglobal.net
sendgrid.com
sendgrid.net
serverfault.com
stackoverflow.com
tumblr.com
twitter.com
yahoo.com
yandex.ru
zendesk.com
zoho.com
# /opt/iredapd/tools/greylisting_admin.py --list-whitelists
10.162.0.0/16 -> @., 'AUTO-UPDATE: icloud.com'
103.151.192.0/23 -> @., 'AUTO-UPDATE: cloudflare.com'
103.28.42.0/24 -> @., 'AUTO-UPDATE: ebay.com'
103.9.96.0/22 -> @., 'AUTO-UPDATE: messagelabs.com'
104.130.122.0/23 -> @., 'AUTO-UPDATE: mailgun.com'
104.130.96.0/28 -> @., 'AUTO-UPDATE: mailgun.com'
104.43.243.237 -> @., 'AUTO-UPDATE: zendesk.com'
104.44.112.128/25 -> @., 'AUTO-UPDATE: microsoft.com'
104.47.0.0/17 -> @., 'AUTO-UPDATE: github.com'
104.47.108.0/23 -> @., 'AUTO-UPDATE: hotmail.com'
104.47.20.0/23 -> @., 'AUTO-UPDATE: hotmail.com'
104.47.75.0/24 -> @., 'AUTO-UPDATE: hotmail.com'
106.50.16.0/28 -> @., 'AUTO-UPDATE: amazon.com'
107.20.18.111/32 -> @., 'AUTO-UPDATE: fishbowl.com'
107.20.210.250 -> @., 'AUTO-UPDATE: mailchimp.com'
108.174.0.0/24 -> @., 'AUTO-UPDATE: linkedin.com'
108.174.0.215 -> @., 'AUTO-UPDATE: linkedin.com'
108.174.3.0/24 -> @., 'AUTO-UPDATE: linkedin.com'
108.174.3.215 -> @., 'AUTO-UPDATE: linkedin.com'
108.174.6.0/24 -> @., 'AUTO-UPDATE: linkedin.com'
108.174.6.215 -> @., 'AUTO-UPDATE: linkedin.com'
108.175.18.45 -> @., 'AUTO-UPDATE: paypal.com'
108.175.30.45 -> @., 'AUTO-UPDATE: paypal.com'
108.177.8.0/21 -> @., 'AUTO-UPDATE: cloudflare.com'
108.177.96.0/19 -> @., 'AUTO-UPDATE: cloudflare.com'
108.179.144.0/20 -> @., 'AUTO-UPDATE: fishbowl.com'
111.221.112.0/21 -> @., 'AUTO-UPDATE: hotmail.com'
111.221.23.128/25 -> @., 'AUTO-UPDATE: hotmail.com'
111.221.26.0/27 -> @., 'AUTO-UPDATE: hotmail.com'
111.221.66.0/25 -> @., 'AUTO-UPDATE: hotmail.com'
111.221.69.128/25 -> @., 'AUTO-UPDATE: hotmail.com'
112.19.199.64/29 -> @., 'AUTO-UPDATE: icloud.com'
112.19.242.64/29 -> @., 'AUTO-UPDATE: icloud.com'
117.120.16.0/21 -> @., 'AUTO-UPDATE: messagelabs.com'
12.130.86.238 -> @., 'AUTO-UPDATE: paypal.com'
121.244.91.48/32 -> @., 'AUTO-UPDATE: zoho.com'
122.15.156.182/32 -> @., 'AUTO-UPDATE: zoho.com'
128.17.0.0/20 -> @., 'AUTO-UPDATE: cust-spf.exacttarget.com'
128.17.128.0/20 -> @., 'AUTO-UPDATE: cust-spf.exacttarget.com'
128.17.192.0/20 -> @., 'AUTO-UPDATE: cust-spf.exacttarget.com'
128.17.64.0/20 -> @., 'AUTO-UPDATE: cust-spf.exacttarget.com'
128.245.0.0/20 -> @., 'AUTO-UPDATE: cust-spf.exacttarget.com'
128.245.176.0/20 -> @., 'AUTO-UPDATE: cust-spf.exacttarget.com'
128.245.240.0/24 -> @., 'AUTO-UPDATE: cust-spf.exacttarget.com'
128.245.241.0/24 -> @., 'AUTO-UPDATE: cust-spf.exacttarget.com'
128.245.242.0/24 -> @., 'AUTO-UPDATE: cust-spf.exacttarget.com'
128.245.242.16 -> @., 'AUTO-UPDATE: exacttarget.com'
128.245.242.17 -> @., 'AUTO-UPDATE: exacttarget.com'
128.245.242.18 -> @., 'AUTO-UPDATE: exacttarget.com'
128.245.243.0/24 -> @., 'AUTO-UPDATE: cust-spf.exacttarget.com'
128.245.244.0/24 -> @., 'AUTO-UPDATE: cust-spf.exacttarget.com'
128.245.245.0/24 -> @., 'AUTO-UPDATE: cust-spf.exacttarget.com'
128.245.246.0/24 -> @., 'AUTO-UPDATE: cust-spf.exacttarget.com'
128.245.247.0/24 -> @., 'AUTO-UPDATE: cust-spf.exacttarget.com'
128.245.248.0/21 -> @., 'AUTO-UPDATE: cust-spf.exacttarget.com'
128.245.64.0/20 -> @., 'AUTO-UPDATE: cust-spf.exacttarget.com'
129.145.74.12 -> @., 'AUTO-UPDATE: mailchimp.com'
129.146.147.105 -> @., 'AUTO-UPDATE: mailchimp.com'
129.146.236.58 -> @., 'AUTO-UPDATE: mailchimp.com'
129.146.88.28 -> @., 'AUTO-UPDATE: mailchimp.com'
129.151.67.221 -> @., 'AUTO-UPDATE: mailchimp.com'
129.153.104.71 -> @., 'AUTO-UPDATE: mailchimp.com'
129.153.168.146 -> @., 'AUTO-UPDATE: mailchimp.com'
129.153.190.200 -> @., 'AUTO-UPDATE: mailchimp.com'
129.153.194.228 -> @., 'AUTO-UPDATE: mailchimp.com'
129.153.62.216 -> @., 'AUTO-UPDATE: mailchimp.com'
129.154.255.129 -> @., 'AUTO-UPDATE: mailchimp.com'
129.158.56.255 -> @., 'AUTO-UPDATE: constantcontact.com'
129.159.22.159 -> @., 'AUTO-UPDATE: mailchimp.com'
129.159.87.137 -> @., 'AUTO-UPDATE: mailchimp.com'
129.213.195.191 -> @., 'AUTO-UPDATE: mailchimp.com'
129.41.169.249 -> @., 'AUTO-UPDATE: exacttarget.com'
129.41.77.70 -> @., 'AUTO-UPDATE: paypal.com'
129.80.145.156 -> @., 'AUTO-UPDATE: constantcontact.com'
129.80.5.164 -> @., 'AUTO-UPDATE: mailchimp.com'
129.80.64.36 -> @., 'AUTO-UPDATE: constantcontact.com'
129.80.67.121 -> @., 'AUTO-UPDATE: mailchimp.com'
13.110.208.0/21 -> @., 'AUTO-UPDATE: cust-spf.exacttarget.com'
13.110.209.0/24 -> @., 'AUTO-UPDATE: exacttarget.com'
13.110.216.0/22 -> @., 'AUTO-UPDATE: cust-spf.exacttarget.com'
13.110.224.0/20 -> @., 'AUTO-UPDATE: cust-spf.exacttarget.com'
13.111.0.0/16 -> @., 'AUTO-UPDATE: cust-spf.exacttarget.com'
13.111.191.0/24 -> @., 'AUTO-UPDATE: cust-spf.exacttarget.com'
130.162.39.83 -> @., 'AUTO-UPDATE: mailchimp.com'
130.211.0.0/22 -> @., 'AUTO-UPDATE: cloudflare.com'
130.61.9.72 -> @., 'AUTO-UPDATE: mailchimp.com'
131.253.121.0/26 -> @., 'AUTO-UPDATE: microsoft.com'
131.253.30.0/24 -> @., 'AUTO-UPDATE: microsoft.com'
132.145.13.209 -> @., 'AUTO-UPDATE: mailchimp.com'
132.226.26.225 -> @., 'AUTO-UPDATE: mailchimp.com'
132.226.49.32 -> @., 'AUTO-UPDATE: mailchimp.com'
132.226.56.24 -> @., 'AUTO-UPDATE: mailchimp.com'
134.170.113.0/26 -> @., 'AUTO-UPDATE: microsoft.com'
134.170.141.64/26 -> @., 'AUTO-UPDATE: microsoft.com'
134.170.143.0/24 -> @., 'AUTO-UPDATE: microsoft.com'
134.170.174.0/24 -> @., 'AUTO-UPDATE: microsoft.com'
134.170.27.8 -> @., 'AUTO-UPDATE: microsoft.com'
135.84.80.0/24 -> @., 'AUTO-UPDATE: zoho.com'
135.84.81.0/24 -> @., 'AUTO-UPDATE: zoho.com'
135.84.82.0/24 -> @., 'AUTO-UPDATE: zoho.com'
135.84.83.0/24 -> @., 'AUTO-UPDATE: zoho.com'
136.143.160.0/24 -> @., 'AUTO-UPDATE: zoho.com'
136.143.161.0/24 -> @., 'AUTO-UPDATE: zoho.com'
136.143.162.0/24 -> @., 'AUTO-UPDATE: zoho.com'
136.143.178.49/32 -> @., 'AUTO-UPDATE: zoho.com'
136.143.182.0/23 -> @., 'AUTO-UPDATE: zoho.com'
136.143.184.0/24 -> @., 'AUTO-UPDATE: zoho.com'
136.143.188.0/24 -> @., 'AUTO-UPDATE: zoho.com'
136.143.190.0/23 -> @., 'AUTO-UPDATE: zoho.com'
136.147.128.0/20 -> @., 'AUTO-UPDATE: cust-spf.exacttarget.com'
136.147.135.0/24 -> @., 'AUTO-UPDATE: mailgun.com'
136.147.176.0/20 -> @., 'AUTO-UPDATE: cust-spf.exacttarget.com'
136.147.176.0/24 -> @., 'AUTO-UPDATE: mailgun.com'
136.147.182.0/24 -> @., 'AUTO-UPDATE: mailgun.com'
136.147.224.0/20 -> @., 'AUTO-UPDATE: cust-spf.exacttarget.com'
136.179.50.206 -> @., 'AUTO-UPDATE: zendesk.com'
139.138.35.44 -> @., 'AUTO-UPDATE: mailchimp.com'
139.138.46.121 -> @., 'AUTO-UPDATE: mailchimp.com'
139.138.46.176 -> @., 'AUTO-UPDATE: mailchimp.com'
139.138.46.219 -> @., 'AUTO-UPDATE: mailchimp.com'
139.138.57.55 -> @., 'AUTO-UPDATE: mailchimp.com'
139.138.58.119 -> @., 'AUTO-UPDATE: mailchimp.com'
139.180.17.0/24 -> @., 'AUTO-UPDATE: fishbowl.com'
139.60.152.0/22 -> @., 'AUTO-UPDATE: mailchimp.com'
140.238.148.191 -> @., 'AUTO-UPDATE: constantcontact.com'
141.148.159.229 -> @., 'AUTO-UPDATE: mailchimp.com'
141.193.184.128/25 -> @., 'AUTO-UPDATE: fishbowl.com'
141.193.184.32/27 -> @., 'AUTO-UPDATE: fishbowl.com'
141.193.184.64/26 -> @., 'AUTO-UPDATE: fishbowl.com'
141.193.185.128/25 -> @., 'AUTO-UPDATE: fishbowl.com'
141.193.185.32/27 -> @., 'AUTO-UPDATE: fishbowl.com'
141.193.185.64/26 -> @., 'AUTO-UPDATE: fishbowl.com'
141.193.32.0/23 -> @., 'AUTO-UPDATE: mailgun.com'
143.244.80.0/20 -> @., 'AUTO-UPDATE: fishbowl.com'
143.47.120.152 -> @., 'AUTO-UPDATE: constantcontact.com'
143.55.224.0/21 -> @., 'AUTO-UPDATE: mailgun.com'
143.55.232.0/22 -> @., 'AUTO-UPDATE: mailgun.com'
143.55.236.0/22 -> @., 'AUTO-UPDATE: mailgun.com'
144.160.159.21 -> @., 'AUTO-UPDATE: sbcglobal.net'
144.160.159.22 -> @., 'AUTO-UPDATE: sbcglobal.net'
144.160.235.143 -> @., 'AUTO-UPDATE: sbcglobal.net'
144.160.235.144 -> @., 'AUTO-UPDATE: sbcglobal.net'
144.178.36.0/24 -> @., 'AUTO-UPDATE: icloud.com'
144.178.38.0/24 -> @., 'AUTO-UPDATE: icloud.com'
144.24.6.140 -> @., 'AUTO-UPDATE: mailchimp.com'
144.34.32.247 -> @., 'AUTO-UPDATE: twitter.com'
144.34.33.247 -> @., 'AUTO-UPDATE: twitter.com'
144.34.8.247 -> @., 'AUTO-UPDATE: twitter.com'
144.34.9.247 -> @., 'AUTO-UPDATE: twitter.com'
144.76.86.15 -> @., 'AUTO-UPDATE: cloudfiltering.com'
146.20.112.0/26 -> @., 'AUTO-UPDATE: mailgun.com'
146.20.113.0/24 -> @., 'AUTO-UPDATE: mailgun.com'
146.20.14.104 -> @., 'AUTO-UPDATE: constantcontact.com'
146.20.14.105 -> @., 'AUTO-UPDATE: constantcontact.com'
146.20.14.106 -> @., 'AUTO-UPDATE: constantcontact.com'
146.20.14.107 -> @., 'AUTO-UPDATE: constantcontact.com'
146.20.191.0/24 -> @., 'AUTO-UPDATE: mailgun.com'
146.20.215.0/24 -> @., 'AUTO-UPDATE: fishbowl.com'
146.20.215.182 -> @., 'AUTO-UPDATE: fbmta.com'
146.88.28.0/24 -> @., 'AUTO-UPDATE: ebay.com'
147.243.1.153 -> @., 'AUTO-UPDATE: microsoft.com'
147.243.1.47 -> @., 'AUTO-UPDATE: microsoft.com'
147.243.1.48 -> @., 'AUTO-UPDATE: microsoft.com'
147.243.128.24 -> @., 'AUTO-UPDATE: microsoft.com'
147.243.128.26 -> @., 'AUTO-UPDATE: microsoft.com'
148.105.0.0/16 -> @., 'AUTO-UPDATE: mailchimp.com'
148.105.8.0/21 -> @., 'AUTO-UPDATE: ebay.com'
149.72.0.0/16 -> @., 'AUTO-UPDATE: ebay.com'
149.72.223.204 -> @., 'AUTO-UPDATE: constantcontact.com'
149.72.248.236 -> @., 'AUTO-UPDATE: reddit.com'
149.97.173.180 -> @., 'AUTO-UPDATE: zendesk.com'
15.200.201.185 -> @., 'AUTO-UPDATE: mailchimp.com'
15.200.21.50 -> @., 'AUTO-UPDATE: mailchimp.com'
15.200.44.248 -> @., 'AUTO-UPDATE: mailchimp.com'
150.230.98.160 -> @., 'AUTO-UPDATE: mailchimp.com'
151.145.38.14 -> @., 'AUTO-UPDATE: constantcontact.com'
152.67.105.195 -> @., 'AUTO-UPDATE: mailchimp.com'
152.69.200.236 -> @., 'AUTO-UPDATE: mailchimp.com'
152.70.155.126 -> @., 'AUTO-UPDATE: mailchimp.com'
155.248.208.51 -> @., 'AUTO-UPDATE: mailchimp.com'
155.248.220.138 -> @., 'AUTO-UPDATE: constantcontact.com'
155.248.234.149 -> @., 'AUTO-UPDATE: constantcontact.com'
155.248.237.141 -> @., 'AUTO-UPDATE: constantcontact.com'
157.151.208.65 -> @., 'AUTO-UPDATE: paypal.com'
157.255.1.64/29 -> @., 'AUTO-UPDATE: icloud.com'
157.55.0.192/26 -> @., 'AUTO-UPDATE: hotmail.com'
157.55.1.128/26 -> @., 'AUTO-UPDATE: hotmail.com'
157.55.11.0/25 -> @., 'AUTO-UPDATE: hotmail.com'
157.55.157.128/25 -> @., 'AUTO-UPDATE: hotmail.com'
157.55.2.0/25 -> @., 'AUTO-UPDATE: hotmail.com'
157.55.225.0/25 -> @., 'AUTO-UPDATE: hotmail.com'
157.55.49.0/25 -> @., 'AUTO-UPDATE: hotmail.com'
157.55.61.0/24 -> @., 'AUTO-UPDATE: hotmail.com'
157.55.9.128/25 -> @., 'AUTO-UPDATE: hotmail.com'
157.56.120.128/26 -> @., 'AUTO-UPDATE: microsoft.com'
157.56.232.0/21 -> @., 'AUTO-UPDATE: hotmail.com'
157.56.24.0/25 -> @., 'AUTO-UPDATE: hotmail.com'
157.56.240.0/20 -> @., 'AUTO-UPDATE: hotmail.com'
157.56.248.0/21 -> @., 'AUTO-UPDATE: hotmail.com'
157.58.196.96/29 -> @., 'AUTO-UPDATE: microsoft.com'
157.58.249.3 -> @., 'AUTO-UPDATE: microsoft.com'
157.58.30.128/25 -> @., 'AUTO-UPDATE: microsoft.com'
158.101.211.207 -> @., 'AUTO-UPDATE: mailchimp.com'
158.247.16.0/20 -> @., 'AUTO-UPDATE: fishbowl.com'
159.112.240.0/20 -> @., 'AUTO-UPDATE: mailgun.com'
159.112.242.162 -> @., 'AUTO-UPDATE: cloudflare.com'
159.135.132.128/25 -> @., 'AUTO-UPDATE: mailgun.com'
159.135.140.80/29 -> @., 'AUTO-UPDATE: mailgun.com'
159.135.224.0/20 -> @., 'AUTO-UPDATE: mailgun.com'
159.135.228.10 -> @., 'AUTO-UPDATE: cloudflare.com'
159.183.0.0/16 -> @., 'AUTO-UPDATE: ebay.com'
159.92.154.0/24 -> @., 'AUTO-UPDATE: cust-spf.exacttarget.com'
159.92.155.0/24 -> @., 'AUTO-UPDATE: cust-spf.exacttarget.com'
159.92.157.0/24 -> @., 'AUTO-UPDATE: cust-spf.exacttarget.com'
159.92.157.16 -> @., 'AUTO-UPDATE: exacttarget.com'
159.92.157.17 -> @., 'AUTO-UPDATE: exacttarget.com'
159.92.157.18 -> @., 'AUTO-UPDATE: exacttarget.com'
159.92.158.0/24 -> @., 'AUTO-UPDATE: cust-spf.exacttarget.com'
159.92.159.0/24 -> @., 'AUTO-UPDATE: cust-spf.exacttarget.com'
159.92.160.0/24 -> @., 'AUTO-UPDATE: cust-spf.exacttarget.com'
159.92.161.0/24 -> @., 'AUTO-UPDATE: cust-spf.exacttarget.com'
159.92.162.0/24 -> @., 'AUTO-UPDATE: cust-spf.exacttarget.com'
159.92.163.0/24 -> @., 'AUTO-UPDATE: cust-spf.exacttarget.com'
159.92.164.0/22 -> @., 'AUTO-UPDATE: cust-spf.exacttarget.com'
159.92.168.0/21 -> @., 'AUTO-UPDATE: cust-spf.exacttarget.com'
160.1.62.192 -> @., 'AUTO-UPDATE: mailchimp.com'
161.38.192.0/20 -> @., 'AUTO-UPDATE: mailgun.com'
161.38.204.0/22 -> @., 'AUTO-UPDATE: mailgun.com'
161.71.32.0/19 -> @., 'AUTO-UPDATE: cust-spf.exacttarget.com'
161.71.64.0/20 -> @., 'AUTO-UPDATE: cust-spf.exacttarget.com'
162.247.216.0/22 -> @., 'AUTO-UPDATE: mailchimp.com'
163.114.130.16 -> @., 'AUTO-UPDATE: instagram.com'
163.114.132.120 -> @., 'AUTO-UPDATE: instagram.com'
163.114.134.16 -> @., 'AUTO-UPDATE: instagram.com'
163.114.135.16 -> @., 'AUTO-UPDATE: instagram.com'
163.47.180.0/22 -> @., 'AUTO-UPDATE: ebay.com'
164.152.23.32 -> @., 'AUTO-UPDATE: mailchimp.com'
164.177.132.168/30 -> @., 'AUTO-UPDATE: constantcontact.com'
165.173.128.0/24 -> @., 'AUTO-UPDATE: zoho.com'
166.78.68.0/22 -> @., 'AUTO-UPDATE: mailgun.com'
166.78.68.221 -> @., 'AUTO-UPDATE: cloudflare.com'
166.78.69.169 -> @., 'AUTO-UPDATE: github.com'
166.78.69.170 -> @., 'AUTO-UPDATE: github.com'
166.78.71.131 -> @., 'AUTO-UPDATE: github.com'
167.220.67.232/29 -> @., 'AUTO-UPDATE: microsoft.com'
167.89.0.0/17 -> @., 'AUTO-UPDATE: ebay.com'
167.89.101.192/28 -> @., 'AUTO-UPDATE: github.com'
167.89.101.2 -> @., 'AUTO-UPDATE: github.com'
167.89.46.159 -> @., 'AUTO-UPDATE: cloudflare.com'
167.89.54.103 -> @., 'AUTO-UPDATE: reddit.com'
167.89.60.95 -> @., 'AUTO-UPDATE: sendgrid.com'
167.89.64.9 -> @., 'AUTO-UPDATE: cloudflare.com'
167.89.65.0 -> @., 'AUTO-UPDATE: cloudflare.com'
167.89.65.100 -> @., 'AUTO-UPDATE: cloudflare.com'
167.89.65.53 -> @., 'AUTO-UPDATE: cloudflare.com'
167.89.74.233 -> @., 'AUTO-UPDATE: cloudflare.com'
167.89.75.126 -> @., 'AUTO-UPDATE: cloudflare.com'
167.89.75.136 -> @., 'AUTO-UPDATE: cloudflare.com'
167.89.75.164 -> @., 'AUTO-UPDATE: cloudflare.com'
167.89.75.33 -> @., 'AUTO-UPDATE: cloudflare.com'
168.138.5.36 -> @., 'AUTO-UPDATE: mailchimp.com'
168.138.73.51 -> @., 'AUTO-UPDATE: mailchimp.com'
168.138.77.31 -> @., 'AUTO-UPDATE: constantcontact.com'
168.245.0.0/17 -> @., 'AUTO-UPDATE: ebay.com'
168.245.12.252 -> @., 'AUTO-UPDATE: reddit.com'
168.245.127.231 -> @., 'AUTO-UPDATE: reddit.com'
168.245.46.9 -> @., 'AUTO-UPDATE: reddit.com'
169.148.129.0/24 -> @., 'AUTO-UPDATE: zoho.com'
169.148.131.0/24 -> @., 'AUTO-UPDATE: zoho.com'
169.148.142.10/32 -> @., 'AUTO-UPDATE: zoho.com'
169.148.144.0/25 -> @., 'AUTO-UPDATE: zoho.com'
169.148.144.10/32 -> @., 'AUTO-UPDATE: zoho.com'
17.142.0.0/15 -> @., 'AUTO-UPDATE: icloud.com'
17.41.0.0/16 -> @., 'AUTO-UPDATE: icloud.com'
17.57.155.0/24 -> @., 'AUTO-UPDATE: icloud.com'
17.57.156.0/24 -> @., 'AUTO-UPDATE: icloud.com'
17.58.0.0/16 -> @., 'AUTO-UPDATE: icloud.com'
170.10.128.0/24 -> @., 'AUTO-UPDATE: zendesk.com'
170.10.129.0/24 -> @., 'AUTO-UPDATE: zendesk.com'
170.10.132.56/29 -> @., 'AUTO-UPDATE: zendesk.com'
170.10.132.64/29 -> @., 'AUTO-UPDATE: zendesk.com'
170.10.133.0/24 -> @., 'AUTO-UPDATE: zendesk.com'
172.104.245.227 -> @., 'AUTO-UPDATE: iredmail.org'
172.105.68.48 -> @., 'AUTO-UPDATE: iredmail.org'
172.217.0.0/19 -> @., 'AUTO-UPDATE: cloudflare.com'
172.217.128.0/19 -> @., 'AUTO-UPDATE: cloudflare.com'
172.217.160.0/20 -> @., 'AUTO-UPDATE: cloudflare.com'
172.217.192.0/19 -> @., 'AUTO-UPDATE: cloudflare.com'
172.217.32.0/20 -> @., 'AUTO-UPDATE: cloudflare.com'
172.253.112.0/20 -> @., 'AUTO-UPDATE: cloudflare.com'
172.253.56.0/21 -> @., 'AUTO-UPDATE: cloudflare.com'
173.0.84.0/29 -> @., 'AUTO-UPDATE: paypal.com'
173.0.84.224/27 -> @., 'AUTO-UPDATE: paypal.com'
173.0.94.244/30 -> @., 'AUTO-UPDATE: paypal.com'
173.194.0.0/16 -> @., 'AUTO-UPDATE: cloudflare.com'
173.203.79.182 -> @., 'AUTO-UPDATE: exacttarget.com'
173.203.81.39 -> @., 'AUTO-UPDATE: exacttarget.com'
173.224.161.128/25 -> @., 'AUTO-UPDATE: paypal.com'
173.224.165.0/26 -> @., 'AUTO-UPDATE: paypal.com'
173.245.48.0/20 -> @., 'AUTO-UPDATE: cloudflare.com'
174.36.114.128/30 -> @., 'AUTO-UPDATE: exacttarget.com'
174.36.114.140/30 -> @., 'AUTO-UPDATE: exacttarget.com'
174.36.114.148/30 -> @., 'AUTO-UPDATE: exacttarget.com'
174.36.114.152/29 -> @., 'AUTO-UPDATE: exacttarget.com'
174.36.84.144/29 -> @., 'AUTO-UPDATE: exacttarget.com'
174.36.84.16/29 -> @., 'AUTO-UPDATE: exacttarget.com'
174.36.84.240/29 -> @., 'AUTO-UPDATE: exacttarget.com'
174.36.84.32/29 -> @., 'AUTO-UPDATE: exacttarget.com'
174.36.84.8/29 -> @., 'AUTO-UPDATE: exacttarget.com'
174.36.85.248/30 -> @., 'AUTO-UPDATE: exacttarget.com'
174.37.67.28/30 -> @., 'AUTO-UPDATE: exacttarget.com'
175.41.215.51 -> @., 'AUTO-UPDATE: zendesk.com'
176.32.105.0/24 -> @., 'AUTO-UPDATE: amazon.com'
176.32.127.0/24 -> @., 'AUTO-UPDATE: amazon.com'
178.154.239.136/29 -> @., 'AUTO-UPDATE: yandex.ru'
178.154.239.144/28 -> @., 'AUTO-UPDATE: yandex.ru'
178.154.239.200/29 -> @., 'AUTO-UPDATE: yandex.ru'
178.154.239.208/28 -> @., 'AUTO-UPDATE: yandex.ru'
178.154.239.72/29 -> @., 'AUTO-UPDATE: yandex.ru'
178.154.239.80/28 -> @., 'AUTO-UPDATE: yandex.ru'
178.236.10.128/26 -> @., 'AUTO-UPDATE: amazon.com'
18.156.89.250 -> @., 'AUTO-UPDATE: zendesk.com'
18.157.243.190 -> @., 'AUTO-UPDATE: zendesk.com'
18.194.95.56 -> @., 'AUTO-UPDATE: zendesk.com'
18.198.96.88 -> @., 'AUTO-UPDATE: zendesk.com'
18.208.124.128/25 -> @., 'AUTO-UPDATE: fishbowl.com'
18.216.232.154 -> @., 'AUTO-UPDATE: zendesk.com'
18.235.27.253/32 -> @., 'AUTO-UPDATE: fishbowl.com'
18.236.40.242 -> @., 'AUTO-UPDATE: zendesk.com'
18.236.56.161 -> @., 'AUTO-UPDATE: constantcontact.com'
182.50.76.0/22 -> @., 'AUTO-UPDATE: exacttarget.com'
182.50.78.64/28 -> @., 'AUTO-UPDATE: paypal.com'
185.12.80.0/22 -> @., 'AUTO-UPDATE: cloudflare.com'
185.138.56.128/25 -> @., 'AUTO-UPDATE: inbox.com'
185.189.236.0/22 -> @., 'AUTO-UPDATE: mailgun.com'
185.211.120.0/22 -> @., 'AUTO-UPDATE: mailgun.com'
185.250.236.0/22 -> @., 'AUTO-UPDATE: mailgun.com'
185.250.239.148 -> @., 'AUTO-UPDATE: pinterest.com'
185.250.239.168 -> @., 'AUTO-UPDATE: pinterest.com'
185.250.239.190 -> @., 'AUTO-UPDATE: pinterest.com'
185.4.120.0/22 -> @., 'AUTO-UPDATE: ebay.com'
185.58.84.93 -> @., 'AUTO-UPDATE: zendesk.com'
185.90.20.0/22 -> @., 'AUTO-UPDATE: ebay.com'
188.172.128.0/20 -> @., 'AUTO-UPDATE: cloudflare.com'
192.0.64.0/18 -> @., 'AUTO-UPDATE: tumblr.com'
192.111.0.125 -> @., 'AUTO-UPDATE: stackoverflow.com'
192.111.0.71 -> @., 'AUTO-UPDATE: stackoverflow.com'
192.124.132.125 -> @., 'AUTO-UPDATE: stackoverflow.com'
192.124.132.71 -> @., 'AUTO-UPDATE: stackoverflow.com'
192.161.144.0/20 -> @., 'AUTO-UPDATE: cloudflare.com'
192.18.139.154 -> @., 'AUTO-UPDATE: mailchimp.com'
192.18.145.36 -> @., 'AUTO-UPDATE: constantcontact.com'
192.18.152.58 -> @., 'AUTO-UPDATE: constantcontact.com'
192.237.158.0/23 -> @., 'AUTO-UPDATE: mailgun.com'
192.237.159.42 -> @., 'AUTO-UPDATE: cloudflare.com'
192.237.159.43 -> @., 'AUTO-UPDATE: cloudflare.com'
192.254.112.0/20 -> @., 'AUTO-UPDATE: ebay.com'
192.254.112.60 -> @., 'AUTO-UPDATE: github.com'
192.254.112.98/31 -> @., 'AUTO-UPDATE: github.com'
192.254.113.10 -> @., 'AUTO-UPDATE: github.com'
192.254.113.101 -> @., 'AUTO-UPDATE: github.com'
192.254.114.176 -> @., 'AUTO-UPDATE: github.com'
192.30.252.0/22 -> @., 'AUTO-UPDATE: github.com'
192.33.11.125 -> @., 'AUTO-UPDATE: stackoverflow.com'
192.33.11.71 -> @., 'AUTO-UPDATE: stackoverflow.com'
193.109.254.0/23 -> @., 'AUTO-UPDATE: messagelabs.com'
193.122.128.100 -> @., 'AUTO-UPDATE: mailchimp.com'
193.123.56.63 -> @., 'AUTO-UPDATE: mailchimp.com'
194.106.220.0/23 -> @., 'AUTO-UPDATE: messagelabs.com'
194.113.24.0/22 -> @., 'AUTO-UPDATE: ebay.com'
194.154.193.192/27 -> @., 'AUTO-UPDATE: amazon.com'
194.19.134.0/25 -> @., 'AUTO-UPDATE: inbox.com'
194.64.234.129 -> @., 'AUTO-UPDATE: paypal.com'
195.234.109.226/32 -> @., 'AUTO-UPDATE: tumblr.com'
195.245.230.0/23 -> @., 'AUTO-UPDATE: messagelabs.com'
195.54.172.0/23 -> @., 'AUTO-UPDATE: ebay.com'
198.178.234.57 -> @., 'AUTO-UPDATE: paypal.com'
198.2.128.0/18 -> @., 'AUTO-UPDATE: cloudflare.com'
198.2.128.0/24 -> @., 'AUTO-UPDATE: cloudflare.com'
198.2.132.0/22 -> @., 'AUTO-UPDATE: cloudflare.com'
198.2.136.0/23 -> @., 'AUTO-UPDATE: cloudflare.com'
198.2.145.0/24 -> @., 'AUTO-UPDATE: cloudflare.com'
198.2.177.0/24 -> @., 'AUTO-UPDATE: cloudflare.com'
198.2.178.0/23 -> @., 'AUTO-UPDATE: cloudflare.com'
198.2.180.0/24 -> @., 'AUTO-UPDATE: cloudflare.com'
198.2.186.0/23 -> @., 'AUTO-UPDATE: cloudflare.com'
198.21.0.0/21 -> @., 'AUTO-UPDATE: ebay.com'
198.244.48.0/20 -> @., 'AUTO-UPDATE: mailgun.com'
198.244.59.30 -> @., 'AUTO-UPDATE: pinterest.com'
198.244.59.33 -> @., 'AUTO-UPDATE: pinterest.com'
198.244.59.35 -> @., 'AUTO-UPDATE: pinterest.com'
198.244.60.0/22 -> @., 'AUTO-UPDATE: mailgun.com'
198.245.80.0/20 -> @., 'AUTO-UPDATE: cust-spf.exacttarget.com'
198.245.81.0/24 -> @., 'AUTO-UPDATE: mailgun.com'
198.252.206.125 -> @., 'AUTO-UPDATE: stackoverflow.com'
198.252.206.71 -> @., 'AUTO-UPDATE: stackoverflow.com'
198.37.144.0/20 -> @., 'AUTO-UPDATE: ebay.com'
198.37.152.186 -> @., 'AUTO-UPDATE: zendesk.com'
198.61.254.0/23 -> @., 'AUTO-UPDATE: mailgun.com'
198.61.254.21 -> @., 'AUTO-UPDATE: pinterest.com'
198.61.254.231 -> @., 'AUTO-UPDATE: paypal.com'
199.101.161.130 -> @., 'AUTO-UPDATE: linkedin.com'
199.101.162.0/25 -> @., 'AUTO-UPDATE: linkedin.com'
199.122.120.0/21 -> @., 'AUTO-UPDATE: cust-spf.exacttarget.com'
199.122.123.0/24 -> @., 'AUTO-UPDATE: mailgun.com'
199.127.232.0/22 -> @., 'AUTO-UPDATE: amazon.com'
199.15.212.0/22 -> @., 'AUTO-UPDATE: cloudflare.com'
199.16.156.0/22 -> @., 'AUTO-UPDATE: twitter.com'
199.255.192.0/22 -> @., 'AUTO-UPDATE: amazon.com'
199.33.145.1 -> @., 'AUTO-UPDATE: mailchimp.com'
199.33.145.32 -> @., 'AUTO-UPDATE: mailchimp.com'
199.34.22.36/32 -> @., 'AUTO-UPDATE: zoho.com'
199.59.148.0/22 -> @., 'AUTO-UPDATE: twitter.com'
199.67.80.2/32 -> @., 'AUTO-UPDATE: zoho.com'
199.67.82.2/32 -> @., 'AUTO-UPDATE: zoho.com'
199.67.84.0/24 -> @., 'AUTO-UPDATE: zoho.com'
199.67.86.0/24 -> @., 'AUTO-UPDATE: zoho.com'
199.67.88.0/24 -> @., 'AUTO-UPDATE: zoho.com'
20.105.209.76/30 -> @., 'AUTO-UPDATE: microsoft.com'
20.107.239.64/30 -> @., 'AUTO-UPDATE: microsoft.com'
20.118.139.208/30 -> @., 'AUTO-UPDATE: microsoft.com'
20.141.10.196 -> @., 'AUTO-UPDATE: microsoft.com'
20.185.214.0/27 -> @., 'AUTO-UPDATE: fbmta.com'
20.185.214.32/27 -> @., 'AUTO-UPDATE: fbmta.com'
20.185.214.64/27 -> @., 'AUTO-UPDATE: fbmta.com'
20.51.6.32/30 -> @., 'AUTO-UPDATE: microsoft.com'
20.51.98.61 -> @., 'AUTO-UPDATE: constantcontact.com'
20.52.128.133 -> @., 'AUTO-UPDATE: zendesk.com'
20.52.52.2 -> @., 'AUTO-UPDATE: zendesk.com'
20.59.80.4/30 -> @., 'AUTO-UPDATE: microsoft.com'
20.63.210.192/28 -> @., 'AUTO-UPDATE: microsoft.com'
20.69.8.108/30 -> @., 'AUTO-UPDATE: microsoft.com'
20.83.222.104/30 -> @., 'AUTO-UPDATE: microsoft.com'
20.88.157.184/30 -> @., 'AUTO-UPDATE: microsoft.com'
20.94.180.64/28 -> @., 'AUTO-UPDATE: microsoft.com'
20.97.34.220/30 -> @., 'AUTO-UPDATE: microsoft.com'
20.98.148.156/30 -> @., 'AUTO-UPDATE: microsoft.com'
20.98.194.68/30 -> @., 'AUTO-UPDATE: microsoft.com'
2001:4860:4000::/36 -> @., 'AUTO-UPDATE: cloudflare.com'
202.129.242.0/23 -> @., 'AUTO-UPDATE: exacttarget.com'
202.177.148.100 -> @., 'AUTO-UPDATE: microsoft.com'
202.177.148.110 -> @., 'AUTO-UPDATE: microsoft.com'
203.122.32.250 -> @., 'AUTO-UPDATE: microsoft.com'
203.145.57.160/27 -> @., 'AUTO-UPDATE: ebay.com'
203.32.4.25 -> @., 'AUTO-UPDATE: microsoft.com'
203.55.21.0/24 -> @., 'AUTO-UPDATE: ebay.com'
203.81.17.0/24 -> @., 'AUTO-UPDATE: amazon.com'
204.11.168.0/21 -> @., 'AUTO-UPDATE: icontact.com'
204.13.11.48/29 -> @., 'AUTO-UPDATE: paypal.com'
204.14.232.0/21 -> @., 'AUTO-UPDATE: exacttarget.com'
204.14.232.64/28 -> @., 'AUTO-UPDATE: icontact.com'
204.14.234.64/28 -> @., 'AUTO-UPDATE: paypal.com'
204.141.32.0/23 -> @., 'AUTO-UPDATE: zoho.com'
204.141.42.0/23 -> @., 'AUTO-UPDATE: zoho.com'
204.220.160.0/21 -> @., 'AUTO-UPDATE: mailgun.com'
204.220.168.0/21 -> @., 'AUTO-UPDATE: mailgun.com'
204.220.176.0/20 -> @., 'AUTO-UPDATE: mailgun.com'
204.232.168.0/24 -> @., 'AUTO-UPDATE: fishbowl.com'
204.75.142.0/24 -> @., 'AUTO-UPDATE: ebay.com'
204.92.114.187 -> @., 'AUTO-UPDATE: paypal.com'
204.92.114.203 -> @., 'AUTO-UPDATE: twitter.com'
204.92.114.204/31 -> @., 'AUTO-UPDATE: twitter.com'
205.139.110.0/24 -> @., 'AUTO-UPDATE: zendesk.com'
205.201.128.0/20 -> @., 'AUTO-UPDATE: cloudflare.com'
205.201.131.128/25 -> @., 'AUTO-UPDATE: cloudflare.com'
205.201.134.128/25 -> @., 'AUTO-UPDATE: cloudflare.com'
205.201.136.0/23 -> @., 'AUTO-UPDATE: cloudflare.com'
205.201.137.229 -> @., 'AUTO-UPDATE: ebay.com'
205.201.139.0/24 -> @., 'AUTO-UPDATE: cloudflare.com'
205.207.104.0/22 -> @., 'AUTO-UPDATE: constantcontact.com'
205.220.167.17 -> @., 'AUTO-UPDATE: instagram.com'
205.220.167.98 -> @., 'AUTO-UPDATE: constantcontact.com'
205.220.179.17 -> @., 'AUTO-UPDATE: instagram.com'
205.220.179.98 -> @., 'AUTO-UPDATE: constantcontact.com'
205.251.233.32/32 -> @., 'AUTO-UPDATE: amazon.com'
205.251.233.36/32 -> @., 'AUTO-UPDATE: amazon.com'
206.165.246.80/29 -> @., 'AUTO-UPDATE: ebay.com'
206.191.224.0/19 -> @., 'AUTO-UPDATE: microsoft.com'
206.246.157.1 -> @., 'AUTO-UPDATE: exacttarget.com'
206.25.247.143 -> @., 'AUTO-UPDATE: paypal.com'
206.25.247.155 -> @., 'AUTO-UPDATE: paypal.com'
206.55.144.0/20 -> @., 'AUTO-UPDATE: amazon.com'
207.126.144.0/20 -> @., 'AUTO-UPDATE: exacttarget.com'
207.171.160.0/19 -> @., 'AUTO-UPDATE: amazon.com'
207.211.30.128/25 -> @., 'AUTO-UPDATE: zendesk.com'
207.211.30.64/26 -> @., 'AUTO-UPDATE: zendesk.com'
207.211.31.0/25 -> @., 'AUTO-UPDATE: zendesk.com'
207.211.41.113 -> @., 'AUTO-UPDATE: zendesk.com'
207.218.90.122 -> @., 'AUTO-UPDATE: zendesk.com'
207.250.68.0/24 -> @., 'AUTO-UPDATE: cust-spf.exacttarget.com'
207.46.116.128/29 -> @., 'AUTO-UPDATE: hotmail.com'
207.46.117.0/24 -> @., 'AUTO-UPDATE: hotmail.com'
207.46.132.128/27 -> @., 'AUTO-UPDATE: hotmail.com'
207.46.198.0/25 -> @., 'AUTO-UPDATE: hotmail.com'
207.46.200.0/27 -> @., 'AUTO-UPDATE: hotmail.com'
207.46.22.35 -> @., 'AUTO-UPDATE: microsoft.com'
207.46.4.128/25 -> @., 'AUTO-UPDATE: hotmail.com'
207.46.50.192/26 -> @., 'AUTO-UPDATE: hotmail.com'
207.46.50.224 -> @., 'AUTO-UPDATE: hotmail.com'
207.46.50.72 -> @., 'AUTO-UPDATE: microsoft.com'
207.46.50.82 -> @., 'AUTO-UPDATE: microsoft.com'
207.46.52.71 -> @., 'AUTO-UPDATE: microsoft.com'
207.46.52.79 -> @., 'AUTO-UPDATE: microsoft.com'
207.46.58.128/25 -> @., 'AUTO-UPDATE: hotmail.com'
207.67.38.0/24 -> @., 'AUTO-UPDATE: cust-spf.exacttarget.com'
207.67.98.192/27 -> @., 'AUTO-UPDATE: cust-spf.exacttarget.com'
207.68.176.0/26 -> @., 'AUTO-UPDATE: hotmail.com'
207.68.176.96/27 -> @., 'AUTO-UPDATE: hotmail.com'
207.97.204.96/29 -> @., 'AUTO-UPDATE: constantcontact.com'
208.117.48.0/20 -> @., 'AUTO-UPDATE: ebay.com'
208.185.229.45 -> @., 'AUTO-UPDATE: paypal.com'
208.201.241.163 -> @., 'AUTO-UPDATE: paypal.com'
208.40.232.70 -> @., 'AUTO-UPDATE: paypal.com'
208.43.21.28/30 -> @., 'AUTO-UPDATE: exacttarget.com'
208.43.21.64/29 -> @., 'AUTO-UPDATE: exacttarget.com'
208.43.21.72/30 -> @., 'AUTO-UPDATE: exacttarget.com'
208.64.132.0/22 -> @., 'AUTO-UPDATE: paypal.com'
208.72.249.240/29 -> @., 'AUTO-UPDATE: paypal.com'
208.74.204.5 -> @., 'AUTO-UPDATE: constantcontact.com'
208.74.204.9 -> @., 'AUTO-UPDATE: constantcontact.com'
208.75.120.0/22 -> @., 'AUTO-UPDATE: constantcontact.com'
208.82.237.104/31 -> @., 'AUTO-UPDATE: craigslist.org'
208.82.237.96/29 -> @., 'AUTO-UPDATE: craigslist.org'
208.82.238.104/31 -> @., 'AUTO-UPDATE: craigslist.org'
208.82.238.96/29 -> @., 'AUTO-UPDATE: craigslist.org'
208.85.50.137 -> @., 'AUTO-UPDATE: paypal.com'
209.43.22.0/28 -> @., 'AUTO-UPDATE: cust-spf.exacttarget.com'
209.46.117.168 -> @., 'AUTO-UPDATE: paypal.com'
209.46.117.179 -> @., 'AUTO-UPDATE: paypal.com'
209.61.151.0/24 -> @., 'AUTO-UPDATE: mailgun.com'
209.61.151.236 -> @., 'AUTO-UPDATE: pinterest.com'
209.61.151.249 -> @., 'AUTO-UPDATE: pinterest.com'
209.61.151.251 -> @., 'AUTO-UPDATE: pinterest.com'
209.67.98.46 -> @., 'AUTO-UPDATE: paypal.com'
209.67.98.59 -> @., 'AUTO-UPDATE: paypal.com'
209.85.128.0/17 -> @., 'AUTO-UPDATE: cloudflare.com'
212.123.28.40/32 -> @., 'AUTO-UPDATE: amazon.com'
212.227.126.224 -> @., 'AUTO-UPDATE: gmx.com'
212.227.126.225 -> @., 'AUTO-UPDATE: gmx.com'
212.227.126.226 -> @., 'AUTO-UPDATE: gmx.com'
212.227.126.227 -> @., 'AUTO-UPDATE: gmx.com'
212.227.15.15 -> @., 'AUTO-UPDATE: gmx.com'
212.227.15.18 -> @., 'AUTO-UPDATE: gmx.com'
212.227.15.19 -> @., 'AUTO-UPDATE: gmx.com'
212.227.15.44 -> @., 'AUTO-UPDATE: gmx.com'
212.227.15.45 -> @., 'AUTO-UPDATE: gmx.com'
212.227.15.46 -> @., 'AUTO-UPDATE: gmx.com'
212.227.15.47 -> @., 'AUTO-UPDATE: gmx.com'
212.227.15.50 -> @., 'AUTO-UPDATE: gmx.com'
212.227.15.52 -> @., 'AUTO-UPDATE: gmx.com'
212.227.15.53 -> @., 'AUTO-UPDATE: gmx.com'
212.227.17.20 -> @., 'AUTO-UPDATE: gmx.com'
212.227.17.21 -> @., 'AUTO-UPDATE: gmx.com'
212.227.17.22 -> @., 'AUTO-UPDATE: gmx.com'
212.227.17.26 -> @., 'AUTO-UPDATE: gmx.com'
212.227.17.28 -> @., 'AUTO-UPDATE: gmx.com'
212.227.17.29 -> @., 'AUTO-UPDATE: gmx.com'
213.199.128.139 -> @., 'AUTO-UPDATE: microsoft.com'
213.199.128.145 -> @., 'AUTO-UPDATE: microsoft.com'
213.199.138.181 -> @., 'AUTO-UPDATE: microsoft.com'
213.199.138.191 -> @., 'AUTO-UPDATE: microsoft.com'
213.199.161.128/27 -> @., 'AUTO-UPDATE: hotmail.com'
213.199.177.0/26 -> @., 'AUTO-UPDATE: hotmail.com'
216.128.126.97 -> @., 'AUTO-UPDATE: paypal.com'
216.136.162.120/29 -> @., 'AUTO-UPDATE: paypal.com'
216.136.162.65 -> @., 'AUTO-UPDATE: paypal.com'
216.136.168.80/28 -> @., 'AUTO-UPDATE: paypal.com'
216.139.64.0/19 -> @., 'AUTO-UPDATE: fishbowl.com'
216.145.221.0/24 -> @., 'AUTO-UPDATE: zendesk.com'
216.17.150.242 -> @., 'AUTO-UPDATE: constantcontact.com'
216.17.150.251 -> @., 'AUTO-UPDATE: constantcontact.com'
216.198.0.0/18 -> @., 'AUTO-UPDATE: cloudflare.com'
216.203.30.55 -> @., 'AUTO-UPDATE: exacttarget.com'
216.203.33.178/31 -> @., 'AUTO-UPDATE: exacttarget.com'
216.205.24.0/24 -> @., 'AUTO-UPDATE: zendesk.com'
216.221.160.0/19 -> @., 'AUTO-UPDATE: amazon.com'
216.239.32.0/19 -> @., 'AUTO-UPDATE: cloudflare.com'
216.24.224.0/20 -> @., 'AUTO-UPDATE: icontact.com'
216.58.192.0/19 -> @., 'AUTO-UPDATE: cloudflare.com'
216.66.217.240/29 -> @., 'AUTO-UPDATE: paypal.com'
216.71.138.33 -> @., 'AUTO-UPDATE: mailchimp.com'
216.71.152.207 -> @., 'AUTO-UPDATE: ebay.com'
216.71.154.29 -> @., 'AUTO-UPDATE: ebay.com'
216.71.155.89 -> @., 'AUTO-UPDATE: ebay.com'
216.74.162.13 -> @., 'AUTO-UPDATE: ebay.com'
216.74.162.14 -> @., 'AUTO-UPDATE: ebay.com'
216.82.240.0/20 -> @., 'AUTO-UPDATE: messagelabs.com'
216.99.5.67 -> @., 'AUTO-UPDATE: microsoft.com'
216.99.5.68 -> @., 'AUTO-UPDATE: microsoft.com'
217.175.194.0/24 -> @., 'AUTO-UPDATE: ebay.com'
217.77.141.52 -> @., 'AUTO-UPDATE: microsoft.com'
217.77.141.59 -> @., 'AUTO-UPDATE: microsoft.com'
222.73.195.64/29 -> @., 'AUTO-UPDATE: icloud.com'
223.165.113.0/24 -> @., 'AUTO-UPDATE: ebay.com'
223.165.115.0/24 -> @., 'AUTO-UPDATE: ebay.com'
223.165.118.0/23 -> @., 'AUTO-UPDATE: ebay.com'
223.165.120.0/23 -> @., 'AUTO-UPDATE: ebay.com'
23.103.224.0/19 -> @., 'AUTO-UPDATE: microsoft.com'
23.249.208.0/20 -> @., 'AUTO-UPDATE: amazon.com'
23.251.224.0/19 -> @., 'AUTO-UPDATE: amazon.com'
23.253.141.0/24 -> @., 'AUTO-UPDATE: fishbowl.com'
23.253.182.0/23 -> @., 'AUTO-UPDATE: mailgun.com'
23.253.182.103 -> @., 'AUTO-UPDATE: cloudflare.com'
23.253.183.145 -> @., 'AUTO-UPDATE: cloudflare.com'
23.253.183.146 -> @., 'AUTO-UPDATE: cloudflare.com'
23.253.183.147 -> @., 'AUTO-UPDATE: cloudflare.com'
23.253.183.148 -> @., 'AUTO-UPDATE: cloudflare.com'
23.253.183.150 -> @., 'AUTO-UPDATE: cloudflare.com'
2404:6800:4000::/36 -> @., 'AUTO-UPDATE: cloudflare.com'
2607:13c0:0001:0000:0000:0000:0000:7000/116 -> @., 'AUTO-UPDATE: zoho.com'
2607:13c0:0002:0000:0000:0000:0000:1000/116 -> @., 'AUTO-UPDATE: zoho.com'
2607:13c0:0004:0000:0000:0000:0000:0000/116 -> @., 'AUTO-UPDATE: zoho.com'
2607:f8b0:4000::/36 -> @., 'AUTO-UPDATE: cloudflare.com'
2620:109:c003:104::/64 -> @., 'AUTO-UPDATE: linkedin.com'
2620:109:c006:104::/64 -> @., 'AUTO-UPDATE: linkedin.com'
2620:109:c00d:104::/64 -> @., 'AUTO-UPDATE: linkedin.com'
2620:10d:c090:400::8:1 -> @., 'AUTO-UPDATE: instagram.com'
2620:10d:c091:400::8:1 -> @., 'AUTO-UPDATE: instagram.com'
2620:10d:c09b:400::8:1 -> @., 'AUTO-UPDATE: instagram.com'
2620:10d:c09c:400::8:1 -> @., 'AUTO-UPDATE: instagram.com'
2620:119:50c0:207::/64 -> @., 'AUTO-UPDATE: linkedin.com'
2800:3f0:4000::/36 -> @., 'AUTO-UPDATE: cloudflare.com'
2a00:1450:4000::/36 -> @., 'AUTO-UPDATE: cloudflare.com'
2a01:111:f400::/48 -> @., 'AUTO-UPDATE: github.com'
2a01:111:f403:8000::/50 -> @., 'AUTO-UPDATE: hotmail.com'
2a01:111:f403:8000::/51 -> @., 'AUTO-UPDATE: github.com'
2a01:111:f403::/49 -> @., 'AUTO-UPDATE: github.com'
2a01:111:f403:c000::/51 -> @., 'AUTO-UPDATE: github.com'
2a01:111:f403:f000::/52 -> @., 'AUTO-UPDATE: github.com'
2a01:7e01::f03c:91ff:fe74:9543 -> @., 'AUTO-UPDATE: iredmail.org'
2a01:7e01::f03c:93ff:fe25:7e10 -> @., 'AUTO-UPDATE: iredmail.org'
2a02:6b8:0:1472::/64 -> @., 'AUTO-UPDATE: yandex.ru'
2a02:6b8:0:1619::/64 -> @., 'AUTO-UPDATE: yandex.ru'
2a02:6b8:0:1a2d::/64 -> @., 'AUTO-UPDATE: yandex.ru'
2a02:6b8:0:801::/64 -> @., 'AUTO-UPDATE: yandex.ru'
2a02:6b8:c00::/40 -> @., 'AUTO-UPDATE: yandex.ru'
2c0f:fb50:4000::/36 -> @., 'AUTO-UPDATE: cloudflare.com'
3.129.120.190 -> @., 'AUTO-UPDATE: zendesk.com'
3.210.190.0/24 -> @., 'AUTO-UPDATE: fishbowl.com'
3.64.143.187 -> @., 'AUTO-UPDATE: cloudfiltering.com'
3.70.123.177 -> @., 'AUTO-UPDATE: zendesk.com'
3.78.6.244 -> @., 'AUTO-UPDATE: cloudfiltering.com'
3.93.157.0/24 -> @., 'AUTO-UPDATE: fishbowl.com'
3.94.40.108 -> @., 'AUTO-UPDATE: fbmta.com'
34.195.217.107 -> @., 'AUTO-UPDATE: zendesk.com'
34.215.104.144 -> @., 'AUTO-UPDATE: zendesk.com'
34.218.116.3 -> @., 'AUTO-UPDATE: constantcontact.com'
34.225.212.172/32 -> @., 'AUTO-UPDATE: icontact.com'
35.161.32.253 -> @., 'AUTO-UPDATE: zendesk.com'
35.167.93.243 -> @., 'AUTO-UPDATE: zendesk.com'
35.176.132.251 -> @., 'AUTO-UPDATE: mailchimp.com'
35.190.247.0/24 -> @., 'AUTO-UPDATE: cloudflare.com'
35.191.0.0/16 -> @., 'AUTO-UPDATE: cloudflare.com'
35.205.92.9 -> @., 'AUTO-UPDATE: messagelabs.com'
35.242.169.159 -> @., 'AUTO-UPDATE: messagelabs.com'
37.140.190.0/23 -> @., 'AUTO-UPDATE: yandex.ru'
40.107.0.0/16 -> @., 'AUTO-UPDATE: github.com'
40.112.65.63 -> @., 'AUTO-UPDATE: microsoft.com'
40.233.64.216 -> @., 'AUTO-UPDATE: constantcontact.com'
40.233.83.78 -> @., 'AUTO-UPDATE: constantcontact.com'
40.233.88.28 -> @., 'AUTO-UPDATE: constantcontact.com'
40.92.0.0/15 -> @., 'AUTO-UPDATE: github.com'
40.92.0.0/16 -> @., 'AUTO-UPDATE: hotmail.com'
44.193.121.189 -> @., 'AUTO-UPDATE: stackoverflow.com'
44.206.138.57 -> @., 'AUTO-UPDATE: zendesk.com'
44.217.45.156/32 -> @., 'AUTO-UPDATE: fishbowl.com'
44.236.56.93 -> @., 'AUTO-UPDATE: zendesk.com'
44.238.220.251 -> @., 'AUTO-UPDATE: zendesk.com'
45.14.148.0/22 -> @., 'AUTO-UPDATE: mailjet.com'
46.19.170.16 -> @., 'AUTO-UPDATE: constantcontact.com'
46.226.48.0/21 -> @., 'AUTO-UPDATE: messagelabs.com'
5.45.198.0/23 -> @., 'AUTO-UPDATE: yandex.ru'
5.45.224.0/25 -> @., 'AUTO-UPDATE: yandex.ru'
50.18.121.236 -> @., 'AUTO-UPDATE: exacttarget.com'
50.18.121.248 -> @., 'AUTO-UPDATE: exacttarget.com'
50.18.123.221 -> @., 'AUTO-UPDATE: exacttarget.com'
50.18.124.70 -> @., 'AUTO-UPDATE: exacttarget.com'
50.18.125.237 -> @., 'AUTO-UPDATE: exacttarget.com'
50.18.125.97 -> @., 'AUTO-UPDATE: exacttarget.com'
50.18.126.162 -> @., 'AUTO-UPDATE: exacttarget.com'
50.18.45.249 -> @., 'AUTO-UPDATE: exacttarget.com'
50.31.32.0/19 -> @., 'AUTO-UPDATE: ebay.com'
50.31.36.205 -> @., 'AUTO-UPDATE: sendgrid.com'
50.56.130.220 -> @., 'AUTO-UPDATE: constantcontact.com'
50.56.130.221 -> @., 'AUTO-UPDATE: constantcontact.com'
50.56.130.222 -> @., 'AUTO-UPDATE: constantcontact.com'
51.250.56.144/28 -> @., 'AUTO-UPDATE: yandex.ru'
51.250.56.16/28 -> @., 'AUTO-UPDATE: yandex.ru'
51.250.56.80/28 -> @., 'AUTO-UPDATE: yandex.ru'
52.1.14.157 -> @., 'AUTO-UPDATE: mailchimp.com'
52.100.0.0/15 -> @., 'AUTO-UPDATE: github.com'
52.102.0.0/16 -> @., 'AUTO-UPDATE: github.com'
52.103.0.0/17 -> @., 'AUTO-UPDATE: github.com'
52.119.213.144/28 -> @., 'AUTO-UPDATE: amazon.com'
52.185.106.240/28 -> @., 'AUTO-UPDATE: microsoft.com'
52.207.191.216 -> @., 'AUTO-UPDATE: zendesk.com'
52.222.62.51 -> @., 'AUTO-UPDATE: mailchimp.com'
52.222.73.120/32 -> @., 'AUTO-UPDATE: mailchimp.com'
52.222.73.83 -> @., 'AUTO-UPDATE: mailchimp.com'
52.222.75.85 -> @., 'AUTO-UPDATE: mailchimp.com'
52.222.89.228 -> @., 'AUTO-UPDATE: mailchimp.com'
52.234.172.96/28 -> @., 'AUTO-UPDATE: microsoft.com'
52.235.253.128 -> @., 'AUTO-UPDATE: microsoft.com'
52.236.28.240/28 -> @., 'AUTO-UPDATE: microsoft.com'
52.28.63.81 -> @., 'AUTO-UPDATE: zendesk.com'
52.37.142.146 -> @., 'AUTO-UPDATE: zendesk.com'
52.38.191.241 -> @., 'AUTO-UPDATE: stackoverflow.com'
52.5.230.59/32 -> @., 'AUTO-UPDATE: icontact.com'
52.50.24.208 -> @., 'AUTO-UPDATE: reddit.com'
52.58.216.183 -> @., 'AUTO-UPDATE: zendesk.com'
52.59.143.3 -> @., 'AUTO-UPDATE: zendesk.com'
52.60.115.116 -> @., 'AUTO-UPDATE: mailchimp.com'
52.60.41.5 -> @., 'AUTO-UPDATE: zendesk.com'
52.61.91.9 -> @., 'AUTO-UPDATE: mailchimp.com'
52.71.0.205/32 -> @., 'AUTO-UPDATE: icontact.com'
52.73.203.75 -> @., 'AUTO-UPDATE: stackoverflow.com'
52.94.124.0/28 -> @., 'AUTO-UPDATE: amazon.com'
52.95.48.152/29 -> @., 'AUTO-UPDATE: amazon.com'
52.95.49.88/29 -> @., 'AUTO-UPDATE: amazon.com'
54.165.19.38 -> @., 'AUTO-UPDATE: fbmta.com'
54.174.52.0/24 -> @., 'AUTO-UPDATE: fishbowl.com'
54.174.57.0/24 -> @., 'AUTO-UPDATE: fishbowl.com'
54.174.59.0/24 -> @., 'AUTO-UPDATE: fishbowl.com'
54.174.60.0/23 -> @., 'AUTO-UPDATE: fishbowl.com'
54.174.63.0/24 -> @., 'AUTO-UPDATE: fishbowl.com'
54.186.193.102/32 -> @., 'AUTO-UPDATE: mailchimp.com'
54.191.223.56 -> @., 'AUTO-UPDATE: zendesk.com'
54.213.20.246 -> @., 'AUTO-UPDATE: zendesk.com'
54.214.39.184 -> @., 'AUTO-UPDATE: paypal.com'
54.240.0.0/18 -> @., 'AUTO-UPDATE: amazon.com'
54.240.64.0/19 -> @., 'AUTO-UPDATE: amazon.com'
54.240.96.0/19 -> @., 'AUTO-UPDATE: amazon.com'
54.241.16.209 -> @., 'AUTO-UPDATE: paypal.com'
54.244.242.0/24 -> @., 'AUTO-UPDATE: paypal.com'
54.255.61.23 -> @., 'AUTO-UPDATE: zendesk.com'
54.90.148.255/32 -> @., 'AUTO-UPDATE: icontact.com'
62.17.146.128/26 -> @., 'AUTO-UPDATE: exacttarget.com'
62.253.227.114 -> @., 'AUTO-UPDATE: github.com'
63.128.21.0/24 -> @., 'AUTO-UPDATE: zendesk.com'
63.80.14.0/23 -> @., 'AUTO-UPDATE: paypal.com'
64.127.115.252 -> @., 'AUTO-UPDATE: paypal.com'
64.132.88.0/23 -> @., 'AUTO-UPDATE: cust-spf.exacttarget.com'
64.132.92.0/24 -> @., 'AUTO-UPDATE: cust-spf.exacttarget.com'
64.18.0.0/20 -> @., 'AUTO-UPDATE: exacttarget.com'
64.20.241.45 -> @., 'AUTO-UPDATE: exacttarget.com'
64.207.219.10 -> @., 'AUTO-UPDATE: linkedin.com'
64.207.219.11 -> @., 'AUTO-UPDATE: linkedin.com'
64.207.219.12 -> @., 'AUTO-UPDATE: linkedin.com'
64.207.219.13 -> @., 'AUTO-UPDATE: linkedin.com'
64.207.219.135 -> @., 'AUTO-UPDATE: linkedin.com'
64.207.219.136 -> @., 'AUTO-UPDATE: linkedin.com'
64.207.219.137 -> @., 'AUTO-UPDATE: linkedin.com'
64.207.219.138 -> @., 'AUTO-UPDATE: linkedin.com'
64.207.219.139 -> @., 'AUTO-UPDATE: linkedin.com'
64.207.219.14 -> @., 'AUTO-UPDATE: linkedin.com'
64.207.219.140 -> @., 'AUTO-UPDATE: linkedin.com'
64.207.219.141 -> @., 'AUTO-UPDATE: linkedin.com'
64.207.219.142 -> @., 'AUTO-UPDATE: linkedin.com'
64.207.219.143 -> @., 'AUTO-UPDATE: linkedin.com'
64.207.219.15 -> @., 'AUTO-UPDATE: linkedin.com'
64.207.219.7 -> @., 'AUTO-UPDATE: linkedin.com'
64.207.219.71 -> @., 'AUTO-UPDATE: linkedin.com'
64.207.219.72 -> @., 'AUTO-UPDATE: linkedin.com'
64.207.219.73 -> @., 'AUTO-UPDATE: linkedin.com'
64.207.219.74 -> @., 'AUTO-UPDATE: linkedin.com'
64.207.219.75 -> @., 'AUTO-UPDATE: linkedin.com'
64.207.219.76 -> @., 'AUTO-UPDATE: linkedin.com'
64.207.219.77 -> @., 'AUTO-UPDATE: linkedin.com'
64.207.219.78 -> @., 'AUTO-UPDATE: linkedin.com'
64.207.219.79 -> @., 'AUTO-UPDATE: linkedin.com'
64.207.219.8 -> @., 'AUTO-UPDATE: linkedin.com'
64.207.219.9 -> @., 'AUTO-UPDATE: linkedin.com'
64.233.160.0/19 -> @., 'AUTO-UPDATE: cloudflare.com'
64.69.212.0/24 -> @., 'AUTO-UPDATE: mailchimp.com'
64.79.155.192 -> @., 'AUTO-UPDATE: zendesk.com'
64.79.155.193 -> @., 'AUTO-UPDATE: zendesk.com'
64.79.155.205 -> @., 'AUTO-UPDATE: zendesk.com'
64.79.155.206 -> @., 'AUTO-UPDATE: zendesk.com'
65.110.161.77 -> @., 'AUTO-UPDATE: paypal.com'
65.123.29.213/32 -> @., 'AUTO-UPDATE: icontact.com'
65.123.29.220/32 -> @., 'AUTO-UPDATE: icontact.com'
65.154.166.0/24 -> @., 'AUTO-UPDATE: zoho.com'
65.212.180.36 -> @., 'AUTO-UPDATE: paypal.com'
65.52.80.137/32 -> @., 'AUTO-UPDATE: microsoft.com'
65.54.121.120/29 -> @., 'AUTO-UPDATE: hotmail.com'
65.54.190.0/24 -> @., 'AUTO-UPDATE: hotmail.com'
65.54.241.0/24 -> @., 'AUTO-UPDATE: hotmail.com'
65.54.51.64/26 -> @., 'AUTO-UPDATE: hotmail.com'
65.54.61.64/26 -> @., 'AUTO-UPDATE: hotmail.com'
65.55.111.0/24 -> @., 'AUTO-UPDATE: hotmail.com'
65.55.113.64/26 -> @., 'AUTO-UPDATE: hotmail.com'
65.55.116.0/25 -> @., 'AUTO-UPDATE: hotmail.com'
65.55.126.0/25 -> @., 'AUTO-UPDATE: hotmail.com'
65.55.174.0/25 -> @., 'AUTO-UPDATE: hotmail.com'
65.55.178.128/27 -> @., 'AUTO-UPDATE: hotmail.com'
65.55.234.192/26 -> @., 'AUTO-UPDATE: hotmail.com'
65.55.29.77 -> @., 'AUTO-UPDATE: microsoft.com'
65.55.33.64/28 -> @., 'AUTO-UPDATE: hotmail.com'
65.55.34.0/24 -> @., 'AUTO-UPDATE: hotmail.com'
65.55.42.224/28 -> @., 'AUTO-UPDATE: microsoft.com'
65.55.52.224/27 -> @., 'AUTO-UPDATE: hotmail.com'
65.55.78.128/25 -> @., 'AUTO-UPDATE: hotmail.com'
65.55.81.48/28 -> @., 'AUTO-UPDATE: hotmail.com'
65.55.90.0/24 -> @., 'AUTO-UPDATE: hotmail.com'
65.55.94.0/25 -> @., 'AUTO-UPDATE: hotmail.com'
66.102.0.0/20 -> @., 'AUTO-UPDATE: cloudflare.com'
66.119.150.192/26 -> @., 'AUTO-UPDATE: microsoft.com'
66.162.193.226/31 -> @., 'AUTO-UPDATE: icontact.com'
66.170.126.97 -> @., 'AUTO-UPDATE: paypal.com'
66.211.170.88/29 -> @., 'AUTO-UPDATE: paypal.com'
66.211.184.0/23 -> @., 'AUTO-UPDATE: ebay.com'
66.220.144.128/25 -> @., 'AUTO-UPDATE: facebook.com'
66.220.155.0/24 -> @., 'AUTO-UPDATE: facebook.com'
66.220.157.0/25 -> @., 'AUTO-UPDATE: facebook.com'
66.231.80.0/20 -> @., 'AUTO-UPDATE: cust-spf.exacttarget.com'
66.249.80.0/20 -> @., 'AUTO-UPDATE: cloudflare.com'
67.219.240.0/20 -> @., 'AUTO-UPDATE: messagelabs.com'
67.221.168.65 -> @., 'AUTO-UPDATE: paypal.com'
67.228.2.24/30 -> @., 'AUTO-UPDATE: exacttarget.com'
67.228.21.184/29 -> @., 'AUTO-UPDATE: exacttarget.com'
67.228.37.4/30 -> @., 'AUTO-UPDATE: exacttarget.com'
67.23.31.6 -> @., 'AUTO-UPDATE: exacttarget.com'
67.231.145.42 -> @., 'AUTO-UPDATE: instagram.com'
67.231.153.30 -> @., 'AUTO-UPDATE: instagram.com'
67.72.99.26 -> @., 'AUTO-UPDATE: paypal.com'
68.232.140.138 -> @., 'AUTO-UPDATE: mailchimp.com'
68.232.157.143 -> @., 'AUTO-UPDATE: ebay.com'
68.232.192.0/20 -> @., 'AUTO-UPDATE: cust-spf.exacttarget.com'
69.162.98.0/24 -> @., 'AUTO-UPDATE: exacttarget.com'
69.169.224.0/20 -> @., 'AUTO-UPDATE: amazon.com'
69.63.178.128/25 -> @., 'AUTO-UPDATE: facebook.com'
69.63.181.0/24 -> @., 'AUTO-UPDATE: facebook.com'
69.63.184.0/25 -> @., 'AUTO-UPDATE: facebook.com'
69.65.42.195 -> @., 'AUTO-UPDATE: exacttarget.com'
69.65.49.192/29 -> @., 'AUTO-UPDATE: exacttarget.com'
69.72.32.0/20 -> @., 'AUTO-UPDATE: mailgun.com'
69.72.40.93 -> @., 'AUTO-UPDATE: pinterest.com'
69.72.40.94/31 -> @., 'AUTO-UPDATE: pinterest.com'
69.72.40.96/30 -> @., 'AUTO-UPDATE: pinterest.com'
69.72.47.205 -> @., 'AUTO-UPDATE: pinterest.com'
70.37.151.128/25 -> @., 'AUTO-UPDATE: hotmail.com'
70.42.149.35 -> @., 'AUTO-UPDATE: fbmta.com'
72.14.192.0/18 -> @., 'AUTO-UPDATE: cloudflare.com'
72.21.192.0/19 -> @., 'AUTO-UPDATE: amazon.com'
72.21.217.142/32 -> @., 'AUTO-UPDATE: amazon.com'
74.112.67.243 -> @., 'AUTO-UPDATE: paypal.com'
74.125.0.0/16 -> @., 'AUTO-UPDATE: cloudflare.com'
74.202.227.40/32 -> @., 'AUTO-UPDATE: icontact.com'
74.208.4.200 -> @., 'AUTO-UPDATE: mail.com'
74.208.4.201 -> @., 'AUTO-UPDATE: mail.com'
74.208.4.220 -> @., 'AUTO-UPDATE: mail.com'
74.208.4.221 -> @., 'AUTO-UPDATE: mail.com'
74.209.250.0/24 -> @., 'AUTO-UPDATE: fbmta.com'
74.63.234.75 -> @., 'AUTO-UPDATE: exacttarget.com'
74.63.236.0/24 -> @., 'AUTO-UPDATE: exacttarget.com'
74.86.113.28/30 -> @., 'AUTO-UPDATE: exacttarget.com'
74.86.129.240/30 -> @., 'AUTO-UPDATE: exacttarget.com'
74.86.131.208/30 -> @., 'AUTO-UPDATE: exacttarget.com'
74.86.132.208/30 -> @., 'AUTO-UPDATE: exacttarget.com'
74.86.160.160/30 -> @., 'AUTO-UPDATE: exacttarget.com'
74.86.164.188/30 -> @., 'AUTO-UPDATE: exacttarget.com'
74.86.171.192/30 -> @., 'AUTO-UPDATE: exacttarget.com'
74.86.195.28/30 -> @., 'AUTO-UPDATE: exacttarget.com'
74.86.207.36/30 -> @., 'AUTO-UPDATE: exacttarget.com'
74.86.226.216/30 -> @., 'AUTO-UPDATE: exacttarget.com'
74.86.236.240/30 -> @., 'AUTO-UPDATE: exacttarget.com'
74.86.241.250/31 -> @., 'AUTO-UPDATE: exacttarget.com'
75.2.70.75 -> @., 'AUTO-UPDATE: fishbowl.com'
76.223.128.0/19 -> @., 'AUTO-UPDATE: amazon.com'
76.223.176.0/20 -> @., 'AUTO-UPDATE: amazon.com'
77.88.28.0/24 -> @., 'AUTO-UPDATE: yandex.ru'
77.88.29.0/24 -> @., 'AUTO-UPDATE: yandex.ru'
8.20.114.31 -> @., 'AUTO-UPDATE: paypal.com'
8.25.194.0/23 -> @., 'AUTO-UPDATE: twitter.com'
8.25.196.0/23 -> @., 'AUTO-UPDATE: twitter.com'
8.39.54.0/23 -> @., 'AUTO-UPDATE: zoho.com'
8.40.222.0/23 -> @., 'AUTO-UPDATE: zoho.com'
81.223.46.0/27 -> @., 'AUTO-UPDATE: paypal.com'
82.165.159.12 -> @., 'AUTO-UPDATE: gmx.com'
82.165.159.13 -> @., 'AUTO-UPDATE: gmx.com'
82.165.159.130 -> @., 'AUTO-UPDATE: mail.com'
82.165.159.131 -> @., 'AUTO-UPDATE: mail.com'
82.165.159.14 -> @., 'AUTO-UPDATE: gmx.com'
82.165.159.40 -> @., 'AUTO-UPDATE: gmx.com'
82.165.159.41 -> @., 'AUTO-UPDATE: gmx.com'
82.165.159.42 -> @., 'AUTO-UPDATE: gmx.com'
85.158.136.0/21 -> @., 'AUTO-UPDATE: messagelabs.com'
86.61.88.25 -> @., 'AUTO-UPDATE: microsoft.com'
87.238.80.0/21 -> @., 'AUTO-UPDATE: amazon.com'
87.253.232.0/21 -> @., 'AUTO-UPDATE: mailgun.com'
91.211.240.0/22 -> @., 'AUTO-UPDATE: ebay.com'
94.245.112.0/27 -> @., 'AUTO-UPDATE: hotmail.com'
94.245.112.10/31 -> @., 'AUTO-UPDATE: hotmail.com'
95.108.130.0/23 -> @., 'AUTO-UPDATE: yandex.ru'
95.108.205.0/24 -> @., 'AUTO-UPDATE: yandex.ru'
95.131.104.0/21 -> @., 'AUTO-UPDATE: messagelabs.com'
96.43.144.0/20 -> @., 'AUTO-UPDATE: exacttarget.com'
96.43.144.64/28 -> @., 'AUTO-UPDATE: paypal.com'
96.43.144.64/31 -> @., 'AUTO-UPDATE: twitter.com'
96.43.148.64/28 -> @., 'AUTO-UPDATE: paypal.com'
96.43.148.64/31 -> @., 'AUTO-UPDATE: twitter.com'
96.43.151.64/28 -> @., 'AUTO-UPDATE: paypal.com'
98.97.248.0/21 -> @., 'AUTO-UPDATE: mailchimp.com'
99.78.197.208/28 -> @., 'AUTO-UPDATE: amazon.com'
99.83.190.102 -> @., 'AUTO-UPDATE: fishbowl.com'
@yahoo.com -> @., 'AUTO-UPDATE: aol.com'
@yahoo.net -> @., 'AUTO-UPDATE: aol.com'
#
(4)旧仕様クライアント対策
2018年設定時に発生した「postfix/dovecotメールサーバでWindows Live Mail 2012がエラーになる」
Windows Live メールなど古いクライアントに対する対応
公式:Allow insecure POP3/IMAP/SMTP connections without STARTTLS
POP3/IMAPについてdovecotにdisable_plaintext_authとsslの設定がどのように行われているか確認
# grep disable_plaintext_auth *
grep: conf.d: Is a directory
dovecot.conf:# With disable_plaintext_auth=yes AND ssl=required, STARTTLS is mandatory.
dovecot.conf:# Set disable_plaintext_auth=no AND ssl=yes to allow plain password transmitted
dovecot.conf:disable_plaintext_auth = yes
dovecot.conf:#   disable_plaintext_auth = no
dovecot.conf.2024.12.05.10.09.03:# for authentication checks). disable_plaintext_auth is also ignored for
# grep disable_plaintext_auth */*
conf.d/10-auth.conf:#disable_plaintext_auth = yes
conf.d/10-auth.conf:# NOTE: See also disable_plaintext_auth setting.
#
# grep -e "ssl =" -e "ssl=" *
grep: conf.d: Is a directory
dovecot.conf:ssl = required
dovecot.conf:verbose_ssl = no
dovecot.conf:# With disable_plaintext_auth=yes AND ssl=required, STARTTLS is mandatory.
dovecot.conf:# Set disable_plaintext_auth=no AND ssl=yes to allow plain password transmitted
dovecot.conf:    #    ssl = yes
dovecot.conf:    #    ssl = yes
# grep -e "ssl =" -e "ssl=" */*
conf.d/10-auth.conf:# See also ssl=required setting.
conf.d/10-logging.conf:#verbose_ssl = no
conf.d/10-master.conf:    #ssl = yes
conf.d/10-master.conf:    #ssl = yes
conf.d/20-submission.conf:#submission_relay_ssl = no
#
/etc/dovecot以下を検索すると上記のようになっていた。
これをsslをrequired→yes, disable_plaintext_authをyes→noに変更するのだが、/etc/dovecot/dovecot.conf に修正を入れた。
また、TLSv1.2以降をサポートとなっているが、 /var/log/dovecot/dovecot.log を確認すると、「encryption_protocol=TLSv1, encryption_cipher=ECDHE-ECDSA-AES256-SHA,」なんてユーザがいたので、設定を確認
# SSL: Global settings.
# Refer to wiki site for per protocol, ip, server name SSL settings:
# http://wiki2.dovecot.org/SSL/DovecotConfiguration
ssl_min_protocol = TLSv1.2
上記を「ssl_min_protocol = TLSv1」に変えればいけるか?と思ったけど、AlmaLinuxのopenssl側がTLSv1.0, TLSv1.1対応の設定になっていなかった
opensslの設定としてはTLSv1.0もある
# openssl ciphers -v 'ALL:COMPLEMENTOFALL'
TLS_AES_256_GCM_SHA384         TLSv1.3 Kx=any      Au=any   Enc=AESGCM(256)            Mac=AEAD
TLS_CHACHA20_POLY1305_SHA256   TLSv1.3 Kx=any      Au=any   Enc=CHACHA20/POLY1305(256) Mac=AEAD
TLS_AES_128_GCM_SHA256         TLSv1.3 Kx=any      Au=any   Enc=AESGCM(128)            Mac=AEAD
TLS_AES_128_CCM_SHA256         TLSv1.3 Kx=any      Au=any   Enc=AESCCM(128)            Mac=AEAD
ECDHE-ECDSA-AES256-GCM-SHA384  TLSv1.2 Kx=ECDH     Au=ECDSA Enc=AESGCM(256)            Mac=AEAD
ECDHE-RSA-AES256-GCM-SHA384    TLSv1.2 Kx=ECDH     Au=RSA   Enc=AESGCM(256)            Mac=AEAD
DHE-DSS-AES256-GCM-SHA384      TLSv1.2 Kx=DH       Au=DSS   Enc=AESGCM(256)            Mac=AEAD
DHE-RSA-AES256-GCM-SHA384      TLSv1.2 Kx=DH       Au=RSA   Enc=AESGCM(256)            Mac=AEAD
ECDHE-ECDSA-CHACHA20-POLY1305  TLSv1.2 Kx=ECDH     Au=ECDSA Enc=CHACHA20/POLY1305(256) Mac=AEAD
ECDHE-RSA-CHACHA20-POLY1305    TLSv1.2 Kx=ECDH     Au=RSA   Enc=CHACHA20/POLY1305(256) Mac=AEAD
DHE-RSA-CHACHA20-POLY1305      TLSv1.2 Kx=DH       Au=RSA   Enc=CHACHA20/POLY1305(256) Mac=AEAD
ECDHE-ECDSA-AES256-CCM         TLSv1.2 Kx=ECDH     Au=ECDSA Enc=AESCCM(256)            Mac=AEAD
DHE-RSA-AES256-CCM             TLSv1.2 Kx=DH       Au=RSA   Enc=AESCCM(256)            Mac=AEAD
ECDHE-ECDSA-ARIA256-GCM-SHA384 TLSv1.2 Kx=ECDH     Au=ECDSA Enc=ARIAGCM(256)           Mac=AEAD
ECDHE-ARIA256-GCM-SHA384       TLSv1.2 Kx=ECDH     Au=RSA   Enc=ARIAGCM(256)           Mac=AEAD
DHE-DSS-ARIA256-GCM-SHA384     TLSv1.2 Kx=DH       Au=DSS   Enc=ARIAGCM(256)           Mac=AEAD
DHE-RSA-ARIA256-GCM-SHA384     TLSv1.2 Kx=DH       Au=RSA   Enc=ARIAGCM(256)           Mac=AEAD
ADH-AES256-GCM-SHA384          TLSv1.2 Kx=DH       Au=None  Enc=AESGCM(256)            Mac=AEAD
ECDHE-ECDSA-AES128-GCM-SHA256  TLSv1.2 Kx=ECDH     Au=ECDSA Enc=AESGCM(128)            Mac=AEAD
ECDHE-RSA-AES128-GCM-SHA256    TLSv1.2 Kx=ECDH     Au=RSA   Enc=AESGCM(128)            Mac=AEAD
DHE-DSS-AES128-GCM-SHA256      TLSv1.2 Kx=DH       Au=DSS   Enc=AESGCM(128)            Mac=AEAD
DHE-RSA-AES128-GCM-SHA256      TLSv1.2 Kx=DH       Au=RSA   Enc=AESGCM(128)            Mac=AEAD
ECDHE-ECDSA-AES128-CCM         TLSv1.2 Kx=ECDH     Au=ECDSA Enc=AESCCM(128)            Mac=AEAD
DHE-RSA-AES128-CCM             TLSv1.2 Kx=DH       Au=RSA   Enc=AESCCM(128)            Mac=AEAD
ECDHE-ECDSA-ARIA128-GCM-SHA256 TLSv1.2 Kx=ECDH     Au=ECDSA Enc=ARIAGCM(128)           Mac=AEAD
ECDHE-ARIA128-GCM-SHA256       TLSv1.2 Kx=ECDH     Au=RSA   Enc=ARIAGCM(128)           Mac=AEAD
DHE-DSS-ARIA128-GCM-SHA256     TLSv1.2 Kx=DH       Au=DSS   Enc=ARIAGCM(128)           Mac=AEAD
DHE-RSA-ARIA128-GCM-SHA256     TLSv1.2 Kx=DH       Au=RSA   Enc=ARIAGCM(128)           Mac=AEAD
ADH-AES128-GCM-SHA256          TLSv1.2 Kx=DH       Au=None  Enc=AESGCM(128)            Mac=AEAD
ECDHE-ECDSA-AES256-CCM8        TLSv1.2 Kx=ECDH     Au=ECDSA Enc=AESCCM8(256)           Mac=AEAD
ECDHE-ECDSA-AES128-CCM8        TLSv1.2 Kx=ECDH     Au=ECDSA Enc=AESCCM8(128)           Mac=AEAD
DHE-RSA-AES256-CCM8            TLSv1.2 Kx=DH       Au=RSA   Enc=AESCCM8(256)           Mac=AEAD
DHE-RSA-AES128-CCM8            TLSv1.2 Kx=DH       Au=RSA   Enc=AESCCM8(128)           Mac=AEAD
ECDHE-ECDSA-AES256-SHA384      TLSv1.2 Kx=ECDH     Au=ECDSA Enc=AES(256)               Mac=SHA384
ECDHE-RSA-AES256-SHA384        TLSv1.2 Kx=ECDH     Au=RSA   Enc=AES(256)               Mac=SHA384
DHE-RSA-AES256-SHA256          TLSv1.2 Kx=DH       Au=RSA   Enc=AES(256)               Mac=SHA256
DHE-DSS-AES256-SHA256          TLSv1.2 Kx=DH       Au=DSS   Enc=AES(256)               Mac=SHA256
ECDHE-ECDSA-CAMELLIA256-SHA384 TLSv1.2 Kx=ECDH     Au=ECDSA Enc=Camellia(256)          Mac=SHA384
ECDHE-RSA-CAMELLIA256-SHA384   TLSv1.2 Kx=ECDH     Au=RSA   Enc=Camellia(256)          Mac=SHA384
DHE-RSA-CAMELLIA256-SHA256     TLSv1.2 Kx=DH       Au=RSA   Enc=Camellia(256)          Mac=SHA256
DHE-DSS-CAMELLIA256-SHA256     TLSv1.2 Kx=DH       Au=DSS   Enc=Camellia(256)          Mac=SHA256
ADH-AES256-SHA256              TLSv1.2 Kx=DH       Au=None  Enc=AES(256)               Mac=SHA256
ADH-CAMELLIA256-SHA256         TLSv1.2 Kx=DH       Au=None  Enc=Camellia(256)          Mac=SHA256
ECDHE-ECDSA-AES128-SHA256      TLSv1.2 Kx=ECDH     Au=ECDSA Enc=AES(128)               Mac=SHA256
ECDHE-RSA-AES128-SHA256        TLSv1.2 Kx=ECDH     Au=RSA   Enc=AES(128)               Mac=SHA256
DHE-RSA-AES128-SHA256          TLSv1.2 Kx=DH       Au=RSA   Enc=AES(128)               Mac=SHA256
DHE-DSS-AES128-SHA256          TLSv1.2 Kx=DH       Au=DSS   Enc=AES(128)               Mac=SHA256
ECDHE-ECDSA-CAMELLIA128-SHA256 TLSv1.2 Kx=ECDH     Au=ECDSA Enc=Camellia(128)          Mac=SHA256
ECDHE-RSA-CAMELLIA128-SHA256   TLSv1.2 Kx=ECDH     Au=RSA   Enc=Camellia(128)          Mac=SHA256
DHE-RSA-CAMELLIA128-SHA256     TLSv1.2 Kx=DH       Au=RSA   Enc=Camellia(128)          Mac=SHA256
DHE-DSS-CAMELLIA128-SHA256     TLSv1.2 Kx=DH       Au=DSS   Enc=Camellia(128)          Mac=SHA256
ADH-AES128-SHA256              TLSv1.2 Kx=DH       Au=None  Enc=AES(128)               Mac=SHA256
ADH-CAMELLIA128-SHA256         TLSv1.2 Kx=DH       Au=None  Enc=Camellia(128)          Mac=SHA256
ECDHE-ECDSA-AES256-SHA         TLSv1   Kx=ECDH     Au=ECDSA Enc=AES(256)               Mac=SHA1
ECDHE-RSA-AES256-SHA           TLSv1   Kx=ECDH     Au=RSA   Enc=AES(256)               Mac=SHA1
DHE-RSA-AES256-SHA             SSLv3   Kx=DH       Au=RSA   Enc=AES(256)               Mac=SHA1
DHE-DSS-AES256-SHA             SSLv3   Kx=DH       Au=DSS   Enc=AES(256)               Mac=SHA1
DHE-RSA-CAMELLIA256-SHA        SSLv3   Kx=DH       Au=RSA   Enc=Camellia(256)          Mac=SHA1
DHE-DSS-CAMELLIA256-SHA        SSLv3   Kx=DH       Au=DSS   Enc=Camellia(256)          Mac=SHA1
AECDH-AES256-SHA               TLSv1   Kx=ECDH     Au=None  Enc=AES(256)               Mac=SHA1
ADH-AES256-SHA                 SSLv3   Kx=DH       Au=None  Enc=AES(256)               Mac=SHA1
ADH-CAMELLIA256-SHA            SSLv3   Kx=DH       Au=None  Enc=Camellia(256)          Mac=SHA1
ECDHE-ECDSA-AES128-SHA         TLSv1   Kx=ECDH     Au=ECDSA Enc=AES(128)               Mac=SHA1
ECDHE-RSA-AES128-SHA           TLSv1   Kx=ECDH     Au=RSA   Enc=AES(128)               Mac=SHA1
DHE-RSA-AES128-SHA             SSLv3   Kx=DH       Au=RSA   Enc=AES(128)               Mac=SHA1
DHE-DSS-AES128-SHA             SSLv3   Kx=DH       Au=DSS   Enc=AES(128)               Mac=SHA1
DHE-RSA-CAMELLIA128-SHA        SSLv3   Kx=DH       Au=RSA   Enc=Camellia(128)          Mac=SHA1
DHE-DSS-CAMELLIA128-SHA        SSLv3   Kx=DH       Au=DSS   Enc=Camellia(128)          Mac=SHA1
AECDH-AES128-SHA               TLSv1   Kx=ECDH     Au=None  Enc=AES(128)               Mac=SHA1
ADH-AES128-SHA                 SSLv3   Kx=DH       Au=None  Enc=AES(128)               Mac=SHA1
ADH-CAMELLIA128-SHA            SSLv3   Kx=DH       Au=None  Enc=Camellia(128)          Mac=SHA1
RSA-PSK-AES256-GCM-SHA384      TLSv1.2 Kx=RSAPSK   Au=RSA   Enc=AESGCM(256)            Mac=AEAD
DHE-PSK-AES256-GCM-SHA384      TLSv1.2 Kx=DHEPSK   Au=PSK   Enc=AESGCM(256)            Mac=AEAD
RSA-PSK-CHACHA20-POLY1305      TLSv1.2 Kx=RSAPSK   Au=RSA   Enc=CHACHA20/POLY1305(256) Mac=AEAD
DHE-PSK-CHACHA20-POLY1305      TLSv1.2 Kx=DHEPSK   Au=PSK   Enc=CHACHA20/POLY1305(256) Mac=AEAD
ECDHE-PSK-CHACHA20-POLY1305    TLSv1.2 Kx=ECDHEPSK Au=PSK   Enc=CHACHA20/POLY1305(256) Mac=AEAD
DHE-PSK-AES256-CCM             TLSv1.2 Kx=DHEPSK   Au=PSK   Enc=AESCCM(256)            Mac=AEAD
RSA-PSK-ARIA256-GCM-SHA384     TLSv1.2 Kx=RSAPSK   Au=RSA   Enc=ARIAGCM(256)           Mac=AEAD
DHE-PSK-ARIA256-GCM-SHA384     TLSv1.2 Kx=DHEPSK   Au=PSK   Enc=ARIAGCM(256)           Mac=AEAD
AES256-GCM-SHA384              TLSv1.2 Kx=RSA      Au=RSA   Enc=AESGCM(256)            Mac=AEAD
AES256-CCM                     TLSv1.2 Kx=RSA      Au=RSA   Enc=AESCCM(256)            Mac=AEAD
ARIA256-GCM-SHA384             TLSv1.2 Kx=RSA      Au=RSA   Enc=ARIAGCM(256)           Mac=AEAD
PSK-AES256-GCM-SHA384          TLSv1.2 Kx=PSK      Au=PSK   Enc=AESGCM(256)            Mac=AEAD
PSK-CHACHA20-POLY1305          TLSv1.2 Kx=PSK      Au=PSK   Enc=CHACHA20/POLY1305(256) Mac=AEAD
PSK-AES256-CCM                 TLSv1.2 Kx=PSK      Au=PSK   Enc=AESCCM(256)            Mac=AEAD
PSK-ARIA256-GCM-SHA384         TLSv1.2 Kx=PSK      Au=PSK   Enc=ARIAGCM(256)           Mac=AEAD
RSA-PSK-AES128-GCM-SHA256      TLSv1.2 Kx=RSAPSK   Au=RSA   Enc=AESGCM(128)            Mac=AEAD
DHE-PSK-AES128-GCM-SHA256      TLSv1.2 Kx=DHEPSK   Au=PSK   Enc=AESGCM(128)            Mac=AEAD
DHE-PSK-AES128-CCM             TLSv1.2 Kx=DHEPSK   Au=PSK   Enc=AESCCM(128)            Mac=AEAD
RSA-PSK-ARIA128-GCM-SHA256     TLSv1.2 Kx=RSAPSK   Au=RSA   Enc=ARIAGCM(128)           Mac=AEAD
DHE-PSK-ARIA128-GCM-SHA256     TLSv1.2 Kx=DHEPSK   Au=PSK   Enc=ARIAGCM(128)           Mac=AEAD
AES128-GCM-SHA256              TLSv1.2 Kx=RSA      Au=RSA   Enc=AESGCM(128)            Mac=AEAD
AES128-CCM                     TLSv1.2 Kx=RSA      Au=RSA   Enc=AESCCM(128)            Mac=AEAD
ARIA128-GCM-SHA256             TLSv1.2 Kx=RSA      Au=RSA   Enc=ARIAGCM(128)           Mac=AEAD
PSK-AES128-GCM-SHA256          TLSv1.2 Kx=PSK      Au=PSK   Enc=AESGCM(128)            Mac=AEAD
PSK-AES128-CCM                 TLSv1.2 Kx=PSK      Au=PSK   Enc=AESCCM(128)            Mac=AEAD
PSK-ARIA128-GCM-SHA256         TLSv1.2 Kx=PSK      Au=PSK   Enc=ARIAGCM(128)           Mac=AEAD
DHE-PSK-AES256-CCM8            TLSv1.2 Kx=DHEPSK   Au=PSK   Enc=AESCCM8(256)           Mac=AEAD
DHE-PSK-AES128-CCM8            TLSv1.2 Kx=DHEPSK   Au=PSK   Enc=AESCCM8(128)           Mac=AEAD
AES256-CCM8                    TLSv1.2 Kx=RSA      Au=RSA   Enc=AESCCM8(256)           Mac=AEAD
AES128-CCM8                    TLSv1.2 Kx=RSA      Au=RSA   Enc=AESCCM8(128)           Mac=AEAD
PSK-AES256-CCM8                TLSv1.2 Kx=PSK      Au=PSK   Enc=AESCCM8(256)           Mac=AEAD
PSK-AES128-CCM8                TLSv1.2 Kx=PSK      Au=PSK   Enc=AESCCM8(128)           Mac=AEAD
AES256-SHA256                  TLSv1.2 Kx=RSA      Au=RSA   Enc=AES(256)               Mac=SHA256
CAMELLIA256-SHA256             TLSv1.2 Kx=RSA      Au=RSA   Enc=Camellia(256)          Mac=SHA256
AES128-SHA256                  TLSv1.2 Kx=RSA      Au=RSA   Enc=AES(128)               Mac=SHA256
CAMELLIA128-SHA256             TLSv1.2 Kx=RSA      Au=RSA   Enc=Camellia(128)          Mac=SHA256
ECDHE-PSK-AES256-CBC-SHA384    TLSv1   Kx=ECDHEPSK Au=PSK   Enc=AES(256)               Mac=SHA384
ECDHE-PSK-AES256-CBC-SHA       TLSv1   Kx=ECDHEPSK Au=PSK   Enc=AES(256)               Mac=SHA1
SRP-DSS-AES-256-CBC-SHA        SSLv3   Kx=SRP      Au=DSS   Enc=AES(256)               Mac=SHA1
SRP-RSA-AES-256-CBC-SHA        SSLv3   Kx=SRP      Au=RSA   Enc=AES(256)               Mac=SHA1
SRP-AES-256-CBC-SHA            SSLv3   Kx=SRP      Au=SRP   Enc=AES(256)               Mac=SHA1
RSA-PSK-AES256-CBC-SHA384      TLSv1   Kx=RSAPSK   Au=RSA   Enc=AES(256)               Mac=SHA384
DHE-PSK-AES256-CBC-SHA384      TLSv1   Kx=DHEPSK   Au=PSK   Enc=AES(256)               Mac=SHA384
RSA-PSK-AES256-CBC-SHA         SSLv3   Kx=RSAPSK   Au=RSA   Enc=AES(256)               Mac=SHA1
DHE-PSK-AES256-CBC-SHA         SSLv3   Kx=DHEPSK   Au=PSK   Enc=AES(256)               Mac=SHA1
ECDHE-PSK-CAMELLIA256-SHA384   TLSv1   Kx=ECDHEPSK Au=PSK   Enc=Camellia(256)          Mac=SHA384
RSA-PSK-CAMELLIA256-SHA384     TLSv1   Kx=RSAPSK   Au=RSA   Enc=Camellia(256)          Mac=SHA384
DHE-PSK-CAMELLIA256-SHA384     TLSv1   Kx=DHEPSK   Au=PSK   Enc=Camellia(256)          Mac=SHA384
AES256-SHA                     SSLv3   Kx=RSA      Au=RSA   Enc=AES(256)               Mac=SHA1
CAMELLIA256-SHA                SSLv3   Kx=RSA      Au=RSA   Enc=Camellia(256)          Mac=SHA1
PSK-AES256-CBC-SHA384          TLSv1   Kx=PSK      Au=PSK   Enc=AES(256)               Mac=SHA384
PSK-AES256-CBC-SHA             SSLv3   Kx=PSK      Au=PSK   Enc=AES(256)               Mac=SHA1
PSK-CAMELLIA256-SHA384         TLSv1   Kx=PSK      Au=PSK   Enc=Camellia(256)          Mac=SHA384
ECDHE-PSK-AES128-CBC-SHA256    TLSv1   Kx=ECDHEPSK Au=PSK   Enc=AES(128)               Mac=SHA256
ECDHE-PSK-AES128-CBC-SHA       TLSv1   Kx=ECDHEPSK Au=PSK   Enc=AES(128)               Mac=SHA1
SRP-DSS-AES-128-CBC-SHA        SSLv3   Kx=SRP      Au=DSS   Enc=AES(128)               Mac=SHA1
SRP-RSA-AES-128-CBC-SHA        SSLv3   Kx=SRP      Au=RSA   Enc=AES(128)               Mac=SHA1
SRP-AES-128-CBC-SHA            SSLv3   Kx=SRP      Au=SRP   Enc=AES(128)               Mac=SHA1
RSA-PSK-AES128-CBC-SHA256      TLSv1   Kx=RSAPSK   Au=RSA   Enc=AES(128)               Mac=SHA256
DHE-PSK-AES128-CBC-SHA256      TLSv1   Kx=DHEPSK   Au=PSK   Enc=AES(128)               Mac=SHA256
RSA-PSK-AES128-CBC-SHA         SSLv3   Kx=RSAPSK   Au=RSA   Enc=AES(128)               Mac=SHA1
DHE-PSK-AES128-CBC-SHA         SSLv3   Kx=DHEPSK   Au=PSK   Enc=AES(128)               Mac=SHA1
ECDHE-PSK-CAMELLIA128-SHA256   TLSv1   Kx=ECDHEPSK Au=PSK   Enc=Camellia(128)          Mac=SHA256
RSA-PSK-CAMELLIA128-SHA256     TLSv1   Kx=RSAPSK   Au=RSA   Enc=Camellia(128)          Mac=SHA256
DHE-PSK-CAMELLIA128-SHA256     TLSv1   Kx=DHEPSK   Au=PSK   Enc=Camellia(128)          Mac=SHA256
AES128-SHA                     SSLv3   Kx=RSA      Au=RSA   Enc=AES(128)               Mac=SHA1
CAMELLIA128-SHA                SSLv3   Kx=RSA      Au=RSA   Enc=Camellia(128)          Mac=SHA1
PSK-AES128-CBC-SHA256          TLSv1   Kx=PSK      Au=PSK   Enc=AES(128)               Mac=SHA256
PSK-AES128-CBC-SHA             SSLv3   Kx=PSK      Au=PSK   Enc=AES(128)               Mac=SHA1
PSK-CAMELLIA128-SHA256         TLSv1   Kx=PSK      Au=PSK   Enc=Camellia(128)          Mac=SHA256
ECDHE-ECDSA-NULL-SHA           TLSv1   Kx=ECDH     Au=ECDSA Enc=None                   Mac=SHA1
ECDHE-RSA-NULL-SHA             TLSv1   Kx=ECDH     Au=RSA   Enc=None                   Mac=SHA1
AECDH-NULL-SHA                 TLSv1   Kx=ECDH     Au=None  Enc=None                   Mac=SHA1
NULL-SHA256                    TLSv1.2 Kx=RSA      Au=RSA   Enc=None                   Mac=SHA256
ECDHE-PSK-NULL-SHA384          TLSv1   Kx=ECDHEPSK Au=PSK   Enc=None                   Mac=SHA384
ECDHE-PSK-NULL-SHA256          TLSv1   Kx=ECDHEPSK Au=PSK   Enc=None                   Mac=SHA256
ECDHE-PSK-NULL-SHA             TLSv1   Kx=ECDHEPSK Au=PSK   Enc=None                   Mac=SHA1
RSA-PSK-NULL-SHA384            TLSv1   Kx=RSAPSK   Au=RSA   Enc=None                   Mac=SHA384
RSA-PSK-NULL-SHA256            TLSv1   Kx=RSAPSK   Au=RSA   Enc=None                   Mac=SHA256
DHE-PSK-NULL-SHA384            TLSv1   Kx=DHEPSK   Au=PSK   Enc=None                   Mac=SHA384
DHE-PSK-NULL-SHA256            TLSv1   Kx=DHEPSK   Au=PSK   Enc=None                   Mac=SHA256
RSA-PSK-NULL-SHA               SSLv3   Kx=RSAPSK   Au=RSA   Enc=None                   Mac=SHA1
DHE-PSK-NULL-SHA               SSLv3   Kx=DHEPSK   Au=PSK   Enc=None                   Mac=SHA1
NULL-SHA                       SSLv3   Kx=RSA      Au=RSA   Enc=None                   Mac=SHA1
NULL-MD5                       SSLv3   Kx=RSA      Au=RSA   Enc=None                   Mac=MD5
PSK-NULL-SHA384                TLSv1   Kx=PSK      Au=PSK   Enc=None                   Mac=SHA384
PSK-NULL-SHA256                TLSv1   Kx=PSK      Au=PSK   Enc=None                   Mac=SHA256
PSK-NULL-SHA                   SSLv3   Kx=PSK      Au=PSK   Enc=None                   Mac=SHA1
#
しかし、opensslの設定で使えるcipherに入っていない。
# cat /etc/crypto-policies/back-ends/opensslcnf.config
CipherString = @SECLEVEL=2:kEECDH:kRSA:kEDH:kPSK:kDHEPSK:kECDHEPSK:kRSAPSK:-aDSS:-3DES:!DES:!RC4:!RC2:!IDEA:-SEED:!eNULL:!aNULL:!MD5:-SHA384:-CAMELLIA:-ARIA:-AESCCM8
Ciphersuites = TLS_AES_256_GCM_SHA384:TLS_CHACHA20_POLY1305_SHA256:TLS_AES_128_GCM_SHA256:TLS_AES_128_CCM_SHA256
TLS.MinProtocol = TLSv1.2
TLS.MaxProtocol = TLSv1.3
DTLS.MinProtocol = DTLSv1.2
DTLS.MaxProtocol = DTLSv1.2
SignatureAlgorithms = ECDSA+SHA256:ECDSA+SHA384:ECDSA+SHA512:ed25519:ed448:rsa_pss_pss_sha256:rsa_pss_pss_sha384:rsa_pss_pss_sha512:rsa_pss_rsae_sha256:rsa_pss_rsae_sha384:rsa_pss_rsae_sha512:RSA+SHA256:RSA+SHA384:RSA+SHA512:ECDSA+SHA224:RSA+SHA224
Groups = X25519:secp256r1:X448:secp521r1:secp384r1:ffdhe2048:ffdhe3072:ffdhe4096:ffdhe6144:ffdhe8192
#
これを変更するのはどうなのかな?と思って、TLSv1.0.,1.1は無効のまま切り替えを実施したが、現状は問題が出ていない
(5) 他サーバで送信された自ドメインが受信拒否される
2018年設定時に発生した「postfixを使用したiredmailで他サーバで送信された自ドメインメールが受信拒否される」
フォーラムにある「SMTP AUTH is required for users under this sender domain (Mailing list」にある/opt/iredapd/settings.py に「CHECK_SPF_IF_LOGIN_MISMATCH = True」を追加して、iredapd.serviceを再起動する、を今回も採用した。
(6) Barracudacentralがメールを拒否しすぎる問題
2018年設定時に発生した問題「iRedMailの初期設定から変えたところ 2018/08/21版」
現状のpostfix設定をpostconf -vを実行して、確認すると以下が設定されている
postscreen_dnsbl_sites = zen.spamhaus.org=127.0.0.[2..11]*3 b.barracudacentral.org=127.0.0.2*2
あれから6年たってるけど、改めて有効化する勇気は持てなかったので、現状踏襲として、以下で設定した。
postscreen_dnsbl_sites = zen.spamhaus.org=127.0.0.[2..11]*3
postconf -vコマンドは全体をまとめた出力になるので、実際に設定されている場所を確認すると /etc/postfix/main.cf だったので該当箇所は下記のようになった
# Attention:
#   - zen.spamhaus.org free tire has 3 limits
#     (https://www.spamhaus.org/organization/dnsblusage/):
#
#     1) Your use of the Spamhaus DNSBLs is non-commercial*, and
#     2) Your email traffic is less than 100,000 SMTP connections per day, and
#     3) Your DNSBL query volume is less than 300,000 queries per day.
#
#   - FAQ: "Your DNSBL blocks nothing at all!"
#     https://www.spamhaus.org/faq/section/DNSBL%20Usage#261
#
# It's strongly recommended to use a local DNS server for cache.
postscreen_dnsbl_sites =
    zen.spamhaus.org=127.0.0.[2..11]*3
#    b.barracudacentral.org=127.0.0.2*2

postscreen_dnsbl_reply_map = texthash:/etc/postfix/postscreen_dnsbl_reply
postscreen_access_list = permit_mynetworks cidr:/etc/postfix/postscreen_access.cidr
(7) mail.goo.ne.jp メールの拒否解除
2018年設定時に発生した問題「iRedMailの初期設定から変えたところ 2018/08/21版」
iredmailが用意している/etc/postfix/helo_access.pcreを見てみると、2024年でも引き続き mail.goo.ne.jpメールが明示的に拒否されていた
変更前
/^(mail\.goo\.ne\.jp)$/ REJECT ACCESS DENIED. Your email was rejected because it appears to come from a known spamming mail server (${1})
変更後
###/^(mail\.goo\.ne\.jp)$/ REJECT ACCESS DENIED. Your email was rejected because it appears to come from a known spamming mail server (${1})
(8) IPアドレスが入ったホスト名拒否設定の一部解除
2018年設定時に発生した問題「iRedMailの初期設定から変えたところ 2018/08/21版」
ホスト名にIPアドレスが含まれていると拒否する設定があるので、設定を一部変更する。
家庭用回線などnetwork-192-168.0.100.ぷろばいだ.ne.jpという感じでIPアドレスがもろに埋め込まれたホスト名が使われている。
それに対して、メールサーバは多くの場合、ちゃんと命名されていることが多い。
2018年の時よりbypass設定されてるものが増えていた
変更前
# bypass "[IP_ADDRESS]"
/^\[(\d{1,3}\.\d{1,3}\.\d{1,3}\.\d{1,3})\]$/ OK

# Bypass HELOs used by known big ISPs which contains IP address
/\.outbound-(email|mail)\.sendgrid\.net$/ OK
/^\d{1,3}-\d{1,3}-\d{1,3}-\d{1,3}\.mail-.*\.facebook\.com$/ OK
/^outbound-\d{1,3}-\d{1,3}-\d{1,3}-\d{1,3}\.pinterestmail\.com$/ OK
/\.outbound\.protection\.outlook\.com$/ OK
/^ec2-\d{1,3}-\d{1,3}-\d{1,3}-\d{1,3}\..*\.compute\.amazonaws\.com$/ OK
/^out\d{1,3}-\d{1,3}-\d{1,3}-\d{1,3}\.mail\.qq\.com$/ OK
変更後….2018年だと最後が「DUNNO」だったのが、2024年設定だと「OK」に変わっていたので揃えた
# bypass "[IP_ADDRESS]"
/^\[(\d{1,3}\.\d{1,3}\.\d{1,3}\.\d{1,3})\]$/ OK

# Bypass HELOs used by known big ISPs which contains IP address
/\.outbound-(email|mail)\.sendgrid\.net$/ OK
/^\d{1,3}-\d{1,3}-\d{1,3}-\d{1,3}\.mail-.*\.facebook\.com$/ OK
/^outbound-\d{1,3}-\d{1,3}-\d{1,3}-\d{1,3}\.pinterestmail\.com$/ OK
/\.outbound\.protection\.outlook\.com$/ OK
/^ec2-\d{1,3}-\d{1,3}-\d{1,3}-\d{1,3}\..*\.compute\.amazonaws\.com$/ OK
/^out\d{1,3}-\d{1,3}-\d{1,3}-\d{1,3}\.mail\.qq\.com$/ OK

### add for yawata-lions.com
/^sv(\d{1,3}-\d{1,3}-\d{1,3}-\d{1,3}).*.seedshosting.jp$/ OK
### add for shop-pro.jp
# mail-10-200-1-137.mitaka.shop-pro.jp
/^mail-(\d{1,3}-\d{1,3}-\d{1,3}-\d{1,3})/ OK
### add for salesforce
/^smtp*\.mta\.salesforce\.com$/ OK
(9) heloでDNSに登録されていないホスト名しゃべるメールサーバの取り扱い
ml2.vector.co.jp から送られてくるメールは www05.vector.co.jp を名乗っているがDNS登録がなくてエラーになっていた。
Dec 16 10:25:42 ml2 postfix/smtpd[502984]: NOQUEUE: reject: RCPT from ml2.vector.co.jp[180.214.37.169]: 450 4.7.1 <www05.vector.co.jp>: Helo command rejected: Host not found; from=<shopmgr@ml.vector.co.jp> to=<xxxxx@xxxxxx.jp> proto=ESMTP helo=<www05.vector.co.jp>
これ、こっちの設定の問題なのかな?と思いながら確認したところ、トレンドマイクロのWebにちょうどいい物が・・・「配送先のメールサーバから”Helo command rejected: Host not found”といったエラーが返却されて、メールが配送できません。」
原因
InterScan MSS/IMSVA/DDEIがメール配送時にSMTP HELO/EHLOコマンドで指定した自ホスト名が、配送先メールサーバ側で名前解決できなかったことが原因になります。
デフォルトでは、InterScan MSS/IMSVA/DDEIのOSのホスト名がSMTP HELO/EHLOコマンドで使用されます。
メールサーバによっては、「SMTPクライアントがSMTP HELO/EHLOコマンドで指定するホスト名」に対し、対応するAレコードまたはMXレコードがDNSから確認できない場合に受信拒否を行うことがあります。
なお、RFC 2821(Simple Mail Transfer Protocol) の 3.6 Domains では、SMTP EHLOコマンドで指定するホスト名が名前解決できることを求めています。
例として、postfixにはこのような機能があります。当該機能に抵触すると、以下のようなSMTP応答をSMTPクライアントに返却し、メールの受信を拒否いたします。
450 4.7.1 <ホスト名>: Helo command rejected: Host not found
というわけで、送ってくるやつが悪、と
とはいえ、解除できるのか?と確認
iredmailフォーラム「Helo command rejected: Host not found 450 4.7.1 – error [FIXED]」に smtpd_helo_restrictions の記載とあるので新旧サーバのpostconf -vを比較
旧サーバ
smtpd_helo_restrictions = permit_mynetworks permit_sasl_authenticated check_helo_access pcre:/etc/postfix/helo_access.pcre

新サーバ
smtpd_helo_restrictions = permit_mynetworks permit_sasl_authenticated check_helo_access pcre:/etc/postfix/helo_access.pcre reject_non_fqdn_helo_hostname reject_unknown_helo_hostname
なるほど・・・確認したら2018年のpostfix/dovecotメールサーバでWindows Live Mail 2012がエラーになる でreject_non_fqdn_helo_hostname, reject_unknown_helo_hostname を削除した、という記録が残っていた。
ということで、まずは /etc/postfix/main.cf の smtpd_helo_restrictionsからとりあえず reject_unknown_helo_hostnameだけを削除して動作状況確認
・・・設定後に再送されてきたvectorメールはHost not foundになっているので、reject_non_fqdn_helo_hostname も削除してみると、受信成功
というわけで、今回も smtpd_helo_restrictions から reject_non_fqdn_helo_hostnameと reject_unknown_helo_hostname を削除した。
(10) SOGoのタイムゾーン変更
/etc/sogo/sogo.conf に「SOGoTimeZone = “America/New_York”;」という設定があるので「SOGoTimeZone = “Asia/Tokyo”;」に書き換える。
(11) 切り替え後の運用状況確認
rejectの確認
メール受信で想定外の拒否が起きてないかを「tail -f /var/log/maillog |grep reject」で確認
“Recipient address rejected: Intentional policy rejection, please try again later”はgreylist関連で15分後の再送要求なので、ずっと同じfromとtoで発生していない限りは無視
Dec 16 13:34:39 ml2 postfix/smtpd[528122]: NOQUEUE: reject: RCPT from mta-sndfb-e01.mail.nifty.com[106.153.226.65]: 451 4.7.1 <xxxx@xxxx.jp>: Recipient address rejected: Intentional policy rejection, please try again later; from=<yyyy@yyyy.com> to=<xxxx@xxxx.jp> proto=ESMTP helo=<mta-sndfb-e01.mail.nifty.com>
“Sender address rejected: Domain not found”は、存在しないドメインからのメールなので受け取れなくて問題ない。
Dec 16 13:32:44 ml2 postfix/smtpd[528122]: NOQUEUE: reject: RCPT from unknown[178.170.191.125]: 450 4.1.8 <yyyy@yyyy.com>: Sender address rejected: Domain not found; from=<yyyy@yyyy.com> to=<xxxx@xxxx.jp> proto=ESMTP helo=<mx01.vbudushee.ru>
“Helo command rejected: Host not found”は、本来メールサーバホスト名はDNSに登録してる必要があるのに登録していないサーバから送信されてきてる、というのもなんだけど、有名どころでも登録してない場合がちらほらあるので、/etc/postfix/main.cf の smtpd_helo_restrictions設定を見直し
Dec 16 11:35:50 ml2 postfix/smtpd[513244]: NOQUEUE: reject: RCPT from ml2.vector.co.jp[180.214.37.169]: 450 4.7.1 <www05.vector.co.jp>: Helo command rejected: Host not found; from=<yyyyyy@ml.vector.co.jp> to=<xxxx@xxxx.jp> proto=ESMTP helo=<www05.vector.co.jp>
pop3/imap認証のエラー確認
メール取得で認証のエラーを出してないか確認
「tail -f /var/log/dovecot/imap.log|grep “auth fail”」「tail -f /var/log/dovecot/pop3.log|grep “auth fail”」
Dec 16 09:43:22 ml2 dovecot[414228]: imap-login: Disconnected: Connection closed (auth failed, 1 attempts in 8 secs): user=<xxx@xxx.jp>, method=PLAIN, rip=xx.xx.xx.xx, lip=yy.yy.yy.yy, TLS, TLSv1.3 with cipher TLS_AES_256_GCM_SHA384 (256/256 bits), session=<qTdBd1gps43Ssvsh>
Dec 16 11:14:37 ml2 dovecot[414228]: imap-login: Disconnected: Connection closed (auth failed, 1 attempts in 2 secs): user=<yyy@yyy.com>, method=PLAIN, rip=xx.xx.xx.xx, lip=yy.yy.yy.yy, TLS: Connection closed, TLSv1.2 with cipher ECDHE-RSA-AES256-GCM-SHA384 (256/256 bits), session=<SbLtvVkpCuUjSoVw>
Dec 16 08:07:46 ml2 dovecot[414228]: pop3-login: Disconnected: Connection closed (auth failed, 1 attempts in 2 secs): user=<yyy@yyy.com>, method=PLAIN, rip=xx.xx.xx.xx, lip=yy.yy.yy.yy, session=<SeOzIVcpZLE5tnGw>
Dec 16 08:25:44 ml2 dovecot[414228]: pop3-login: Disconnected: Aborted login by logging out (auth failed, 1 attempts in 2 secs): user=<xxx@xxx.jp>, method=PLAIN, rip=xx.xx.xx.xx, lip=yy.yy.yy.yy, TLS, TLSv1.3 with cipher TLS_AES_256_GCM_SHA384 (256/256 bits), session=<xrf1YVcp9P2Zrq1g>
基本的にどっちも元IPである”rip=”のあとのIPアドレスの所属を調べて、妥当な場所からのアクセスだったら、該当ユーザに電話などで連絡を取って状況を確認
メール受信時のgreylist処理詳細確認
iredapdを使用したメール受信時のgreylist処理のログ /var/log/iredapd/iredapd.log を確認
ざらっと見てたら、いまどき暗号化無し(encryption_protocol= の値がなし)なのは大量メール送信者ぐらいって感じでしたね
ポイント系
決済系
docomo-bill.ne.jp (偽物かと思ったら、本物のNTTファイナンス ntt-finance.co.jp でした)
一般サイト
abema.tv
b-cle.com
bestrsv.com
e-trend.co.jp
gnavi.co.jp
yodobashi.com
DM送信業者
cuenote.jp
emberpoint.com
mpse.jp
変な業者
tubox.jp
ec-tools.jp
myselection.net
(12) spamasssasin の設定移植
spamasssasin にいろいろカスタマイズしていたので、その設定を移動
むかし www.flcl.org/~yoh/user_prefs で配布していたものを /etc/mail/spamassassin/japancustom として保存しているので、コピー
また、いろいろカスタムした内容を /etc/mail/spamassassin/private_prefs として保存しているので、コピー
この2ファイルを組み込むように /etc/mail/spamassassin/local.cf の最後に以下を追加
include japancustom
include private_prefs
で spamasssasind を再起動しようとしたら起動してないし、届いたメールのヘッダを確認したら X-Spam-Status とかが存在していない
どういうことか確認したら「Amavisd + SpamAssassin not working? no mail header (X-Spam-*) inserted」を発見。amavisdのなかからspamassassinを起動してるので常時動いてるわけじゃない、というのと、標準だとX-Spamを付けない状態、ということだった。
旧サーバでの設定を確認
#$sa_tag_level_deflt  = 2.0;  # add spam info headers if at, or above that level
$sa_tag_level_deflt = -999;
$sa_tag2_level_deflt = 6.2;  # add 'spam detected' headers at that level
$sa_tag2_level_deflt = 15;
#$sa_kill_level_deflt = 6.9;  # triggers spam evasive actions (e.g. blocks mail)
$sa_kill_level_deflt = 100;
#$sa_dsn_cutoff_level = 10;   # spam level beyond which a DSN is not sent
$sa_dsn_cutoff_level = 100;
$sa_crediblefrom_dsn_cutoff_level = 18; # likewise, but for a likely valid From
# $sa_quarantine_cutoff_level = 25; # spam level beyond which quarantine is off
$penpals_bonus_score = 8;    # (no effect without a @storage_sql_dsn database)
$penpals_threshold_high = $sa_kill_level_deflt;  # don't waste time on hi spam
$bounce_killer_score = 100;  # spam score points to add for joe-jobbed bounces

$sa_mail_body_size_limit = 400*1024; # don't waste time on SA if mail is larger
$sa_local_tests_only = 0;    # only tests which do not require internet access?
新サーバでの設定は?と見てみると
$sa_tag_level_deflt  = 2.0;  # add spam info headers if at, or above that level
$sa_tag2_level_deflt = 6.2;  # add 'spam detected' headers at that level
$sa_kill_level_deflt = 6.9;  # triggers spam evasive actions (e.g. blocks mail)
$sa_dsn_cutoff_level = 10;   # spam level beyond which a DSN is not sent
$sa_crediblefrom_dsn_cutoff_level = 18; # likewise, but for a likely valid From
#$sa_quarantine_cutoff_level = 25; # spam level beyond which quarantine is off

$sa_mail_body_size_limit = 400*1024; # don't waste time on SA if mail is larger
$sa_local_tests_only = 0;    # only tests which do not require internet access?
設定を見比べて思い出した
2018年時点で、標準だとSPAM判定が厳しいなぁ、ということがあったので緩和していました(Webに書いてなかったので忘れてた)
ヘッダーに「X-Spam」を表示するため $sa_tag_level_deflt を 2.0 → -999
殺す率を下げるために $sa_tag2_level_deflt を 6.2 → 15
$sa_kill_level_deflt を 6.9 から 100
$sa_dsn_cutoff_level を 10 から 100
という形で設定した
(13) logwatchの設定調整
logwatchを入れた状態だとpostfixに関してのunmatchが非常に多量に出力される
フォーラムに「Logwatch postfix: a lot of unmatched entries」があり、 /etc/logwatch/conf/services/postfix.conf で 「$postfix_Enable_Long_Queue_Ids = Yes」を設定する、とある。
初期値は「$postfix_Enable_Long_Queue_Ids = No」だったので変更して logwatch –output stdout を実行してみたのだが、postfixは問題なくなったものの、それ以外がまだ多い・・・
特に dovecotに関する出力では lda からの具体的なメールファイルの取り扱い記録が出力されている
/etc/logwatch/conf/services/dovecot.conf は postfix.conf と違って設定可能項目が少ない。
フォーラム見ると「 logwatch and dovecot produce lot of output」で ignore に設定しろ、とある。
とりあえず以下を設定した
# cat /etc/logwatch/conf/ignore.conf
###### REGULAR EXPRESSIONS IN THIS FILE WILL BE TRIMMED FROM REPORT OUTPUT #####
### for dovecot imap,lda
: sieve: from=
: expunge: box=
: copy from
: delete: box=
# maildir move error?
: Expunged message reappeared, giving a new UID
: Warning: Fixed a duplicate:
#
とりあえず問題なさそうに見える
(14) logwatchのdovecotスクリプトカスタマイズ
logwatchのdovecot で pop3 / imap のログイン回数がわかるが、アカウントが乗っ取られた時に如実に表れるのは接続してくるIPアドレスの多さになるので、各アカウントごとに接続に成功したIPアドレス数をカウントすると、なんとなく検知できるようになる
まず、標準のservices/dovecot の設定だとサーバ全体の回数しかわからないので、ユーザごとについても出力できるようにする
/etc/logwatch/conf/services/dovecot.conf の「#$dovecot_detail = 10」を「$dovecot_detail = 10」に変更
で・・・gmail, outlook, などのメールサーバ側でpop3アクセスしてメールを取ってくる、って設定をしている場合、これらのサーバからのアクセスIPはかなりいろいろある。特にgmail
これらをまるっと出力をまとめるために /etc/logwatch/scripts/services/dovecot に修正を入れた
gmailもoutlookもIPv6アドレスが多かったので頻出したものを登録した。
変更前のPOP3部分
   } elsif ( (my ($User, $Host) = ( $ThisLine =~ /^(?:$dovecottag )?pop3-login: Login: (.*?) \[(.*)\]/ ) ) or
             (my ($User, $Host) = ( $ThisLine =~ /^(?:$dovecottag )?pop3-login: (?:Info: )?Login: user=\<(.*?)\>.*rip=(.*), lip=/ ) ) ) {
      if ($Host !~ /$IgnoreHost/) {
         $Host = hostName($Host);
         $Login{$User}{$Host}++;
         $LoginPOP3{$User}++;
         $ConnectionPOP3{$Host}++;
         $Connection{$Host}++;
      }
変更後のPOP3部分
   } elsif ( (my ($User, $Host) = ( $ThisLine =~ /^(?:$dovecottag )?pop3-login: Login: (.*?) \[(.*)\]/ ) ) or
             (my ($User, $Host) = ( $ThisLine =~ /^(?:$dovecottag )?pop3-login: (?:Info: )?Login: user=\<(.*?)\>.*rip=(.*), lip=/ ) ) ) {
      if ($Host !~ /$IgnoreHost/) {
         $Host = hostName($Host);
         if(($Host =~ /mail-[a-z][a-z0-9]*-[a-z][a-z0-9]*\.google\.com/)
                ||($Host =~ /2001:4860:4864:/)
                ||($Host =~ /2607:f8b0:4864:/)
                ||($Host =~ /2a00:1450:4864:/)
                ){
             $Host = "access from Gmail server(POP3)";
         }
         if(($Host =~ /40\.99\.44\.229/)
                ||($Host =~ /40\.99\.251\.133/)
                ||($Host =~ /2603:1036:/)
                ){
             $Host = "access from Microsoft server(POP3)";
         }
         $Login{$User}{$Host}++;
         $LoginPOP3{$User}++;
         $ConnectionPOP3{$Host}++;
         $Connection{$Host}++;
      }
変更前のIMAP部分
   } elsif ( (my ($User, $Host) = ( $ThisLine =~ /^(?:$dovecottag )?imap-login: Login: (.*?) \[(.*)\]/ ) ) or
             (my ($User, $Host, $Session) = ( $ThisLine =~ /^(?:$dovecottag )?imap-login: (?:Info: )?Login: user=\<(.*?)\>.*rip=(.*), lip=.*, session=<([^>]+)>/ ) ) ) {
      if ($Host !~ /$IgnoreHost/) {
         $Host = hostName($Host);
         $Login{$User}{$Host}++;
         $LoginIMAP{$User}++;
         $ConnectionIMAP{$Host}++;
         $Connection{$Host}++;
         if (defined($MUASessionList{$Session})) {
             $MUAList{$MUASessionList{$Session}}{$User}++;
             delete $MUASessionList{$Session};
         }
      }
変更後のIMAP部分
   } elsif ( (my ($User, $Host) = ( $ThisLine =~ /^(?:$dovecottag )?imap-login: Login: (.*?) \[(.*)\]/ ) ) or
             (my ($User, $Host, $Session) = ( $ThisLine =~ /^(?:$dovecottag )?imap-login: (?:Info: )?Login: user=\<(.*?)\>.*rip=(.*), lip=.*, session=<([^>]+)>/ ) ) ) {
      if ($Host !~ /$IgnoreHost/) {
         $Host = hostName($Host);
         if(($Host =~ /mail-[a-z][a-z0-9]*-[a-z][a-z0-9]*\.google\.com/)
                ||($Host =~ /2001:4860:4864:/)
                ||($Host =~ /2607:f8b0:4864:/)
                ||($Host =~ /2a00:1450:4864:/)
                ){
             $Host = "access from Gmail server(IMAP)";
         }
         if(($Host =~ /40\.99\.44\.229/)
                ||($Host =~ /40\.99\.251\.133/)
                ||($Host =~ /2603:1036:/)
                ){
             $Host = "access from Microsoft server(IMAP)";
         }
         $Login{$User}{$Host}++;
         $LoginIMAP{$User}++;
         $ConnectionIMAP{$Host}++;
         $Connection{$Host}++;
         if (defined($MUASessionList{$Session})) {
             $MUAList{$MUASessionList{$Session}}{$User}++;
             delete $MUASessionList{$Session};
         }
      }
(15) logrotateの設定調整
メールログなど長期保存した方がいいので、設定変更をした
/etc/logrotate.conf への修正
rotate 4 → rotate 30
#compress → compress
maillog, dovecot/* の設定が現状 weekly になってるが、元のメールサーバではdailyに変更して日々のメール取扱量が曜日によって変わるかをわかりやすくしていた。
今回は、どうせ必要になることは少ないんだからweeklyのままにしておくか、ということにした。
(16) Let’s Encrypt によるSSL対応を dehydrated を使って行う
公式手順 Request a free cert from Let’s Encrypt (for servers deployed with downloadable iRedMail installer) だと certbot コマンドを使っているが、私は単純化されているdehydratedを使っている。
EPELはiredmailインストール時に有効にしているので「dnf install dehydrated」でインストールできる。
証明書発行時に使う /.well-known/acme-challenge/ へのアクセスを nginx に実施
/etc/nginx/templates/dehydrated.tmpl に以下を記載
location ^~ /.well-known/acme-challenge/ {
  access_log on;
  autoindex off;
  alias /var/www/dehydrated/;
}
/etc/nginx/sites-available/00-default.conf にinclude /etc/nginx/templates/dehydrated.tmpl; を追加
#
# Note: This file must be loaded before other virtual host config files,
#
# HTTP
server {
    # Listen on ipv4
    listen 80;
    listen [::]:80;

    server_name _;

    include /etc/nginx/templates/dehydrated.tmpl;
    # Redirect all insecure http:// requests to https://
    return 301 https://$host$request_uri;
}
/etc/nginx/sites-available/00-default-ssl.conf にも追加
#
# Note: This file must be loaded before other virtual host config files,
#
# HTTP
server {
    # Listen on ipv4
    listen 80;
    listen [::]:80;

    server_name _;

    include /etc/nginx/templates/dehydrated.tmpl;
    # Redirect all insecure http:// requests to https://
    return 301 https://$host$request_uri;
}
[root@ml2 nginx]# cat sites-available/00-default-ssl.conf
#
# Note: This file must be loaded before other virtual host config files,
#
# HTTPS
server {
    listen 443 ssl http2;
    listen [::]:443 ssl http2;
    server_name _;

    root /var/www/html;
    index index.php index.html;

    include /etc/nginx/templates/misc.tmpl;
    include /etc/nginx/templates/ssl.tmpl;
    include /etc/nginx/templates/iredadmin.tmpl;
    include /etc/nginx/templates/roundcube.tmpl;
    include /etc/nginx/templates/sogo.tmpl;
    include /etc/nginx/templates/netdata.tmpl;
    include /etc/nginx/templates/php-catchall.tmpl;
    include /etc/nginx/templates/stub_status.tmpl;
    include /etc/nginx/templates/dehydrated.tmpl;
}
追加した後はnginxを再起動
/etc/dehydrated/domain.txt に発行したいSSL証明書のFQDNをすべて1行に列挙
「dehydrated –register」「dehydrated –register –accept-terms」で登録を行い、「dehydrated –cron」でSSL証明書を発行
で、証明書が発行されたら、Use Let’s Encrypt cert 記載のようなかたちで /etc/pki/tls のファイルを /etc/dehydrated/certs/<FQDN>/ に置き換える作業を行う
また、証明書が発行された場合に自動的に関連するサービスを再起動して読み込み直す処理を入れるため /etc/dehydrated/hook.sh の deploy_cert() { に追加する
deploy_cert() {
  local DOMAIN="${1}" KEYFILE="${2}" CERTFILE="${3}" FULLCHAINFILE="${4}" CHAINFILE="${5}" TIMESTAMP="${6}"

  # 略
  # systemctl reload nginx.service
    chmod a+r /etc/dehydrated/certs/${DOMAIN}/fullchain-*.pem
    chmod a+r /etc/dehydrated/certs/${DOMAIN}/privkey-*.pem
    /usr/bin/systemctl restart postfix.service
    /usr/bin/systemctl restart dovecot.service
    /usr/bin/systemctl restart nginx.service
    /usr/bin/systemctl restart sogod.service
    /usr/bin/systemctl restart mariadb.service
}
最後にdehydratedが自動実行されるように dehydrated.timer 設定を入れるため systemctl enable dehydrated.timer を実行する
systemctl status dehydrated.timer
systemctl enable dehydrated.timer
systemctl status dehydrated.timer
(17) logwatchに spamhaus 登録検知?
最初は問題なく運用できていたのだが、spamhaus に IPv6 逆引きができない、という理由でSPAM登録されるという事態が発生した。
実際には複数の異なるネットワーク上に存在するサーバにてdigコマンドを使ってちゃんと応答が返ってくるにも関わらず、というくそな状態
/var/log/maillog を確認すると下記のような「blocked using Spamhaus.」というログがあった
Dec 23 14:22:12 サーバ名 postfix/smtp[1969195]: 4YGmc31klrz9sls: to=<osakanataro@ドメイン>, relay=hotmail-com.olc.protection.outlook.com[52.101.42.11]:25, delay=0.98, delays=0/0.02/0.85/0.11, dsn=5.7.1, status=bounced (host hotmail-com.olc.protection.outlook.com[52.101.42.11] said: 550 5.7.1 Service unavailable, Client host [xxx.xxx.xx.xxx] blocked using Spamhaus. To request removal from this list see https://www.spamhaus.org/query/ip/xxx.xxx.xx.xxx (ASXXXX). [Name=Protocol Filter Agent][AGT=PFA][MxId=11BA4226D003BECF] [CO1PEPF000044F6.namprd21.prod.outlook.com 2024-12-23T05:22:17.053Z 08DD21136A4618D7] (in reply to MAIL FROM command))
logwatchのpostfixでこれが検出できるようにすればいいかと雑な対応を実施した。
/etc/logwatch/scripts/services/postfixの「Main processing loop」の最初のあたりで、本来はテンプレートにない珍しいログを出力するためのunmatchedとして「blocked using」が含まれる行を送り込めばいいや、という判断です
# diff -u postfix.20241202.sourceforge postfix
--- postfix.20241202.sourceforge        2024-12-26 16:39:56.259000000 +0900
+++ postfix     2024-12-26 17:23:14.236000000 +0900
@@ -2829,6 +2829,13 @@
    # ignore tlsproxy for now
    if ($service_name eq 'tlsproxy')        { next; }                             # postfix/tlsproxy

+   ### 2024/12/26 start
+   if ($p1 =~/blocked using/){
+       inc_unmatched('final')   if ! in_ignore_list ($p1);
+       #return;
+   }
+   ### 2024/12/26 end
+
    my ($helo, $relay, $from, $origto, $to, $domain, $status,
        $type, $reason, $reason2, $filter, $site, $cmd, $qid,
        $rej_type, $reject_name, $host, $hostip, $dsn, $reply, $fmthost, $bytes);
#
とりあえず、これで検出できるようにはなりました。
なお修正後の試験は該当するログがある日付を指定する形で「logwatch –range “2024/12/23” –service postfix」を実行しました。