Zentyalを日本語で使う場合の設定手順


Linux(Ubuntu 16.04 LTS)ベースでDHCPサーバ/ファイヤーウォール/NATルータ/ActiveDirectory/Exchange互換サーバなどを提供できるアプライアンス「zentyal」を久々にセットアップ。 (以前はzentyal.orgだったのが、zentyal.comに統合された)

2019/07/02追記:Ubuntu 18.04.1 LTSベースのZentyal 6.0です。この記事はZentyal 5.1の時に作成していますが、Zentyal 6.0でも同じでした。
2021/08/12追記:Ubuntu 20.04.2 LTSベースのZentyal 7.0ですが、同じように日本語は化け、同じパッケージインストールで修正できました。

以前、日本語訳を投稿しておいたおかげで日本語を選択できるようになっていますが、注意点が1つ。
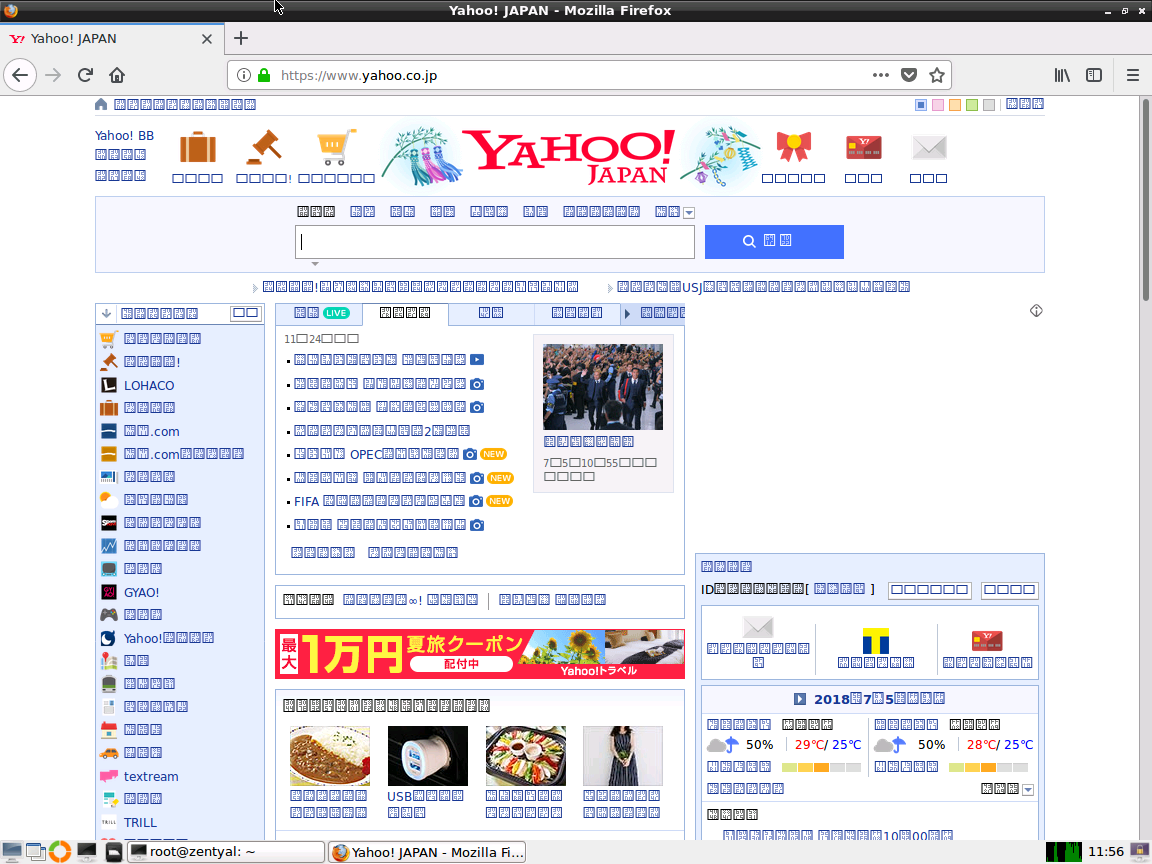
インストール時に日本語を設定してしまうと、firefoxが文字化けし、設定に難儀します。
まずはEnglishでインストールを行った上で、手動でパッケージを追加してから日本語に変更する必要があります。

1. EnglishでZentyalをインストール
2. 初回ログイン
3. シェルを開く
4. Ubuntuの日本語対応をインストール「sudo apt install language-pack-ja firefox-locale-ja」
5. 日本語表示用フォントをインストール「sudo apt install fonts-arphic-uming fonts-takao-pgothic」
6. zentyalの日本語対応をインストール「sudo apt install language-pack-zentyal-ja」
7. zentyalの設定画面で「日本語」を設定する。

2019/12/13追記: fonts-takao-pgothic でエラーとなる場合は fonts-takao-gothic で実施のこと

文字化け状態の例

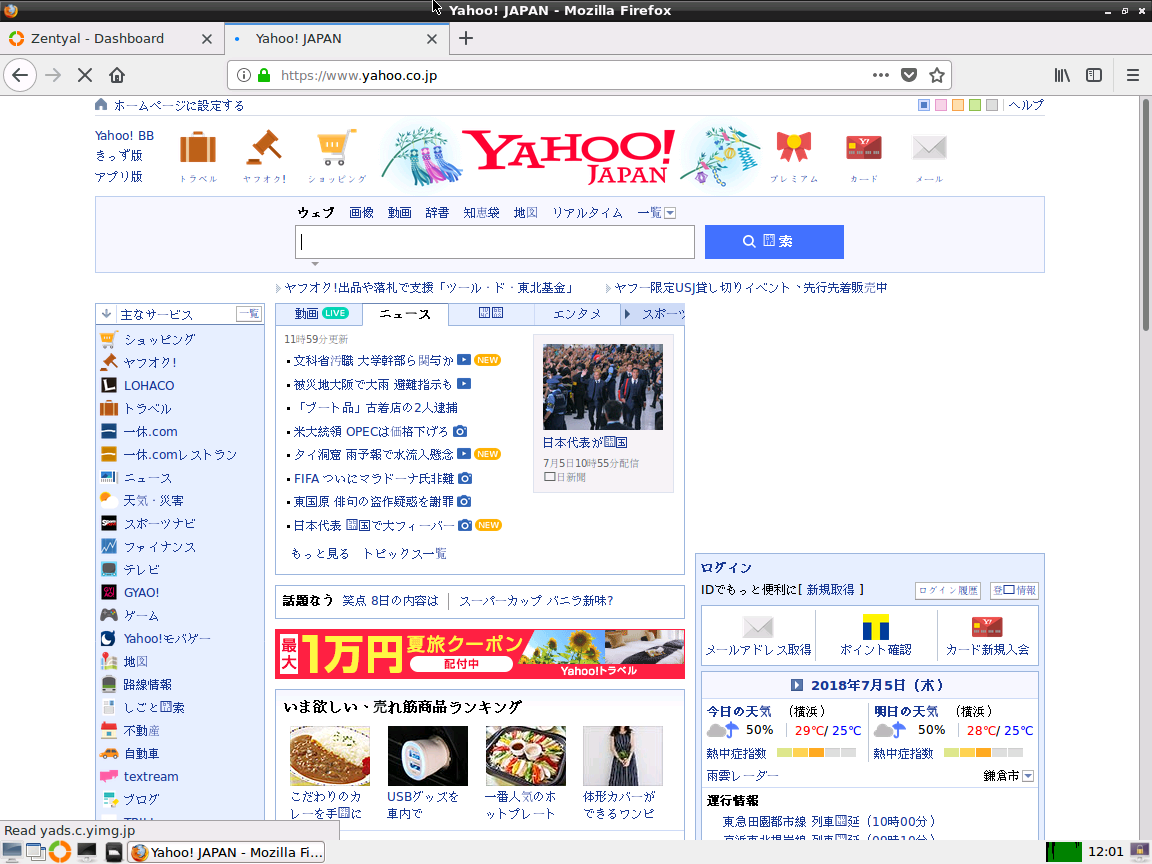
文字化け解消後

なお、yahooのページだと「fonts-arphic-uming」だけでも大丈夫だったが、zentyalではさらに「fonts-takao-pgothic」を追加する必要があった。
なお、 xfonts-intl-japanese では文字化けは直らなかった。

HPE OfficeConnect 1950スイッチをシリアルケーブルで設定できるのか?


HPE OfficeConnect 1950はマニュアルを読む限り設定はWebでしかできないように書かれている。
しかし、設定をExportしたファイルを見ると、HPE 5800と同様のフォーマットで設定が書かれている。
本当にシリアルで設定ができないのか?

まず、シリアルは38400bpsで接続する。

初期は「admin」で、パスワードは無い。

******************************************************************************
* Copyright (c) 2010-2017 Hewlett Packard Enterprise Development LP          *
* Without the owner's prior written consent,                                 *
* no decompiling or reverse-engineering shall be allowed.                    *
******************************************************************************

Line aux0 is available.


Press ENTER to get started.
login: admin
Password:
<HPE>%Mar 19 13:31:25:657 2018 HPE SHELL/5/SHELL_LOGIN: admin logged in from aux0.

「?」を入力すると、いま使えるコマンド一覧が出てくる。

<HPE> ?
User view commands:
  display       Display current system information
  exit          Alias for 'quit'
  initialize    Delete the startup configuration file and reboot system
  ipsetup       IP configuration
  no            Alias for 'undo'
  password      Specify password of local user
  ping          Ping function
  poe           Power over Ethernet
  quit          Exit from current command view
  reboot        Reboot operation
  show          Alias for 'display'
  summary       Display summary information of the device
  telnet        Establish a telnet connection
  transceiver   Enable transceiver phony alarm
  undo          Cancel current setting
  upgrade       Upgrade the system boot file or the Boot ROM program
  xtd-cli-mode  Switch to extended CLI mode to display and execute all commands
                (special authorization required)

<HPE>

Web GUIでエクスポートした設定はHPE 5800相当なのに、使えるコマンドは全然違う。

とりあえず片っ端から入力してみれば、最後の「xtd-cli-mode」が怪しそう。

<HPE>xtd-cli-mode
All commands can be displayed and executed in extended CLI mode. Switch to extended CLI mode? [Y/N]:y
Password:


パスワードを要求される。

調べてみると、パスワードがわかる。

Glazenbakje’s technical blog「HP v1910 Secret Commando list ( how to enable it )」のコメントに記載
俺の技術メモ「HP 1950 Switchのxtd-cli-modeパスワード
HPE Community「HP 1950 JG961A “xtd-cli-mode”

foes-bent-pile-atom-ship

<HPE>xtd-cli-mode
All commands can be displayed and executed in extended CLI mode. Switch to extended CLI mode? [Y/N]:y
Password:
Warning: Extended CLI mode is intended for developers to test the system. Before using commands in extended CLI mode, contact the Technical Support and make sure you know the potential impact on the device and the network.
<HPE>

プロンプトが変わる、ということもないため、変更が反映されたかがわかりません。
とりあえず「?」と入力し、コマンド一覧を出します。

<HPE>?
User view commands:
  archive             Archive configuration
  arp                 Address Resolution Protocol (ARP) module
  backup              Backup operation
  boot-loader         Software image file management
  bootrom             Update/read/backup/restore bootrom
  cd                  Change current directory
  cfd                 Connectivity Fault Detection (CFD) module
  clock               Specify the system clock
  copy                Copy a file
  debugging           Enable system debugging functions
  delete              Delete a file
  diagnostic-logfile  Diagnostic log file configuration
  dir                 Display files and directories on the storage media
  display             Display current system information
  erase               Alias for 'delete'
  exception           Exception information configuration
  exit                Alias for 'quit'
  fdisk               Partition a storage medium
  fixdisk             Check and repair a storage medium
  format              Format a storage medium
  free                Release a connection
  ftp                 Open an FTP connection
  gunzip              Decompress file
  gzip                Compress file
  install             Perform package management operation
  ip                  Specify IP configuration
  local-guest         Manage guest users
  lock                Lock the current line
  logfile             Log file configuration
  md5sum              Compute the hash digest of a file using the MD5 algorithm
  mkdir               Create a new directory
  monitor             System monitor
  more                Display the contents of a file
  mount               Mount a storage medium
  move                Move a file
  mtrace              Configure the multicast traceroute
  no                  Alias for 'undo'
  oam                 OAM module
  ping                Ping function
  process             Process management
  pwd                 Display current working directory
  python              Source using python script
  quit                Exit from current command view
  reboot              Reboot operation
  rename              Rename a file or directory
  repeat              Repeat executing history commands
  reset               Reset operation
  restore             Restore operation
  rmdir               Remove an existing directory
  save                Save current configuration
  scheduler           Scheduler configuration
  scp                 Establish an SCP connection to an SCP server
  screen-length       Multiple-screen output function
  security-logfile    Security log file configuration
  send                Send information to other lines
  sftp                Establish an SFTP connection to an SFTP server
  sha256sum           Compute the hash digest of a file using the SHA256
                      algorithm
  show                Alias for 'display'
  ssh2                Establish an Stelnet connection to an Stelnet server
  startup             Specify system startup parameters
  super               Switch to a user role
  system-view         Enter the System View
  tar                 Archive management
  tclquit             Exit from TCL shell
  tclsh               Enter the TCL shell
  telnet              Establish a telnet connection
  terminal            Set the terminal line characteristics
  tftp                Open a TFTP connection
  tracert             Tracert function
  umount              Unmount a storage medium
  undelete            Recover a deleted file
  undo                Cancel current setting
  web                 Web configuration
  write               Alias for 'save'
  xml                 Enter XML view
  xtd-cli-mode        Switch to extended CLI mode to display and execute all
                      commands (special authorization required)

<HPE>

大幅に増えました。

「show current-configuration」で現在の設定を確認できます。

<HPE> show current-configuration
#
 version 7.1.070, Release 5106p03
#
 sysname HPE
#
 clock timezone Tokyo add 09:00:00
 clock protocol ntp
#
 telnet server enable
<略>
#
user-group system
#
local-user admin class manage
 service-type telnet http https terminal
 authorization-attribute user-role network-admin
 authorization-attribute user-role network-operator
#
 ip http enable
 ip https enable
#
return
<HPE>

この結果は、Web GUIでエクスポートした設定ファイルと等しい状態でした。

ESXi 6.5でVMDirectPath I/Oが設定できるけど使えない


ESXi6.5環境において、16Gb FC HBAのQLogic QLE2662に対して、VMDirectPath I/Oで仮想マシンから直接使える様にパススルー設定をした。
設定は問題なくできたものの、仮想マシンを起動してみると、全然認識してくれない。

よく、パススルー設定で選択できない、という話は聞くが、今回は、設定は出来ている。

ためしに8GbのFC HBA QLE2540 を使ってみると、同様の手法で設定でき、仮想マシンからちゃんと認識している。

ここら辺に糸口があるな、と調査。


<調査過程は省略>

結論からすると「VMware vSphere VMDirectPath I/O:プラットフォームとデバイスの要件」(英語版:VMware vSphere VMDirectPath I/O: Requirements for Platforms and Devices)の「PCI 機能リセット」設定の問題だった。

パススルー設定したPCIeデバイスは、物理サーバ起動時に初期化しているが、接続されている仮想マシンが起動する毎にPCIeデバイスの初期化を行う必要がある。
この初期化手法をどういう風に行うか、という設定を適切に行わないと、仮想マシン側で認識できないようだ。

設定はESXi上の /etc/vmware/passthru.map で行われている。

うまく動いたQLE2540のVender ID/Product IDを「esxcfg-info」コマンドで確認すると「1077」「2523」。
これは /etc/vmware/passthru.map で「1077 2532 default false」という定義で設定されている。
意味は、初期化手法がdefaultで、fptShareableがfalseなので全体初期化になる、というもの。
全体初期化であるため、1枚に複数ポートがある場合、別の仮想マシンに割り当てることができず、同じ仮想マシンに全部のポートを割り当てる必要がある、ということになる。

動かなかったQLE2662の方は「1077」「2031」。
記載が無いので、適切な初期化方法を見つけて追加する必要がある。
KBに「PCI ホスト ブリッジ直下の PCI 機能を VMDirectPath I/O で使用するには、FLR または D3Hot リセットをサポートする必要があります」とあるため「flr」の場合と「d3d0」の場合をそれぞれ実験。
結果、「d3d0」の時のみ仮想マシン側でもデバイスを認識してくれた。

ということで、/etc/vmware/passthru.mapの最終行に「1077 2031 d3d0 default」という記載を追加した。

なお、 passthru.map の修正を行った後は、ESXiを再起動する必要がある。

# cd /etc/vmware/passthru.map
# passthrough attributes for devices
# file format: vendor-id device-id resetMethod fptShareable
# vendor/device id: xxxx (in hex) (ffff can be used for wildchar match)
# reset methods: flr, d3d0, link, bridge, default
# fptShareable: true/default, false

# Intel 82579LM Gig NIC can be reset with d3d0
8086  1502  d3d0     default
# Intel 82598 10Gig cards can be reset with d3d0
8086  10b6  d3d0     default
8086  10c6  d3d0     default
8086  10c7  d3d0     default
8086  10c8  d3d0     default
8086  10dd  d3d0     default
# Broadcom 57710/57711/57712 10Gig cards are not shareable
14e4  164e  default  false
14e4  164f  default  false
14e4  1650  default  false
14e4  1662  link     false
# Qlogic 8Gb FC card can not be shared
1077  2532  default  false
# QLogic QL45604 cards need to be reset with "link" and cannot be shared
1077  1634  link     false
1077  1629  link     false
1077  1636  link     false
1077  1656  link     false
1077  1644  link     false
1077  1654  link     false
# LSILogic 1068 based SAS controllers
1000  0056  d3d0     default    
1000  0058  d3d0     default
# NVIDIA
10de  ffff  bridge   false
# for QLE2662
1077  2031  d3d0     default
#

fail2banで全JAILのステータスを確認したい


Linuxサーバでfail2banを使ってアクセス拒否設定を行っている。

JAILを複数している場合に、全部を一括で確認する手段が標準ではない模様。
調べたところ「kamermans/fail2ban-allstatus.sh」の下記コメントを発見

joergludwig commented on 20 Dec 2017
Shorter version:
fail2ban-client status | sed -n ‘s/,//g;s/.*Jail list://p’ | xargs -n1 fail2ban-client status

これを ~/.bashrc に対して下記のように追加し、「fail2ban-check」で確認出来るように設定した。

alias fail2ban-check="fail2ban-client status | sed -n 's/,//g;s/.*Jail list://p' | xargs -n1 fail2ban-client status"

HPE 5700 スイッチの日付設定


旧H3C系の流れをくむ「HPE 5700 Switch」の設定をしていたところ、現在時刻の設定を手動で行う場合の手順がよくわからなかったのでメモ

なお、使用したfirmwareのバージョンは「HPE Comware Software, Version 7.1.045, Release 2432P01」です

・現在時刻の確認

<HPE>display clock
18:01:34 Tokyo Fri 01/26/2018
Time Zone : Tokyo add 09:00:00
<HPE>

・NTPを設定している場合の確認

<HPE>display ntp-service status
 Clock status: unsynchronized
 Clock stratum: 16
 Reference clock ID: none
 Clock jitter: 0.000000 s
 Stability: 0.000 pps
 Clock precision: 2^-17
 Root delay: 0.00000 ms
 Root dispersion: 101.79138 ms
 Reference time: 00000000.00000000  Thu, Feb  7 2036 15:28:16.000
<HPE>

上記だと「Clock status: unsynchronized」なので、NTPサーバとの同期が取れていない。

・NTPサーバに関しての情報確認

<HPE>display ntp-service session
       source          reference       stra reach poll  now offset  delay disper
********************************************************************************
    [5]xxx.xxx.xx.xx1  INIT              16     0   64    - 0.0000 0.0000 0.0000
    [5]xxx.xxx.xx.xx2  INIT              16     0   64    - 0.0000 0.0000 0.0000
    [5]xxx.xxx.xx.xx3  INIT              16     0   64    - 0.0000 0.0000 0.0000
Notes: 1 source(master), 2 source(peer), 3 selected, 4 candidate, 5 configured.
 Total sessions: 3
<HPE>

上記はNTPサーバを3つ指定している場合の出力。
接続できていないのでreferenceが「INIT」となっている。

・時刻の設定
標準のモード(system-viewを実行してない状態)でclock datetimeコマンドを実行して設定する

<HPE>clock datetime 16:09:00 2018/01/26
<HPE>%Jan 26 16:09:00:008 2018 HPE DEV/5/DEV_CLOCK_CHANGE: -User=**-IPAddr=** ; System clock changed from 14:48:09 Tokyo Wed 01/05/2011 to 16:09:00 Tokyo Fri 01/26/2018.
<HPE>

なお、NTP設定がされている場合は、下記のように「clock protocol none」を設定してから実行しろと表示される。

<HPE>clock datetime 16:09:00 2018/01/26
To manually set the system time, execute the clock protocol none command first.
<HPE>

clock protorolはsystem-viewでないと設定できなかったので、下記のように実行する。

<HPE>system-view
System View: return to User View with Ctrl+Z.
[HPE]clock protocol none
[HPE]quit
<HPE>clock datetime 16:09:00 2018/01/26
<HPE>system-view
System View: return to User View with Ctrl+Z.
[HPE]clock protocol ntp
[HPE]quit
<HPE>

・タイムゾーンの設定
日本で使う場合は9時間ずらす設定を入れる

<HPE>system-view
System View: return to User View with Ctrl+Z.
[HPE]clock timezone Tokyo add 09:00:00
[HPE]quit
<HPE>

・NTPサーバの設定
NTPによる時刻同期を行う場合は「clock protocol ntp」を実行し、
「ntp-service unicast-server IPアドレスまたはホスト名」でNTPサーバを指定する。
NTPサーバの指定が複数ある場合は複数回実行する。

<HPE>system-view
System View: return to User View with Ctrl+Z.
[HPE]clock protocol ntp
[HPE]ntp-service unicast-server xxx.xxx.xx.xx1
[HPE]ntp-service unicast-server xxx.xxx.xx.xx2
[HPE]ntp-service unicast-server xxx.xxx.xx.xx3
[HPE]quit
<HPE>

なお、誤って登録してしまった場合は「undo ntp-service unicast-server xxx.xxx.xx.xx1」と実行すると削除できる。