Raspberry pi上のOSMCにstreamlinkをインストールする

streamlink」をOSMC環境に入れてみた

streamlinkからVLCを起動してHDMI経由の音声出力はできたのですが、HDMI映像出力がうまくいきませんでした。このため、VLCで受信したものをrtspサーバとして出力し、そのデータをkodi側で受け取るという実装にしました。

追加したもの

再生用にVLC

$ sudo apt install vlc vlc-plugin-sdl 

pythonでpipコマンドを使うために

$ sudo apt install python-pip python-setuptools

コンパイルをするために

$ sudo apt install build-essential python-dev

エラー解決のために

下記のエラー解決のために「sudo apt install libffi-dev」

    c/_cffi_backend.c:15:17: fatal error: ffi.h: No such file or directory
     #include <ffi.h>

「sudo apt install libssl-dev」

    build/temp.linux-armv7l-2.7/_openssl.c:498:30: fatal error: openssl/opensslv.h: No such file or directory
     #include <openssl/opensslv.h>

で・・・これでようやくstreamlinkインストールに成功しました。

「sudo pip install streamlink」

再生に至るまで

以下のような感じで、OSMCにログインした状態でコマンドを実行して、ポート8554にてrtspのストリーミングサーバを実行します。

$ streamlink https://www.showroom-live.com/ringo-005 best --player="cvlc --sout '#rtp{sdp=rtsp://:8554/}'"

ちなみに、streamlinkのマニュアルを見ると「–player-args」というオプションで引数を渡すことができるとありましたが、「streamlink https://www.showroom-live.com/ringo-005 best –player=cvlc –player-args=”–sout ‘#rtp{sdp=rtsp://:8554/}'”」を実行すると、以下のエラーになってしまって起動できませんでした。

osmc@osmc:~$ streamlink https://www.showroom-live.com/yui-010 worst --player=cvlc --player-args="--sout '#rtp{sdp=rtsp://:8554/}'"
/usr/local/lib/python2.7/dist-packages/requests/__init__.py:91: RequestsDependencyWarning: urllib3 (1.25.2) or chardet (3.0.4) doesn't match a supported version!
  RequestsDependencyWarning)
[cli][info] Found matching plugin showroom for URL https://www.showroom-live.com/yui-010
[cli][info] Available streams: 144p (worst), low, high, 1080p (best)
[cli][info] Opening stream: 144p (hls)
[cli][info] Starting player: cvlc
[cli][info] Closing currently open stream...
Traceback (most recent call last):
  File "/usr/local/bin/streamlink", line 11, in <module>
    sys.exit(main())
  File "/usr/local/lib/python2.7/dist-packages/streamlink_cli/main.py", line 1033, in main
    handle_url()
  File "/usr/local/lib/python2.7/dist-packages/streamlink_cli/main.py", line 594, in handle_url
    handle_stream(plugin, streams, stream_name)
  File "/usr/local/lib/python2.7/dist-packages/streamlink_cli/main.py", line 447, in handle_stream
    success = output_stream(plugin, stream)
  File "/usr/local/lib/python2.7/dist-packages/streamlink_cli/main.py", line 320, in output_stream
    output.open()
  File "/usr/local/lib/python2.7/dist-packages/streamlink_cli/output.py", line 24, in open
    self._open()
  File "/usr/local/lib/python2.7/dist-packages/streamlink_cli/output.py", line 221, in _open
    self._open_subprocess()
  File "/usr/local/lib/python2.7/dist-packages/streamlink_cli/output.py", line 242, in _open_subprocess
    args = self._create_arguments()
  File "/usr/local/lib/python2.7/dist-packages/streamlink_cli/output.py", line 203, in _create_arguments
    args = self.args.format(filename=filename)
KeyError: 'sdp=rtsp'
osmc@osmc:~$ streamlink https://www.showroom-live.com/yui-010 best --player="cvlc --sout '#rtp{sdp=rtsp://:8554/}'"
/usr/local/lib/python2.7/dist-packages/requests/__init__.py:91: RequestsDependencyWarning: urllib3 (1.25.2) or chardet (3.0.4) doesn't match a supported version!
  RequestsDependencyWarning)
[cli][info] Found matching plugin showroom for URL https://www.showroom-live.com/yui-010
[cli][info] Available streams: 144p (worst), low, high, 1080p (best)
[cli][info] Opening stream: 1080p (hls)
^CInterrupted! Exiting...
[cli][info] Closing currently open stream...
osmc@osmc:~$

続いて、拡張子が.m3uで、以下の内容をテキストエディタで作成します。

#EXTM3U
#EXTINF:-1 
rtsp://127.0.0.1:8554

このm3uファイルをkodiで開くとshowroom動画が再生されました。

RAPIDSについてのメモ

あとで職務で関係しそうな気もするので、メモとして残しておく・・・

ブリュッセルで開かれたオープンソース系のイベントFOSDEM2019でnVidiaによる「RAPIDS : Data Science on GPUs」という講演があり、その講演動画とスライドpdfが公開されてる。

ざらっと内容を流し読んでみたところ、以下であるという理解。

AI処理などでGPU上で処理させる時、1つの処理だけでは終わらず次の処理にデータを回す際、一度メインメモリにデータを持ってきてから次の処理のデータを渡しているのが現状。

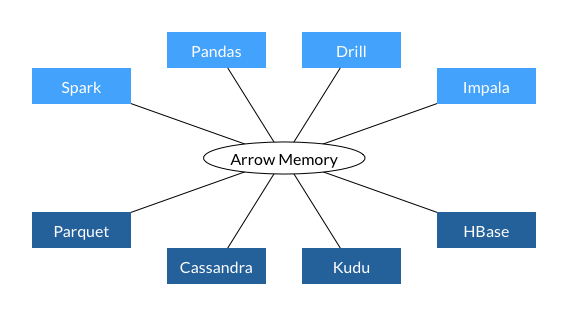
これを「Apache Arrow 」というのを使って、GPU上のメモリにデータを残しながら次の処理にうつれるようにする、データサイエンス向けのプラットフォームが「RAPIDS」 という感じのようだ。

common data layer
(Apache Arrowsのページより引用)

ImageMagick/librsvgではSVGのtextPathが使えない

文字列画像をSVGで作る」で調べたことの副産物を別記事として書きます。

SVGで文字列を描画する際、単純に記載するには「text」を使用する。

textには「textPath」という機能があり、別途定義した「path」の線上に文字列を並べることができるようになっている。

textPathは各種ブラウザではサポートされているものの、ImageMagickではサポートされていない。(「Text by path not working #642」)

ImageMagickでサポートされていない原因は、SVG描画にはlibrsvg2を使用しており、そのlibrsvg2がtextPathをサポートしていない、というものでした。(「[BZ#644624] no support for textPath element」)

4年前に「Partial textPath support」という形で部分的にサポートするためのパッチが投稿されているようなのですが、取り込まれていないままのようです。

果たしてサポートされるようになるのか・・・


2022/04/19追記

どうなったのかな?と確認してみたところ、libsvgでのサポート状況は変わっていなかった。

2021年にwikimediaのSVGサポートではlibsvgを使っているけど、そのままでいいの?といった議論があった模様「[Session] RFC: Re-evaluate librsvg as SVG renderer on Wikimedia wikis

libsvg 2.50、resvg 0.14、Inkscape 1.0、batlk 1.13/1.14を使った場合の速度や負荷などを検討し、resvgがよいのでは?というプレゼン資料があった。

ただ、最終的にwikimedia側でどうしたのかがよくわからなかった。

文字列画像をSVGで作る

ImageMagickの使い方を調べていたら、文字列を記述したSVGをImageMagickの機能で画像にすることができるようだ。

まず、ImageMagickで使えるフォントを確認する。

$ magick -list font
<略>
  Font: VL-Gothic-Regular
    family: VL Gothic
    style: Normal
    stretch: Normal
    weight: 400
    glyphs: /usr/share/fonts/vlgothic/VL-Gothic-Regular.ttf
$

「Font: VL-Gothic-Regular」が日本語フォントを含むものであるため、これを使う形でSVGを記述する。

<?xml version="1.0" encoding="utf-8"?>
<svg version="1.1"
 xmlns="http://www.w3.org/2000/svg"
 xmlns:xlink="http://www.w3.org/1999/xlink"
 viewBox="0 0 200 100"
 >
 <g font-size="16" font-family="VL Gothic">
<text x="0" y="16" style="width:200px;height:100px;font-size:16pt" >文字列78901234567890123456789012345678901234567890</text>
 </g>
</svg>

これで「magick test.svg test.png」とかやると生成される。上記の様にfont-familyをSVG内で指定していない場合は「magick -font VL-Gothic-Regular test.svg test.png 」という形で使用するフォントを指定する。

ただ、コレは自動改行されない。

調べたがSVGで簡単に文字列を自動改行させる方法は無い模様。

「foreignObject」というのを使うとできる、という記述もあったのだが、ImageMagickでは使えないようで、下記のSVGを作ってみたが、真っ白な画像ができあがった。

<?xml version="1.0" encoding="utf-8"?>
<svg version="1.1"
 xmlns="http://www.w3.org/2000/svg"
 width="210" height="110" >
<foreignObject x="0" y="16" width="200" height="100">
 <html xmlns="http://www.w3.org/xhtml/1999">
  <div style="width:200px;height:100px;font-size:16pt" >文字列78901234567890123456789012345678901234567890</div>
 </html>
</foreignObject>
</svg>

snibgo’s ImageMagick pages の「SVG text」にInkscape を使ってテキストを配置するアウトラインを作って、その範囲内に文字列を流し込む、ということができるらしい。

調べていくと「TextPath」を使うとPathで指定した線に沿ってテキストを配置できるので、その線を罫線みたいに引くことで対処できるようだ。

が・・・うちの環境のImageMagick v7では、テキスト文字列が出力されなかったので、調べたところ「RSVGが有効であること」が必要らしい。(参考:「convert SVG to PNG (textPath)」)

このため「yum install librsvg2-devel」でパッケージ追加した後に、「./configure」を実行したが「RSVG –with-rsvg=no no」のまま。「./configure –with-rsvg=yes」にしたところ「RSVG –with-rsvg=yes yes」となった。

しかし、それでもうまく描画はしてくれなかった・・・とりあえず現状はお手上げ状態。今後の記録のために実験したSVGの内容を下記に挙げておく。

その1:ぐるぐる巻きに文字列

<svg viewBox="0 0 100 100" xmlns="http://www.w3.org/2000/svg">

  <!-- to hide the path, it is usually wrap into a <defs> element -->
  <!-- <defs -->
  <path id="MyPath" fill="none" stroke="red"
          d="M10,90 Q90,90 90,45 Q90,10 50,10 Q10,10 10,40 Q10,70 45,70 Q70,70 75,50" />
  <!-- </defs> -->

  <text>
    <textPath href="#MyPath" style="font-size:16pt;color:black">
      The quick brown fox jumps over the lazy dog.
    </textPath>
  </text>

</svg>

その2:ノートみたいな罫線に文字

<svg width="200" height="200"
    xmlns="http://www.w3.org/2000/svg" xmlns:xlink="http://www.w3.org/1999/xlink">
 <defs>
  <!-- define lines for text lies on -->
  <path id="path1" d="M10,30 H190 M10,60 H190 M10,90 H190 M10,120 H190"></path>
 </defs>
 <use xlink:href="#path1" x="0" y="35" stroke="blue" stroke-width="1" />
 <text transform="translate(0,35)" fill="red" font-size="20">
  <textPath xlink:href="#path1"  fill="red">This is a long long long text ......</textPath>
 </text>
</svg>

その3:1/4円上に文字

<?xml version="1.0" standalone="no"?>
<!DOCTYPE svg PUBLIC "-//W3C//DTD SVG 1.1//EN" "http://www.w3.org/Graphics/SVG/1.1/DTD/svg11.dtd">
<svg width="1000px" height="707px" version="1.1" xmlns="http://www.w3.org/2000/svg" xmlns:xlink="http://www.w3.org/1999/xlink">
<defs>
        <path id="MyPath" d="M 599,455 A 244,244 0 0,1 723,578" />
</defs>
<use xlink:href="#MyPath" fill="none" stroke="red"  />
<text font-family="VL Gothic" font-size="16" fill="black" >
<textPath xlink:href="#MyPath">
 We go up, then we go down, then up again
</textPath>
</text>
</svg>

librsvg2-toolsを入れると「rsvg-convert」コマンドによってsvgからpngを生成できるというので試してみたが、結果は同じだった。フォントが足らないのかな?と「yum install ipa-gothic-fonts.noarch ipa-mincho-fonts.noarch ipa-pgothic-fonts.noarch ipa-pmincho-fonts.noarch」を実行してみて、IPAフォントを追加し「IPAGothic」などを指定してみても結果は変わらず。

ImageMagickのgithub ISSUEに「Text by path not working #642」というのがあった。これは、librsvgのISSUE「[BZ#644624] no support for textPath element」→「[BZ#644624] no support for textPath element」(gitlab)ということで、librsvgがtextPathに対応していない、ということになる。

Partial textPath support」という形でサポートするためのコードも送られているものの、現時点ではまだ取り込まれていないようだ。

現時点でとれる対処方法はInkspaceを使ってSVG to PNGをやらせることぐらいらしい。


2023/03/23追記

Ubuntu 22.04環境でlibsvg2-2 2.52.5+dfsg-3 と、ImagemagickサイトからダウンロードしたImageMagick 7.1.1-4 Q16-HDRI を使って実験してみましたが、最初の改行されない日本語サンプルの↓以外は期待通りの動作はしていませんでした

PowerCLIを使ってvSphere仮想マシンをテンプレートから連続デプロイ

RedHat OpenShift環境を作るためのansible hostsファイルがすごく難解。

おかげでいろんなhostsファイル記述を実験する羽目に・・・

仮想マシンテンプレートを作ったあと、仮想マシンのカスタマイズ仕様を元にデプロイするだけとは言え、マスタ2台、インフラノード2台、ノード2台とかを毎回作り直すのが面倒。

簡略化するためにPowerCLIを使って一括作成できるようなスクリプトを作成した。

$vcenter="testvcenter"       # 接続先vCenterホスト名 or IPアドレス
$vcenterusername="administrator@vsphere.local" # vCenterユーザ名
$vcenterpassword="test"       # vCenterパスワード
$vmtemplatename="rhel7-os311" # 仮想マシンテンプレート名
$vmcustomizespec="rhel7-base" # 仮想マシンのカスタマイズ仕様名
$datastore="vsphere10"          # デプロイ先データストア
$esxserver="172.17.44.10"       # デプロイ先ESXiサーバ
$subnetmask="255.255.0.0"       # 仮想マシンのサブネット
$defaultgw="172.17.0.1"         # 仮想マシンのデフォルトゲートウェイ

connect-vcenter -Server $vcenter -User $vcenterusername -Password $vcenterpassword -WarningAction 0

deployvm -vmname "master221" -ipaddr "172.17.44.221" -cpu 4 -memory 16
deployvm -vmname "master222" -ipaddr "172.17.44.222" -cpu 4 -memory 16
deployvm -vmname "infra-node223" -ipaddr "172.17.44.223" -cpu 2 -memory 8
deployvm -vmname "node224" -ipaddr "172.17.44.224" -cpu 2 -memory 8
deployvm -vmname "node225" -ipaddr "172.17.44.225" -cpu 2 -memory 8

Disconnect-VIServer -Confirm:$false


###########################################
### 関数名: connect-vcenter
### 役割:   指定したvCenterサーバに接続
### 入力: 「-Server vCenterサーバ名」 
###      「-User ユーザ名」
###      「-Password パスワード」 
###      「-Credential パスワードの暗号化文字列」
###       「-Password」か「-Credential」かは排他指定
### 注意: パイプライン処理不可
###########################################
function connect-vcenter{
    param(
        [Parameter(ValueFromPipeline=$false,Mandatory=$false)][string]$Server,
        [Parameter(ValueFromPipeline=$false,Mandatory=$false)][string]$User,
        [Parameter(ValueFromPipeline=$false,Mandatory=$false)][string]$Password,
        [Parameter(ValueFromPipeline=$false,Mandatory=$false)][SecureString]$Credential
    )

    # $global:DefaultVIServers が存在している場合はすでにvCenterに接続されているので処理を飛ばす
    #  vROpsと異なり接続がなくなったら変数もなくなるようだが、念のためこちらも接続中のユーザ名があることを確認
    if([String]::IsNullOrEmpty($global:DefaultVIServers.User)){
        Try {
            if($Credential){
                $pscredential=New-Object System.Management.Automation.PSCredential($User,$Credential)
                Connect-VIServer -Server $Server -Credential $pscredential -WarningAction 0 | Out-Null
                if($? -eq $false){ throw }
            }else{
                Connect-VIServer -Server $Server -User $User -Password $Password -WarningAction 0 | Out-Null
                if($? -eq $false){ throw }
            }
        } Catch {
            Write-Host "vCenterサーバへの接続に失敗しました"
            Write-Host $Error[0]
            exit 1
        }
    }
    return
}

###########################################
### 関数名: deployvm
### 役割:   仮想マシンテンプレートから仮想マシンをデプロイ
### 入力: 「-vmname 仮想マシンホスト名」 
###      「-ipaddr IPアドレス」
###      「-cpu CPU数」 
###      「-memory メモリ容量」
### 注意: 簡略化のため、下記の前提がある
###    デプロイ先のESXiサーバを、グローバル変数 $esxserver で指定していること
###    デプロイ先のデータストアを、グローバル変数 $datastore で指定していること
###    仮想マシンテンプレートを、グローバル変数 $vmtemplatename で指定していること(作成済みであること)
###    仮想マシンのカスタマイズ仕様を、グローバル変数 $vmcustomizespec で指定していること(作成済みであること)
###    グローバル変数で仮想マシンのサブネットマスク $subnetmask とデフォルトゲートウェイ $defaultgw を指定していること
###########################################
function deployvm{
    Param(
        [Parameter(ValueFromPipeline=$false,Mandatory=$false)][string]$vmname,
        [Parameter(ValueFromPipeline=$false,Mandatory=$false)][string]$ipaddr,
        [Parameter(ValueFromPipeline=$false,Mandatory=$false)][int]$cpu,
        [Parameter(ValueFromPipeline=$false,Mandatory=$false)][int]$memory
    )
    Get-OSCustomizationSpec $vmcustomizespec | New-OSCustomizationSpec -Name vmtemp -Type NonPersistent
    Get-OSCustomizationNicMapping vmtemp | Set-OSCustomizationNicMapping -IpMode UseStaticIP -IpAddress $ipaddr -SubnetMask $subnetmask -DefaultGateway $defaultgw
    Get-OSCustomizationSpec vmtemp | Set-OSCustomizationSpec -NamingScheme vm

    New-VM -Name $vmname -VMHost $esxserver -Template $vmtemplatename -OSCustomizationSpec vmtemp -Datastore $datastore -Confirm:$false
    Set-VM -VM $vmname -MemoryGB $memory -NumCpu $cpu -Confirm:$false
    Start-VM -VM $vmname -Confirm:$false
    Remove-OSCustomizationSpec vmtemp -Confirm:$false
}

なお、vCenterへの接続部分がごっつい関数にしてあるのは、他で使ったものの流用であるためです。

deployvmで行っていることの詳細については「PowerShellを使ってVMwareのテンプレートからデプロイで「既存のカスタマイズ仕様を使用してカスタマイズする」を行う方法」を参照のこと。