2026/01/09修正 VMware-Tools 13.0.5に書き換え
2025/09/18修正 VMware-Tools 13.0のことと、Windows Updateで提供されるドライバについて追記
2025/04/09修正 ドキュメントURLを修正
2024/05/21修正 Broadcom移管に伴うURL修正など反映
2022/11/15修正 最近のVMware Toolsのサポート状況についてまとめ直した
Windows編
Windows Update経由で一部のドライバが提供されている(VMware Tools Drivers Published to Windows Update)
Windows Server 2012~2025: ディスク(pvscsi)、NIC(vmxne3)、vSphere基盤との通信(vmci)は提供。ディスプレイドライバ(WDDM)とVMware-Toolsは無し
Windows 10, 11: ディスク(pvscsi)、NIC(vmxne3)、vSphere基盤との通信(vmci)、ディスプレイドライバ(WDDM)が提供。VMware-Toolsは無し
Windows Server 2008R2 SP1~Windows Server 2025 / Windows 7 SP1~Windows 11 13.0.5(随時更新中,ESXi 9.x同梱版?)
ReleaseNote:
https://packages.vmware.com/tools/releases/13.0.5/windows/
Windows Server 2008R2 SP1~Windows Server 2025 / Windows 7 SP1~Windows 11 12.5.4(随時更新中,ESXi 8.x同梱版?)
ReleaseNote:
https://customerconnect.vmware.com/ja/downloads/details?downloadGroup=VMTOOLS1240&productId=742 ← Broadcom移行に伴い代替URLが不明
https://packages.vmware.com/tools/releases/12.5.4/windows/
Windows Server 2008 SP2 / Vista SP2用 11.0.6(最終)
ReleaseNote:
https://customerconnect.vmware.com/ja/downloads/details?downloadGroup=VMTOOLS1106&productId=742 ← Broadcom移行に伴い代替URLが不明
https://packages.vmware.com/tools/releases/11.0.6/windows/
Linux編
RHEL7以降はopen-vm-toolsを使う
VMware support for open-vm-tools (VMware KB:2073803)(Broadcom KB:313456)
https://github.com/vmware/open-vm-tools
RHEL6/CentOS6用 10.3.26(最終)
ReleaseNote https://docs.vmware.com/en/VMware-Tools/10.3/rn/vmware-tools-10326-release-notes/index.html ← Broadcom移管後ドキュメント見当たらず
https://customerconnect.vmware.com/ja/downloads/details?downloadGroup=VMTOOLS10326&productId=974 ← Broadcom移行に伴い代替URLが不明
https://packages.vmware.com/tools/releases/10.3.26/rhel6/
RHEL5/CentOS5用 10.3.22(最終)
ReleaseNote https://docs.vmware.com/en/VMware-Tools/10.3/rn/VMware-Tools-10322-Release-Notes.html ← Broadcom移管後ドキュメント見当たらず
https://customerconnect.vmware.com/en/downloads/details?downloadGroup=VMTOOLS10322&productId=1072 ← Broadcom移行に伴い代替URLが不明
https://packages.vmware.com/tools/releases/10.3.22/rhel5/
なお、RHEL5はSSL1.2に非対応のため、2022年11月現在RHEL5サーバ上からhttpsアクセスがほぼ不可能になっていることに注意
Ubuntu 14.04以降はopen-vm-toolsを使う
VMware support for open-vm-tools (VMware KB:2073803)(Broadcom KB:313456)
Ubuntu 10.04/11.04/11.10/12.04用 10.3.26(最終)
ReleaseNote https://docs.vmware.com/en/VMware-Tools/10.3/rn/vmware-tools-10326-release-notes/index.html ← Broadcom移管後ドキュメント見当たらず
https://customerconnect.vmware.com/ja/downloads/details?downloadGroup=VMTOOLS10326&productId=974 ← Broadcom移行に伴い代替URLが不明
https://packages.vmware.com/tools/releases/10.3.26/ubuntu/dists/
なお、SSL1.2に非対応であるなら2022年11月現在サーバ上からhttpsアクセスがほぼ不可能になっていることに注意
(Ubuntuの対応について調べていない)
Solaris x86編
Solaris 10 x86用 10.3.10(最終)
ReleaseNote https://docs.vmware.com/jp/VMware-Tools/10.3/rn/vmware-tools-10310-release-notes.html ← Broadcom移管後ドキュメント見当たらず
https://customerconnect.vmware.com/ja/downloads/details?downloadGroup=VMTOOLS10310&productId=742 ← Broadcom移行に伴い代替URLが不明
https://packages.vmware.com/tools/frozen/solaris/
↓は参考用の過去の記録
古いOSだとSSL1.2非対応のため、httpsアクセスができなくなっていることに注意のこと
VMware toolsのダウンロードURLを調べていたら、Linuxディストリビューションの一部では、yumコマンドでダウンロードできるようなレポジトリファイルも配布されているのを発見したのでメモ書き。
バージョンごとの配布場所:
https://packages.vmware.com/tools/releases
VMwareにあるvmware-tools配布場所:「https://packages.vmware.com/tools/esx/latest/index.html」
Linux向けvmware-toolsについて
Linux向けレポジトリのファイル置き場:
vSpehre 6.7向け: https://packages.vmware.com/tools/esx/6.7latest/repos/
vSphere 7.0向け: https://packages.vmware.com/tools/esx/7.0/repos
レポジトリファイルは、上記4つの他に、SLES11.0, SLES11.1, SLES11.2, SLES11.3, Ubuntu10.04, Ubuntu11.10, Ubuntu12.04が公開されている。
RHEL/CentOSのyumコマンドでインストールする場合、
必要なドライバを一通りインストールする「yum install vmware-tools-esx-nox 」でインストールされるパッケージ
vmware-tools-esx-nox
vmware-tools-core
vmware-tools-foundation
vmware-tools-guestlib
vmware-tools-libraries-nox
vmware-tools-plugins-autoUpgrade
vmware-tools-plugins-deployPkg
vmware-tools-plugins-guestInfo
vmware-tools-plugins-hgfsServer
vmware-tools-plugins-powerOps
vmware-tools-plugins-timeSync
vmware-tools-plugins-vix
vmware-tools-plugins-vmbackup
vmware-tools-services
最小限ってことで「yum install vmware-tools-thinprint」でインストールされるパッケージ
vmware-tools-thinprint
vmware-tools-core
vmware-tools-foundation
vmware-tools-guestlib
vmware-tools-libraries-nox
vmware-tools-services
+追加でOSパッケージがいくつか
vmxnet3,vmw_pvscsi,vmware_balloonがインストールされるけど、vmware-tools-esx-noxでインストールした方がいい。
X-Windowsドライバを含めたインストールを行う「yum install vmware-tools-esx」でインストールされるパッケージ
vmware-tools-esx
vmware-tools-core
vmware-tools-esx-nox
vmware-tools-foundation
vmware-tools-guestlib
vmware-tools-libraries-nox
vmware-tools-libraries-x
vmware-tools-plugins-autoUpgrade
vmware-tools-plugins-deployPkg
vmware-tools-plugins-desktopEvents
vmware-tools-plugins-guestInfo
vmware-tools-plugins-hgfsServer
vmware-tools-plugins-powerOps
vmware-tools-plugins-resolutionSet
vmware-tools-plugins-timeSync
vmware-tools-plugins-unity
vmware-tools-plugins-vix
vmware-tools-plugins-vmbackup
vmware-tools-services
vmware-tools-user
+追加でOSパッケージがいくつか
RHEL7/CentOS7など最近のLinuxでは、open-vm-toolsでのサポートになっているため、上記のモノは使用しない。
open-vm-tools に対する VMware のサポートについて (2074713)(英語の原文:VMware support of open-vm-tools (2073803))
具体的には以下のOSが対象となる。
・Fedora 19 and later releases
・Debian 7.x and later releases
・openSUSE 11.x and later releases
・Recent Ubuntu releases (12.04 LTS, 13.10 and later)
・Red Hat Enterprise Linux 7.0 and later releases
・SUSE Linux Enterprise 12 – available Q4 2014
RHEL5向けのvmware toolsの最終版は VMware Tools 10.3.22
また、RHEL5/CentOS5はTLS1.2に対応していない(TLS1.0/1.1のみ)ため、最近のWebサイトからwget/curlおよびyumコマンドでのアクセスができないことに注意
ISOファイルは Download Product:VMware Tools 10.3.22 から入手できる
Windows向けvmware-toolsについて
Windows版vmware-tools配布場所:https://packages.vmware.com/tools/esx/latest/windows/index.html
Windows Server 2008 SP2 / Windows Vista SP2の最終サポート: VMware Tools 11.0.6 (ダウンロードURL VMware Tools 11.0.6)
VMware tools 12.0.0以降からネットワークアダプタ VMXNet2(拡張)が使えなくなりました。いまだに使っている場合はVMXNet3に変更する必要がある(VMwware Tools 12.0.5リリースノートより)
Solaris x86向けvmware-toolsについて
Solaris x86をインストールした時に、VMware-toolsを探したのでメモ書きとして追加
公式文書としては「Installing and upgrading the latest version of VMware Tools on existing hosts (2129825)」が出てくるんだけど、Solaris用のVMware-toolsがどこから入手できるのかMy VMwareからダウンロードできるよ、しか書いてない。
[Product Download]-[VMware vSphere]で「Drivers&Tools」を選択し、「VMware Tools」のツリーを開く
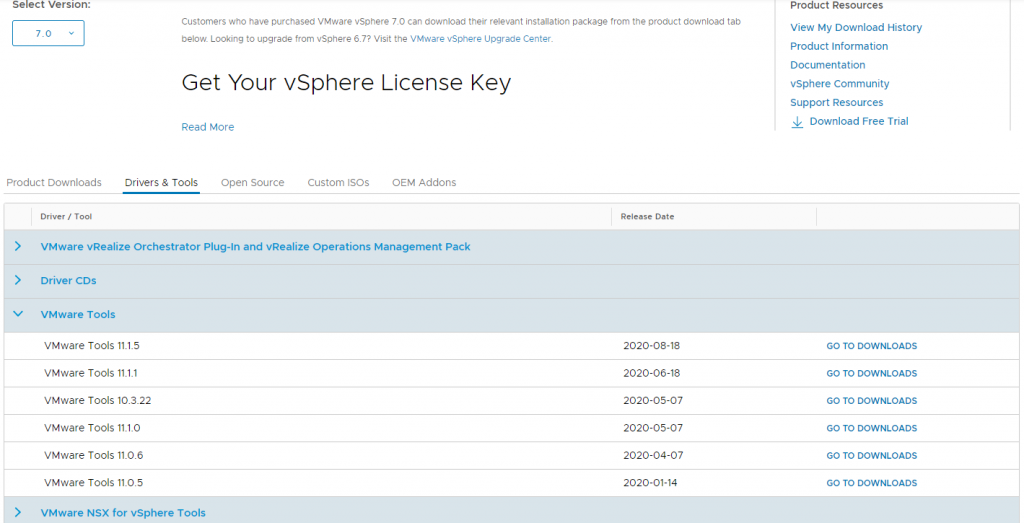
いろいろ表示されている中の「VMware Tools 11.0.6」か「VMware Tools 11.1.0」を選択

するとリンク先には「Solaris用はVMware Tools 10.3.10が最後」と誘導されているので、そのリンクを飛ぶと、「VMware Tools packages for Solaris and OS X」がダウンロードできる。
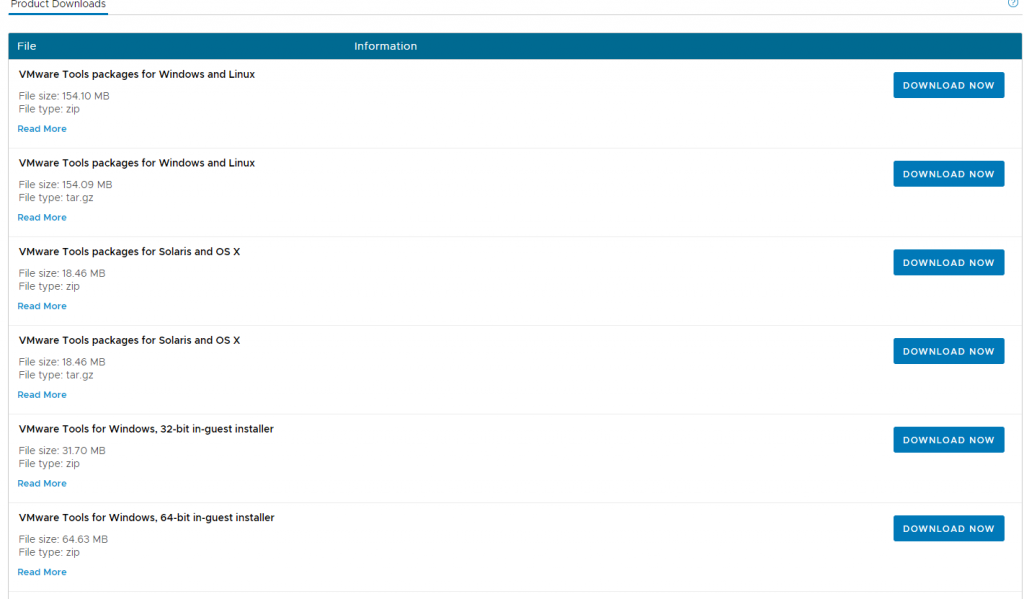
これを展開して、ESXiの /usr/lib/vmware/isoimages に配置する。
といってもこれは /productLocker/vmtools/ へのシンボリックリンクになっている。
この「/productLocker」をさす先は、ESXiの設定でUserVars.ProductLockerLocation を使って指定する。
指定したディレクトリ内に「vmtools」というディレクトリを作成し、その中にisoイメージなどを展開しておくと、これを使ってVMware toolsのインストールをすることができるようになる。