2023/05/15追記:「SD card/USB boot device revised guidance (85685) 」の2023年2月更新版ではvSphere 8環境での取り扱いについて明記されている。
対処方法1: 普通のローカルディスク起動に変更
基本的にはローカルディスクを使え、という話のようです。
2022/08/05追記:「SD card/USB boot device revised guidance (85685) 」にてvSphereの新バージョン(7.0の次)ではSDカード/USBメモリはブートの起点としてしか使えなくなり、別途何らかのストレージにOSDATAを配置する必要がある、ということになる。(新バージョンではRAMDISKは非推奨)
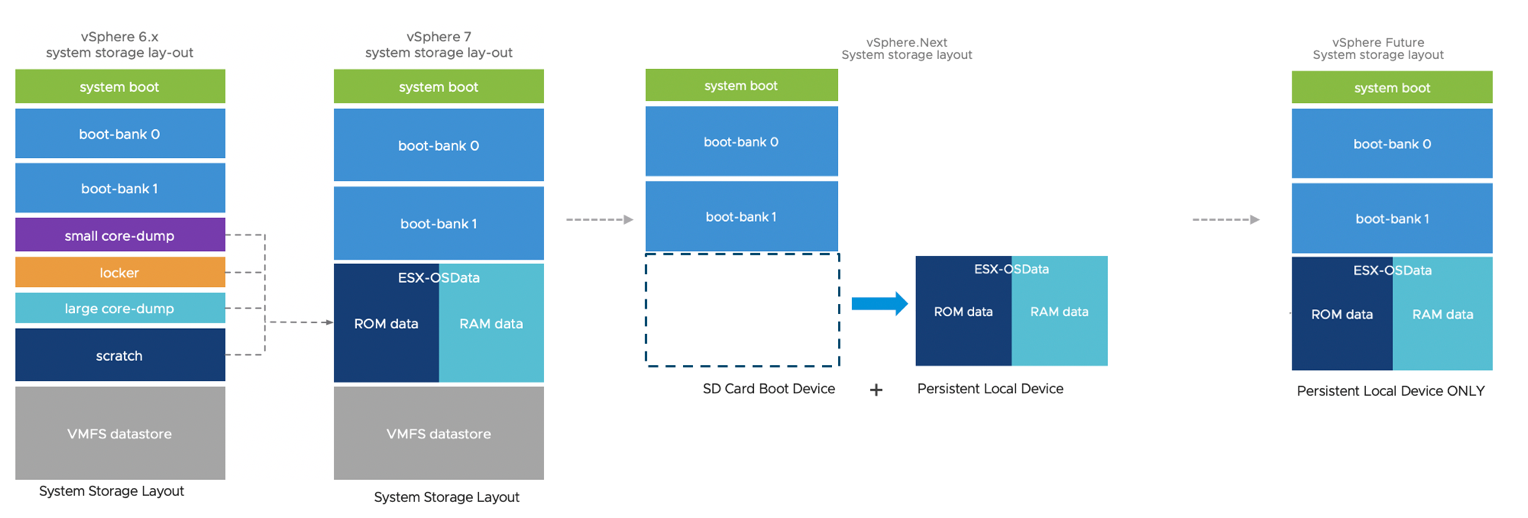
VMware vSphere / ESXi 7.0 から ESXiのブートディスクの構造が変更になった。
VMware vSphere Blog「vSphere 7 – ESXi System Storage Changes 」ESXi 7.0 のシステム ストレージの変更 」
ESXi 6.0時代 /scratch となっているパーテーションとかあるが、基本的に起動したあとデータ書き込みはあまりないかたちで運用されていた。
ところがESXi 7.0からは細かく分かれていたパーテーションがESX-OSDataパーテーションに統合されている。しかも、ここに書き込みが行われるようになった。
そして、ESXi 7.0 Update 1 / Update 2においてSDカード / USBメモリへの書き込み手法が変更され、起動ディスクに対して従来と比較すると多量の書き込み操作が実行されることになった。
これにより、ESXi 7.0 Update 1 / Update 2において、SDカード/USBメモリ起動にしている場合に、書き換え回数超過によるSDカード/USBメモリのアクセス不可事例が発生しやすくなっているようだ。
VMware KB VMFS-L Locker partition corruption on SD cards in ESXi 7.0 (83376) SD Boot issue Solution in 7.x 」
上記KB83376を見ると、ESXi 7.0(初期)ではI/O抑制機能があったが、ESXi 7.0 Update 1ではなくなったことが発生しやすくなった要因の1つであるようだ。
しかも、VMware的には「ESXi のシステム ストレージの概要 」で、「ESX-OSData は 高耐久性ストレージ デバイス上に作成する必要があります。」と書いてあるから、書き換え回数上限が低いものを使わないのは当然でしょ、というスタンスな模様。
OEMメーカが選定したSDカードなどが死んだとしても、それはその部材を選んだOEMメーカ側の責任だということらしい。
実際、DELLの「VMware vSphere 7.x on Dell EMC PowerEdge Servers Getting Started Guide」の「Getting started with VMware vSphere 」をみると、ESXi 7.0ではSDカードは推奨しない、と書いてある。
NOTE: If you had ordered VMware ESXi with your Dell EMC PowerEdge server, it is preinstalled on your server. The ESXi installer media is required for reinstallation. The Boot Optimized Storage Solution (BOSS) card is the preferred non-HDD or SSD device for VMware ESXi 7.0 installation. The Dell Internal Dual SD Module (IDSDM) install is no longer recommended due to write endurance issues with the SD flash media. For more information, see the Storage Requirements for ESXi 7.0 Installation or Upgrade section on the VMware ESXi Installation and Setup Guide or see VMware Knowledge Base article 2145210 .
さて、この問題について、とることができる方策は下記の5つが考えられる。
その1) 高耐久性のものに変更する(USB接続のSSDや、MLCチップのSDカードなど)ESXi 7.0 U2c で提供開始
その4の手法はVMware KB83376 内にリンクがあり「High frequency of read operations on VMware Tools image may cause SD card corruption (2149257) 」で説明されている。
ドキュメント的にはESXi 6.0 と ESXi 6.5用になっているが、ESXi 7.0でも適用できるようだ。
ESXi 7.0のshellに入って、現在の /UserVars/ToolsRamdisk の設定を確認
# esxcli system settings advanced list -o /UserVars/ToolsRamdisk
   Path: /UserVars/ToolsRamdisk
   Type: integer
   Int Value: 0
   Default Int Value: 0
   Min Value: 0
   Max Value: 1
   String Value:
   Default String Value:
   Valid Characters:
   Description: Use VMware Tools repository from /tools ramdisk.
#
「Int Value: 0」ということなので、現在は「0」となっている。
これを1に変更するため、以下を実行する
# esxcli system settings advanced set -o /UserVars/ToolsRamdisk -i 1
#
変更が反映されたか確認
# esxcli system settings advanced list -o /UserVars/ToolsRamdisk
   Path: /UserVars/ToolsRamdisk
   Type: integer
   Int Value: 1
   Default Int Value: 0
   Min Value: 0
   Max Value: 1
   String Value:
   Default String Value:
   Valid Characters:
   Description: Use VMware Tools repository from /tools ramdisk.
#
「Int Value: 1」となっていたら変更されている。
この後、ESXi を再起動して、RAMディスクを実際に稼働させる。
ESXi設定のバックアップ&リストア
SDカード/USBメモリが壊れることを許容する場合、ESXiの設定ファイルをバックアップしておき、再セットアップ時にリストアする、という手法が考えられる。
手法はVMware KB「ESXi ホストの構成のバックアップ方法 (2042141) 」
リストアの際、ESXiにIPアドレスを割り当てておく必要がある。
具体的にどれくらいの書き込み要求があるんだろう?と調べて見た。
DELL PartnerSEつぶやきブログ「BOSSってなんだろう? 」から、ESXiが要求するSSD/Flashデバイスに対する要求要件が書かれた「vSphere SSD and Flash Device Support (2145210) 」を発見
それによると下記のようになっている。
Table 1: SSD/Flash Endurance Requirements
SSD/Flash Device Use Case JEDEC Endurance Requirement Workload Charectization Notes Host Swap Cache 365 TBW or better Random, infrequent writes Host memory rarely overcommitted 3650 TBW or better Random, frequent writes Host memory routinely overcommitted Regular Datastore 3650 TBW or better1 Virtual Machine workload dependent Size >= 1TB needs more endurance vSphere Flash Read Cache (VFlash) 365 TBW or better Virtual Machine workload dependent Size <= 4TB ESXi Boot Device 0.5 TBW minimum2 Sequential (WAF <10) Size >= 4GB3 ESXi Coredump Device 0.1 TBW minimum2,4 Extremely sequential (WAF ~1) Size >= 4GB3,4 ESXi Logging Device 64 TBW (dedicated device) Sequential7 Size >= 4GB2,3
ESXi起動デバイスとしては2TBWぐらいだったものが、ログデバイスとしての128TBWぐらいが要求され、USBメモリ上を仮想マシンを置く用のVMFSデータストアとしての使うとなると3650TBWが要求される、などと、起動ディスクとして使うだけの場合より50倍以上の要求がある、ということがわかった。
そりゃ、あっさり死にますね
2022/05/06追記
ESXi 7.0U1 では /UserVars/ToolsRamdisk という変数自体がない。
ESXi 7.0U3 だと /UserVars/ToolsRamdisk はあり、システムのインストール先が HDD か SDカードかによって、「Default Int Value」の値が異なっていた。
HDDでは「0」で、SDカードだと「1」となっていた。
このため、手動で変更する必要性は薄いようだ。(SDカードなら必ず”1″となるかは、ドキュメント上に特に記載されていないため、確認を行うこと)
2022/07/21追記
VMware KBに「SD card/USB boot device revised guidance (85685) 」という記事が登場
SDカードやUSBメモリからの起動は可能であるものの推奨しないこととなった。
NVMeやSSDから起動しろ、とのこと。
SDカードやUSBメモリから起動した場合でも、OSDATAパーテーションを別のHDDなどに設定する、ということが推奨される。
ESXi 7.xまではRAMDISKで回避することもできるが、次のESXiではその設定はなくなる、とのこと