ONTAPでS3互換ストレージを提供する

ONTAP 9.7でTechnical Previewとして導入されたS3互換オブジェクトストレージ機能(【 2020年1月GA版リリース】ONTAP 9.7アップデート情報)は、ONTAP 9.8から正式提供となった(ONTAP 9でのS3のサポートについて)。

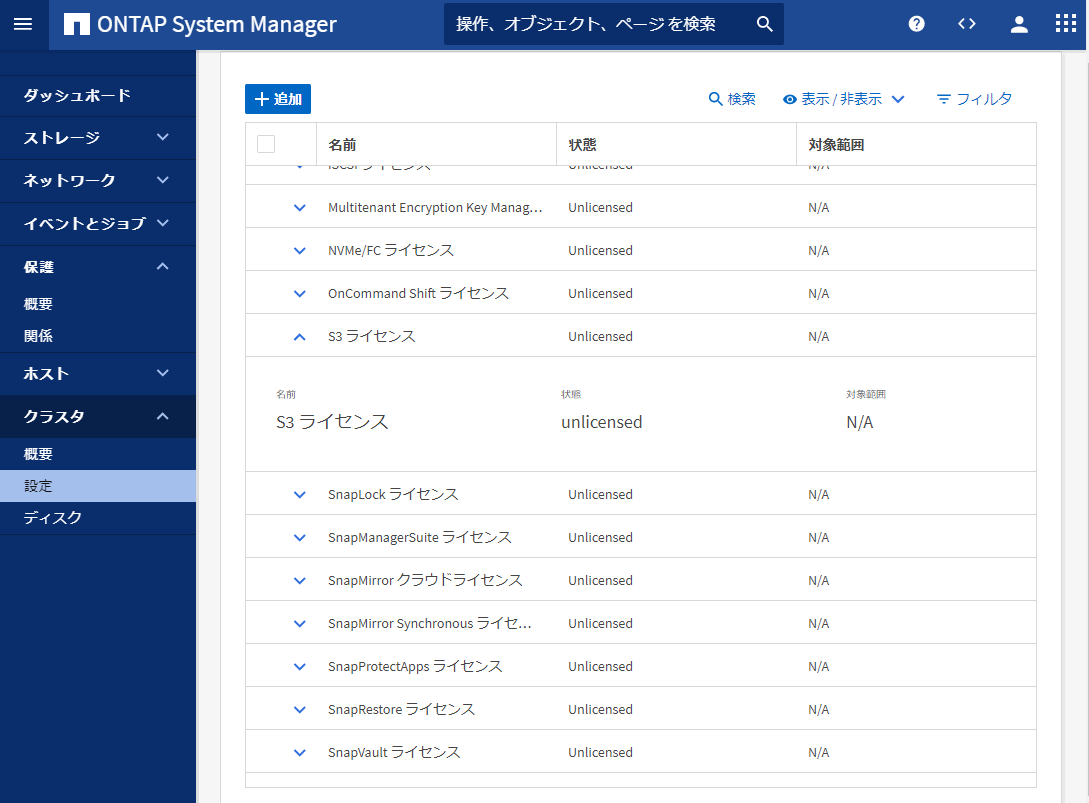
ただ、普通に提供されるライセンスコード一覧にはS3ライセンスが含まれていない(2021/11/10追記:ONTAP9.9.1で入荷した実機にはS3ライセンスも入力済みだった)

ONTAPシミュレータ9.8で提供されるライセンスにもS3ライセンスは含まれていない。

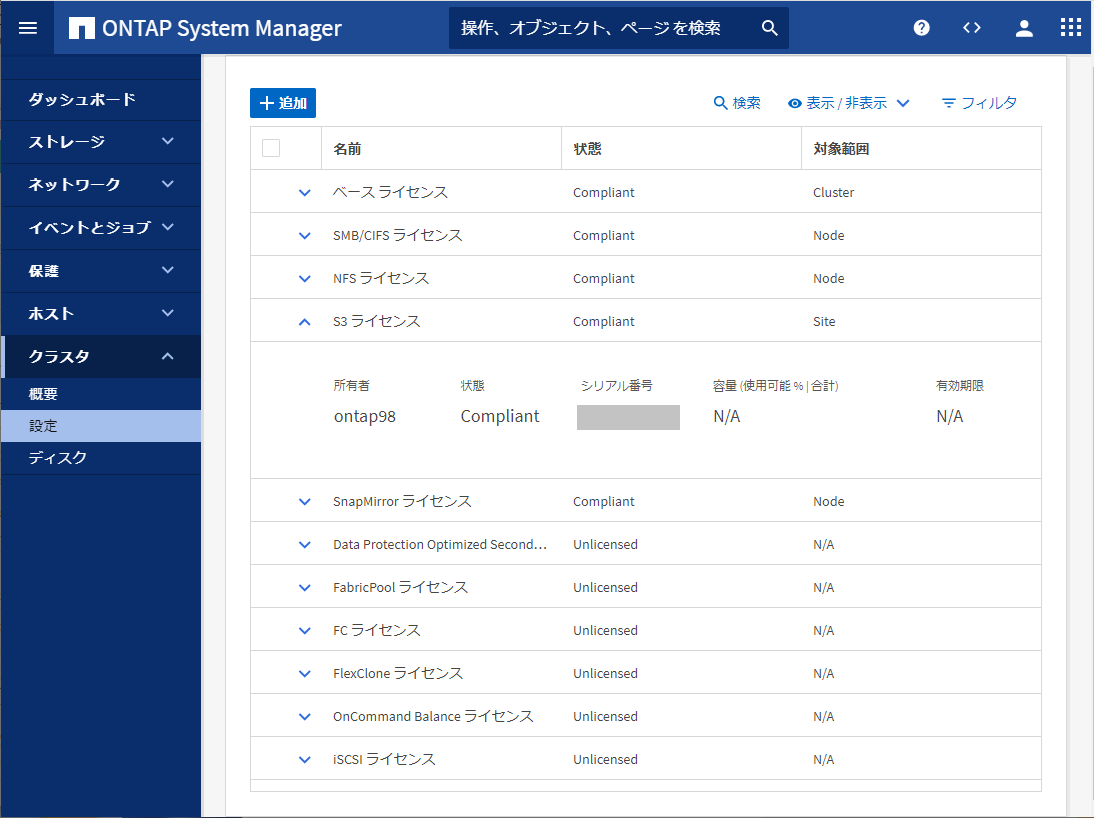
しかし、確認してみると、NetApp Supportページにある「Master License Keys」ページから「ONTAP S3」ライセンスが取得出来るらしい。

手続きを進めてみると、こんな感じでライセンスキーが表示された。

機種などが制限されていないようなので、ONTAPシミュレータ環境にライセンスを入れてみたところ、問題無く認識された。

ONTAP 9の[オブジェクトストレージのプロビジョニング]-[S3構成パワー ガイド]に従い設定を実施。

ただマニュアル上はCLIでしか設定できないような記載がされてるのだが、ONTAP 9.8 System Managerから設定ができそう

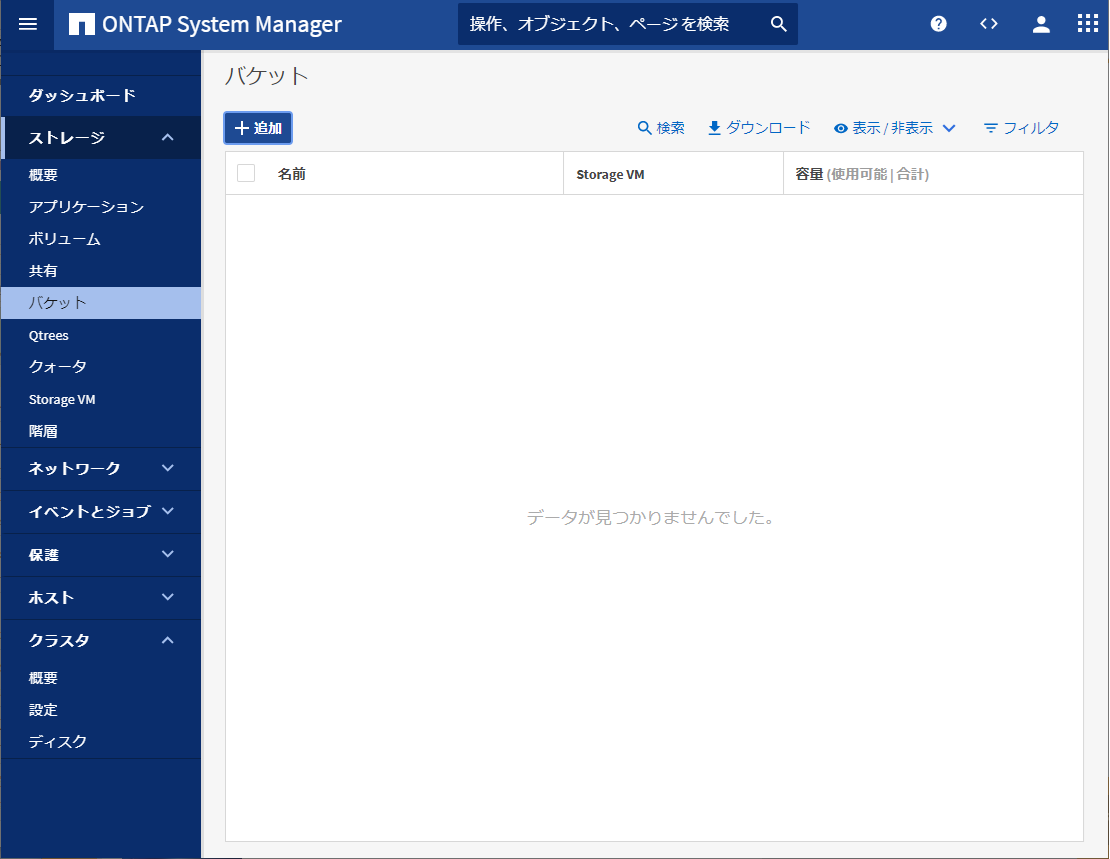
[ストレージ]-[バケット]にそれっぽい項目があったり

[ストレージ]-[Storage VM]の設定画面に「S3」が見える。
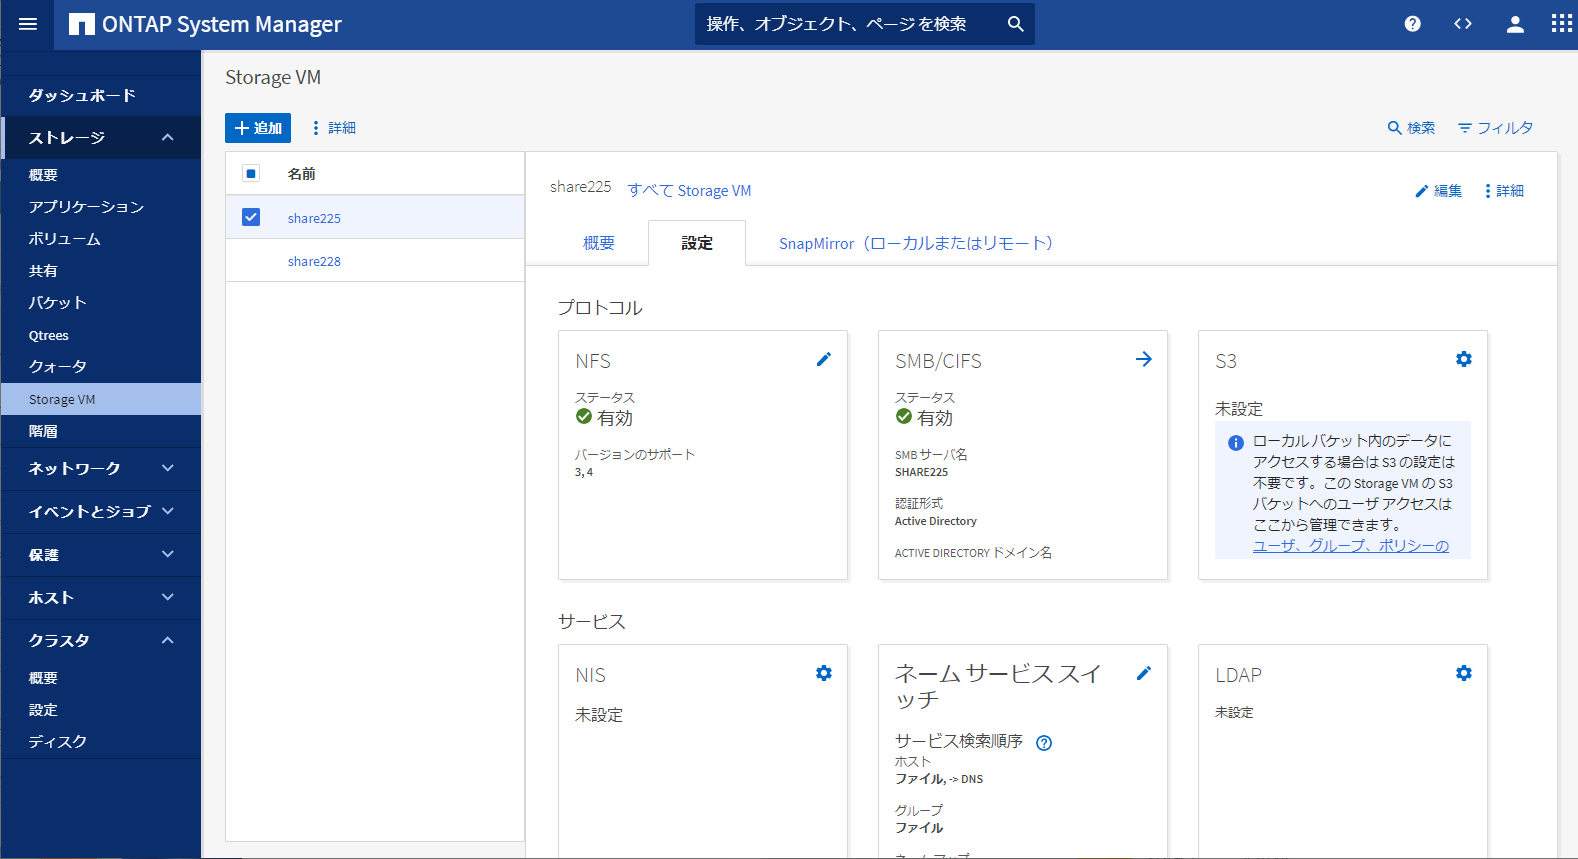
S3の設定を行ってみる。

「S3サーバ名」は、S3互換としてアクセスする場合に指定するホスト名を設定(DNS解決できるように設定しておくこと)

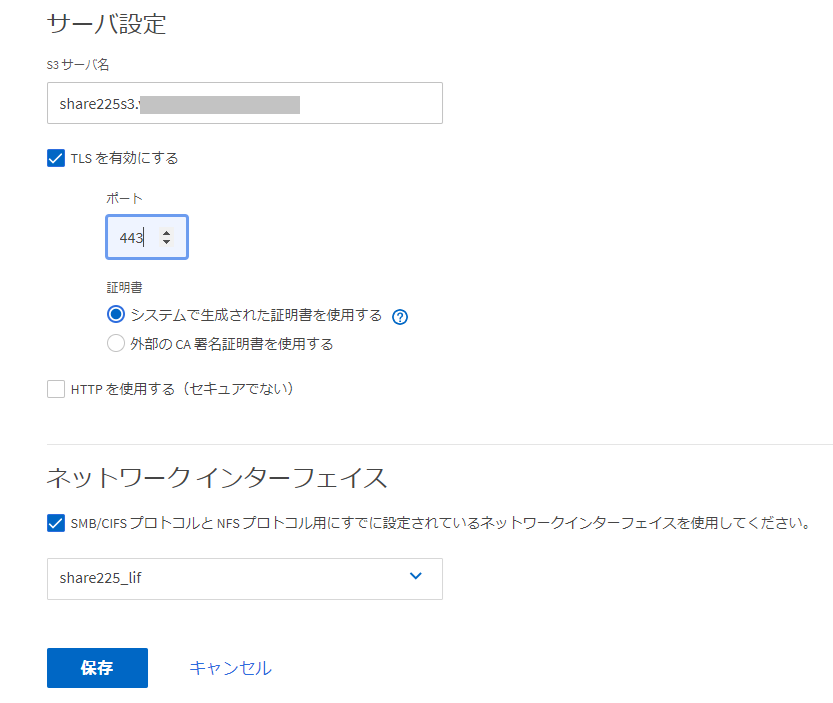
今回は既存のNFS/CIFS用に設定しているIPアドレス(LIF)に相乗りしてS3サービスを提供します。
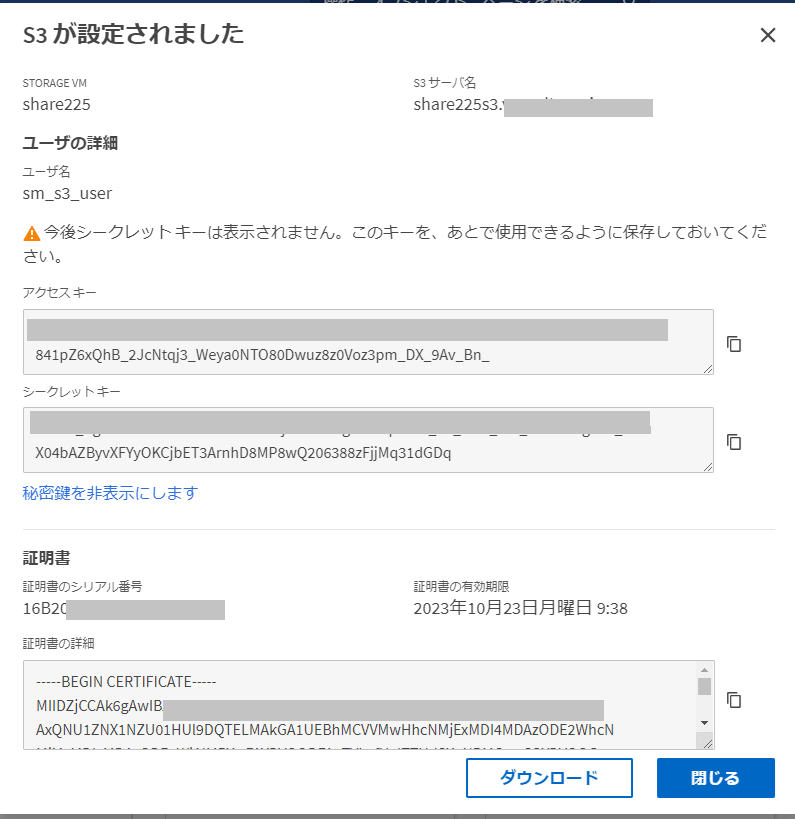
作成すると、下記の表示があります。

標準で「sm_s3_user」というユーザが作成され、S3互換接続のアカウント設定で使用する「アクセスキー」と「シークレットキー」が表示されます。

シークレットキーはこの画面を閉じたら再確認する方法がなくなるので必ず記録しておきます。(失った場合はアクセスキー/シークレットキーの再発行が必要です)

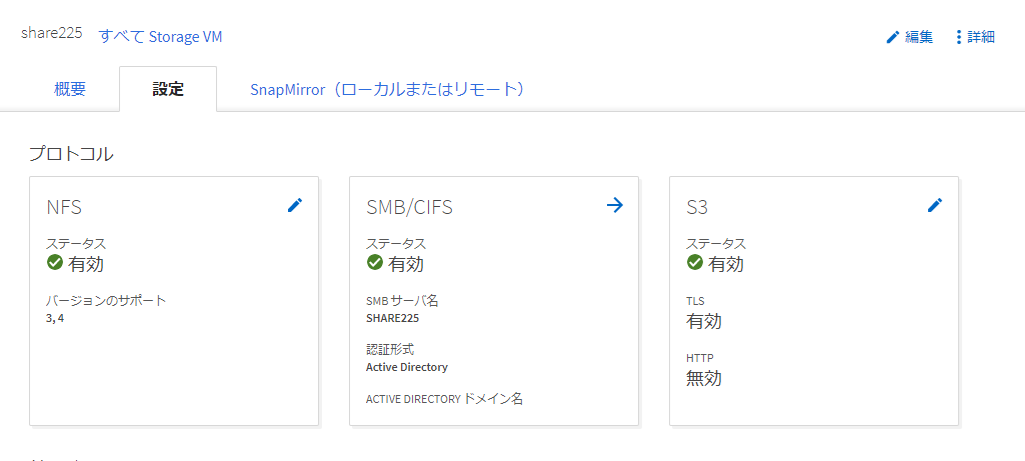
これでSVMのサービス一覧でS3のステータスが有効となります。

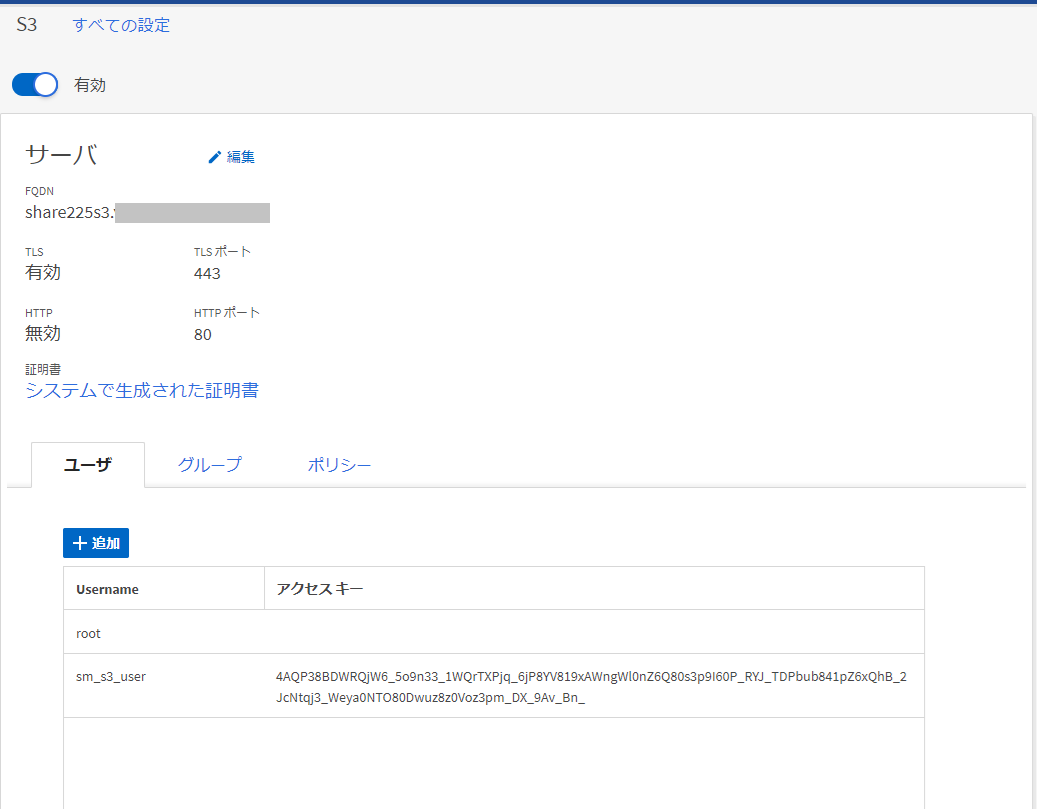
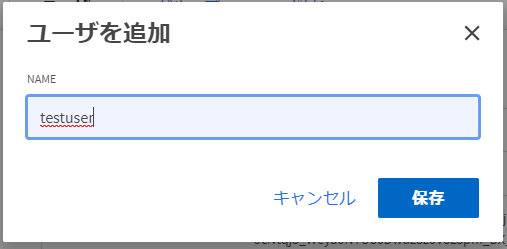
標準で作られたsm_s3_userではなく、別のユーザを作る場合は[ストレージ]-[Storage VM]で「S3設定」を開きます

ここでユーザの追加を行います。

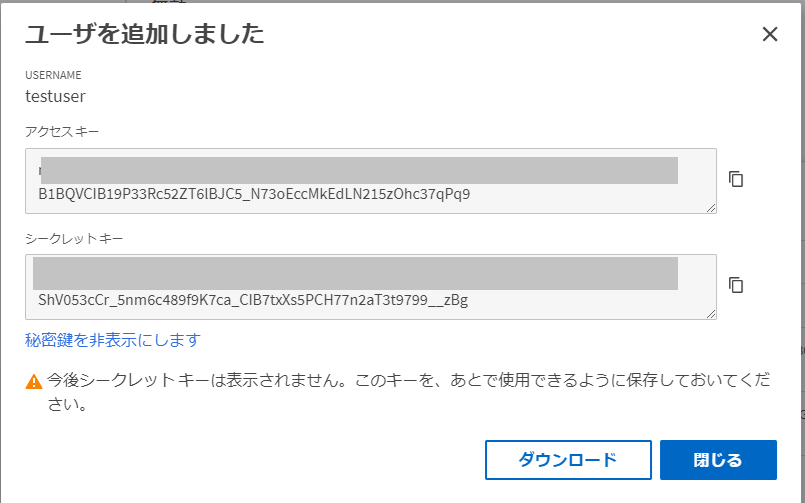
S3互換アクセスに使う「アクセスキー」と「シークレットキー」が表示されるので記録します。

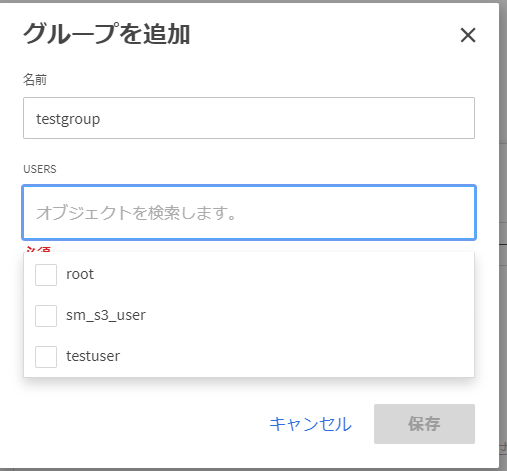
次にユーザに権限を与えるためにグループを作成します。

ちょっと表示がわかりにくいですが、「名前」を入力したあと、「USERS」をクリックするとユーザ一覧が表示されますので、作成したユーザを選択します。

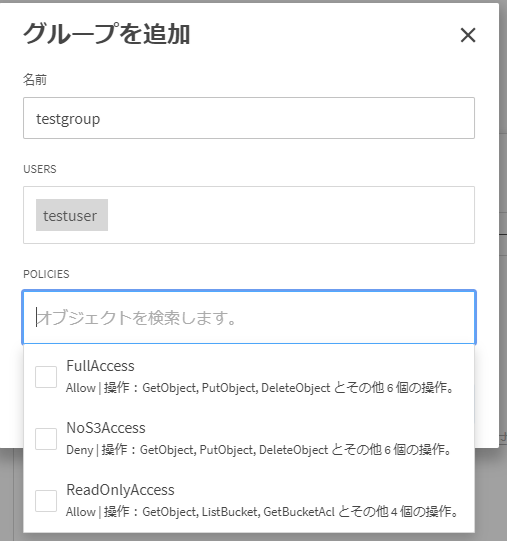
同様に「POLICIES」を選択するとポリシー一覧が表示されますので、FullAccessを選択します。
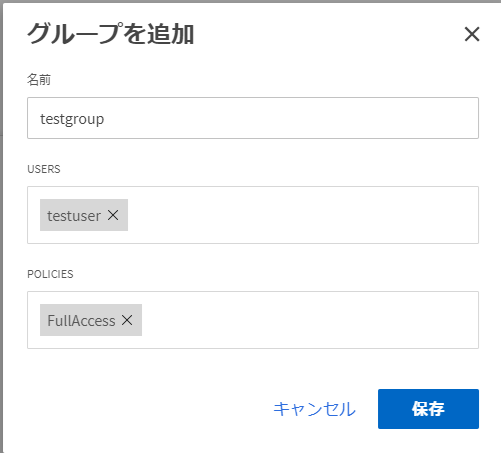
これでグループの作成が終わりました。

次に「バケット(bucket)」を作成します。[ストレージ]-[バケット]を表示します。

[追加]からバケットを作成します。なお、指定可能な最小容量は95GBです。

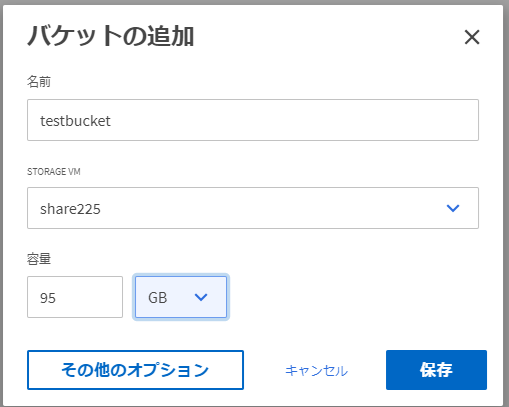
保存すると下記の様に一覧に表示されるようになります。

ちなみにこれを作成するとGUIの[ストレージ]-[ボリューム]には表示されない「ボリューム名:fg_oss_~」というものが追加されています。

ontap98::> volume show
Vserver   Volume       Aggregate    State      Type       Size  Available Used%
--------- ------------ ------------ ---------- ---- ---------- ---------- -----
ontap98   MDV_aud_6e2de4f0a96c4edbbf4c751a3f4626cc aggr0_ontap98_01 online RW 2GB 1.90GB  0%
ontap98   MDV_aud_b39196a1f11940519b4238a511f7c93d ontap98_01_FC_1 online RW 2GB 1.90GB  0%
ontap98-01 vol0        aggr0_ontap98_01 online RW       7.11GB     2.03GB   69%
share225  fg_oss_1635381690 -       online     RW      421.1GB    210.6GB    0%
share225  nfsshare     ontap98_01_FC_1 online  RW       5.26GB     5.00GB    0%
share225  share225_root ontap98_01_FC_1 online RW         20MB    17.50MB    7%
share225  share226_dr  ontap98_01_FC_1 online  DP        100GB   100.00GB    0%
share225  testvol      ontap98_01_FC_1 online  RW      105.3GB    99.99GB    0%
share228  share227_root ontap98_01_FC_1 online RW         20MB    17.57MB    7%
9 entries were displayed.

ontap98::>

95GBと指定しているのに400GBを取っている、とか、そのくせaggregateの空き容量は減っていないとかいろいろアレな感じではあります。

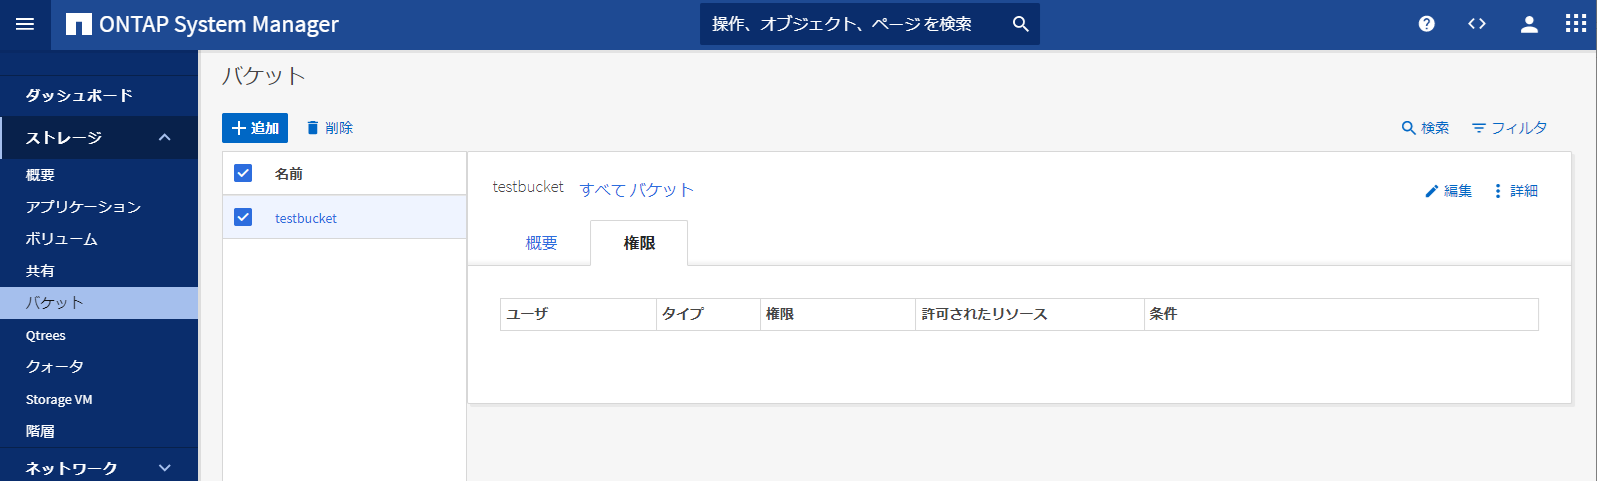
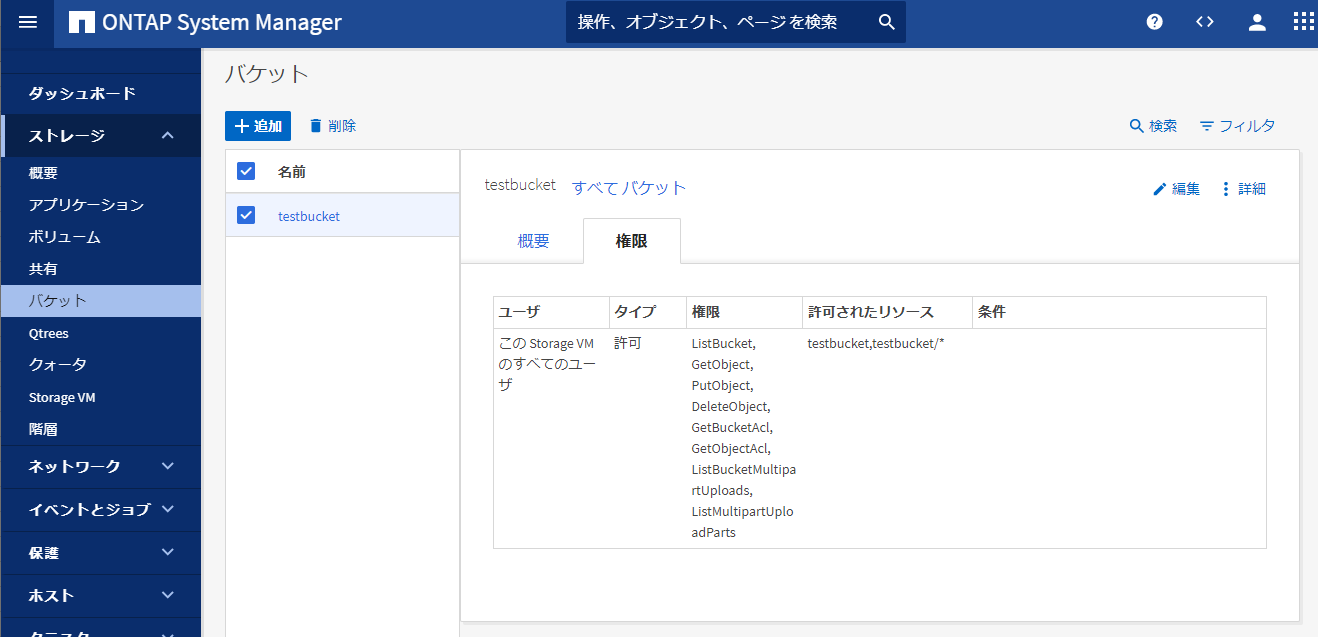
作成しただけでは先ほど作成したユーザのアクセス権限がついていないので[ストレージ]-[バケット]で作成したバケットを選択し「権限」タブで設定していきます。

[編集]ボタンをクリックすると下記の画面が開きます。
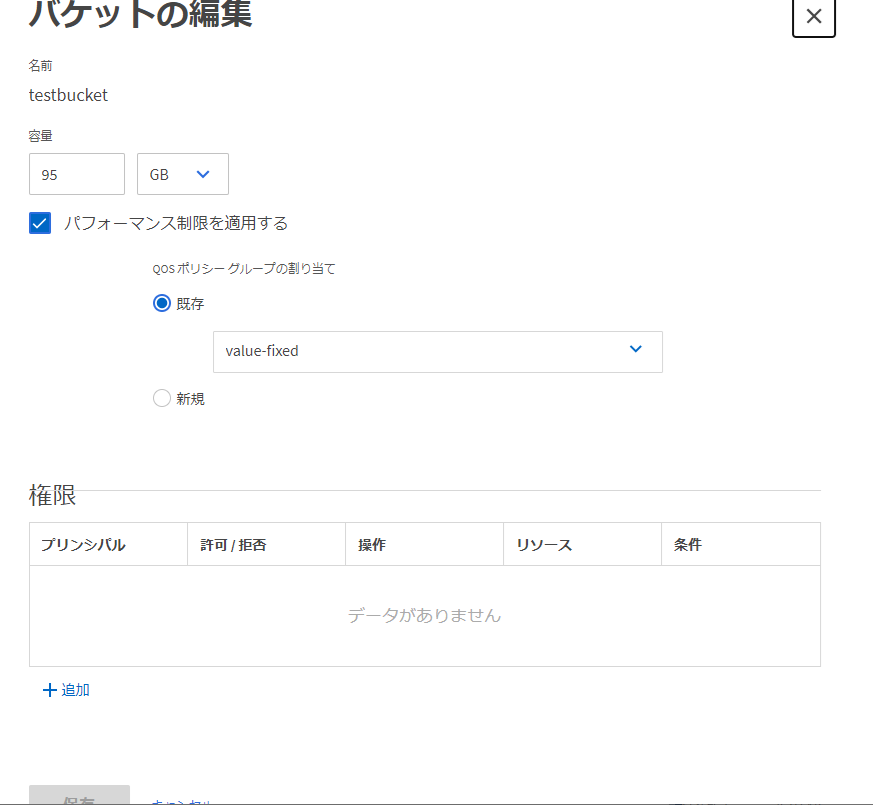
[権限]にて「追加」をクリック

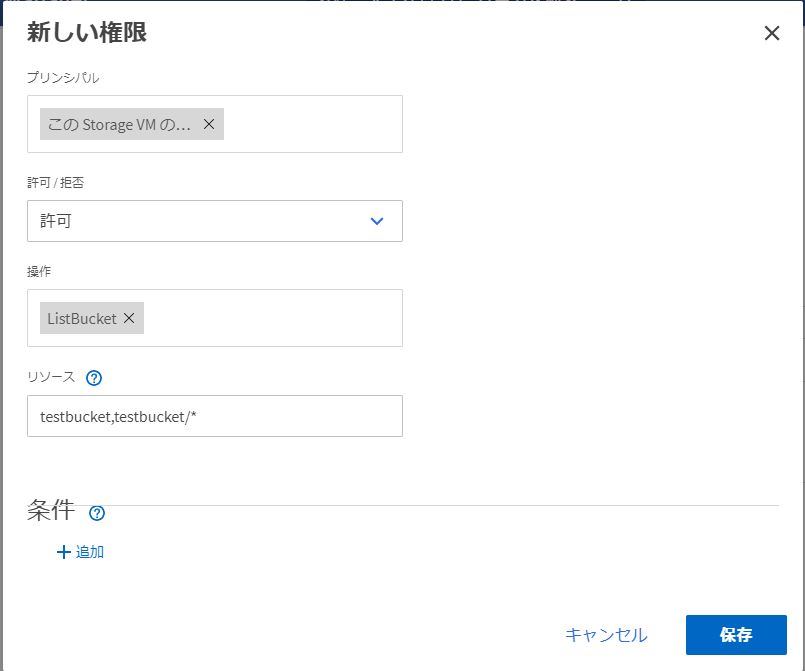
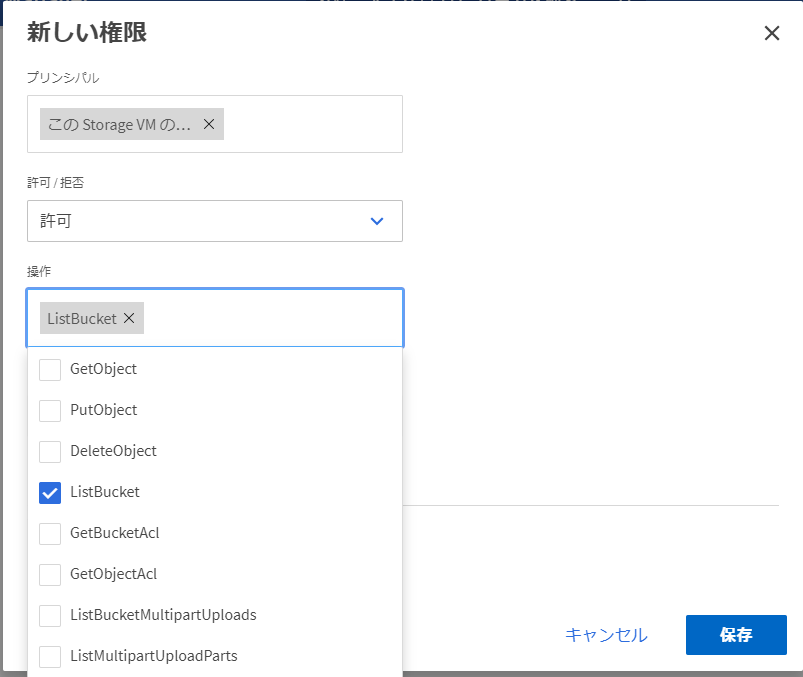
初期の「ListBucket」のみだとオブジェクト一覧のみが表示出来ます。選択できるものを全て選択します。
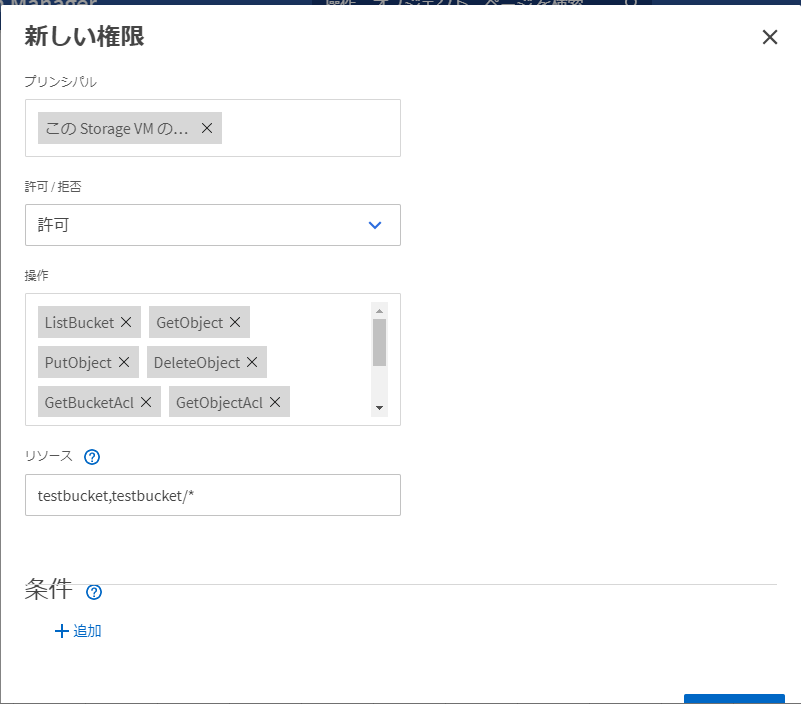
これでバケットを保存します。

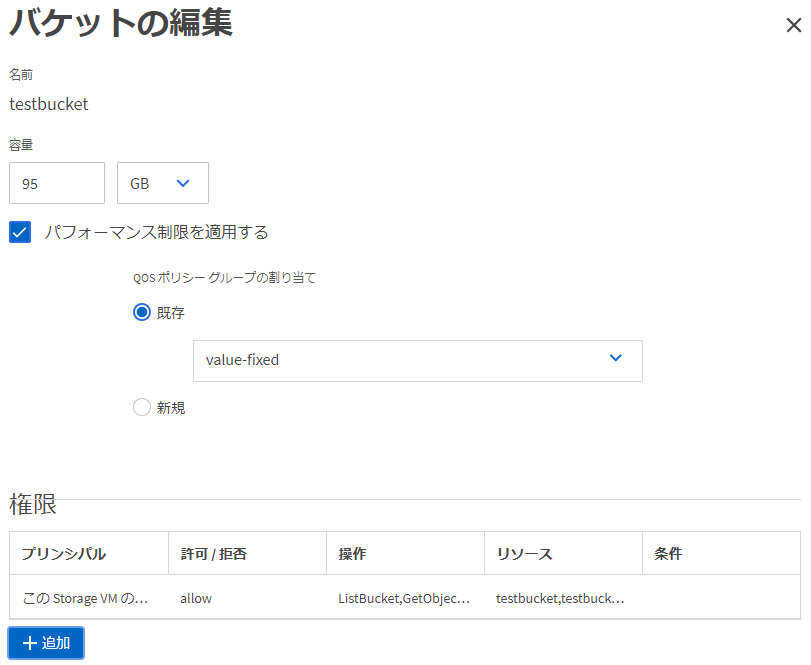
そうすると[権限]タブが下記の様になっています。

これで、S3互換アクセスが可能な状態となりました。

アクセス検証には「S3 Browser」というWindowsアプリを使用しました。

アカウント設定は下記の様に行います

Account Type: S3 Compatible Storage
REST Endpoint: Storage VMのS3設定にある「S3サーバ名」で指定したもの
Access Key ID: 作成したユーザのアクセスキー
Secret Access Key: 作成したユーザの シークレットキー
Use secure transfer (SSL/TLS)にチェックを入れる

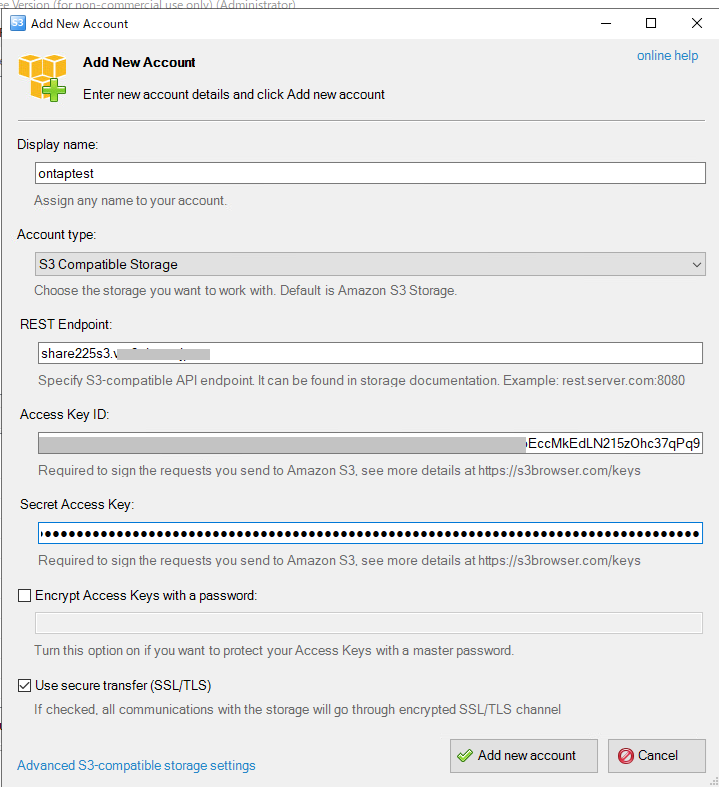
ここまで設定したら「Advanced S3-compatible storage settings」をクリックします。

Signature versionを「Singnature V4」に設定します。(2021/10/28時点の初期値はSingnature V2でした)

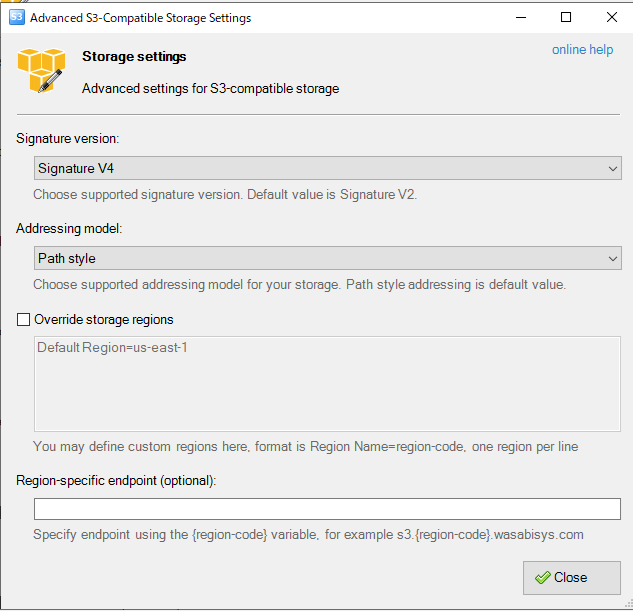
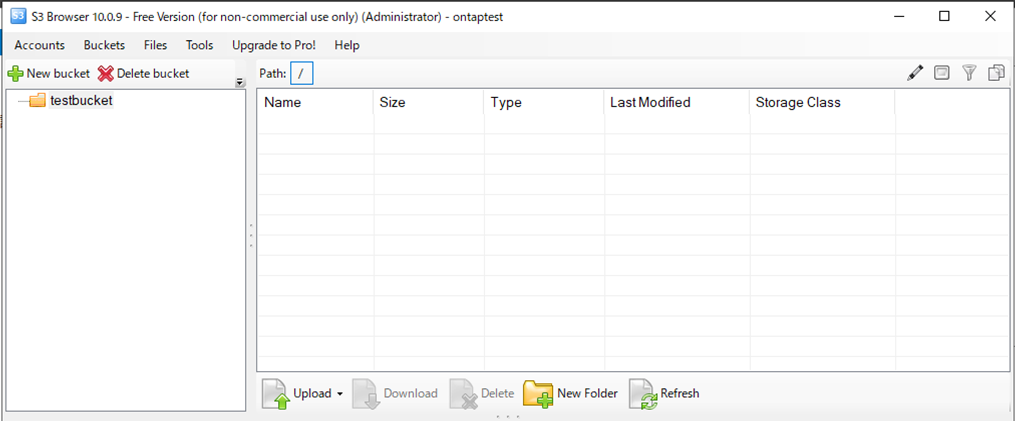
これで保存するとS3 Browser上にバケットが表示され、使える様になります。

なお、S3 BrowserでSingnature V4に設定する必要がある、というのは storageexorcist「NetApp ONTAP 9.8 – S3 is GA!」の記事を見て知りました。

知ったあとに「TR-4814: S3 in ONTAP Best Practices」を見直してみたところ「Security」の項目に記載がありました。

Signature Version 4
S3 in ONTAP requires the use of Signature Version 4 (v4 signatures).
Note: Using v2 signatures result in a failure to connect. It is important to be aware of this because many client applications, including commonly used S3 browsers, use v2 signatures by default.
Configure client applications to use v4 signatures to avoid connectivity errors.

NetApp ONTAP 9.xの設定取得用TeraTermマクロ

NetApp ONTAP 9.1環境から9.8環境に移行する案件があったので、現状の設定とステータスをだいたい取れるようなTera Termマクロを作ったので公開

githubにも置いた https://github.com/osakanataro/get-ontap-config


sendln 'rows 0'
wait '::> '
sendln 'date'
wait '::> '


;基本設定系
;システム構成
sendln 'vserver show'
wait '::> '

sendln 'vserver show -ins'
wait '::> '
sendln 'system node show'
wait '::> '
sendln 'system node show -ins'
wait '::> '
sendln 'options'
wait '::> '
sendln 'system license show'
wait '::> '
sendln 'system license show -ins'
wait '::> '
sendln 'system snmp show'
wait '::> '
sendln 'system node autosupport show'
wait '::> '
sendln 'system node autosupport show -ins'
wait '::> '
sendln 'system node autosupport history show'
wait '::> '
sendln 'cluster time-service ntp server show'
wait '::> '
sendln 'timezone'
wait '::> '
sendln 'system service-processor show'
wait '::> '
sendln 'system service-processor network show'
wait '::> '

;ネットワーク関連	
sendln 'network interface show'
wait '::> '
sendln 'network interface show -ins'
wait '::> '
sendln 'network interface show -failover'
wait '::> '
sendln 'network interface failover-groups show'
wait '::> '

sendln 'network port show'
wait '::> '
sendln 'network port show -ins'
wait '::> '
sendln 'network port ifgrp show'
wait '::> '
sendln 'network port ifgrp show -ins'
wait '::> '

sendln 'network ipspace show'
wait '::> '
sendln 'network port broadcast-domain show'
wait '::> '


sendln 'vserver services name-service ns-switch show'
wait '::> '
sendln 'vserver services name-service dns hosts show'
wait '::> '
sendln 'vserver services name-service dns hosts show -ins'
wait '::> '
sendln 'security login show'
wait '::> '
sendln 'security login show -ins'
wait '::> '

;名前解決関連	
sendln 'vserver services name-service dns show'
wait '::> '
sendln 'vserver services name-service nis-domain show'
wait '::> '

;ディスク構成	
sendln 'storage disk show'
wait '::> '
sendln 'storage disk show -ins'
wait '::> '
sendln 'storage disk show -partition-ownership'
wait '::> '

sendln 'df'
wait '::> '
sendln 'df -h'
wait '::> '
sendln 'df -A -h'
wait '::> '
sendln 'df -i'
wait '::> '

sendln 'storage aggregate show'
wait '::> '
sendln 'storage aggregate show -ins'
wait '::> '
sendln 'storage aggregate show-spare-disks'
wait '::> '

sendln 'volume show'
wait '::> '
sendln 'volume show -ins'
wait '::> '
sendln 'volume language'
wait '::> '
sendln 'volume show -fields junction-path,snapshot-policy,policy'
wait '::> '

sendln 'volume efficiency show'
wait '::> '
sendln 'volume efficiency policy show'
wait '::> '


;ファイル共有(NFS/CIFS)	
sendln 'vserver cifs show'
wait '::> '
sendln 'vserver cifs show -ins'
wait '::> '
sendln 'vserver cifs share show'
wait '::> '
sendln 'vserver cifs share show -ins'
wait '::> '
sendln 'vserver cifs share access-control show'
wait '::> '
sendln 'vserver cifs share access-control show -ins'
wait '::> '
sendln 'vserver nfs show'
wait '::> '
sendln 'vserver nfs show -ins'
wait '::> '
sendln 'vserver export-policy show'
wait '::> '
sendln 'vserver export-policy show -ins'
wait '::> '
sendln 'vserver export-policy rule show'
wait '::> '
sendln 'vserver export-policy rule show -ins'
wait '::> '
sendln 'volume qtree show'
wait '::> '
sendln 'volume qtree show -ins'
wait '::> '
sendln 'volume quota show'
wait '::> '
sendln 'volume quota show -ins'
wait '::> '
sendln 'volume quota policy show'
wait '::> '
sendln 'volume quota policy show -ins'
wait '::> '
sendln 'volume quota policy rule show'
wait '::> '
sendln 'volume quota policy rule show -ins'
wait '::> '
sendln 'volume quota report'
wait '::> '

;Snapshot運用	
sendln 'volume snapshot show'
wait '::> '
sendln 'volume snapshot policy show'
wait '::> '
sendln 'volume snapshot autodelete show'
wait '::> '
sendln 'volume show -fields snapshot-policy,policy'
wait '::> '
sendln 'volume show -fields percent-snapshot-space'
wait '::> '
sendln 'volume show -fields sched-snap-name'
wait '::> '

;Snapmirror	
sendln 'snapmirror show'
wait '::> '
sendln 'snapmirror show -ins'
wait '::> '
sendln 'snapmirror show-history'
wait '::> '
sendln 'snapmirror show-history -ins'
wait '::> '

;ストレージ間通信	
sendln 'storage shelf show'
wait '::> '
sendln 'storage shelf acp show'
wait '::> '

;クラスタ設定	
sendln 'cluster show'
wait '::> '
sendln 'cluster show -ins'
wait '::> '
sendln 'cluster peer show'
wait '::> '

sendln 'vserver peer show'
wait '::> '
sendln 'vserver peer show -ins'
wait '::> '

NetAppでファイルのアクセス監査ログを取る

ファイルサーバで、誰かがエクスプローラーの誤操作で変なところにファイルを移動させてしまうことがある。

その時に、アクセス監査ログから誰が移動(削除)操作を行ったかなどを特定できないか、ということで、NetAppのStorage VMに対するアクセス監査の設定を行った。

CIFSアクセスとNFS v4アクセスで利用できる。

公式ドキュメント:SVMでのNASイベントの監査

まずは監査ログの出力先ディレクトリを作成する。これは設定するStorage VM配下のボリュームのどこかに作成する。

今回はvolume:testvolの中に「audit」というディレクトリを作成した。

Storage VMへの監査有効化は「vserver audit create -vserver SVM名 -destination /出力先ディレクトリ」で行う。

ontap98::> vserver audit show
This table is currently empty.

ontap98::> vserver audit create -vserver share225 -destination /testvol/audit

ontap98::>

設定されたことを確認する。

ontap98::> vserver audit show
Vserver     State  Event Types        Log Format Target Directory
----------- ------ ------------------ ---------- ----------------------------
share225    false  file-ops,          evtx       /testvol/audit
                   cifs-logon-logoff,
                   audit-policy-
                   change

ontap98::> vserver audit show -ins

                           Vserver: share225
                    Auditing State: false
              Log Destination Path: /testvol/audit
     Categories of Events to Audit: file-ops, cifs-logon-logoff,
                                    audit-policy-change
                        Log Format: evtx
               Log File Size Limit: 100MB
      Log Rotation Schedule: Month: -
Log Rotation Schedule: Day of Week: -
        Log Rotation Schedule: Day: -
       Log Rotation Schedule: Hour: -
     Log Rotation Schedule: Minute: -
                Rotation Schedules: -
          Log Files Rotation Limit: 0
            Log Retention Duration: 0s

ontap98::>

次にディレクトリに監査を設定する。

CIFSの場合

volume:testvolの中にある「test1」というディレクトリに設定を行うため、プロパティから「詳細設定」を選択

「監査」タブで設定を行う

今回はファイルやディレクトリの削除について記録したいので、「プリンシパル」を「Everyone」と指定し、「高度なアクセス許可」で「サブフォルダーとファイルの削除」と「削除」で設定します。

下記のような表示になります。

これで設定は完了です。

該当するファイルアクセスを行うと、指定したディレクトリ内に「audit_<vserver名>_last.evtx」というファイルにログが出力されていきます。

上記は毎日2:00にファイルをローテートする設定を追加しているので複数のファイルが存在しています。

ちなみに設定は下記の様に行いました。(-rotate-limit 3で設定しているのでファイルが日時入りのファイルが3つある)

ontap98::> vserver audit modify -vserver share225 -rotate-schedule-month all -rotate-schedule-dayofweek all -rotate-schedule-hour 2 -rotate-schedule-minute 0 -rotate-limit 3 -rotate-size 1M

ontap98::> vserver audit show -ins

                           Vserver: share225
                    Auditing State: true
              Log Destination Path: /testvol/audit
     Categories of Events to Audit: file-ops
                        Log Format: evtx
               Log File Size Limit: 1MB
      Log Rotation Schedule: Month: January-December
Log Rotation Schedule: Day of Week: Sunday-Saturday
        Log Rotation Schedule: Day: -
       Log Rotation Schedule: Hour: 2
     Log Rotation Schedule: Minute: 0
                Rotation Schedules: @2:00
          Log Files Rotation Limit: 3
            Log Retention Duration: 0s

ontap98::>

(1回設定した値を消すには 「-rotate-schedule-dayofweek -」などを行う)

で、どんなログが出るか、というあたりですが、ファイルを削除した場合には、イベントID:4656とイベントID:9999が出力されました。

イベントIDの詳細については「監査できるSMBイベント」を参照のこと…ただ、載ってないのもあるんですよね…

NFSv4の場合

NFS v4の場合はLinux上から nfs4_getfacl, nfs4_setfaclコマンドを使って設定する。

NFS v4でマウントして、「test3」というディレクトリのACLを確認

[root@linux mnt]# nfs4_getfacl test3/

# file: test3/
A::OWNER@:rwaDxtTnNcCy
A:g:GROUP@:rxtncy
A::EVERYONE@:rxtncy
[root@linux mnt]#

上記には「U:」で始まるものがありません。

ファイルとディレクトリに関して成功した操作→「fdS」
対象は全ユーザ→「EVERYONE@」
ACLの変更と削除に関して記録→「Cd」

ということを行いたい場合は「nfs4_setfacl -R -a U:fdS:EVERYONE@:Cd 対象ディレクトリ」と実行します。

[root@linux mnt]# nfs4_setfacl -R -a U:fdS:EVERYONE@:Cd test3
[root@linux mnt]# nfs4_getfacl test3/

# file: test3/
A::OWNER@:rwaDxtTnNcCy
A:g:GROUP@:rxtncy
A::EVERYONE@:rxtncy
U:fdS:EVERYONE@:dC
[root@linux mnt]#

で、ファイルを削除した場合、イベントID:4663 とイベントID:4658 が記録されました。

NFSで監査できるイベントについては「監査できるNFSファイルおよびディレクトリのアクセス イベント」に記載があるのですが、evtx出力した時にどういうイベントIDになるのか、という対応表はないようです。

また、どちらの場合でも、下記の様なエラーっぽいものが表示されています。この説明が見つかりませんは仕様で回避方法は無いようです。

ソース "NetApp-Security-Auditing" からのイベント ID 4658 の説明が見つかりません。このイベントを発生させるコンポーネントがローカル コンピューターにインストールされていないか、インストールが壊れています。ローカル コンピューターにコンポーネントをインストールするか、コンポーネントを修復してください。

イベントが別のコンピューターから発生している場合、イベントと共に表示情報を保存する必要があります。

イベントには次の情報が含まれています: 

172.17.44.87
EV_RenderedValue_2.00
false
Not Present
Not Present
Security
File
00000000000406;00;0000064f;046d016e
(nfsshare);/test3/test2.txt

メッセージ リソースは存在しますが、メッセージがメッセージ テーブルに見つかりませんでした。
The description for Event ID 4658 from source NetApp-Security-Auditing cannot be found. Either the component that raises this event is not installed on your local computer or the installation is corrupted. You can install or repair the component on the local computer.

If the event originated on another computer, the display information had to be saved with the event.

The following information was included with the event: 

172.17.44.87
EV_RenderedValue_2.00
false
Not Present
Not Present
Security
File
00000000000406;00;0000064f;046d016e
(nfsshare);/test3/test2.txt

日本語メッセージリソースがないことが原因なのかと考え、英語UIに替えてみても表示は同じでした。

NetApp KB「The description for Event ID cannot be found in the EVTX logs generated by clustered Data ONTAP」があるので解決できるのかと思ったのですが、無理そうです。

古いONTAPがActive Directoryに参加できない

古いONTAP、具体的にはONTAP 8.3.2環境の移行案件があったので、検証のためにONTAP simulatorのONTAP 8.3.2版を仮想環境上に作成して、Active Directoryに参加しようとしたところ下記のエラーとなった。(なお、接続先Active Direcrotyはsamba 4.14.5で構成している)

ontap832::> vserver cifs create -cifs-server share226 -domain adosakana.local -vserver share226

In order to create an Active Directory machine account for the CIFS server, you
must supply the name and password of a Windows account with sufficient
privileges to add computers to the "CN=Computers" container within the
ADOSAKANA.LOCAL domain.

Enter the user name: administrator

Enter the password:

Error: Machine account creation procedure failed
  [ 12154] Loaded the preliminary configuration.
  [ 12332] Created a machine account in the domain
  [ 12339] Successfully connected to 172.17.44.49:445 using TCP
  [ 12351] Unable to connect to LSA service on
           samba.adosakana.local (Error:
           RESULT_ERROR_GENERAL_FAILURE)
  [ 14357] TCP connection to 172.17.44.141:445 via interface
           172.17.44.236 failed: (Operation timed out).
  [ 14357] Could not open a socket to 'samba.adosakana.local'
  [ 14357] Unable to connect to LSA service on
           samba.adosakana.local (Error:
           RESULT_ERROR_SPINCLIENT_UNABLE_TO_RESOLVE_SERVER)
  [ 14357] No servers available for MS_LSA, vserver: 2, domain:
           adosakana.local.
**[ 14357] FAILURE: Unable to make a connection (LSA:adosakana.local),
**         result: 6940
  [ 14357] Could not find Windows SID
           'S-1-5-21-937304154-1581684492-536532533-512'
  [ 14381] Deleted existing account
           'CN=SHARE226,CN=Computers,DC=adosakana,DC=local'

Error: command failed: Failed to create the Active Directory machine account
       "SHARE226". Reason: SecD Error: no server available.

ontap832::>

これは暗号化の問題なので「vserver cifs security show」で設定項目を確認する。

ontap832::> vserver cifs security show -vserver share226

Vserver: share226

                    Kerberos Clock Skew:                   - minutes
                    Kerberos Ticket Age:                   - hours
                   Kerberos Renewal Age:                   - days
                   Kerberos KDC Timeout:                   - seconds
                    Is Signing Required:                   -
        Is Password Complexity Required:                   -
   Use start_tls For AD LDAP connection:               false
              Is AES Encryption Enabled:               false
                 LM Compatibility Level:  lm-ntlm-ntlmv2-krb
             Is SMB Encryption Required:                   -

ontap832::>

ONTAP 8.3.2無印では関連するオプション「SMB2 Enabled for DC Connections」を設定する項目が無い

ontap832::> version -node *

ontap832-01:
NetApp Release 8.3.2: Tue Feb 23 23:35:06 UTC 2016


ontap832::>

アップデータを探したところ、832P12_q_image.tgz(リンク先はNetAppサポートサイトにログインを済ませてからアクセス) があったので、「ONTAP 9.7シミュレータをアップデートする手法」と同じ手法でアップデートを行った。

ontap832::> version -node *

ontap832-01:
NetApp Release 8.3.2P12: Mon Aug 14 02:57:01 UTC 2017


ontap832::>

ONTAP 8.3.2P12であれば、「SMB2 Enabled for DC Connections」が存在していた。

ontap832::> vserver cifs security show -vserver share226

Vserver: share226

                    Kerberos Clock Skew:                   - minutes
                    Kerberos Ticket Age:                   - hours
                   Kerberos Renewal Age:                   - days
                   Kerberos KDC Timeout:                   - seconds
                    Is Signing Required:                   -
        Is Password Complexity Required:                   -
   Use start_tls For AD LDAP connection:               false
              Is AES Encryption Enabled:               false
                 LM Compatibility Level:  lm-ntlm-ntlmv2-krb
             Is SMB Encryption Required:                   -
        SMB1 Enabled for DC Connections:                   -
        SMB2 Enabled for DC Connections:                   -

ontap832::>

設定を変更

ontap832::> vserver cifs security modify -vserver share226 -smb1-enabled-for-dc-connections false -smb2-enabled-for-dc-connections true

ontap832::> vserver cifs security show -vserver share226

Vserver: share226

                    Kerberos Clock Skew:                   - minutes
                    Kerberos Ticket Age:                   - hours
                   Kerberos Renewal Age:                   - days
                   Kerberos KDC Timeout:                   - seconds
                    Is Signing Required:                   -
        Is Password Complexity Required:                   -
   Use start_tls For AD LDAP connection:               false
              Is AES Encryption Enabled:               false
                 LM Compatibility Level:  lm-ntlm-ntlmv2-krb
             Is SMB Encryption Required:                   -
        SMB1 Enabled for DC Connections:               false
        SMB2 Enabled for DC Connections:                true

ontap832::>

そして、Active Directoryへの参加

ontap832::> vserver cifs create -cifs-server share226 -domain adosakana.local -vserver share226

In order to create an Active Directory machine account for the CIFS server, you
must supply the name and password of a Windows account with sufficient
privileges to add computers to the "CN=Computers" container within the
ADOSAKANA.LOCAL domain.

Enter the user name: administrator

Enter the password:

Warning: An account by this name already exists in Active Directory at
         CN=SHARE226,CN=Computers,DC=adosakana,DC=local
         Ok to reuse this account? {y|n}: y

ontap832::>

今度は成功した。

富士通のNetApp型番メモ 2021/07/07版

富士通はETERNUS NRシリーズとしてNetApp FASシリーズを取り扱っていた。

2020年に「ETERNUS AX/HXシリーズ」に改名したが、元のNetApp型番と違う番号がついており、よくわからなくなってしまった。

(これまではFAS 2720A→NR F2720という感じで分かりやすかった)

ETERNUS AX/ETERNUS HX series 製品変遷FUJITSU Storage ETERNUS AX series, HX series 製品比較表NetApp Fusionで「New ASA, AFF and FAS Manual Design」で出てくるプロダクトを比較しつつこんな感じかな、というのが下記

正しいかどうかは未確認

ETERNUX AX1100
 拡張Shelf不許可の廉価版AX2100?
 CPU/メモリスペックは2CPU8コア/64GB

ETERNUS AX2100 = AFF A220A? AFF A250A?
 CPU/メモリスペックはAX2100/HX2100/2200で同じ2CPU12コア/64GB
ETERNUS AX2200 = FAS500fA
 NVMe/FCにも対応
 拡張Shelf NS224とあわせてNVMe SSD SED専用
 220V電源専用
 CPU/メモリスペックは2CPU12コア/128GB
ETERNUS AX4100 = AFF A400A
 NVMe/FCにも対応
 CPU/メモリスペックは2CPU10コア/256GB

ETERNUS HX2100 = FAS2720A
 コントローラ内蔵が3.5インチHDD
 CPU/メモリスペックはAX2100/HX2100/2200で同じ2CPU12コア/64GB
ETERNUS HX2200 = FAS2750A
 コントローラ内蔵が2.5インチHDD
 CPU/メモリスペックはAX2100/HX2100/2200で同じ2CPU12コア/64GB
ETERNUS HX6100 = FAS8300A?
 CPU/メモリスペックは2CPU10コア/256GB


富士通が提供する日本語資料

ETNERNUS AX/HX Series ホワイトペーパー
ETNERNUS AX/HX Series マニュアル

ETERNUS AX series、ETERNUS HX series データ移行情報 相互接続性について」という文書内でNetApp製FAS、ETERNUS NRと、ETRERNUS AX/HXに機能差異があるような記載が・・・
ライセンス内容の差異だといいんだけど


2021/10/20追記

HX2100実機が来た

NR1000F時代はNetAppそのままだったものが、富士通カスタマイズでの提供になりました。Lenovo/IBM版と同じような提供形態になりましたね。

NetApp純正だとONTAP 9.8P11が出ていますが、富士通からは9.8P3での提供でした。(SupportDeskサイトでのアップデートは未提供)

初期パスワードについてはNR1000F時代から引き続き「password0」でした。また、ライセンスはライセンスコードを印字したシートが付属です。また、ライセンスは入力された状態で起動します。

モバイルバージョンを終了