ONTAPアップデート時の警告についてのメモ


ONTAPアップデート時に検証を行うと、下記の様な警告が表示される。

とはいえ、ここで表示される警告の大半はノードが再起動するので問題があるかも?というものになる。

ONTAPシミュレータの場合はシングルノードなので再起動したら完全に止まりますが、ちゃんとしたハードウェアNetAppであれば2ノード以上あるので、実行するノードを切り替えつつアップデートされるので、影響は最小限となっています。

警告の例

Manual checks that can be done using Upgrade ONTAP documentation

これはほぼ必ず表示される警告

片ノード運用になるけど、I/O負荷大丈夫?SVMが動作しているノードを切り替える時に1回I/O止まってリトライされるけど大丈夫?という確認

Manual checks that can be done using Upgrade ONTAP documentation

メッセージ
Manual validation checks need to be performed. Refer to the Upgrade Advisor Plan or the "What should I verify before I upgrade with or without Upgrade Advisor" section in the "Upgrade ONTAP" documentation for the remaining validation checks that need to be performed before update. Failing to do so can result in an update failure or an I/O disruption.
解決策
Refer to the Upgrade Advisor Plan or the "What should I verify before I upgrade with or without Upgrade Advisor" section in the "Upgrade ONTAP" documentation for the remaining validation checks that need to be performed before update.

ONTAP API to REST transition warning

ONTAP 9.12.1以降だと

ONTAP API to REST transition warning

メッセージ
NetApp ONTAP API has been used on this cluster for ONTAP data storage management within the last 30 days. NetApp ONTAP API is approaching end of availability.
解決策
Transition your automation tools from ONTAP API to ONTAP REST API. CPC-00410 - End of availability: ONTAPI : https://mysupport.netapp.com/info/communications/ECMLP2880232.html

LIFs on home node status

LIF(ネットワークインタフェース)がホーム以外のポートで運用されている場合に表示されます。

home portに戻すことで警告は消えます。home portに戻すことができない場合はONTAP OSのアップデートできません。

One or more LIFs are not on the node, verify that all LIFs are on the home node before attempting NDU.

Cluster/management switch support

Netappの各ノード間を接続しているクラスタネットワークの設定を確認してくれ、というものだが2ノード直結時でも出るので、謎。基本無視している。

Ensure that the NX-OS (cluster network switches), IOS (management network switches), and reference configuration file (RCF) software ersions are compatible with the target Data ONTAP release.
Refer to http://mysupport.netapp.com/NOW/download/software/cm_switches/ and http://mysupport.netapp.com/NOW/download/software/cm_switches_ntap/ for more details.

Name Service Configuration DNS Check

設定されているDNSサーバにアクセスできない状態で表示されますが、無視できる警告です。

無視してアップデートは可能ですが、名前解決ができないということはCIFS/Active Directory環境からのアクセスで問題が発生するかもしれないので注意が必要です。(再起動によりキャッシュが消えることによる問題)

Name Service Configuration DNS Check

メッセージ
None of the configured DNS servers are reacjanle for the following Vservers: 名前. There might be other Vservers for DNS servers are not reachable.

解決策
Delete the DNS server, or verify that the DNS status is "up". Delete the DNS configuration for the Vservers which do not have "dns" as a configured source in the ns-switch database.

NFS mounts

NFSサービスを提供している場合、NFS client側のマウント設定でsoft mountが使用されている場合、NetApp側ノード切り替え時にNFS client側の動作がイマイチな場合がある、という警告。

基本的にはNFS client側はhard mount設定で使ってほしい。

NetApp側で対処出来ることはないので無視する。

NFS mounts

メッセージ
This cluster is serving NFS clients. If NFS soft mounts are used, there is a possibility of frequent NFS timeouts and race conditions that can lead to data corruption during the upgrade

解決策
Use NFS hard mounts, if possible

CIFS status

CIFSサービスを提供している場合、NetApp側ノード切り替え時にCIFS clientのアクセス手法によってはイマイチな動作をする可能性がある、という警告。

これも無視しちゃう

CIFS status

メッセージ
CIFS is currently in use. Any unprotected sessions may be affected with possible loss of data.

解決作
Stop all unprotected CIFS workloads before performing the update. To list the unprotected CIFS workloads, run the command: vserver cifs session show -continuously-available No, Partial


警告内容は「cluster image show-update-progress」を実行すると確認できる

ontap9121::> cluster image show-update-progress

                                             Estimated         Elapsed
Update Phase         Status                   Duration        Duration
-------------------- ----------------- --------------- ---------------
Pre-update checks    completed                00:10:00        00:00:38

Details:

Pre-update Check     Status            Error-Action
-------------------- ----------------- --------------------------------------
AMPQ Router and      OK                N/A
Broker Config
Cleanup
Aggregate online     OK                N/A
status and parity
check
Application          OK                N/A
Provisioning Cleanup
Autoboot Bootargs    OK                N/A
Status
Backend              OK                N/A
Configuration Status
Boot Menu Status     OK                N/A
CIFS compatibility   OK                N/A
status check
Capacity licenses    OK                N/A
install status check
Check For SP/BMC     OK                N/A
Connectivity To
Nodes
Check LDAP fastbind  OK                N/A
users using
unsecure connection.
Cloud keymanager     OK                N/A
connectivity check
Cluster health and   OK                N/A
eligibility status
Cluster/management   OK                N/A
switch check
Compatible New       OK                N/A
Image Check
Current system       OK                N/A
version check if it
is susceptible to
possible outage
during NDU
Data ONTAP Version   OK                N/A
and Previous
Upgrade Status
Data aggregates HA   OK                N/A
policy check
Disk status check    OK                N/A
for failed, broken
or non-compatibility
Duplicate Initiator  OK                N/A
Check
Encryption key       OK                N/A
migration status
check
External             OK                N/A
key-manager with
legacy KMIP client
check
External keymanager  OK                N/A
key server status
check
Infinite Volume      OK                N/A
availibility check
Logically over       OK                N/A
allocated DP
volumes check
Manual checks that   Warning           Warning: Manual validation checks
can be done using                      need to be performed. Refer to the
Upgrade ONTAP                          Upgrade Advisor Plan or the "What
documentation                          should I verify before I upgrade with
                                       or without Upgrade Advisor" section
                                       in the "Upgrade ONTAP" documentation
                                       for the remaining validation checks
                                       that need to be performed before
                                       update. Failing to do so can result
                                       in an update failure or an I/O
                                       disruption.
                                       Action: Refer to the Upgrade Advisor
                                       Plan or the "What should I verify
                                       before I upgrade with or without
                                       Upgrade Advisor" section in the
                                       "Upgrade ONTAP" documentation for the
                                       remaining validation checks that need
                                       to be performed before update.
MetroCluster         OK                N/A
configuration
status check for
compatibility
Minimum number of    OK                N/A
aggregate disks
check
NAE Aggregate and    OK                N/A
NVE Volume
Encryption Check
NDMP sessions check  OK                N/A
NFS mounts status    OK                N/A
check
NVMe over Fabrics    OK                N/A
license check
Name Service         OK                N/A
Configuration DNS
Check
Name Service         OK                N/A
Configuration LDAP
Check
Node to SP/BMC       OK                N/A
connectivity check
OKM/KMIP enabled     OK                N/A
systems - Missing
keys check
ONTAP API to REST    Warning           Warning: NetApp ONTAP API has been
transition warning                     used on this cluster for ONTAP data
                                       storage management within the last 30
                                       days. NetApp ONTAP API is approaching
                                       end of availability.
                                       Action: Transition your automation
                                       tools from ONTAP API to ONTAP REST
                                       API. For more details, refer to
                                       CPC-00410 - End of availability:
                                       ONTAPI
                                       https://mysupport.netapp.com/info/
                                       communications/ECMLP2880232.html
ONTAP Image          OK                N/A
Capability Status
OpenSSL 3.0.x        OK                N/A
upgrade validation
check
Openssh 7.2 upgrade  OK                N/A
validation check
Pre-Update           OK                N/A
Configuration
Verification
RDB Replica Health   OK                N/A
Check
Replicated database  OK                N/A
schema consistency
check
Running Jobs Status  OK                N/A
SAN and NVMe LIF     OK                N/A
Online Check
SAN compatibility    OK                N/A
for manual
configurability
check
SAN kernel agent     OK                N/A
status check
Secure Purge         OK                N/A
operation Check
Shelves and Sensors  OK                N/A
check
SnapLock Version     OK                N/A
Check
SnapMirror           OK                N/A
Synchronous
relationship status
check
SnapMirror           OK                N/A
compatibility
status check
Supported platform   OK                N/A
check
Target ONTAP         OK                N/A
release support for
FiberBridge 6500N
check
Upgrade Version      OK                N/A
Compatibility Status
Verify all bgp       OK                N/A
peer-groups are in
the up state
Verify that e0M is   OK                N/A
home to no LIFs
with high speed
services.
Volume Conversion    OK                N/A
In Progress Check
Volume move          OK                N/A
progress status
check
Volume online        OK                N/A
status check
iSCSI target portal  OK                N/A
groups status check
Overall Status       Warning           Warning
61 entries were displayed.

ontap9121::>

ONTAPシミュレータの新規導入手順


ONTAPシミュレータを標準設定でインストールすると結構面倒くさいので、トラブルが起きにくいように設定するやりかたのメモ書き

2023/12/14時点でONTAP 9.13.1のシミュレータもあるのですが、デプロイ後再起動するとブートループに陥る、という謎現象が発生していたりするので、この手順はONTAP 9.12.1で作っています。ONTAP 9.12.1で導入して9.13.1P2や9.13.1P7にアップデートしても動きが怪しい状況です。

1) 普通にovaファイルをデプロイ

2) 初回起動前にハードディスク2を拡大

これ、やる必要があるのかあまり確信はないのですが、ONTAPシミュレータで作成した場合、データは仮想マシン上のハードディスク2に保存されているようです。

初期値は200GB程度なので、実データがそれ以上保存できないんじゃないかなぁと思っているので、2000GBに増やしています。(下記画像は2000GBで指定したあとのTB表記)

3) 初回起動し、adminでログイン

ログイン後、初期セットアップが始まる状態の場合は、Ctrl+Cで強制終了して、プロンプトを出す

4) systemshellでローカルコマンドが実行できるか確認

最近のONTAPだと標準無効化されていると思うので、まずは状態を確認

「set diag」コマンドでdiagモードに移行したあとで「system node systemshell -node localhost -command ls /」を実行してどうなるかを確認する。

::> set diag

Warning: These diagnostic commands are for use by NetApp personnel only.
Do you want to continue? {y|n}: y

::*> system node systemshell -node localhost -command ls /
  (system node systemshell)

Error: command failed: Error: Account currently locked. Contact the storage
       administrator to unlock it.

::*>

ONTAPシミュレータ 9.12.1以降は上記の様な「Error」となると思われる。

5) diagアカウントのロックを解除

上記のエラーはdiagアカウントがロック状態であることが原因であるため、ロックを解除する。

「security login show -user-or-group-name diag」を実行して現在の状態を確認(ONTAPバージョンによっては “security login show -username diag”)

::*> security login show -user-or-group-name diag

Vserver: Default
                                                                 Second
User/Group                 Authentication                 Acct   Authentication
Name           Application Method        Role Name        Locked Method
-------------- ----------- ------------- ---------------- ------ --------------
diag           console     password      admin            yes    none

::*>

「Acct Lock: yes」であるためロックされていることを確認できる。

「security login unlock -username diag」を実行する

::*> security login unlock -username diag

Error: command failed: The admin password is not set. Use the "security login
          password" command to set the password, then try the command again.

::*>

上記のエラーがでた場合は「security login password -username admin」コマンドを実行して、adminユーザのパスワードを設定した後で、再度「security login unlock -username diag」を実行する

::*> security login password -username admin

Enter your current password: <初期設定前であればエンターキー入力>
Enter a new password: <新しいパスワード>
Enter it again: <新しいパスワード>

::*> security login unlock -username diag

::*>

ロック解除に成功した場合、なにも表示されないため、確認のために「security login show -user-or-group-name diag」を実行する

::*> security login show -user-or-group-name diag

Vserver: Default
                                                                 Second
User/Group                 Authentication                 Acct   Authentication
Name           Application Method        Role Name        Locked Method
-------------- ----------- ------------- ---------------- ------ --------------
diag           console     password      admin            no     none

::*>

6) 現状のディスク構成を確認

現状のディスク構成を確認するために「system node systemshell -node local -command “ls -l /sim/dev/,disks”」を実行する。

なお、日本語キーボードで「”」を入力する場合はShiftキーを押しながら「*:け」のキーを押すと入力できる。

::*> system node systemshell -node local -command "ls -l /sim/dev/,disks"

total 1849640
-rwxr-xr-x  1 root  wheel         912 Mar 10 16:07 ,reservations
-rw-r--r--  1 root  wheel        1372 Mar 10 16:07 Shelf:DiskShelf14
-rw-r--r--  1 root  wheel  1094312960 Mar 10 16:45 v0.16:NETAPP__:VD-1000MB-FZ-520:13511800:2104448
-rw-r--r--  1 root  wheel  1094312960 Mar 10 16:45 v0.17:NETAPP__:VD-1000MB-FZ-520:13511901:2104448
<略>
-rw-r--r--  1 root  wheel  1094312960 Mar 10 16:23 v1.29:NETAPP__:VD-1000MB-FZ-520:15901912:2104448
-rw-r--r--  1 root  wheel  1094312960 Mar 10 16:23 v1.32:NETAPP__:VD-1000MB-FZ-520:15901913:2104448

::*>

7) いまあるディスクを削除

/sim/dev/,disks にあるファイルを削除するために「system node systemshell -node local -command “cd /sim/dev/,disks; sudo rm *”」を実行します。

(日本語キーボードで「*」を入力する場合はShiftキーを押しながら「8(ゆ」のキーを押すと入力できる。)

実行後「system node systemshell -node local -command “ls -l /sim/dev/,disks”」を実行し、ファイルが削除されたことも確認します。

::*> system node systemshell -node local -command "cd /sim/dev/,disks; sudo rm *"

::*> system node systemshell -node local -command "ls -l /sim/dev/,disks"
total 0

::*>

8) ディスク作成

「system node systemshell -node localhost -command “cd /sim/dev;sudo vsim_makedisks -t 36 -n 20 -a 0″」を実行してディスクを20本追加します。

(日本語キーボードで「_」を入力する場合はShiftキーを押しながら「=-ほ」のキーを押すと入力できる。)

「system node systemshell -node localhost -command “cd /sim/dev;sudo vsim_makedisks -t 36 -n 20 -a 1″」を追加実行して、さらに20本追加します。

9) 再起動

「reboot」を実行します。

10) Boot Menuを出す

再起動の始めに、下記のような「Press Ctrl-C for Boot Menu.」と出力されたタイミングでCtrl+Cキーを押す。

しばらく待つと下記の選択肢が表示される。

11) ディスク初期化を実行

“4. Clean configuration and initialize all disks.”の「4」を入力

“Zero disks, reset config and install a new file system?:”に「yes」と入力

続く”This will erase all the data on the disks, are you sure?:”も「yes」

初期化が終わると、自動再起動します。

12) 初期設定開始

ONTAP初期設定プロセスを実行していきます

初期セットアップ終了して、プロンプトを確認します。

13) 初期設定完了後追加設定

初期設定後、追加でしておくべき設定項目です。

この他に、SVM作ってCIFS/NFSファイルサーバをたてたりしていきます。

13a) aggr0へのディスク追加

ONTAPバージョンアップを行う場合、初期aggregateのサイズが10GB以上あった方が安全です。(ONTAP 9.7からいろいろバージョンアップテストを実施した結果)

ontap9121::> storage aggregate show


Aggregate     Size Available Used% State   #Vols  Nodes            RAID Status
--------- -------- --------- ----- ------- ------ ---------------- ------------
aggr0_ontap9121_01
            7.51GB   374.8MB   95% online       1 ontap9121-01     raid_dp,
                                                                   normal

ontap9121::> df -A -h
Aggregate                total       used      avail capacity
aggr0_ontap9121_01      7695MB     7320MB      374MB      95%
aggr0_ontap9121_01/.snapshot 405MB     0B      405MB       0%
2 entries were displayed.

ontap9121::>

7.51GBで、この容量であればパッチ適用程度であれば問題ないが、2段階アップデートを行う場合は少し容量が足らない可能性があります。

とりあえずディスク1本追加するため「storage aggregate add-disks -aggregate <aggregate名> -diskcount 1」を実行します。

ontap9121::> storage aggregate add-disks -aggregate aggr0_ontap9121_01 -diskcount 1

Warning: Aggregate "aggr0_ontap9121_01" is a root aggregate. Adding disks to
         the root aggregate is not recommended. Once added, disks cannot be
         removed without re-initializing the node.
Do you want to continue? {y|n}: y

Info: Disks would be added to aggregate "aggr0_ontap9121_01" on node
      "ontap9121-01" in the following manner:

      First Plex

        RAID Group rg0, 4 disks (block checksum, raid_dp)
                                                            Usable Physical
          Position   Disk                      Type           Size     Size
          ---------- ------------------------- ---------- -------- --------
          data       NET-1.11                  FCAL         8.79GB   8.82GB

      Aggregate capacity available for volume use would be increased by 7.91GB.

Do you want to continue? {y|n}: y

ontap9121::> storage aggregate show


Aggregate     Size Available Used% State   #Vols  Nodes            RAID Status
--------- -------- --------- ----- ------- ------ ---------------- ------------
aggr0_ontap9121_01
           15.03GB    7.88GB   48% online       1 ontap9121-01     raid_dp,
                                                                   normal

ontap9121::> df -A -h
Aggregate                total       used      avail capacity
aggr0_ontap9121_01        15GB     7320MB     8069MB      48%
aggr0_ontap9121_01/.snapshot 810MB     0B      810MB       0%
2 entries were displayed.

ontap9121::>

13b) vol0領域の拡大

aggregateを拡大しただけでは、実際のアップデート時に使うvol0領域の大きさは変わりません。

vol0を拡大します。

現在値は「volume show」もしくは「df -h」で確認します。

ontap9121::> volume show
Vserver   Volume       Aggregate    State      Type       Size  Available Used%
--------- ------------ ------------ ---------- ---- ---------- ---------- -----
ontap9121-01 vol0      aggr0_ontap9121_01 online RW     7.11GB     6.04GB   10%

ontap9121::> df -h
Filesystem               total       used      avail capacity  Mounted on                 Vserver
/vol/vol0/              6915MB      731MB     6184MB      10%  ---                        ontap9121-01
/vol/vol0/.snapshot      363MB         0B      363MB       0%  ---                        ontap9121-01
2 entries were displayed.

ontap9121::>

vol0の容量を10GBに設定する「volume size -vserver <ノード名> -volume vol0 -new-size 10g」を実行します。

(実行できない場合「node run -node <ノード名> vol0 10g」

ontap9121::> volume size -vserver ontap9121-01 -volume vol0 -new-size 10g
vol size: Volume "ontap9121-01:vol0" size set to 10g.

ontap9121::> volume show
Vserver   Volume       Aggregate    State      Type       Size  Available Used%
--------- ------------ ------------ ---------- ---- ---------- ---------- -----
ontap9121-01 vol0      aggr0_ontap9121_01 online RW       10GB     8.78GB    7%

ontap9121::> df -h
Filesystem               total       used      avail capacity  Mounted on                 Vserver
/vol/vol0/              9728MB      740MB     8987MB       7%  ---                        ontap9121-01
/vol/vol0/.snapshot      512MB         0B      512MB       0%  ---                        ontap9121-01
2 entries were displayed.

ontap9121::>

13c) 未割り当てディスク追加

現在のONTAP上で認識しているディスクを確認するために「storage disk show」を実行します。

ontap9121::> storage disk show
                     Usable           Disk    Container   Container
Disk                   Size Shelf Bay Type    Type        Name      Owner
---------------- ---------- ----- --- ------- ----------- --------- --------
NET-1.1                   -     -  16 FCAL    unassigned  -         -
NET-1.2                   -     -  17 FCAL    unassigned  -         -
NET-1.3                   -     -  18 FCAL    unassigned  -         -
NET-1.4                   -     -  19 FCAL    unassigned  -         -
NET-1.5                   -     -  20 FCAL    unassigned  -         -
NET-1.6                   -     -  21 FCAL    unassigned  -         -
NET-1.7                   -     -  22 FCAL    unassigned  -         -
NET-1.8              8.81GB     -  16 FCAL    aggregate   aggr0_ontap9121_01 ontap9121-01
NET-1.9              8.81GB     -  17 FCAL    aggregate   aggr0_ontap9121_01 ontap9121-01
NET-1.10             8.81GB     -  18 FCAL    aggregate   aggr0_ontap9121_01 ontap9121-01
NET-1.11             8.81GB     -  19 FCAL    aggregate   aggr0_ontap9121_01 ontap9121-01
NET-1.12                  -     -  24 FCAL    unassigned  -         -
NET-1.13                  -     -  25 FCAL    unassigned  -         -
NET-1.14                  -     -  26 FCAL    unassigned  -         -
NET-1.15                  -     -  27 FCAL    unassigned  -         -
NET-1.16                  -     -  28 FCAL    unassigned  -         -
NET-1.17                  -     -  29 FCAL    unassigned  -         -
NET-1.18             8.81GB     -  20 FCAL    spare       Pool0     ontap9121-01
NET-1.19             8.81GB     -  21 FCAL    spare       Pool0     ontap9121-01
NET-1.20             8.81GB     -  22 FCAL    spare       Pool0     ontap9121-01
NET-1.21             8.81GB     -  24 FCAL    spare       Pool0     ontap9121-01
NET-1.22             8.81GB     -  25 FCAL    spare       Pool0     ontap9121-01
NET-1.23             8.81GB     -  26 FCAL    spare       Pool0     ontap9121-01
NET-1.24             8.81GB     -  27 FCAL    spare       Pool0     ontap9121-01
NET-1.25                  -     -  32 FCAL    unassigned  -         -
NET-1.26                  -     -  33 FCAL    unassigned  -         -
NET-1.27             8.81GB     -  28 FCAL    spare       Pool0     ontap9121-01
NET-1.28             8.81GB     -  29 FCAL    spare       Pool0     ontap9121-01
NET-1.29             8.81GB     -  32 FCAL    spare       Pool0     ontap9121-01
NET-1.30             8.81GB     -  33 FCAL    spare       Pool0     ontap9121-01
NET-1.31                  -     -  34 FCAL    unassigned  -         -
NET-1.32                  -     -  35 FCAL    unassigned  -         -
NET-1.33                  -     -  36 FCAL    unassigned  -         -
NET-1.34                  -     -  37 FCAL    unassigned  -         -
NET-1.35             8.81GB     -  34 FCAL    spare       Pool0     ontap9121-01
NET-1.36             8.81GB     -  35 FCAL    spare       Pool0     ontap9121-01
NET-1.37                  -     -  38 FCAL    unassigned  -         -
NET-1.38             8.81GB     -  36 FCAL    spare       Pool0     ontap9121-01
NET-1.39             8.81GB     -  37 FCAL    spare       Pool0     ontap9121-01
NET-1.40             8.81GB     -  38 FCAL    spare       Pool0     ontap9121-01
40 entries were displayed.

ontap9121::>

10本は割り当てられていますが、10本は未割り当て(unassigned)となっています。

割り当てるためには「storage disk assign -disklist *」を実行します。

ontap9121::> storage disk assign -disklist *

ontap9121::> storage disk show
                     Usable           Disk    Container   Container
Disk                   Size Shelf Bay Type    Type        Name      Owner
---------------- ---------- ----- --- ------- ----------- --------- --------
NET-1.1              8.81GB     -  16 FCAL    spare       Pool0     ontap9121-01
NET-1.2              8.81GB     -  17 FCAL    spare       Pool0     ontap9121-01
NET-1.3              8.81GB     -  18 FCAL    spare       Pool0     ontap9121-01
NET-1.4              8.81GB     -  19 FCAL    spare       Pool0     ontap9121-01
NET-1.5              8.81GB     -  20 FCAL    spare       Pool0     ontap9121-01
NET-1.6              8.81GB     -  21 FCAL    spare       Pool0     ontap9121-01
NET-1.7              8.81GB     -  22 FCAL    spare       Pool0     ontap9121-01
NET-1.8              8.81GB     -  16 FCAL    aggregate   aggr0_ontap9121_01 ontap9121-01
NET-1.9              8.81GB     -  17 FCAL    aggregate   aggr0_ontap9121_01 ontap9121-01
NET-1.10             8.81GB     -  18 FCAL    aggregate   aggr0_ontap9121_01 ontap9121-01
NET-1.11             8.81GB     -  19 FCAL    aggregate   aggr0_ontap9121_01 ontap9121-01
NET-1.12             8.81GB     -  24 FCAL    spare       Pool0     ontap9121-01
NET-1.13             8.81GB     -  25 FCAL    spare       Pool0     ontap9121-01
NET-1.14             8.81GB     -  26 FCAL    spare       Pool0     ontap9121-01
NET-1.15             8.81GB     -  27 FCAL    spare       Pool0     ontap9121-01
NET-1.16             8.81GB     -  28 FCAL    spare       Pool0     ontap9121-01
NET-1.17             8.81GB     -  29 FCAL    spare       Pool0     ontap9121-01
NET-1.18             8.81GB     -  20 FCAL    spare       Pool0     ontap9121-01
NET-1.19             8.81GB     -  21 FCAL    spare       Pool0     ontap9121-01
NET-1.20             8.81GB     -  22 FCAL    spare       Pool0     ontap9121-01
NET-1.21             8.81GB     -  24 FCAL    spare       Pool0     ontap9121-01
NET-1.22             8.81GB     -  25 FCAL    spare       Pool0     ontap9121-01
NET-1.23             8.81GB     -  26 FCAL    spare       Pool0     ontap9121-01
NET-1.24             8.81GB     -  27 FCAL    spare       Pool0     ontap9121-01
NET-1.25             8.81GB     -  32 FCAL    spare       Pool0     ontap9121-01
NET-1.26             8.81GB     -  33 FCAL    spare       Pool0     ontap9121-01
NET-1.27             8.81GB     -  28 FCAL    spare       Pool0     ontap9121-01
NET-1.28             8.81GB     -  29 FCAL    spare       Pool0     ontap9121-01
NET-1.29             8.81GB     -  32 FCAL    spare       Pool0     ontap9121-01
NET-1.30             8.81GB     -  33 FCAL    spare       Pool0     ontap9121-01
NET-1.31             8.81GB     -  34 FCAL    spare       Pool0     ontap9121-01
NET-1.32             8.81GB     -  35 FCAL    spare       Pool0     ontap9121-01
NET-1.33             8.81GB     -  36 FCAL    spare       Pool0     ontap9121-01
NET-1.34             8.81GB     -  37 FCAL    spare       Pool0     ontap9121-01
NET-1.35             8.81GB     -  34 FCAL    spare       Pool0     ontap9121-01
NET-1.36             8.81GB     -  35 FCAL    spare       Pool0     ontap9121-01
NET-1.37             8.81GB     -  38 FCAL    spare       Pool0     ontap9121-01
NET-1.38             8.81GB     -  36 FCAL    spare       Pool0     ontap9121-01
NET-1.39             8.81GB     -  37 FCAL    spare       Pool0     ontap9121-01
NET-1.40             8.81GB     -  38 FCAL    spare       Pool0     ontap9121-01
40 entries were displayed.

ontap9121::>

「storage disk show -container-type unassigned」を実行してunassigned のディスクが無いことを確認します。

ontap9121::> storage disk show -container-type unassigned
There are no entries matching your query.

ontap9121::>

13d) vol0に対するsnapshot設定無効化

現在のvol0に対するスナップショット設定を確認するため「node run -node localhost -command snap sched」を実行

ontap9121::> node run -node localhost -command snap sched
Volume vol0: 0 2 6@8,12,16,20

ontap9121::>

上記の場合、vol0に対して定期的なsnapshotが作成される設定となっています。

この場合、vol0の使用容量枯渇のエラーになる場合があるため、定期取得を停止したほうがいいので、変更します。

変更は「node run -node localhost -command snap sched vol0 0 0 0」で行います。

ontap9121::> node run -node localhost -command snap sched vol0 0 0 0

ontap9121::> node run -node localhost -command snap sched
Volume vol0: 0 0 0

ontap9121::>

上記の様に「vol0: 0 0 0」となっていれば無効化されています。

(シミュレーター, simulator)

DataDomainをAWS上にたてる場合の構成のメモ 2023/12/07


DELL PowerProtect DD(DataDomain)には、オブジェクトストレージにデータを保存するような機能がある。

1つはAvamarと連動した場合に使用できる、Data Domain全体のバックアップをオブジェクトストレージに対して保存するというDataDomain CloudDR機能。

もう1つは、Data Domainにある、高速でコストが高いActive Tierにデータを保存して、一定日数経ってアクセスする可能性が少なくなったデータを遅くてコストが安いCold Tierに移動する、という階層化構造を利用するCloud Tier機能である。

Cloud Tier機能を使う場合、一度DataDomainに接続されているディスクに対してデータを保存し、一定日数(最小14日)経過後にオブジェクトストレージに転送される、という設定になる。

この2種類の方法だと、クラウド上だけにデータが保存されている、というわけではないので使いにくい。

いろいろ資料を調べると、AWS, Azure, GCP上に仮想的なDataDomain、DELL PowerProtect DD Virtual Edition(DDVE)が提供されていて、これらにおいては、オブジェクトストレージのみに対してデータを保存するという、Active Tier on Object Storage (ATOS) という機能があるようだ。

ローカル(オンプレ)のvSphere, Hyper-V上に対してDDVEも展開できるのだが、その場合はその機能はついていない。(これは評価版を入れて確認した)

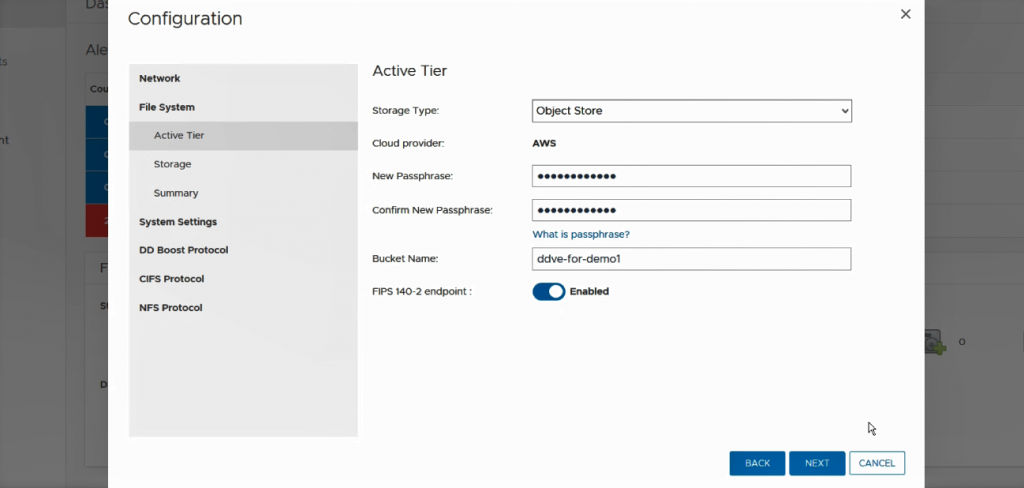
Dell PowerProtect DDVE on Amazon Web Services 7.12 Installation and Administration Guide」の「初期設定手順」を確認すると、「File System」の「Active Tier」設定で、Storage Typeとして「Object Store」で設定している。

なので、DDVEをクラウド上に展開するときだけ、使えるんだと思うんだけど、認識はあってるんだろうか?

Data Domain: DDVE and ATOS Supported Configurations, Event Message: Unsupported virtual hardware configuration

Data Domain: Data Domain Virtual Edition(DDVE) which are Cloud deployed (ATOS), may run out of Local-Metadata Storage

AWS上に作成する場合、「APEX Protection Storage for AWS (DDVE)」(以前DDVEと呼ばれいたAPEX Protection Storageと注釈が入ってる)にはサンプル構成として以下のようなものが書かれている

ドキュメントをいろいろ眺めてみると

・インスタンスについて
保存領域のサイズによってインスタンス選択が変わり
2023年12月時点では M5.xlarge(16TB), M5.2xlarge(32TB), M5.4xlarge(96TB), M5.8xlarge(256TB) となっている。
なお、以前は M4シリーズだった模様

・インスタンスが動作するために必要なEBSについて
GP3のストレージが要求されている(以前はGP2)
root領域 250GB
NVRAM disk領域 10GB
data disk領域 1024GB(これ不要かも?)
metadata disk領域が最小2TB~26TB以上

metadata disk領域は、重複排除/圧縮状況により変化し、重複排除率が上がると使用容量も増え、残り容量が20%を切ると増設が必要となるので注意。
16TB構成時 1TB*2個
32TB構成時 1TB*4個
96TB構成時 1TB*10個
256TB構成時 2TB*13個

metadata用領域が足らなくなった場合の対処→「Data Domain: Data Domain Virtual Edition(DDVE) which are Cloud deployed (ATOS), may run out of Local-Metadata Storage

・このほかにデータを保存するオブジェクトストレージ AWS S3

・ATOS構成の場合、Cloud Tierは使用できない
いきなりクラウドに書いてるので、そこからさらにクラウドに移動させる、という機能は使えない(not support)

iSCSIストレージ上のvSphere仮想マシンのSANバックアップを仮想マシン上で実験する


vSphere仮想環境でFC-SANやiSCSI-SANの共有ディスク上に作ったVMFSデータストアがあり、そこにあるvSphere仮想マシンのバックアップを行う場合の手法はいくつかある。

・SAN
・HotAdd
・NBD/NBDSSL

ここらを解説してる資料があるかなーと探してみると

vSphere 5時代の「Virtual Disk Transport Methods」だと絵付きで解説されてるんですが、現状のVMware公式記述はVMware Virtual Disk Development Kit Programming Guide 8.0の「Virtual Disk Transport Methods」で一覧としてのページには絵はないが個別ページ(SAN Transport)には絵がある。

じゃあ、とバックアップソフト側を探すといろいろでてくる

その中でも、Veritas NetBackup「VMware のトランスポートモード: ベストプラクティスとトラブルシューティング」が分かりやすいかなぁ、と感じた。

SAN Transport

SAN Transportについて、何の変哲もないiSCSIストレージを、ESXiサーバとWindowsサーバの両方につなげただけでも使えるのかな、と検証してみようとした。

(上記画像はVMwareから転載)

まあ、実機の環境がなかったので、vSphere仮想マシンのWindowsサーバからiSCSI接続して構築してみたところ、commvaultの場合は「SAN access is only supported for physical machines.」というメッセージでバックアップさせてくれなかった。

Event Code: 91:248
Severity: Minor
Program: vsbkp
Description:
Unable to open the disks for virtual machine [仮想マシン名] for SAN access. SAN access is only supported for physical machines.

なにを設定すればごまかせるかな?と試行錯誤・・・とりあえず以下の設定で仮想マシンを作ってみたものの駄目だった。

CPU:ハードウェア仮想化 ハードウェアアシストによる仮想化をゲストOSに公開
IOMMU:IOMMUをゲストOSに公開
パフォーマンスカウント:仮想CPUパフォーマンスカウンタの有効化
SCSIコントローラ:LSI Logic SAS
ネットワークアダプタ:E1000e
ゲストOS:その他 その他(64ビット)
VMware-toolsインストールなし

結局のところ、普通に作ってから、[構成パラメータ]で「smbios.reflecthost」を「TRUE」とするだけで成功した。以下は実際に使った設定。

SCSIコントローラ:LSI Logic SAS
ネットワークアダプタ:E1000e
ゲストOS:Windows Windows Server 2016以降
VMware-toolsインストールあり
構成パラメータ: smbios.reflecthost 「TRUE」

どうやらBIOS stringにVMwareの文字列が入っているかどうかで判定していた模様。

今回はCommvaultバックアップでの事例だったけど、NetBackupなど他のバックアップソフトウェアでもvSphere環境へのアクセスはVDDK経由で行っているので、おそらく同じような制限がかかっているのではないかと想定している。

2023/11/22追記: NetBackup 8.1.1環境があったので試してみたら、こちらは偽装しなくてもそのまま動いた

ONTAP 9.6以前からONTAP 9.7以降にアップデートする際に容量の問題が発生する可能性


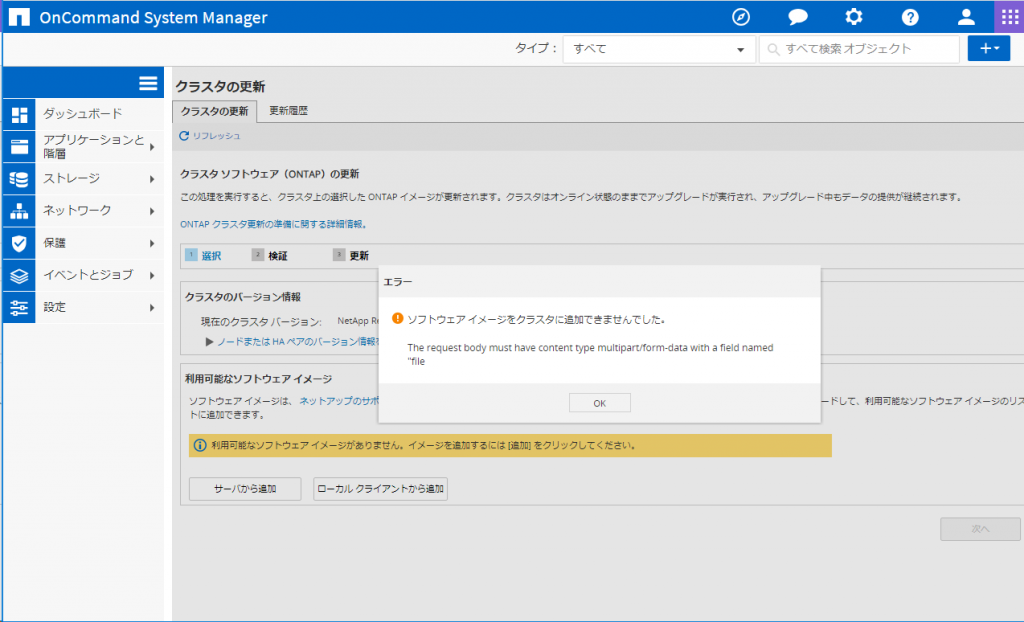
ONTAP 9.5P5シミュレータ環境をONTAP 9.7にアップデートした場合には問題なかったのに、運用中のONTAP 9.5P10環境をアップデートしようとしたところ、firmwareアップロードの段階で「THe request body must have content type multipart/form-data with a field named file」というエラーとなった。

確認すると、ONTAP 9.5P10, ONTAP9.6~ONTAP 9.6P6で発生するというえらくピンポイントな仕様問題だった。(System Manager ONTAP 9.7 image upload fails with multipart/form-data error)

ファイルをアップロードする領域が2GBと設定されているが、ONTAP 9.7では2GBでは足らなくなったためエラーになる、という問題だった。

webのアップロード用パラメータを2GBから4GBに変更することで対処できるとのことで実施した。

まず、diagモードに切り替えて現在の設定確認

netappcluster::> set diag

Warning: These diagnostic commands are for use by NetApp personnel only.
Do you want to continue? {y|n}: y

netappcluster::*> system services web file-uploads config show
Node              Size
----------------- ------------
netappcluster-01  2GB
netappcluster-02  2GB
2 entries were displayed.

netappcluster::*>

次に変更を実施

netappcluster::*> system services web file-uploads config modify -node * -size 4GB

Warning: Files already uploaded or are being uploaded will be lost. Starting a
         file upload before the resize operation is finished will cause the
         uploaded file to be unavailable.
Do you want to continue? {y|n}: y
[Job 14002] Job is queued: Web File Upload Resize Node Job.
[Job 14003] Job is queued: Web File Upload Resize Node Job.
2 entries were modified.

netappcluster::*> 

すぐに反映されないので、上記で出力されたジョブIDのステータスを確認する。


netappcluster::*> job show -id 14002
                            Owning
Job ID Name                 Vserver    Node           State
------ -------------------- ---------- -------------- ----------
14002  Web File Upload Resize Node Job netappcluster netappcluster-01 Success
       Description: Web File Upload Resize Node Job

netappcluster::*> job show -id 14003
                            Owning
Job ID Name                 Vserver    Node           State
------ -------------------- ---------- -------------- ----------
14003  Web File Upload Resize Node Job netappcluster netappcluster-02 Success
       Description: Web File Upload Resize Node Job

netappcluster::*>

「Success」が含まれていれば変更が完了している。(変更途中は Running )

ただ、変更が終わったあとの設定表記は4GBとならずに「0B」となるが、これで正常とのこと

netappcluster::*> system services web file-uploads config show
Node              Size
----------------- ------------
netappcluster-01  0B
netappcluster-02  0B
2 entries were displayed.

netappcluster::*>

KBには「system node systemshell -node * -command df -h /mroot/etc/upload」を実行して /mroot/etc/upload に割り当てられた容量を確認する、という記載がある。

ここで使っているsystemshellコマンドは最近のONTAP OSでは標準で使えない状態に変更されているため「Error: command failed: Error: Account currently locked. Contact the storage administrator to unlock it.」というエラーとなる場合がある。その場合は、ロックを解除する必要がある。手順については「NetApp ONTAPから他サーバに気軽にsshできる穴がふさがれてしまった」を参考のこと

で、ONTAP 9.13.1ぐらいになってくると状況によっては4GBより必要な可能性もあるようで、最近になって「System Manager fails to upload ONTAP image due to insufficient space」というKBが追加されていた。こちらは7GBに変更するとあるが、2023年11月時点ではこの問題が発生する状況が未公開となっているため、4GBのままで良さそうである。